The MCU-Link is an inexpensive CMSIS-DAP debug probe from NXP. It can be used as a GDB server debug probe, and as such it includes scripting support. This scripting can be very useful in some cases where the MCU cannot be accessed by a normal debug session. This happens for example if students are not pay attention what binary they flash to which device, causing an MCU to potentially get ‘bricked’.
If one is using a dedicated logger module like the McuLog, then you don’t have to worry or care about timestamp support. But if your application is using normal printf() calls for for logging purpose, you will face issues to adding timestamps to it. You might consider to change all prinft() calls. This might be a lot of work, or not possible in all cases if you cannot change the source code.
But there is a really cool feature of the GNU linker to solve that problem. It allows to ‘wrap’ around any symbol or function, including the ones in the standard library. That way I can add my mode to the printf() code as a wrapper, for example adding a timestamp for every call.
In the example below you can see this in action:
printf() calls with added timestamps
In this article I’ll show how you can wrap any function with custom code.
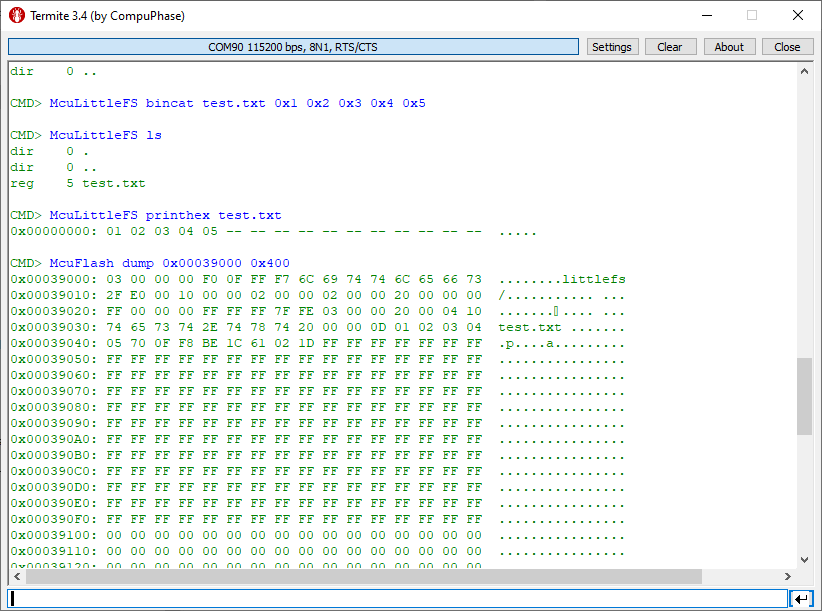
In many of my embedded projects I need persistent data or storage for settings. If using an SD card, then FatFS is usually my choice for the file system. But if using an external FLASH memory device, then my preferred choice is usually LittleFS: it is a little fail-safe filesystem, designed for micro-controllers, which I’m using with external flash memory devices.
In the case where there is enough MCU flash, or if there is no external FLASH device available in a design, it can use the MCU internal FLASH as storage storage too. This is the topic of this article:
Embedded hardware comes with limitations, and one if it is the given number of hardware breakpoints. Depending on your MCU, 4 or only 2 hardware breakpoints are available, making debugging and stepping in read-only memory (FLASH) a challenge.
Debugging NXP LPC845 with unlimited FLASH Breakpoints using MCU-Link
Did you know that one can have ‘unlimited’ number of breakpoints in FLASH, with the help of GDB? This is very useful for extended debugging, or if you want to use breakpoints for testing?
Sometimes it makes sense to write everything in assembly, even these days. For example if using a tiny microcontroller. Or just if one just don’t need all the productivity of the C/C++ tools. And it is a good educational experience: getting hands-on on the lower levels.
GDB is the de-facto debugging engine and debug connection for micro-controllers these days: it is versatile and with its client-server architecture very flexible and powerful, and pretty much every debug probe and vendor (PEMICRO, SEGGER, OpenOCD, pyOCD, …) offers it. But a GDB server or command line implementation was not available for the NXP LinkServer family of debug probes (LPC-Link, MCU-Link, MCU-Link Pro). This has changed now: LinkServer is available as command line tool and can be used as GDB Server:
LinkServer as GDB Server with Eclipse
With the new LinkServer package I do not only get a gdb server implementation: I have now a command line tool I can use for automation and all kind of different things: programming boards, erasing flash, and so on.
A Triumvirate is or Triarchy is built by three individuals which lead or rule something. In this article I want to rule a project with Eclipse CDT, Visual Studio Code and with building it from the command line for automated builds.
So what if I have an Eclipse project (say MCUXpresso IDE and SDK), and want to build it on a build server, and and I want to use the same time the project with Eclipse IDE and Visual Studio code?
Key to this is CMake: I’m keeping the Eclipse CDT features, adding CMake with Make and Ninja to the fix, and have it ‘ruled’ by three different ’emperor’: Eclipse, Visual Studio Code and from a shell console:
MCUXpresso SDK CDT project with CMake for Eclipse, Visual Studio Code and Command Line BuildingContinue reading →
We all should know it: dynamic memory usage can be dangerous. There can be memory fragmentation, use-after-free, out-of-memory and memory leaks. While I do prefer static memory allocation for embedded systems, using a dynamic memory allocation in some applications is not avoidable or just makes sense.
In one of my lecture modules we develop a ‘Boulder’ game, where the player has to collect underground diamonds and avoid moving monsters:
LPC845-BRK with OLED using dynamic memory allocation
I’ll show you have FreeRTOS memory usage can be tracked and monitored.
The MCU-Link debug probe comes without an enclosure. To protect the hardware against ESD issues, I had created a 3D printed enclosure for it. That one worked fine, but takes some time to print it. If you have to build many enclosures for a full classroom setup, then a laser cutter is much faster. And to create some variations, I have decided to cut it with different materials and colors. To be environment friendly, extra glue is needed, and with recycled PMMA, different colors are possible too.
Different laser-cut enclosure: wood, and red, transparent, blue and green PMMAContinue reading →