
For an university research project we are implementing a software simulator for the EZH (or SmartDMA) co-prozessor present on some NXP MCUs.
This article describes how to setup and build QEMU in a docker container, including debugging QEMU with VS Code.
Outline
QEMU is an open source simulator or machine, licensed under GPL2. With QEMU one can run a full system (e.g. Linux), user mode applications (e.g. Linux or BSD) or micro-controllers like ARM Cortex-M (mostly instruction set simulation).
QEMU was initially released in 2003. It is especially useful for cross-platform development and testing. Ideally it could be used for full-chip-simulation (FCS) even for an embedded target. The challenge is that simulating all the peripherals of an MCU takes a lot of efforts. And probably because of the GPL2 license the silicon vendors are reluctant to contribute to the QEMU project. Still, using QEMU can be a useful addition to on-target testing.
To isolate the environment, I’m building QEMU inside a Docker container.
Prerequisites
I’m using Windows 11 with WSL2 and Docker Desktop. Instead Windows, a Linux machine can be used too.
I’m using VS Code as front end for the build process for convenience. Of course one can use everything from the command line too.
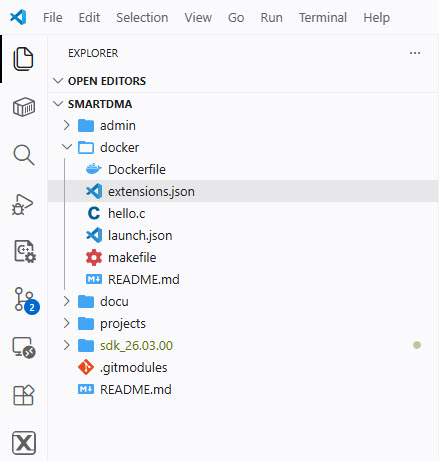
extensions.json
The file extensions.json lists the recommended extensions:
{
    "recommendations": [
        "ms-vscode.cpptools",
        "ms-vscode.cpptools-extension-pack"
    ]
}
hello.c
‘hello.c’ is a simple test file which uses semihosting to print a message to the console:
#include <stdio.h>

extern void initialise_monitor_handles(void);

int main(void) {
    // Initialize semihosting (newlib / rdimon)
    initialise_monitor_handles();

    // This will generate a semihosting call
    printf("Hello from semihosting!\n");

    return 0;
}
launch.json
launch.json is used to debug QEMU with VS Code, see Debug C/C++ Apps in Docker with VS Code: A Step-by-Step Guide.
{
  "configurations": [
    {
      "name": "(gdb) Launch",
      "type": "cppdbg",
      "request": "launch",
      "miDebuggerArgs": "-iex \"set debuginfod enabled off\" -iex \"set debuginfod urls\" -iex \"set debug-file-directory /dev/null\"",
      "program": "${workspaceFolder}/qemu/build/qemu-system-arm",
      "args": ["-M", "versatilepb", "-nographic", "-semihosting", "-kernel", "${workspaceFolder}/hello.elf", "-audio", "driver=none"],
      "stopAtEntry": true,
      "cwd": "${fileDirname}",
      "environment": [],
      "externalConsole": false,
      "MIMode": "gdb",
      "setupCommands": [
          {
              "description": "Enable pretty-printing for gdb",
              "text": "-enable-pretty-printing",
              "ignoreFailures": true
          },
          {
              "description": "Set Disassembly Flavor to Intel",
              "text": "-gdb-set disassembly-flavor intel",
              "ignoreFailures": true
          }
      ]
    }
  ]
}
Dockerfile
Below is the docker file to create a container. The basic steps are7
- installs the prerequisites, including QEMU binaries
- creates a directory for downloads and build
- clone QEMU sources from GitHub and build it
- clone GDB sources from GitHub and build it
- copy configuration file for debugging (
launch.json) - copy test source to run QEMU with semihosting (
hello.c) and build it - Make file to build and run container (
makefile)
# Docker file to install and build qemu in a container
# As base for the EZH work, we additionally build gdb from sources

# Fetch ubuntu image
FROM ubuntu:24.04

# Install prerequisites
RUN \
    apt update \
    && apt install -y git python3 python3-venv zip nano file \
    && apt install -y cmake gcc-arm-none-eabi gdb-arm-none-eabi libnewlib-arm-none-eabi build-essential ninja-build

# install qemu binaries
RUN \
    apt-get install -y qemu-system

# Create a working directory for our work
RUN \
  mkdir /home/qemu

# copy qemu semihosting example code for some tests
COPY hello.c /home/qemu

# copy VS Code launch config to project for debugging
RUN \
  mkdir /home/qemu/.vscode
COPY launch.json /home/qemu/.vscode
COPY extensions.json /home/qemu/.vscode

# build semihosting example
RUN \
  cd /home/qemu \
  && arm-none-eabi-gcc \
    -O0 -g hello.c \
    -o hello.elf \
    -specs=rdimon.specs \
    -lc -lrdimon -lnosys \
    -static

# Build QUEMU from sources, to have the latest version with all the features we need
# Install QEMU pre-requisites for building it from sources
RUN \
  apt install -y git libglib2.0-dev libfdt-dev libpixman-1-dev zlib1g-dev ninja-build flex bison python3-venv

# create working directory and clone repository.
RUN \
    cd /home/qemu \
    && git clone https://github.com/qemu/qemu.git

# build it for the ARM software emulator and AVR
RUN \
 cd /home/qemu/qemu \
 && ./configure --target-list=arm-softmmu,avr-softmmu \
 && make \
 && cd ..

# build gdb for avr (avr-gdb)
# install needed packages
RUN apt-get install -y gcc make texinfo git flex bison build-essential libgmp-dev libmpfr-dev
RUN \
  mkdir /home/gdb  \
  && cd /home/gdb \
  && git clone git://sourceware.org/git/binutils-gdb.git \
  && cd binutils-gdb \
  && mkdir build \
  && cd build \
  && ../configure --target=avr --enable-languages=c,c++ --disable-werror \
  && make \
  && make install

# Command that will be invoked when the container starts
ENTRYPOINT ["/bin/bash"]
makefile
Below is the makefile I use:
all:
	echo "use target 'clean', 'build' or 'start'"

clean:
	docker rm ezh-container
	echo "deleting container done"

build:
	docker build -t ezh-image .
	docker create -i -t --name ezh-container ezh-image
	echo "creating and building image done"

start:
	docker start -i ezh-container
To build the container, use
make build
Then use the following to start the container
make start
Example application
In the container, change into the working directory
cd /home/qemu
Then you can run the system (pre-built) QEMU with the following:
qemu-system-arm -M versatilepb -nographic -semihosting -kernel hello.elf -audio driver=none
This should write the following to the console:
Hello from semihosting!
Next, try it with QEMU built from sources:
./qemu/build/qemu-system-arm -M versatilepb -nographic -semihosting -kernel hello.elf -audio driver=none
If it writes the same message to the console, you have a working QEMU built from sources :-).
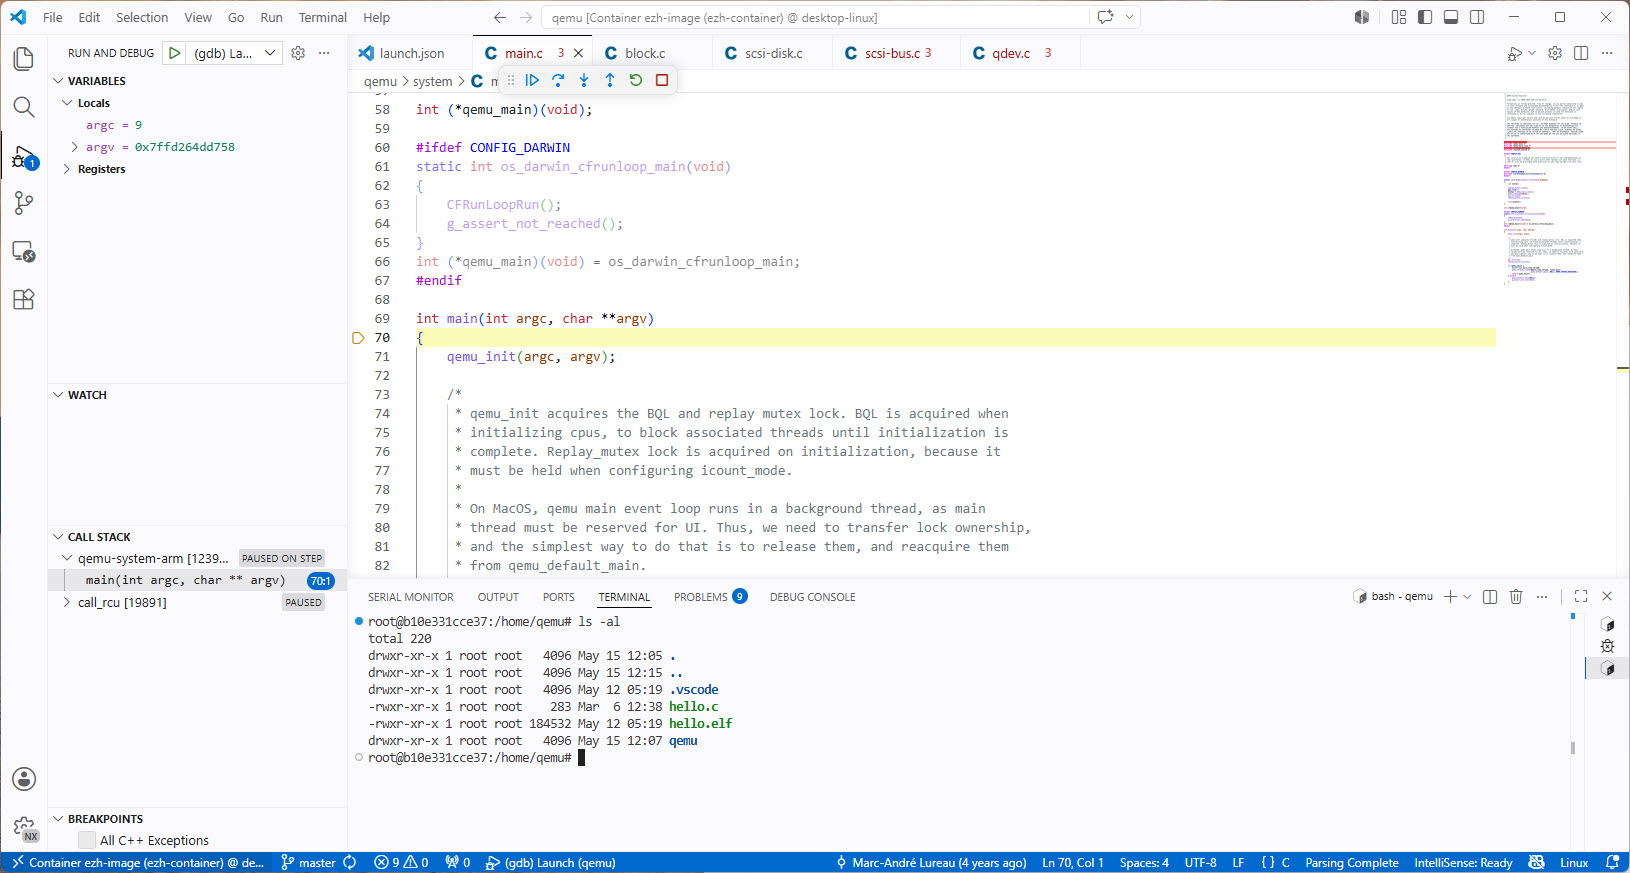
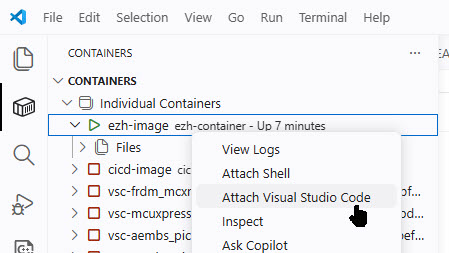
Debugging QEMU
Finally, you can use VS Code to debug. Attach VS Code to the container:
Use the menu File > Open Folder to open /home/qemu.
Then use the normal ‘debug’. The first time VS Code might ask to install extensions and can take longer.
Congratulations! We can build and debug QEMU :-).
Summary
If working or developing for QEMU, it is possible to build the simulator from sources. With the provided docker file, I build and debug the QEMU from GitHub. You can easily change the URL to use your own version of QEMU if needed.
Happy qemuing:-)
