Maybe you are using a multi-core device in your projects, but have not tapped into multi-core usage yet? FreeRTOS V11.0 is out, and the big news is that it has finally Symmetric Multi-Processing (SMP) integrated into the mainline. This greatly simplifies FreeRTOS usage, as I finally can use the same RTOS for my SMP targets and boards, and I can easily switch between single-core and multi-core applications.
One key element of a CI/CD pipeline is the automatic testing phase: whenever I check in new source code or manually trigger it, I can run a test suite to make sure that the changes do not break anything. For this, I have to run automated tests. For an an embedded target, it means that I have to run some tests on the board itself too.
The MCU-Link is a small and inexpensive $10 CMSIS-DAP debug probe from NXP. It can work with OpenOCD, but has better target support using the NXP LinkServer which implements a gdb server. This makes it an ideal combination for scripting or automated testing.
An important part of every CI/CD pipeline is having a testing phase. In this article I show how to use GNU gcov (coverage) with an embedded target, using Visual Studio Code as front end:
GNU gcov with VS Code
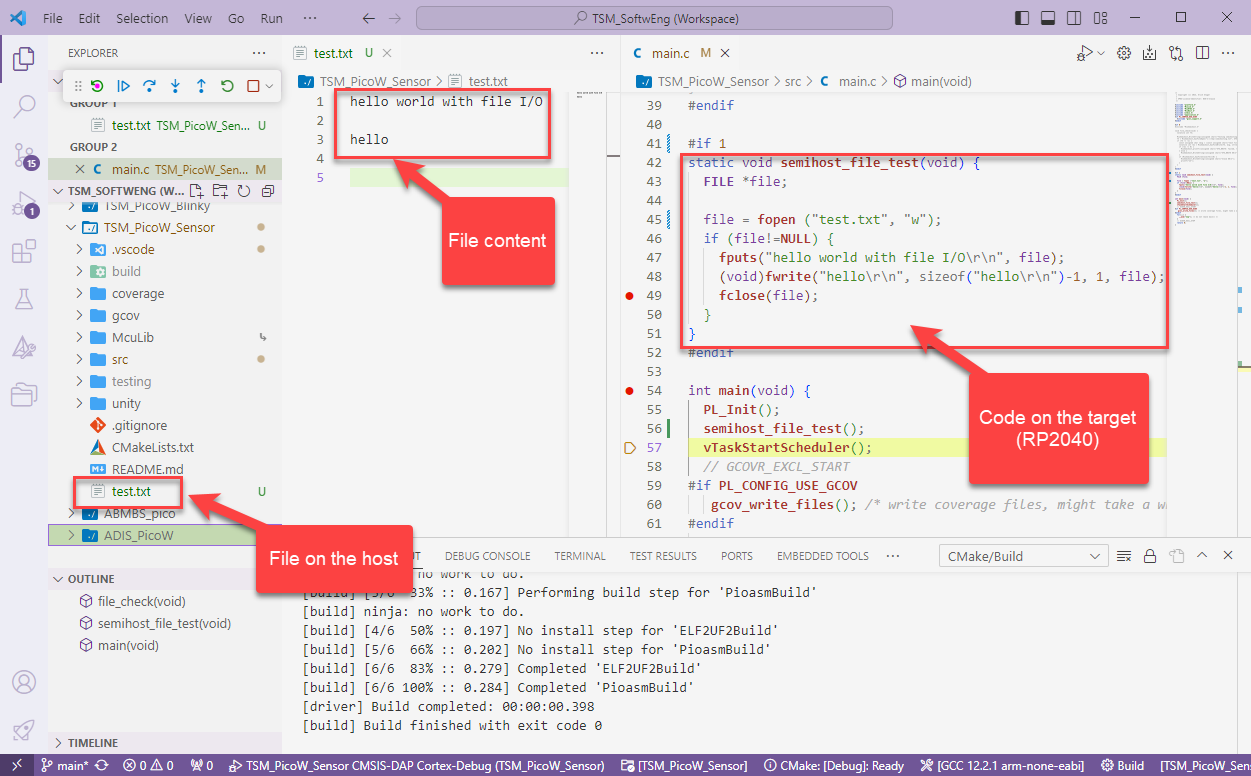
With this, I can run the code on the embedded target which stores the coverage data on the host.
I’m working recently on a new lecture module using the Raspberry Pi Pico (RP2040) board, which highlights several aspects of modern software engineering, including DevOps and CI/CD. An important part of any CI/CD pipeline is testing. For a host application, one could pass arguments to the application, e.g. ‘myapp --test=module1‘, or let it read such information from a configuration file which describes the tests. Or write GNU gcov data to a file to collect coverage information.
Unfortunately, a normal embedded application has no argv[], and many system have no file system. A solution to this problem would be using semihosting with file I/O. Unfortunately for the Raspberry Pi Pico SDK 1.5.1 for the RP2040, there is no semihosting file I/O implemented :-(.
I have now implemented and added file I/O to the SDK, making it possible for the RP2040 to access and use files on the host, among other things. This greatly extends the capabilities of the device, and is very useful for testing, including gathering test coverage information.
With semihosting I can use standard I/O function like printf() and I can read and write data on the host through the debug connection. If used with care, this is a great feature especially for unit testing.
I have lots of hardware and debug probes on my desk, and I discussed using nicknames for debug probes to better identify them.
‘Green’ and ‘Yellow’ Robots and J-Link Probes
So far so good. At that time of the previous article, it was possible to assign nicknames to J-Link debug probes, but not to use the nickname instead of the USB serial number. Well, SEGGER was fast again, and responded with a new J-Link software pack version 7.92d which implements that features: I can now use the nickname to connect to a debug probe :-).
Sometimes I have a wish. Not every time it gets fulfilled. But this time I’m lucky and happy developer. A few days ago I wrote about the LPC4322-based SEGGER OB (on-board) J-Link firmware. It works great, but the board requires another USB cable to power the target board.
Rolf Segger contacted me, and a few days later I had a J-Link firmware with a ‘power-on’ feature:
That way, only one USB cable is needed. All what you need to do is to update the firmware.
Going with the factory default can be fine. But an upgrade could give a performance boost plus added functionality. Many of the NXP i.MX RT evaluation boards have an LPC4322 based debug circuit on it. One example for this is the i.MX RT1010 board.
NXP i.MX RT1010 EVK
On such boards, one of the first steps I do is: upgrading the firmware and change it to a better option: improved speed, SWO support plus avoiding issues with the USB MSD device.