
I’m getting my head more and more around CMake and its features. After having so many issues with VS Code dealing with CMake Kits, I have found feature in CMake which really is a game changer for me: CMake Presets.
Outline
In a nutshell, CMake is an open source ‘cross-platform build generator’: Using CMake files, I can orchestrate my build process. CMake is a generator, so it generates build files for builders like for GNU make or ninja. The downside is that it takes time to learn CMake and its imperative programming language. In contrast, on Eclipse the ‘managed make’ build process is very easy to use, but less flexible. VS Code does not come with a build system, so I’m using and learning CMake with it.
Recently I had a lot of issues with CMake in VS Code, and I have found a way to make the build process both independent of VS Code, and the same time much better integrated. And here CMake Presets were a true game changer, as now I can easily have different build types like ‘debug‘, ‘release‘ or ‘coverage‘.
All this could be done with rather complex command lines running CMake, e.g.
cmake . -B build/debug -DCMAKE_BUILD_TYPE=DEBUG -DCMAKE_TOOLCHAIN_FILE=arm-none-eabi-gcc.cmake
but this is hard to remember, or I need to create script/batch files, which makes things really complex with different configurations. CMake Presets replaces all this, with a set o JSON files defining the options and more.
In the next sections I explain how I’m using CMake Presets to make building more flexible and easier. There might be better ways, but at least this is currently working very well for me, and enables me to have an easy and simple CI/CD pipeline too.
You can find an example how I’m using CMake Presets with VS Code on GitHub.
CMake Presets Definition File
CMake Presets contain information how to configure, build, test and even package a project. Preset information is stored in a JSON files:
{
  "version": 6,
  "cmakeMinimumRequired": {
    "major": 3,
    "minor": 23,
    "patch": 0
  },
  "configurePresets": [
    {
      // ...
    }
  ],
  "buildPresets": [
    {
      // ...
    }
  ],
  "testPresets": [
    {
      // ...
    }
  ]
}
With the configurePresets I specify how the project is configured (paths, architecture, options, …). They are used if I do a CMake: Configure in VS Code.
The buildPresets describe what build types I have (e.g. debug, release, …). And finally, the testPresets define the builds to be used for testing. They are used if I do a CMake: Build in VS Code.
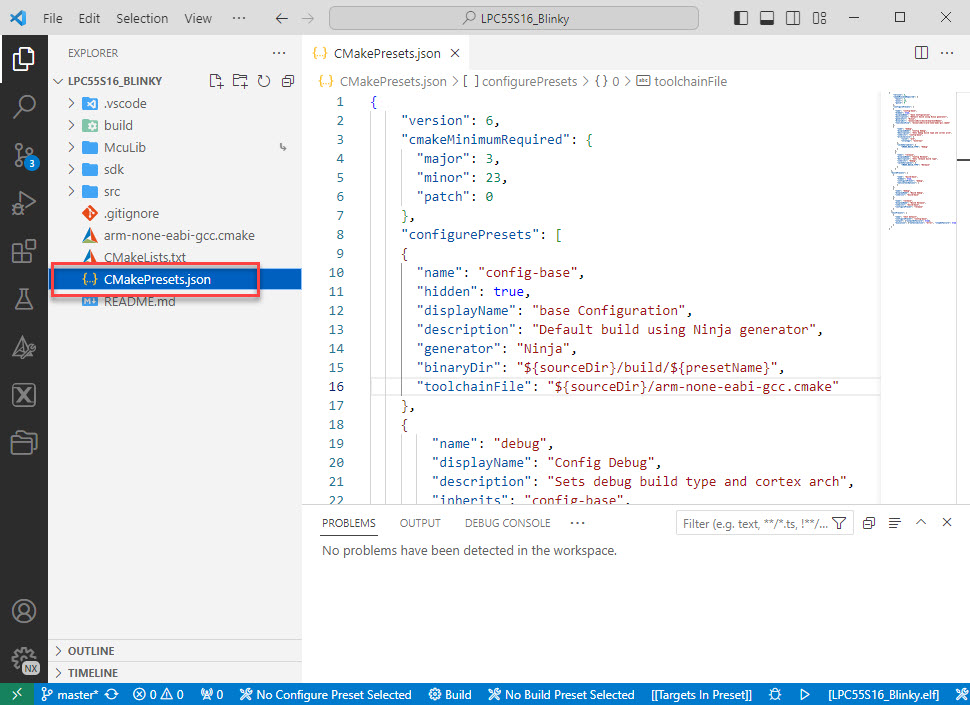
The default file is named CMakePresets.json and is located in the root folder of the project:
It is possible to use a CMakeUserPresets.json: this one is meant to specify own local settings and build details for a developer.
Configure Preset
Below is an example of a preset:
"configurePresets": [
    {
      "name": "config-base",
      "hidden": true,
      "displayName": "base Configuration",
      "description": "Default build using Ninja generator",
      "generator": "Ninja",
      "binaryDir": "${sourceDir}/build/${presetName}",
      "toolchainFile": "${sourceDir}/arm-none-eabi-gcc.cmake"
    },
    {
        "name": "debug",
        "displayName": "Config Debug",
        "description": "Sets debug build type and cortex arch",
        "inherits": "config-base",
        "architecture": {
            "value": "arm",
            "strategy": "external"
        },
        "cacheVariables": {
            "CMAKE_BUILD_TYPE": "Debug"
        }
      },
      {
        "name": "release",
        "displayName": "Config Release",
        "description": "Sets release build type",
        "inherits": "debug",
        "cacheVariables": {
            "CMAKE_BUILD_TYPE": "Release"
        }
      }
  ]
The first entry describes the ‘config-base’, which is hidden and is inherited in the ‘debug’ and ‘release’ configuration. The inheritance works nicely here, as I can define a some base properties, which then can be used and possibly overwritten in the debug and release configuration.
Notice that with the ‘toolchainFile‘ the CMake kit to be used is specified. Using ‘cacheVariables‘ I can set variables and settings used later in the CMakeLists.txt files.
Build Presets
In a similar way, the build presets are built up here for debug and release builds:
"buildPresets": [
    {
        "name": "build-base",
        "hidden": true,
        "configurePreset": "debug",
    },
    {
      "name": "debug",
      "displayName": "Build Debug",
      "inherits": "build-base"
    },
    {
      "name": "release",
      "displayName": "Build Release",
      "inherits": "build-base",
      "configurePreset": "release"
    }
  ]
Here again I define a (hidden) build-base, and inherit from it for a release and debug build. The build presets point back to a configure preset.
CMake Command-line Usage
To list the available presets with CMake, I use the following:
cmake --list-presets
which gives:
Available configure presets:

  "debug"   - Config Debug
  "release" - Config Release
To configure a project with CMake using a preset, I use the following:
cmake --preset <name-of-preset>
for example:
> cmake --preset debug
Preset CMake variables:
  CMAKE_BUILD_TYPE="Debug"
  CMAKE_TOOLCHAIN_FILE:FILEPATH="LPC55S16-EVK/LPC55S16_Blinky/arm-none-eabi-gcc.cmake"

-- McuLib for MCUXpresso SDK
-- Configuring done (0.3s)
-- Generating done (0.1s)
-- Build files have been written to: LPC55S16-EVK/LPC55S16_Blinky/build/debug
In a similar way, I can list the build presets:
cmake --build --list-presets
To build a project, I use
cmake --build --preset <name-of-preset>
For example:
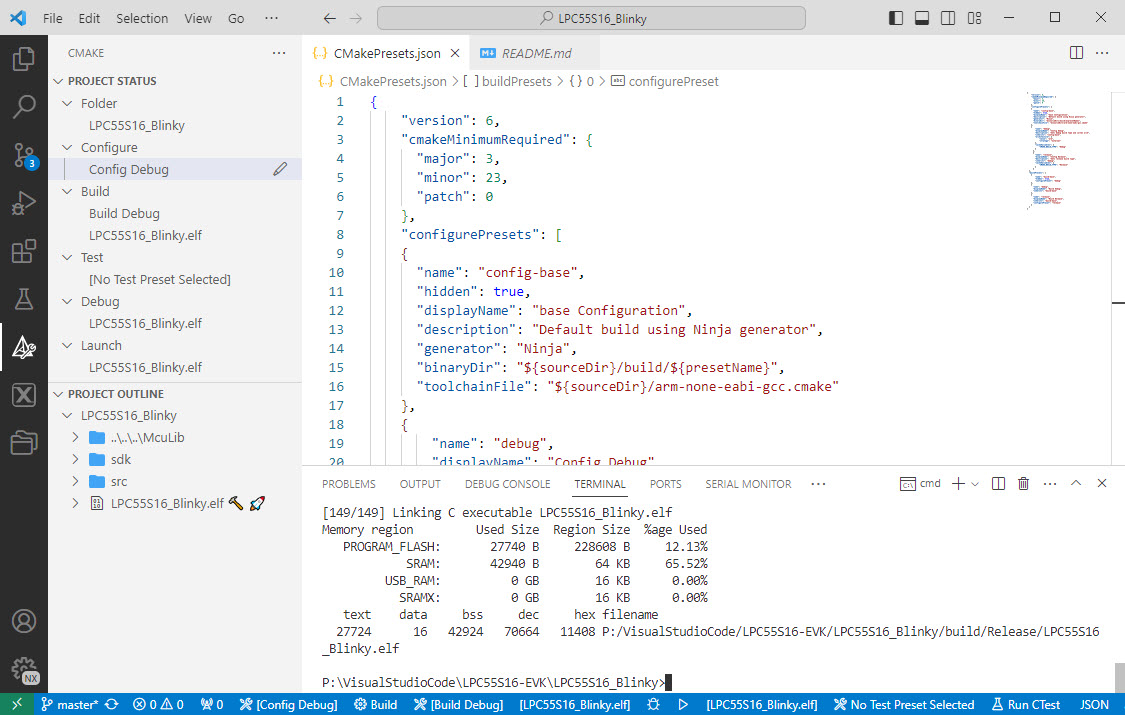
> cmake --build --preset release
[149/149] Linking C executable LPC55S16_Blinky.elf
Memory region         Used Size  Region Size  %age Used
   PROGRAM_FLASH:       27740 B     228608 B     12.13%
            SRAM:       42940 B        64 KB     65.52%
         USB_RAM:          0 GB        16 KB      0.00%
           SRAMX:          0 GB        16 KB      0.00%
   text    data     bss     dec     hex filename
  27724      16   42924   70664   11408 LPC55S16-EVK/LPC55S16_Blinky/build/Release/LPC55S16_Blinky.elf
With this, I have the ability to build the project. I don’t need an IDE or editor for this, everything is easily managed by command line commands. That way, it it can be integrated into a CI/CD pipeline, and the CMake kits and options are all defined with the Preset, the referenced CMake Kit and the CMakeLists.txt.
CMake Presets with VS Code
While we can build everything from the command line, CMake Presets are supported in VS Code.
To tell VS Code to use CMake Presets, use the following two settings in settings.json:
"cmake.useCMakePresets": "always",
"cmake.options.statusBarVisibility": "visible",
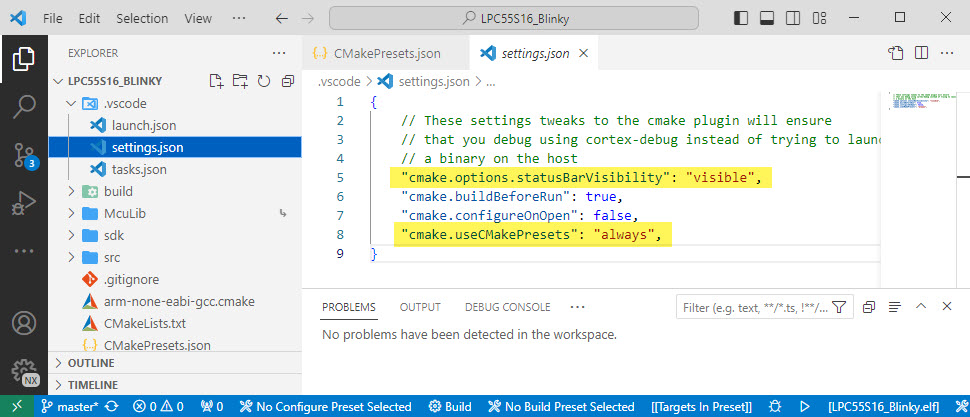
- useCMakePresets tells VS Code to use presets with CMake.
- statusBarVisibility makes sure that all the preset options are shown in the bottom status bar.
VS Code Status Bar
The status bar in VS Code shows the currently selected Presets, and I can click on them to change the preset e.g. from Release to Debug:

💡 In above project I do not have a Test Preset defined: this is a subject of a future article describing how to set up tests and run it with CTest.
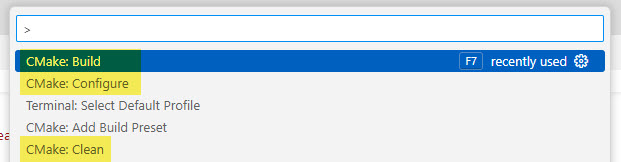
With that, I can use the usual CMake commands in VS code to clean, configure and build:
CMake Project Status
Additionally, the CMake extensions shows the project status with all the settings:
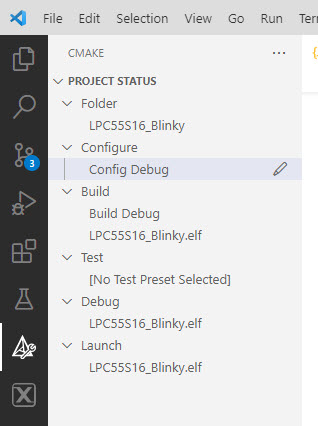
I can directly edit the settings from that view, e.g. change the ‘Debug’ build to a ‘Release’ one.
Summary
CMake Presets are probably one of the most powerful and useful features in CMake. Instead using complex command lines, I can structure my builds and options for it. The same time it nails down the CMake Kits which has been a constant source of frustration and problems with VS Code for me. With CMake Presets I can configure and build my projects on the command line. The same time CMake presets are much better supported and used with VS Code. My CMake and VS Code projects have been dramatically simplified with using Presets.
Most VS Code users or even many CMake users might not be aware of CMake Presets: I hope with this article I can help you to get to the next level of using CMake. I’m using Presets for my test builds too, more about this in future article.
Happy presetting 🙂
Links
- Project on GitHub: https://github.com/ErichStyger/mcuoneclipse/tree/master/Examples/VisualStudioCode/LPC55S16-EVK/LPC55S16_Blinky
- CI/CD for Embedded with VS Code, Docker and GitHub Actions
- CMake Presets: https://cmake.org/cmake/help/latest/manual/cmake-presets.7.html
- CMake Presets in VS Code: https://github.com/microsoft/vscode-cmake-tools/blob/main/docs/cmake-presets.md
- “No Kit Selected”: Fixing VS Code CMake Kit Assignment

The preset is very powerful. I’m using it for almost all of my CMake projects. However, it still can be improved. For example, adding support for -D argument so that it won’t be necessary to write presets for different targets. One of my project has many different targets for different platforms. To avoid writing many similar presets, I wrote a makefile to call CMake presets with different environment variable values.
LikeLike
I have transformed pretty much all of my CMake projects using Presets too. As for passing -D options: you could use nativeToolOptions for this, in the same way as you would pass options to CMake directly.
LikeLike
Actually a better way would be to use “cacheVariables”. In your configuration you can have something like this:
"cacheVariables": {

    "CMAKE_BUILD_TYPE": "Debug",

     "EXTRA_DEFINES": "-DDEBUG"

 }
Then in the CMakeLists.txt you simply can add that option to the list of defines, e.g.:
if (DEFINED EXTRA_DEFINES)

  list(APPEND PROJECT_DEFINES ${EXTRA_DEFINES})

endif()
LikeLike
In that project, we have like 10 different models controled by -DMODEL=xxx. The model specific CMake configurations are saved in some model_xxx.cmake and model_yyy.cmake files.
With makefile, I use “make xxx_debug” to build debug version of model xxx under build/xxx_dubug and “make yyy_release” to build release version of model yyy under build/yyy_release, etc. In fact, I have another build variant called dev aside from debug and release. The dev variant is the same with debug except it skips some time-consuming code checking steps so that the building time when developing could be reduced.
Under the hood, the makefile simpily extract the model string (xxx) and variant string (debug) and pass it to cmake as a environment variable. In the main CMakeLists.txt, it simply include the corresponding model_xxx.cmake file. It is tricy but clean. When a new model is needed (yes, it happens time to time and I’m dying for it), all I need to do in the build system is copy xxx.cmake to zzz.cmake and write model specific configurations in zzz.cmake.
However, if with cmake presets, I have to repeat myself to add like 10 different configurations for debug, release and dev versions. The CMakePresets.json would be filled with duplicate codes and annoying.
LikeLike
Hey,
Is debugging with vscode and cmake presets also working?
I have issues that if I want to launch debug session vscode searches for the cmake-kits.json file but because using CMakePresets.json I don’t have that file and so debugging does not work.
And I also don’t see you have that file in your example project.
LikeLike
Yes, debug works without problem. Check your preset config, it shall reference the kit, e.g.
"toolchainFile": "${sourceDir}/arm-none-eabi-gcc.cmake",
Other than that, check your launch.json how the executable is specified. I have this:
"executable": "${command:cmake.launchTargetPath}",
LikeLike
Are you going to rename this blog “MCU on VS Code”? 🙂
LikeLike
I don’t have plans for that.
LikeLike
The question was more like a joke, but indeed, this blog is shifting slowly from Eclipse to VSCode.
IMHO, this is a good move, as the resources available on MCU development using VSCode are scarce on the Web, and your pragmatic writing style makes it a lot easier to grasp, thank you!
LikeLike
Yes, I’m definitely moving more to VS Code these days, see https://mcuoneclipse.com/2023/08/01/consolidating-with-vs-code/.
I still have many projects running with Eclipse, and expect it the case for the coming years that way. But newer projects have been more on VS Code recently.
LikeLike
An important feature of presets is inheritance.
By including more generic preset files, it is possible to gradually specialize the presets to fit your needs.
It is thus possible to define a default set of options like generator, output binary dir, cache and environment variables, etc. into a default preset file that is included in more specific ones, up to the top-level CMakePresets.json, which can be further customized by a CMakeUserPresets.json file to specify local / user-specific settings like tool paths.
But as presets can inherit from multiple existing presets, I found very convenient to define presets dealing with hardware-specific settings on one hand, and some other presets dealing with software-specific features and/or build types on the other hand.
I also use 3 levels of “inheritance” for toolchain files like this:
* a toolchain-arm-none-eabi-gcc.cmake that is called by
* a toolchain-vendor.cmake that is in turn called by
* a toolchain-project.cmake
As a last sophistication, I use *.code-workspace files instead of plain directory structures to get a VSCode project view very similar to other IDEs.
LikeLike
Yes, I have played with the inheritance, and this is very useful. Dominic Berner (https://dominikberner.ch/cmake-presets-best-practices/) had a good suggestion how to organize presets, but I have not fully used that yet. As for your way of doing things: do you have an example e.g. shared on GitHub? That would be useful for everyone else too.
LikeLike
Unfortunately, I cannot share my own code for legal reasons, but here is something close to it on Github:
https://github.com/lzptr/efr32_base
Another very nice feature of VSCode is the support for devcontainers:
https://code.visualstudio.com/docs/devcontainers/containers
Here is template devcontainer for embedded developments:
https://github.com/philips-software/amp-devcontainer
Also, here is Espressif’s ESP-IDF SDK devcontainer tutorial:
https://github.com/espressif/vscode-esp-idf-extension/blob/master/docs/tutorial/using-docker-container.md
The goal is to isolate your build environment into a single docker container that you can use everywhere (read: among several developers on different machines/OS) and also for CI/CD purposes. For development, you can mount it right under VSCode just like you attach to a “remote ssh” WSL2 instance.
This goes far beyond what you can do with Conda (that you already covered in one post).
Maybe a good subject for another post 😉
LikeLike
I was finally able to solve the problem on my side, caused by recursive library dependencies. I had a) to create the shared library as OBJECT library (add_library(myLib OBJECT ${FILES}), and b) I had to use PUBLIC and PRIVATE library dependencies in the source libraries. That finally solved it. INTERFACE did not help at all or solved it, but you brought me on the right track, thank you!
LikeLike
hi,
i am having trouble with presets…
defining a kit .vscode/cmake-kits.json enable me to define a environmentSetupScript, in my case enabling a python environment
without this the build fail on generating nanopb header and sources.
it could be that a workaround is to call
cmake –preset presetname
cmake –build –preset presetname
from a shell with enabled virtualenv. but since CMakePresets.json does not accept vscode variables when run from command line(which are convenient to use) i get an invalid preset file error…
LikeLike
My thinking is that you should keep CMake and VS Code separate, and not depending on VS Code to setup things, e.g. a python environment. Same for using VS Code variables in the preset file. Doing so will only cause problems imho. VS Code is not an IDE, it is basically just an editor with extensions. If you keep CMake and VS Code mixed up, then you won’t be able to run CMake files standalone, e.g. preventing proper CI/CD.
LikeLike
after removing the VS Code variables it is “working”, but now i ended up having some absolute path defined in my presets at the ‘environment’ tag.
the absolute paths coded in an Environment variable defines the location of sources which are out of tree.
how can i get rid of it?(more a cmake question in general)
as “working” i intend running the build manually with the python env activated, vscode cmake extension cannot activate the environment
LikeLike
what I do is to create the environment (variables) outside (e.g. with conda or a shell script), then run CMake or VS Code within that environment. That way you don’t have any absolute variables in your build or VS Code.
LikeLike
Yes, activating the python env does exactly that, then protoc from the env is used.
This approach is good as you said for automating it , but we lost some features of the cmake vsc extension
LikeLike
I would not base and count on the vsc extensions: they create a dependency I do not want and only gets in the way. This is exactly the reason why I had to use CMake presets because VSC is handling this so buggy and poorly. Sure you can build everything around VSC, but sooner or later you will end up in the same situation as I was: VSC is getting in the way and only adds complexity and a undesired dependency. Just my 1 cent. So I had to step back from trying to use VSC as an IDE, and switched back to use VSC as an editor (with nice extensions): to what VSC and its extensions is designed for.
LikeLike
Another question/whish:
How would you configure unit testing with native toolchain using presets?
so i don’t tink you can make a reply here, but maybe a post? 🙂
Thank you a lot for all the help you give!
LikeLike
See https://mcuoneclipse.com/2023/12/18/modern-on-target-embedded-system-testing-with-cmake-and-ctest/
LikeLike
yes i have seen it, but in this example you are using the arm crosstoolchain for test running on the target
but i see it is straigthforward to use presets to switch toolchain and then using some variable defined in the presets to switch between the executable to build and run the tests for native unit tests
LikeLike