The NXP MCU-Link is a powerful $10 debug probe for ARM Cortex-M devices and works with the NXP LinkServer for debugging. The LinkServer does not an implement a gdb server, so it limits its usage e.g. for scripting or command line debugging. But as MCU-Link is also a CMSIS-DAP compatible debug probe, I can use it with OpenOCD which is open source and implements a GDB server. This article shows how I can use it with the MCU-Link.

Debugging FRDM-KL25Z with MCU-Link
Outline
In this article I show how you can use OpenOCD with Eclipse (MCUXpresso IDE or any other recent Eclipse) and the MCU-Link or any other CMSIS-DAP capable debug probe. I’m using the binaries and plugins from Liviu Ionescu and his great Eclipse Embedded CDT project (formerly GNU ARM Eclipse).
Why OpenOCD? It is open source and supports many micro-controller families. It allows you to use the NXP MCU-Link with GDB server which is great for command-line debugging and scripting. The downside is that using OpenOCD requires tweaking and without expert knowledge you are stuck with the devices supported by the OpenOCD distribution. So if you want to have professional tools, working out of the box and supporting many silicon vendors, I recommend to consider SEGGER or P&E.
MCU-Link
The NXP MCU-Link debug probe (see “New MCU-Link Debug Probe from NXP“) enumerates as CMSIS-DAP debug probe and can be used with OpenOCD as such:

MCU-Link CMSIS-DAP Debug Probe
Installation
The first step is installing the pre-built OpenOCD binaries. Using OpenOCD is challenging for most users as for more than 3 years there has been no new releases from OpenOCD.org: instead it is expected that you configure and build your binaries. Which is OK but can be daunting for new users. Luckily there are pre-built binaries available provided by Liviu Ionescu on https://xpack.github.io/openocd/releases/.

xPack OpenOCD Release
Download the binaries and install them. In this article I’m using the v0.10.0-15 release and I have it installed on Windows in
C:\Program Files (x86)\GNU ARM Eclipse\OpenOCD\xpack-openocd-0.10.0-15
The next thing is to install the Eclipse Plugins: One way is to use the Eclipse Marketplace:
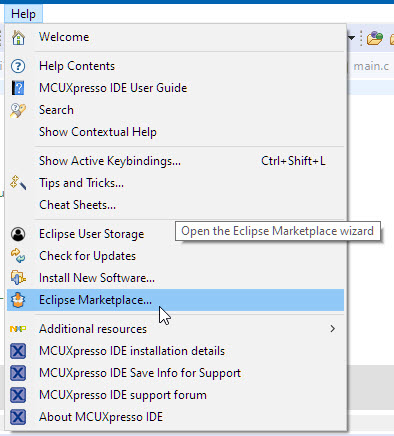
Menu Eclipse Marketplace
From there, search for the Eclipse Embedded C/C++ plugin:
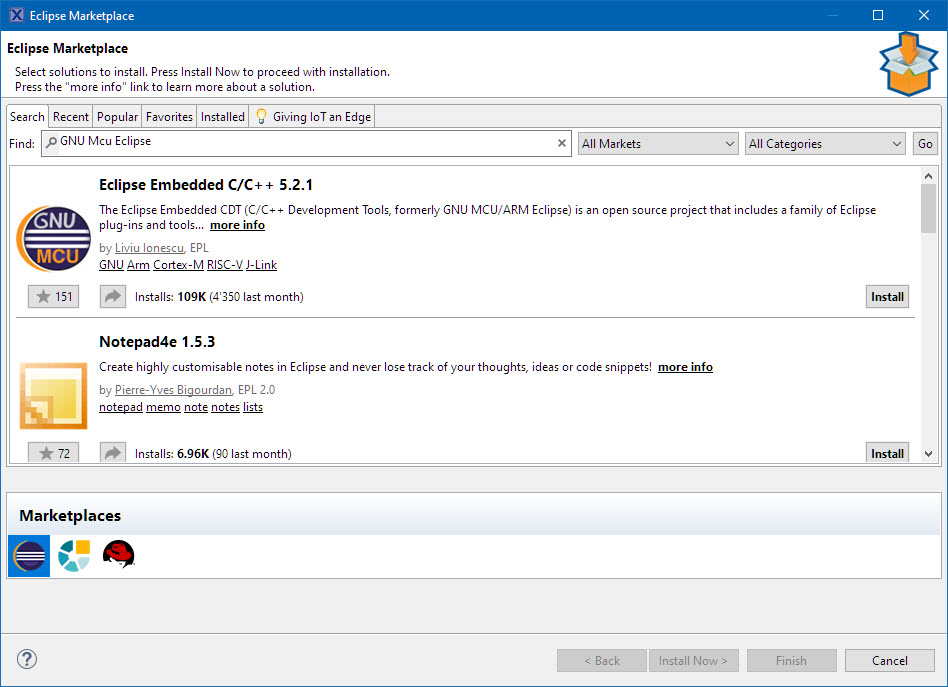
Eclipse Marketplace
Then install the plugin. I have installed it with all available options:
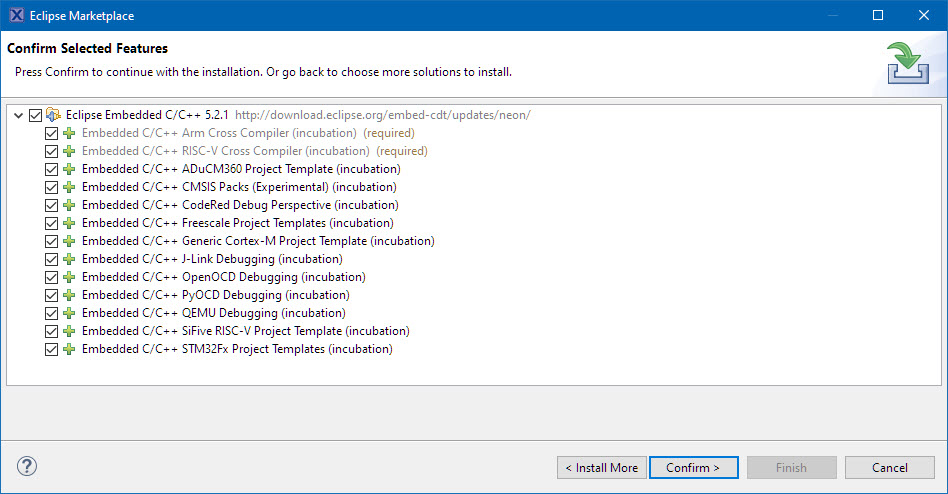
Plugin Features
Finish the installation process and restart Eclipse.
In the workspace preferences, check that the global OpenOCD path is pointing to the installed OpenOCD binaries:
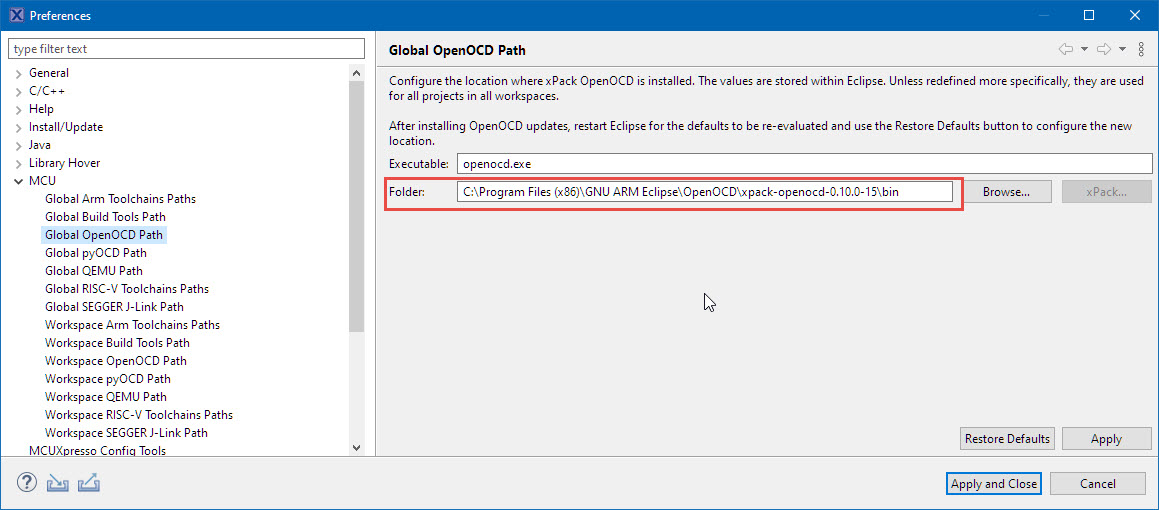
Global OpenOCD Path
With this, everything is installed. The only thing missing is to configure the debug configuration(s) to be used.
Debug Configuration
To use OpenOCD, I have to setup a debug configuration first. Have the project selected and go to the Debug Configurations:

Debug Configurations
Double-Click on ‘GDB OpenOCD Debugging’.
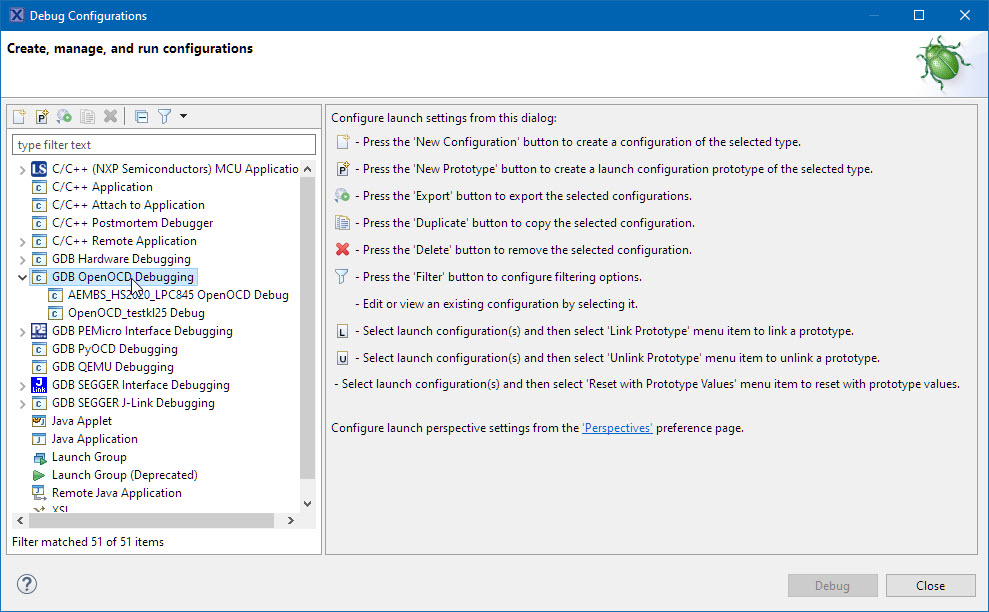
GDB OpenOCD Debugging
This creates a new launch configuration based on the project selected.
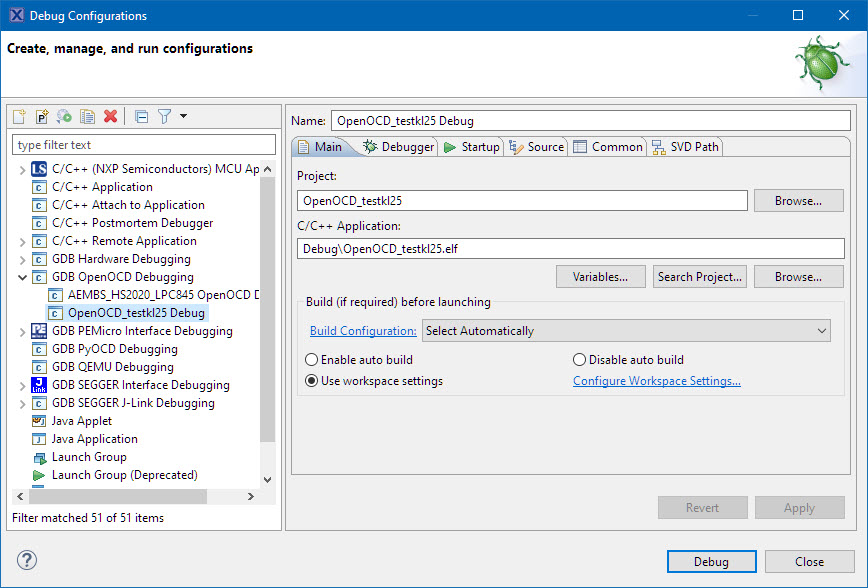
New Launch Configuration
Make sure the configuration points to the OpenOCD executable:
${openocd_path}/${openocd_executable}

OpenOCD Executable
Make sure you use the gdb from the GNU toolchain used to build the application:
${eclipse_home}tools/bin/arm-none-eabi-gdb.exe
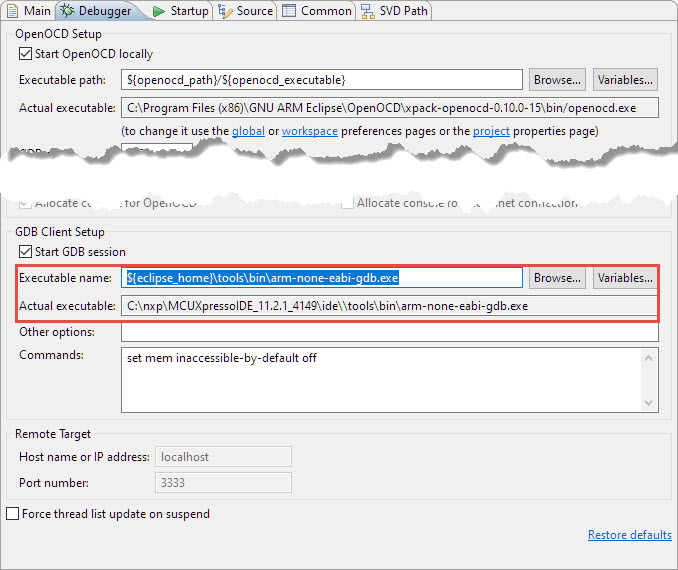
GDB Client
Now the most difficult part: OpenOCD needs a configuration file for the device used, passed with the -f command line option. For example for the FRDM-KL25Z board I can use
-f "board/frdm-kl25z.cfg"
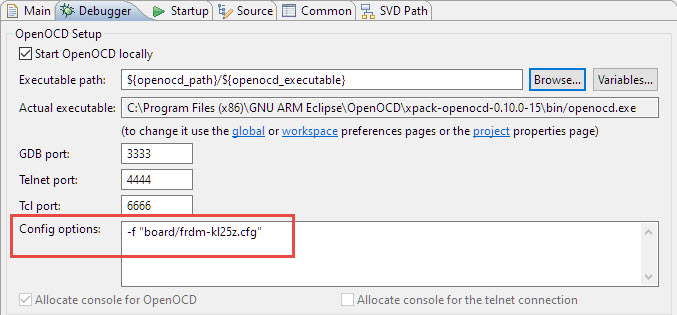
OpenOCD Config Options
You can find existing board files in the OpenOCD installation folder, in my case it is in
C:\Program Files (x86)\GNU ARM Eclipse\OpenOCD\xpack-openocd-0.10.0-15\scripts\board
If your board is not listed, you can create a new board file, similar to the existing ones. Basically you need to set the interface (CMSIS-DAP for the MCU-Link) and the target. Below is the example for the FRDM-KL25Z.
# This is an Freescale Freedom eval board with a single MKL25Z128VLK4 chip.
# http://www.freescale.com/webapp/sps/site/prod_summary.jsp?code=FRDM-KL25Z
#

source [find interface/cmsis-dap.cfg]

# increase working area to 16KB
set WORKAREASIZE 0x4000

# chip name
set CHIPNAME MKL25Z128VLK4

reset_config srst_only

source [find target/kl25.cfg]
Last but not least: I recommend to store it as a ‘shared file’ (see “Sharing Debug Configuration with Eclipse“):
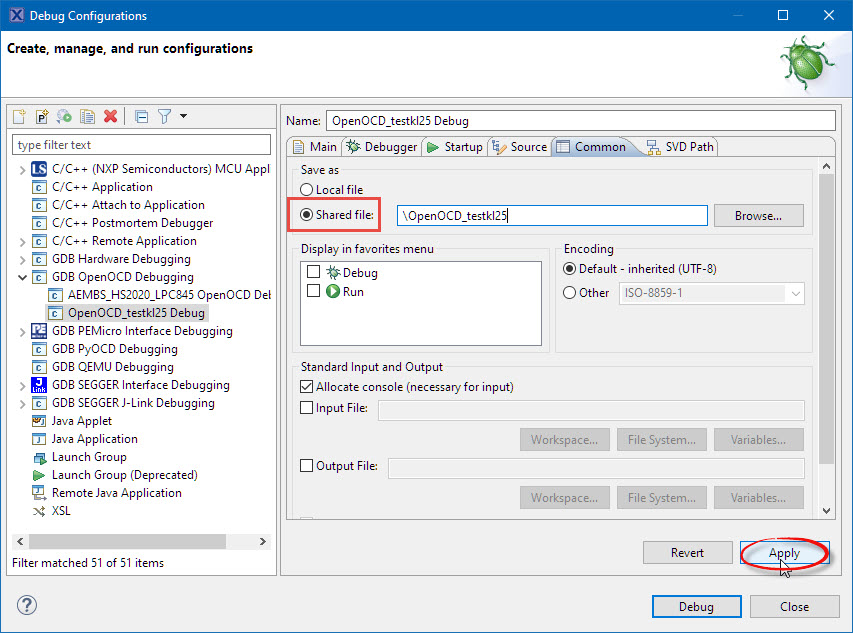
Shared Launch Configuration
To launch the debug session, use the ‘green’ debugger icon:
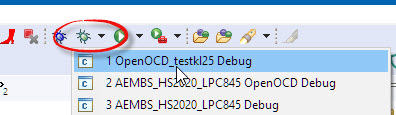
starting debug session
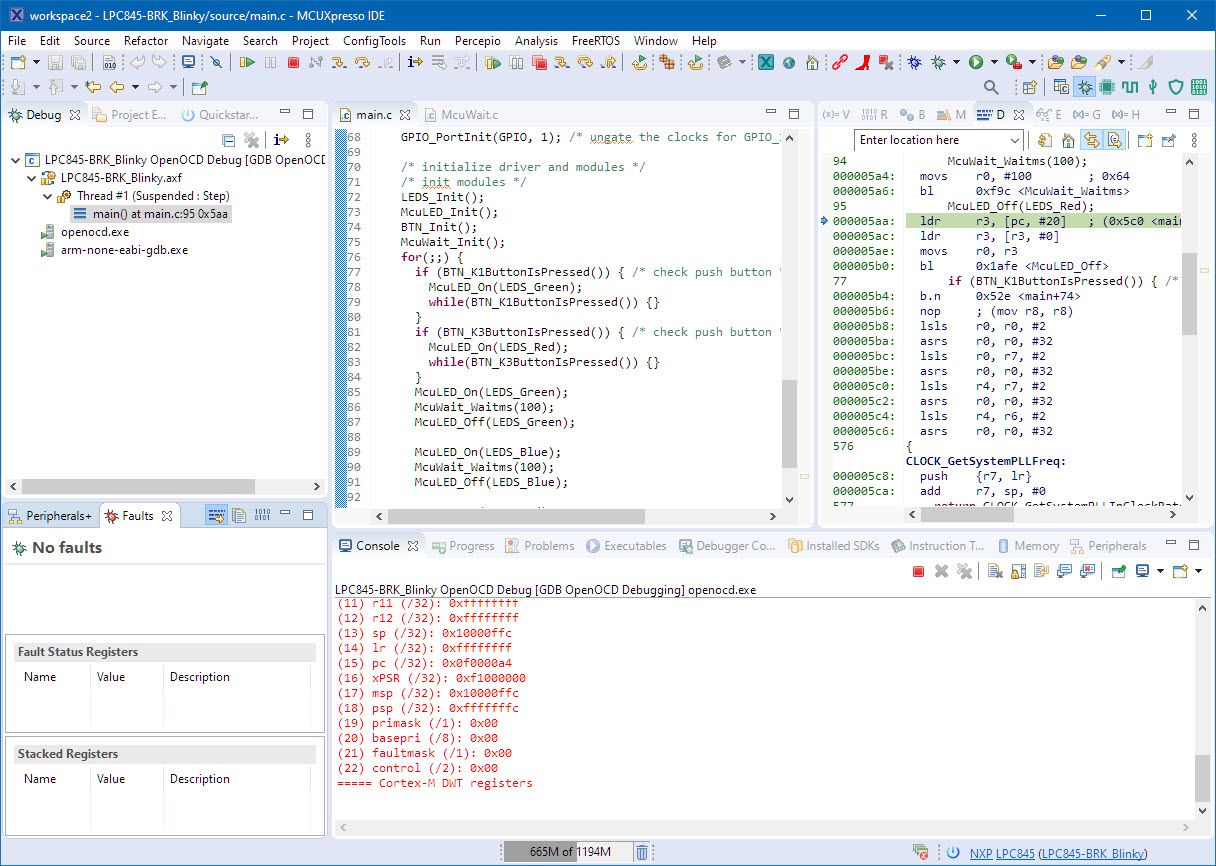
With this, I’m debugging with OpenOCD:
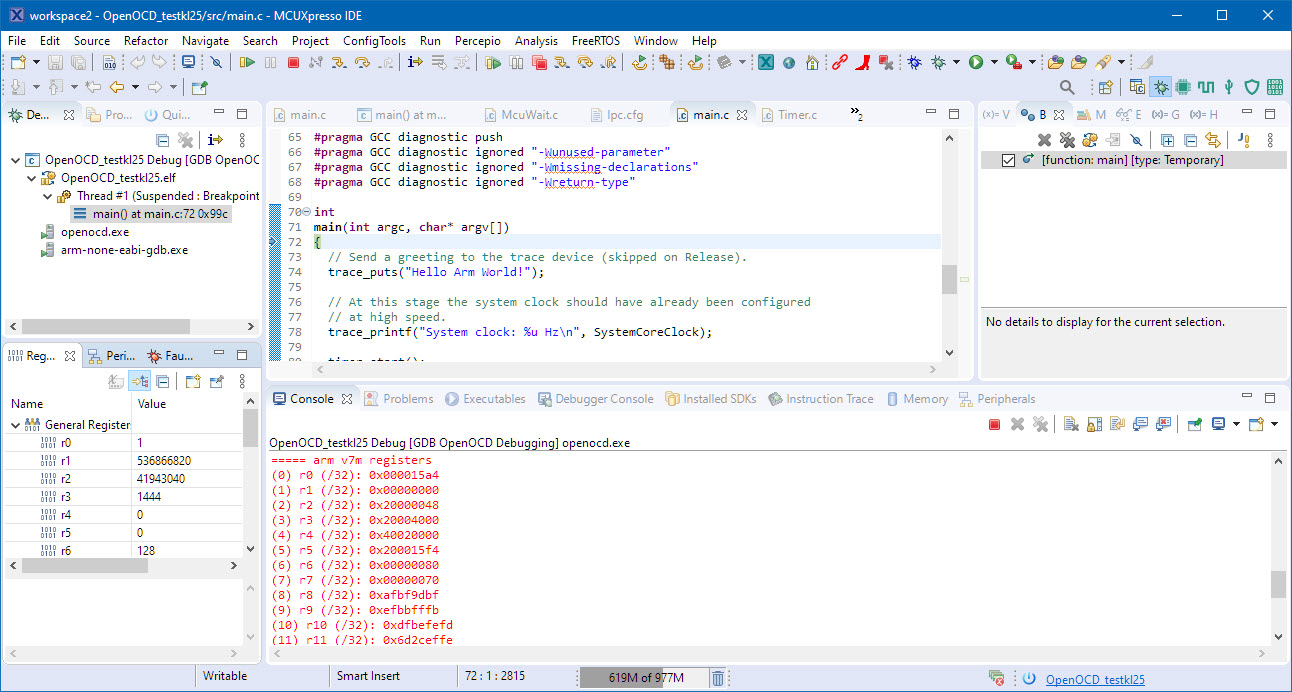
Debugging with MCU-Link and OpenOCD
Debugging FRDM-KL25Z with MCU-Link
In case you see some warnings about timeouts and the recommendation to increase it :
Warn : keep_alive() was not invoked in the 1000 ms timelimit. GDB alive packet not sent! (2150 ms). Workaround: increase "set remotetimeout" in GDB
Below is how it can be increased to 5 seconds:
set remotetimeout 5
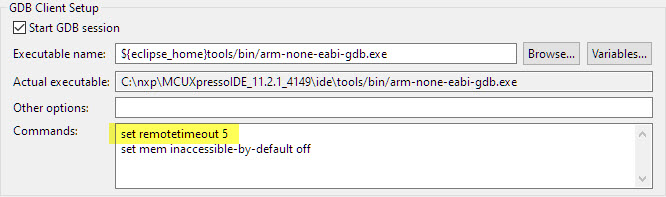
gdb set remotetimeout
Using OpenOCD with LPC845
One of my favorite NXP LPC devices is the LPC845. In order to use OpenOCD with the LPC845-BRK board, there are a few but important tweaks to be made.
First, create a new OpenOCD configuration file (lpc845-brk.cfg) and place it into scripts/board, with following content:
# File: board/lpc845-brk.cfg
# This is the OpenOCD configuration for the NXP LPC845-BRK evaluation board with the LPC845M301JBD4

# MCU-Link is a CMSIS-DAP probe
source [find interface/cmsis-dap.cfg]

# LPC845 only supports SWD
transport select swd

# set chip name, internally it uses lpc8xx as well
set CHIPNAME lpc84x

# TAP ID is different from the others
set CPUTAPID 0x0bc11477

# we do have up to 8K RAM, use a good portion of it
set WORKAREASIZE 0x1000

# the lpc1xxx.cfg sets an adapter speed of just 10 which is *really slow*
# comment it out in target/lpc1xxx.cfg and use the one below:
adapter speed 5000

# LPC845 has a special IPA Entry point:
set IAP_ENTRY 0x0F001FF1

# load LPC845 configuration
source [find target/lpc84x.cfg]
The really important one is the thing about the adapter speed. The script uses the target/lpc1xxx.cfg configuration in the back end which by default sets a very slow speed of 10: as noted in the comment above, disable that value and use the one from the board/lpc845-brk.cfg:
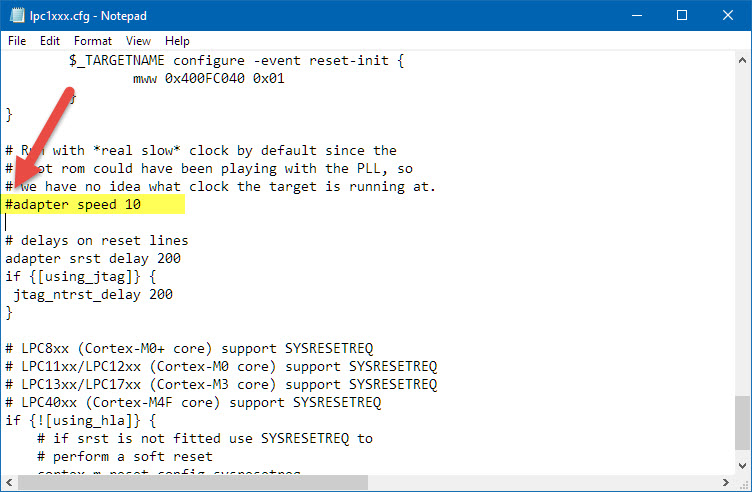
disabled adapter speed in lpc1xxx.cfg
With this, I can debut the LPC845 with OpenOCD:
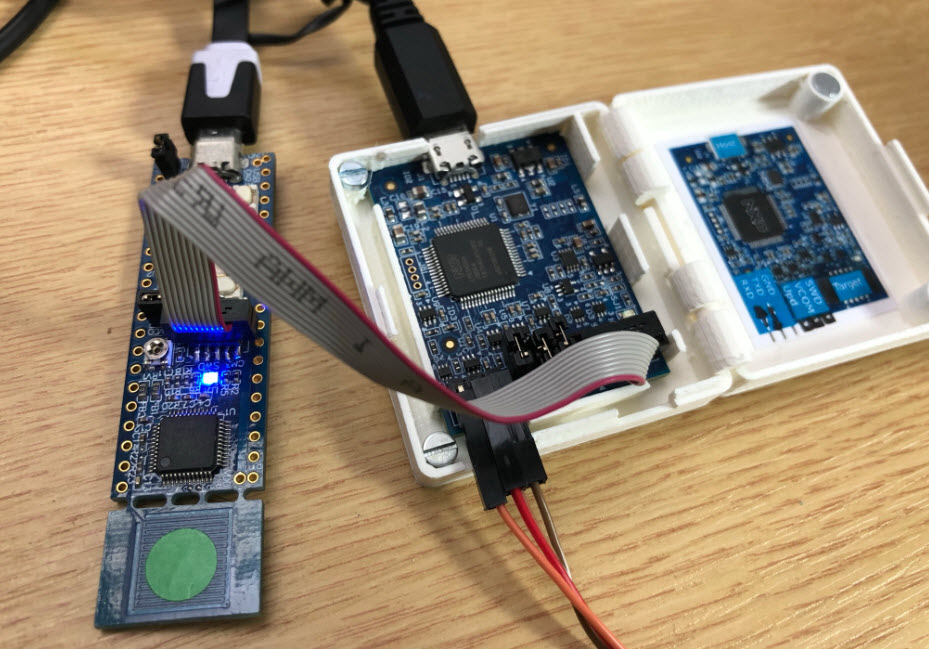
Debugging LPC845-BRK Board with NXP MCU-Link
Debugging LPC845-BRK with OpenOCD
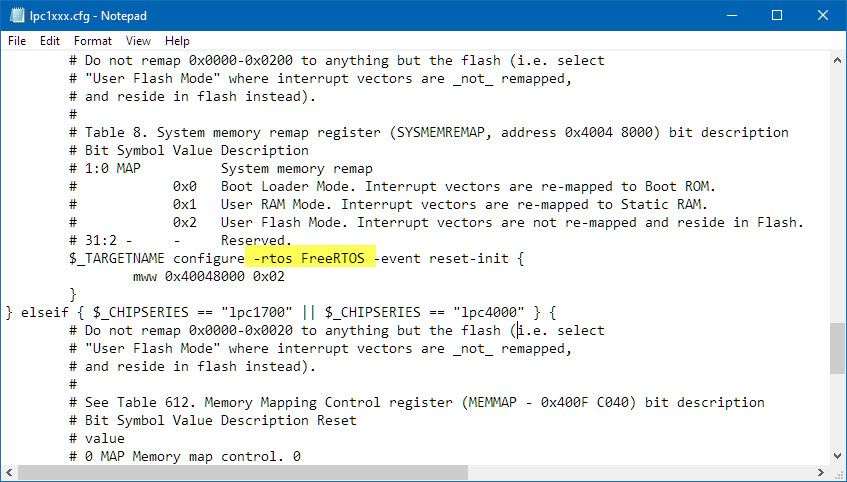
FreeRTOS
💡 I recommend to use the McuLib FreeRTOS port on because this port has all the patches and tweaks implemented to make OpenOCD FreeRTOS debugging possible. The usual FreeRTOS ports do not have this included.
To get FreeRTOS thread awareness in OpenOCD, see “FreeRTOS Thread Debugging with Eclipse and OpenOCD“.
FreeRTOS for OpenOCD
Be aware that at least with the GNU gdb (GNU Tools for Arm Embedded Processors 9-2019-q4-major) 8.3.0.20190709-git there is a bug in the gdb preventing using it:
[Switching to thread 1 (Thread 1)]
/mnt/workspace/workspace/GCC-9-pipeline/jenkins-GCC-9-pipeline-100_20191030_1572397542/src/gdb/gdb/inferior.c:287: internal-error: inferior* find_inferior_pid(int): Assertion `pid != 0' failed.
A problem internal to GDB has been detected,
further debugging may prove unreliable.
Quit this debugging session?
So at least for that version I FreeRTOS thread awareness is not possible with OpenOCD.
Command Line Debugging
The benefit of using OpenOCD instead of the NXP LinkServer on the MCU-Link is that OpenOCD implements a GDB server. For details how to use OpenOCD as command line debugger see the instructions in OpenOCD/CMSIS-DAP Debugging with Eclipse and without an IDE
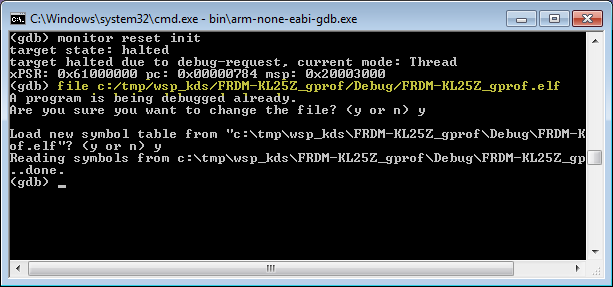
Loading ELF File with GDB
CMSIS-SVD
To have hardware register details, point in the debug configuration to the device CMSIS-SVD file:
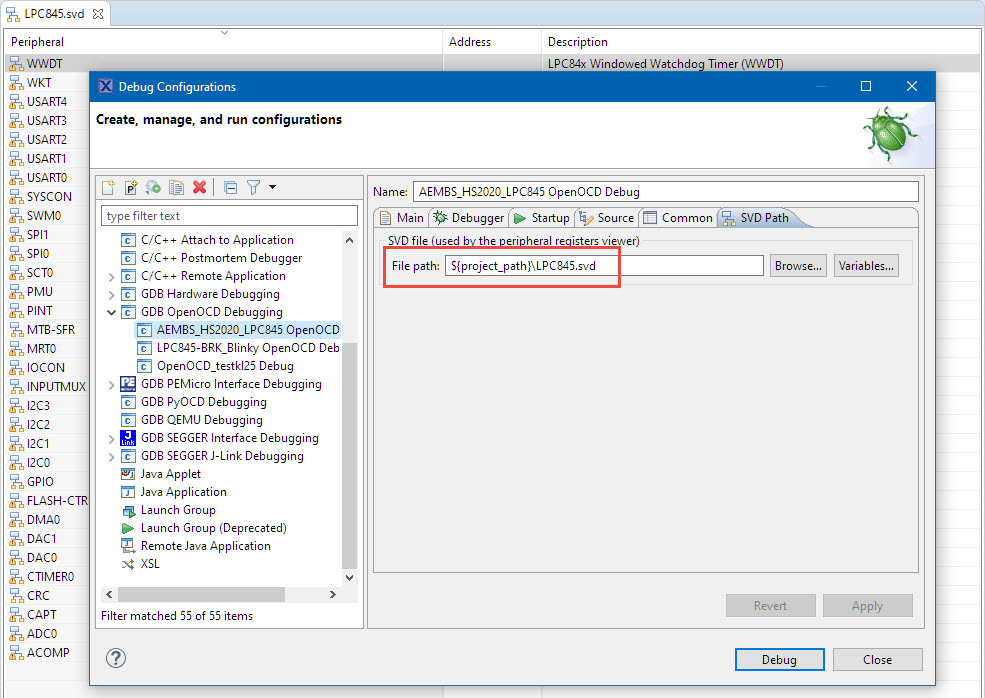
SVD File
See this article how you can get the SVD files as they are usually part of the SDK. With the SVD file I have now register details in the Peripheral view:
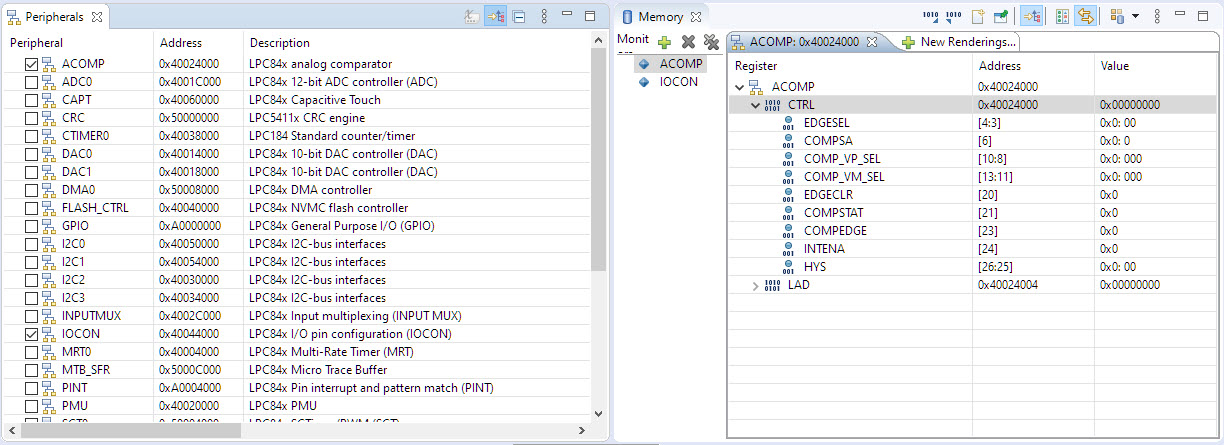
Peripherals with OpenOCD
Summary
To get OpenOCD running is not the simplest task, but can be very rewarding. I’m able now to use it with the NXP MCU-Link and have an open source debug solution which implements a GDB server: great for scripting and automation. The Eclipse Embedded CDT (thanks Liviu!) greatly simplifies things if you don’t want to recompile the OpenOCD binaries. The downside is that not all and every device is supported by OpenOCD, but that might improve over time. At least popular devices are supported by the community, and with the MCU-Link I have a very low cost debug probe for it too.
Happy Probing 🙂

Pingback: New MCU-Link Debug Probe from NXP | MCU on Eclipse
If you using a 64-bit Windows, there is a 64-bit version of the xPack OpenOCD, which you would probably not want to install in ‘C>\Program Files (x86)\’.
Anyway, the new recommended way to install binaries is via xpm, see the prerequisites pages. You can also install multiple versions of the toolchains, the Windows Build Tools, etc.
Also please note that Eclipse Embedded CDT will be available as a separate Eclipse top package, starting with Eclipse 2020-12, to be released in a few days.
LikeLiked by 1 person
Hi Liviu,
Yes, I used the 64-bit version, and installed/unzipped hand into that folder because I had my previous version there. You are right, the non-x86 folder would have been more appropriate. And I do have multiple version of toolchains too, but for a lecture/lab I had to use the same GNU binaries as in MCUXpresso IDE for various reasons. Good news about the package be available in the Eclipse package: you really can be proud about that achievement!
Thanks again for all your work!
LikeLike
Hi.
As a C / C ++ application, I see an .axf file, not an .elf. Does it work the same?
How are Openocd binaries installed in Windows 7 64bit? For now, what I have done is copy it to the “Program Files (x86)” directory, I don’t know if that is correct or if an installation process has to be executed.
I need to use it with a Kinetis MK66 microcontroller or the FRDM board with that microcontroller, but I can’t find any configuration files, neither with this chip nor with this board. Could you indicate how to create that file?
Regards.
LikeLiked by 1 person
Yes, .axf and .elf are the same, just different extensions. ARM somehow invented the .axf extension while others are using the .elf for ELF/Dwarf files.
Installation: I downloaded the 64bit zip file from Liviu’s page and just extracted it because I had all the USB drivers already installed. I recommend you follow Liviu’s installation guide if you are new to OpenOCD.
I don’t have a K66: I recommend you look at the existing Kinetis OpenOCD support/script files.
LikeLike
https://xpack.github.io/openocd/install/
LikeLiked by 1 person
Pingback: MCU-Link with Cortex-Debug and LinkServer @McuOnEclipse « Adafruit Industries – Makers, hackers, artists, designers and engineers!
Pingback: Open source ARM based toolchain development and debug on Windows with no emulation – ALEA