
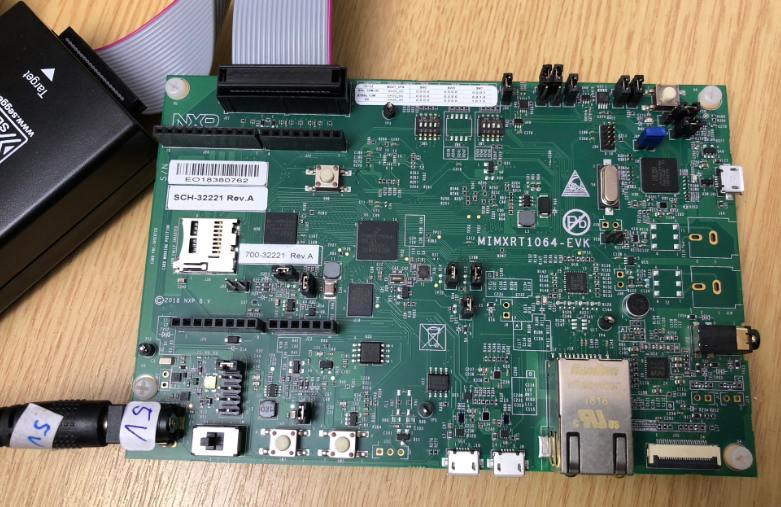
This tutorial shows how to use and collect coverage data using the GNU gcov tool. As board and hardaware I’m using the NXP i.MX RT1064 EVK:
While this tutorial uses this specific board, things are pretty generic and should be applicable for any other board or MCU.
Outline
Collecting coverage or test coverage data is very useful and tells which part of the code has been executed and how many time. This is especially useful to show how much of the code has been tested (or not). For details how this works using the gcov GNU utility and for other boards, see the links to my articles in the ‘Links’ section at the end of this tutorial, especially Tutorial: GNU Coverage with MCUXpresso IDE.
The project created and used is available on GitHub.

SDK
I’m using the SDK 2.10.0 from https://mcuxpresso.nxp.com with the version 11.4.1 of the eclipse-based MCUXpresso IDE.

Project
I recommend to start using gcov with a small project. Use the menu File > New Project and then create a new project or import the Hello World project:

Next, make sure the project builds successfully and can be debugged.

I’m using the J-Link debug connection as this one supports fully the semihosting file I/O which is required for gcov data collection.
Coverage Stubs
Add the coverage stubs folder and files to the project (you can copy it from my project on GitHub). Make sure the folder is not excluded from the build:

Library
Make sure that the newlib library is used with semihosting:

Coverage Initialization
The library needs to be initialized properly, which requires the symbol __init_array_start to be present. For this create (or copy) the file main_text.ldt into a folder named linkscripts.

Initializing Stubs
From the main file, call the gcov stubs like this:

Semihosting File I/O
gcov uses file I/O through semihosting to write the data to the host. Check that your debug connection is able to sucessfully open and create a file on the host. For this there is a check routine present in the stub library:

Heap and Stack
File I/O uses lots of heap and stack space. Be sure that you allocate enough space: the more the better, at least trying out things. You still can reduce it later.

My usual approach is to give it as much as possible (e.g. >8k for stack, >8k for heap) and then check with the ‘Heap and stack usage’ view in the IDE:

How much is needed depends on the library used too, but because file I/O needs large set of data, the more is better. Newlib nano should use less RAM than newlib.
Linker Option
Instruct the linker to link with the gcov library using the -fprofile-arcs option:

Instrumenting to collect Coverage Information
To collect coverage, individual files/folders need to use the following (file/project!) specific option:
-fprofile-arcs -ftest-coverage
In return if you build the project, there shall be a file with extension .gcno created:

Writing Coverage
To write the coverage information to the host, call gcov_write() at the end:

Collecting Coverage
Now execute the file with the debugger and write the data. This shall create files with the .gcda extension:

Then terminate the debug session.
If you should get an error like this:
libgcov profiling error:....gcda:overwriting an existing profile data with a different timestamp
it means that there is existing profiler information data with a different time stamp and previously generated. Make sure to delete any old or existing data (delete for example the ‘debug’ folder).
💡 in case of problems, I recommend to make a clean-clean with deleting the ‘debug’ folder.
From Gcc11 on, the function __gcov_flush() to write the data has been replaced by __gocv_dump(). The following code checks for the gcc version and used the correct function:
  #if __GNUC__ < 11
    __gcov_flush(); /* __gcov_flush() has been removed in the libraries for GCC11, use */
  #else
    __gcov_dump(); /* from GCC11 on, use __gcov_dump() */
  #endif
gcov library
Additionally, the libgcov.a library in MCUXpresso IDE 11.8.0 (as well in 11.9.x) does *not* properly implement the library and has only empty functions in it.
You need to use a toolchain with gcov library support enabled for example the xpack-arm-none-eabi-gcc-12.2.1-1.2-win32-x64 from https://github.com/xpack-dev-tools/arm-none-eabi-gcc-xpack/releases
Which library you need for the MCU is described in https://github.com/ARM-software/toolchain-gnu-bare-metal/blob/master/readme.txt. As we have an M7 with FPU, we can identify the following line:
|------------|--------------------------------------------|--------------|
| Cortex-M7  | -mthumb -mcpu=cortex-m7 -mfloat-abi=hard   | thumb        |
| (Hard FP)  | -mfpu=fpv5-sp-d16                          | /v7e-m+dp    |
|            |                                            | /hard        |
|------------|--------------------------------------------|--------------|
Another way is to check the linker .map file:
 .text.__gcov_dump
                0x70004720        0x4 c:/nxp/mcuxpressoide_11.9.1_2170/ide/plugins/com.nxp.mcuxpresso.tools.win32_11.9.1.202402080819/tools/bin/../lib/gcc/arm-none-eabi/12.3.1/thumb/v7e-m+dp/hard\libgcov.a(_gcov_dump.o)
                0x70004720                __gcov_dump
So we are using the library in the v7e-m+dp folder of the toolchain, where we have the libgcovlib.a:
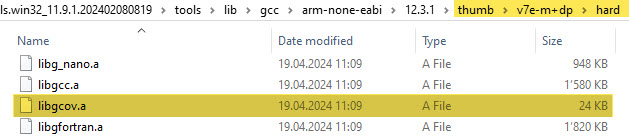
Note that the size of the library is rather small, because it somehow has been built without the needed implementation. We we rename the original file (e.g. to libgcov_orig.a) and use the one from the xpack distribution (make sure it is the same version of toolchain and from the same architecture folder).
So I copied the libgcov.a from my xpack toolchain directory to the IDE toolchain:
xpack-arm-none-eabi-gcc-12.3.1-1.1-win32-x64\xpack-arm-none-eabi-gcc-12.3.1-1.1\lib\gcc\arm-none-eabi\12.3.1\thumb\v7e-m+dp\hard\libgcov.a

Note that the xpack libgcov.a is much larger, because it implements the needed coverage functionality.
With this, I link my application with the xpack version of libgcov.a.
💡 It would be a better idea to have the whole toolchain replaced, but that could be another topic for a future article.
Show Coverage
To show the collected information, double-click on the generated data and press OK in the dialog:

This opens the ‘gcov’ view with the details. Double-clicking on an entry opens the corresponding source file which shows the coverage information with green/red color.

Summary
Congratulations, you successfully instrumented and collected coverage information :-).
Collecting GNU coverage with gcov is rather straightforward with the MCUXpresso IDE, as all the necessary plugins are included. All what I have to do is to add the necessary high-level steps, add a linker symbol plus add the necessary compiler and linker options.
I hope you find this tutorial useful. Please check the links below for more details and further information, or check my project(s) on GitHub.
Happy covering 🙂
Links
- NXP MCUXpresso SDK: https://mcuxpresso.nxp.com
- NXP MCUXpresso IDE: https://www.nxp.com/mcuxpresso/ide/download
- Code Coverage for Embedded Target with Eclipse, gcc and gcov: https://mcuoneclipse.com/2014/12/26/code-coverage-for-embedded-target-with-eclipse-gcc-and-gcov/
- Code Coverage With Eclipse and gcov for Embedded System: https://www.youtube.com/watch?v=KjrLHykZkoo
- Adding GNU Coverage Tools to Eclipse: https://mcuoneclipse.com/2017/06/18/adding-gnu-coverage-tools-to-eclipse/
- Tutorial: GNU Coverage with MCUXpresso IDE: https://mcuoneclipse.com/2021/02/01/tutorial-gnu-coverage-with-mcuxpresso-ide/
- Project of this tutorial on GitHub: https://github.com/ErichStyger/mcuoneclipse/tree/master/Examples/MCUXpresso/i.MX%20RT1064_EVK/MIMXRT1064_gcov

Hi Erich,
As always very interesting – one question, how do you determine how much additional heap/stack that is required?
LikeLiked by 1 person
Hi Myke,
thanks :-). Good point! I admit I use a ‘trial&error’ approach for the heap and stack, with a check of that dedicated view in the IDE. I have updated the article with that information.
LikeLiked by 1 person
Is there a rule of thumb for values to start with?
I’m curious because I always find myself using up all the available resources. Not necessarily because of my largess, just because I want to select the minimum device for the application and SRAM, in embedded devices, is always a resource you’d like more of,
LikeLike
With using semihosting file I/O, I would start with about 2 kByte of RAM for the stack. For using gcov, the amoung of heap depends on the number of instrumented modules (or better: arcs). It starts with something around 4KByte for a single module instrumented, and only the ‘sky’ is the limit.
LikeLiked by 1 person
Hi Erich.
I’m trying to make a setup as yours, but using the LPCXpresso55S06 board. I’m getting the following error all the time:
Description Resource Path Location Type
undefined reference to `__gcov_flush’ gcov_support.c /CEC_FW_POC_LPC55S06_GCOV_led_blinky/gcov line 69 C/C++ Problem
I’m using the NewLib(semihost), with the SDK 2.14.0 and MCUXpresso 11.8.0. I tried with the SDK 2.10.0, but without success. Do you have any clue about whats happening?
Thanks for your help.
LikeLike
Hi Andre,
From GCC11 on, you have to use __gcov_dump() intead of __gcov_flush(). I have updated the article about this, thanks for reporting!
Erich
LikeLiked by 1 person
Hi Erich.
Thanks for your reply. I tried this, and now I’m not getting compilation errors, but the gcda files are not being generated when I execute the code. I checked that the semihost is working with the gcov_check function.
Thanks for your help.
LikeLike
I would have to try it on my side. Maybe something else is missing?
LikeLiked by 1 person
Hi Erich.
I really appreciate if you could try on your side. I will try on my side again and check if something is missing. If I find the problem I will write here on the comments, maybe this could help someone else….
Thanks
LikeLike
Quick update: I did try it with the latest MCUXpresso IDE 11.8.0, and I confirm that the data files are not written. Quickly checking the problem shows that NXP (or ARM?) somehow did not build the libraries with coverage support implemented. Or in other words: looking at the libgcov.a and its code, the coverage functions like __gcov_dump() do nothing and simply return.
LikeLike
Hi Erich, thanks for the update.
I’m going to test the previous versions of the MCUXpresso to see the last version that coverage works. As soon as I have any update I will comment here.
LikeLike
Hi Erich. I tested with the MCUXpresso 11.7.0 and the Jlink Software tools V7.88m and the coverage worked. Thanks a lot for the help and the support.
LikeLike
Hi Andre,
thanks for the confirmation. I tried things on my side too.
I used the libgcov.a from the GNU ARM and replaced the version in
C:\NXP\MCUXpressoIDE_11.8.0_1165\ide\plugins\com.nxp.mcuxpresso.tools.win32_11.8.0.202306131047\tools\lib\gcc\arm-none-eabi\12.2.1\thumb\v7e-m+fp\hard (for an ARM Cortex-4M).
One can clearly see that the original NXP library is only 24 KByte in size, while the ‘good’ one is 251 KByte.
LikeLike
Hi Andre,
I got a 11.7.0 libgcov.a for my M4, but placing that one into the installation did not help: no .gcda files generated.
Not sure why it is working for you?
I got a working one with the xpack toolchain here: https://xpack.github.io/blog/2023/02/05/arm-none-eabi-gcc-v12-2-1-1-2-released/
LikeLike