
This is a new article in my series about using Microsoft Visual Studio Code: After installation, project setup, building, debugging, setting up a kit, IntelliSense and FreeRTOS. This one is about setting up and using the xPack Extension to build cross-platform-multi-tool project with a project manager.

Outline
If you have read the comments and discussions in my previous articles in this series, you might have noticed that it can be daunting and complex to setup projects for Visual Studio Code, especially if they have to be cross-platform with multiple build configurations and have dependencies on different build tools. The xPack C/C++ Managed Build Tools aim to solve that problem. Notice that this Visual Studio Code extension is coming from Liviu Ionescu who already contributed de-facto standard cross platform plugins for Eclipse which is now Eclipse Embedded CDT.
Installation
The extension is available from https://marketplace.visualstudio.com/items?itemName=ilg-vscode.xpack and can be installed from there.
Or use the following in a terminal to install it from the command line:
code --install-extension ilg-vscode.xpackAdditionally you need to install the xpm project manager. It is basically an extended version of npm and uses the same package format. Very likely you don’t have npm for which you need to install node.js. See https://xpack.github.io/install/ how to install it, or go directly to https://nodejs.org and install it from there.

With node.js installed and npm available, install xpm from the command line:
npm install --global xpm@latestIf you have Visual Studio Code open: make sure to restart it, otherwise xpm or npm is not known to VSC.
Creating Hello World Project
There is a tutorial available on https://xpack.github.io/vscode/quick-start/ which I recommend to follow. Here are only the quick steps:
- Use the command palette: xPack: Create a Hello World project
- Create/slect the folder where to create the project
- Use/follow the wizard in the Terminal view to specify kind of project (c, cpp) and build system (cmake, meson, autotools) and tool chain (gcc, system)
If you get a message in the console as the one below:
xpm : File C:\Users\...\AppData\Roaming\npm\xpm.ps1 cannot be loaded because running scripts is disabled on this system. For more information, see about_Execution_Policies at
https:/go.microsoft.com/fwlink/?LinkID=135170.
At line:1 char:1
+ xpm init --template @xpack/hello-world-template@latest --property lan ...
+ ~~~
    + CategoryInfo          : SecurityError: (:) [], PSSecurityException
    + FullyQualifiedErrorId : UnauthorizedAccess
The terminal process "C:\WINDOWS\System32\WindowsPowerShell\v1.0\powershell.exe -Command xpm init --template @xpack/hello-world-template@latest --property language=cpp" terminated with exit code: 1.
Consult the listed Microsoft article and for example lift the policy with
Set-ExecutionPolicy -ExecutionPolicy Bypass -Scope CurrentUser💡 Ideally I would allow only signed scripts, but as the scripts are not signed, I have to bypass the security settings here 😦
With this, the project creation should be without issues:

xPack Actions
You will notice that the project contains a file package.json which configures a set of xPack Actions:

There are actions to install tools (ninja, cmake, …) which is very convenient.
Notice that the project has two configurations: Debug and Release. A tooltip informs about the action:

Press the ‘play’ icon next to it to run the action:
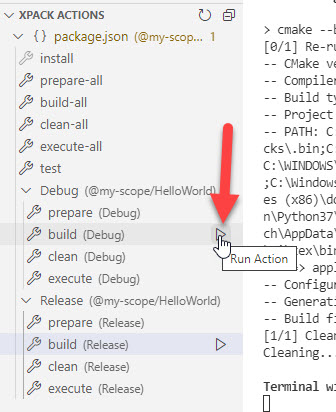
The xPack actions makes it really easy to configure and execute build (and beyond) tasks.
Dependencies
A key aspect of xPack are dependencies: each project contains the package.json which lists the dependencies including the necessary development tools:

Using the xPack install action they get automatically installed:

This means that each project has a well defined toolchain associated and can be fetched and installed as such if not present. The xPacks get installed on my machine into
C:\Users\<user>\AppData\Roaming\xPacksand all the development tools into
C:\Users\<user>\AppData\Roaming\xPacks\@xpack-dev-toolsCustom or from scratch
With the above steps I have a ‘hello world’ project for example running on the host machine, using the host GNU tool chain. Here are the steps to create a project for an ARM Cortex with a cross-toolchain.
First, use the Command Palette to create an xPack empty project:
Follow the steps in the Terminal Wizard to have the project created.
In the package.json I specify this as devDependency:
💡 according to Liviu, manually editing the package.json for adding or removing dependencies should be avoided: instead he recommends to use ‘xpm install’ or ‘xpm uninstall’ in the project folder as below.
"devDependencies": {
    "@xpack-dev-tools/arm-none-eabi-gcc": "10.2.1-1.1.2",
    "@xpack-dev-tools/cmake": "3.19.8-1.1",
    "@xpack-dev-tools/ninja-build": "1.10.2-3.1"
  },
💡 UPDATE: this issue is fixed with xPack v0.4.16 or later.
With xpm v0.10.6 it might require to restart the IDE. This has been reported and is most likely fixed in a new version.
Run the xPack ‘install’ action. You can manually install the latests arm-none-eabi tools with the following:
xpm install @xpack-dev-tools/arm-none-eabi-gcc@latest
For the example of the arm-none-eabi-gcc 10.2.1 it gets installed here:
C:\Users\<user>\AppData\Roaming\xPacks\@xpack-dev-tools\arm-none-eabi-gcc\10.2.1-1.1.2Now I can run the ‘prepare’, ‘build’, ‘clean’ and other xPack actions on the project and it will use the arm-none-eabi toolchain I have specified.
It is possible to run xpm commands in the terminal directly too. Execute it in the project root folder:
xpm run prepare --config Debug
The project settings (using cmake) are inside the ‘meta’ subfolder of the project. Here you can add extra source files or change the compiler options as needed.
Summary
Building more complex projects can be daunting with Visual Studio Code. The xPack extension makes things easier, especially with its concept of tool chain packaging and xPack actions. Still it is a long way towards the same simple and easy user experience which exists with Eclipse and its auto-build system. What is great inside Visual Studio Code is the usage of command line commands, so you can use the GUI but you don’t have to. I expect that the xPack approach and extension will be growing over time, and that approach might be the right one for the more complex and cross-multi-platform projects.
Happy xPacking 🙂
Links
- Visual Studio Code for C/C++ with ARM Cortex-M: Part 1 – Installation
- Visual Studio Code for C/C++ with ARM Cortex-M: Part 2 – Project
- Visual Studio Code for C/C++ with ARM Cortex-M: Part 3 – Build
- Visual Studio Code for C/C++ with ARM Cortex-M: Part 4 – Debug
- Visual Studio Code for C/C++ with ARM Cortex-M: Part 5 – ToolKit
- Visual Studio Code for C/C++ with ARM Cortex-M: Part 6 – IntelliSense
- Visual Studio Code for C/C++ with ARM Cortex-M: Part 7 – FreeRTOS
- Visual Studio Code website: https://code.visualstudio.com/
- xPack C/C++ VSC extension: https://marketplace.visualstudio.com/items?itemName=ilg-vscode.xpack
- xpm, the xPack project manager: https://www.npmjs.com/package/xpm
- Examples on GitHub: https://github.com/ErichStyger/mcuoneclipse/tree/master/Examples/VisualStudioCode

Thanks for the useful article, Erich.
LikeLiked by 1 person
Hey Erich,
Great article as always.
LikeLiked by 1 person
thank you!
LikeLike
I’m a bit surprised about the annoyance with the PowerShell execution policy, since I never encountered it; probably you explicitly set PowerShell as the default shell, or this is the new default on recent Windows versions (sorry if this makes little sense, my Windows experience is quite limited).
Anyway, the issue is not specific to xpm, it affects all node.js command line applications, including npm, which are all ECMAscript/JavaScript applications. No other platform I know prevents them to run, only Microsoft seems to take this restrictive path.
LikeLiked by 2 people
I have not changed anything, and PS is not the default in the system, but VSC offers this as the default inside the IDE. VSC recently raised the bar about security too, asking several things about ‘do you trust these files’ etc. In general this is a good thing, even if annoying.
LikeLiked by 1 person
Pingback: Visual Studio Code for C/C++ with ARM Cortex-M: Part 9 – RTT | MCU on Eclipse
Pingback: Visual Studio Code for C/C++ with ARM Cortex-M: Part 10 – Assembly Stepping | MCU on Eclipse
Hi,
Thanks a lot for this article series and it is extremely helpful. But I kind of go back and forth between VS code and MCU xpresso (for configuring Pins, peripherals , clocks and Target debugging etc.)
So I use the cmake build for testing the business logic with native Linux and Test cases with it but I also need to call the CMake from the Mcu xpresso. (probably with shell script or modifying the Build settiings from Mcuxpresso?)
Like Project-> build –
instead of built-in External builder with and NXP tool chain managed build I want to use the same CMake.
I tried playing around with the C/C++ Build settings but I could not find a way to do so.
Any hints on how can i do this?
Regards,
Vivek
LikeLike
Hi Vivek,
I experimented with native CMake support in Eclipse a year from now, and at this time it was not really solid. Did not check the latest release for this. I wanted to do the same as you: using cmake with auto-build. I ended up calling CMake directly from the builder settings and managing my CMakeList.txt manually. For example I’m doing this for my ESP32 projects that way. I hope this helps.
LikeLike