
This is the second part of series or articles how to use the Microsoft Visual Studio Code for embedded development on ARM Cortex-M. In this part I’m going to show how to create and build a project using CMake running Make or Ninja as build system.

Outline
In Part 1 we have installed the necessary tools, so make sure you have completed that part. Part 2 is about creating a very simple C project. The goal is is to create something simple and easy you can use for your own projects. It is about using the most essential tools to do the job, without the need for other ‘frameworks’ unless you really want them. It is about creating a main file, adding a startup code and build it as a project.
I’m not going to use ‘fancy’ wizards or frameworks, I’m just using the base tools for a reason: to keep things simple.
Don’t worry: it is easy. And all the files used/created here are on GitHub: https://github.com/ErichStyger/mcuoneclipse/tree/master/Examples/VisualStudioCode
SDK
Beside of the compiler/linker/debugger you need some minimal files to build a project:
- Main: a file with the application main entry point (main()).
- Startup code: this gets executed out of reset, initializes the system, memory, library and jumps to main().
- System: In a CMSIS environment, the startup code calls a system initialization callback (SystemInit() to set clocks, configure watchdog, …). In addition it provides header files for the memory mapped device registers and peripherals like I2C, SPI, …
- Linker File: this defines the memory mapping plus how the application shall be linked together
Item one is something you easily can write yourself. The other items you can get from examples (e.g. from my GitHub) or from the SDK/examples provided by the vendor of your silicon device, e.g. NXP.
NXP provides all the needed files in the MCUXpresso SDK. Make sure you have the SDK for the GNU gcc:

The advantage of using such an SDK is that you have the freedom of choice and complete control, without the ‘lock-in’ into custom frameworks and dependencies from the beginning.
Colors? Colors!
Before I forget: Something very easy to start with: here is where you can change the color theme in Visual Studio Code to whatever you like:

Workspace and Project(s)
Similar to other IDEs, VSC is using the concept of a ‘workspace’. In simple words, a workspace is a collection of Folders open in the IDE. See https://code.visualstudio.com/docs/editor/workspaces for more details. In the most simple case a workspace just contains a folder which is the folder for the project. So all what we need is a add a folder.

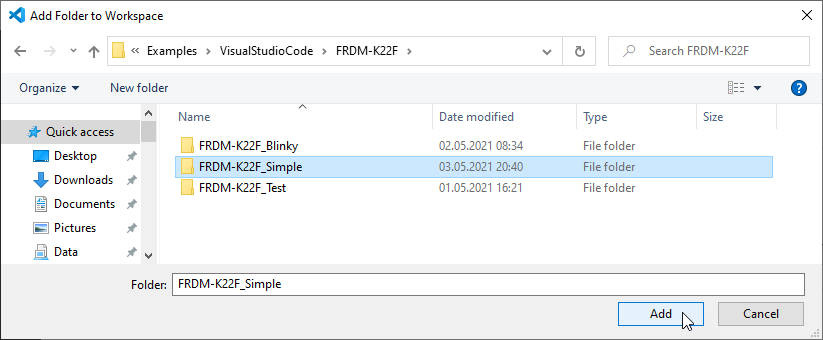
Use File > Add Folder to Workspace …

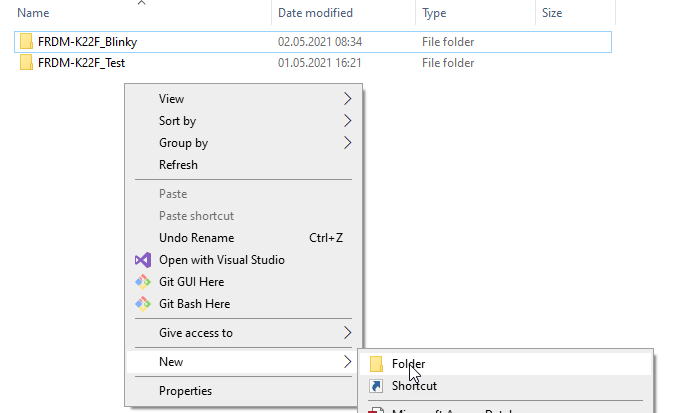
Browse to an existing new (empty) folder or simply create one from the dialog:
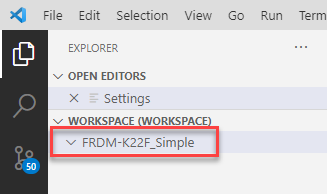
Below I have created a new ‘FRDM-K22F_Simple’ folder and then add it:
This folder now shows up in the workspace:
Main
Add a new file: main.c

Implement the main function, then save it (CTRL+S):

Folders
I recommend to organize files in folders.

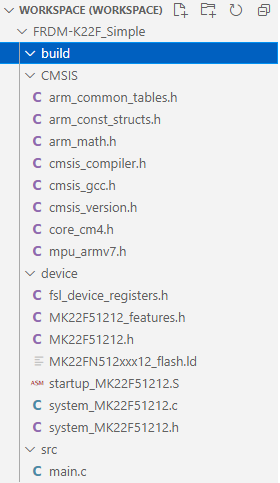
It is really up to you how you organize the files. My preferred ‘standard’ organization is using the following folders:
- CMSIS: contains the ARM CMSIS header files
- device: device specific header files, system initialization, startup code and linker file
- src: application source files including main file
- build: Scratch, holds all the generated build files, object files and executable. Everything in this folder can be disposed/deleted/cleaned as it built from the sources.
Again, it is up to you. For the rest of the article I’m going to use that structure.

Startup, System and Linker files
From the SDK copy the system, startup and linker files to the project folder.
The next steps are about compiling and linking.
Toolchain CMake File
I’m going to use CMake with Make to build the project. CMake needs some information where to find the tools. A simple and easy way is to to add a the following file to the project. I have named it arm-none-eabi-gcc.cmake and placed it in the project root folder. Below is a template as well on GitHub.
set(CMAKE_SYSTEM_NAME Generic)
set(CMAKE_SYSTEM_PROCESSOR ARM)

set(ARM_TOOLCHAIN_DIR "C:/Program Files (x86)/GNU Arm Embedded Toolchain/10 2020-q4-major/bin")
set(BINUTILS_PATH ${ARM_TOOLCHAIN_DIR})

set(TOOLCHAIN_PREFIX ${ARM_TOOLCHAIN_DIR}/arm-none-eabi-)

set(CMAKE_TRY_COMPILE_TARGET_TYPE STATIC_LIBRARY)

set(CMAKE_C_COMPILER "${TOOLCHAIN_PREFIX}gcc.exe")
set(CMAKE_ASM_COMPILER ${CMAKE_C_COMPILER})
set(CMAKE_CXX_COMPILER "${TOOLCHAIN_PREFIX}g++.exe")

set(CMAKE_OBJCOPY ${TOOLCHAIN_PREFIX}objcopy CACHE INTERNAL "objcopy tool")
set(CMAKE_SIZE_UTIL ${TOOLCHAIN_PREFIX}size CACHE INTERNAL "size tool")

set(CMAKE_FIND_ROOT_PATH ${BINUTILS_PATH})
set(CMAKE_FIND_ROOT_PATH_MODE_PROGRAM NEVER)
set(CMAKE_FIND_ROOT_PATH_MODE_LIBRARY ONLY)
set(CMAKE_FIND_ROOT_PATH_MODE_INCLUDE ONLY)
ARM_TOOLCHAIN_DIR specifies the compiler to be used (I have multiple versions of the toolchain installed on my system, update it to match your version).
Additionally it defines extra tools as size and objcopy.

Note: the above and this article has simplicity in mind, and as you can see there is an absolute path to the toolchain present in there. There are other more sophisticated ways to do this, starting with a ‘cmake’ folder with more advanced or portable cmake scripts. There are other dedicated extensions like https://marketplace.visualstudio.com/items?itemName=ilg-vscode.xpack which can help you with this.
CMake CMakeLists.txt
To tell CMake what to do, create a file name CMakeList.txt in the project root. Below is a template for it as well on GitHub.
cmake_minimum_required(VERSION 3.15.3)

# Optional: print out extra messages to see what is going on. Comment it to have less verbose messages
set(CMAKE_VERBOSE_MAKEFILE ON)

# Path to toolchain file. This one has to be before 'project()' below
set(CMAKE_TOOLCHAIN_FILE ${CMAKE_SOURCE_DIR}/arm-none-eabi-gcc.cmake)

# Setup project, output and linker file
project(FRDM-K22F_Simple)
set(EXECUTABLE ${PROJECT_NAME}.elf)
set(LINKER_FILE ${CMAKE_SOURCE_DIR}/device/MK22FN512xxx12_flash.ld)

enable_language(C ASM)
set(CMAKE_C_STANDARD 99)
set(CMAKE_C_STANDARD_REQUIRED ON)
set(CMAKE_C_EXTENSIONS OFF)

# Optional: issue a message to be sure it uses the correct toolchain file.
message(STATUS "CMAKE_TOOLCHAIN_FILE is: ${CMAKE_TOOLCHAIN_FILE}")

# List of source files
set(SRC_FILES
        src/main.c
        device/startup_MK22F51212.S
        device/system_MK22F51212.c
        )

# Build the executable based on the source files
add_executable(${EXECUTABLE} ${SRC_FILES})

# List of compiler defines, prefix with -D compiler option
target_compile_definitions(${EXECUTABLE} PRIVATE
        -DCPU_MK22FN512VLH12
        -DCPU_MK22FN512VLH12_cm4
        )

# List of includ directories
target_include_directories(${EXECUTABLE} PRIVATE
        src
        device
        CMSIS
        )

# Compiler options
target_compile_options(${EXECUTABLE} PRIVATE
        -mcpu=cortex-m4
        -mthumb
        -mfpu=fpv4-sp-d16
        -mfloat-abi=hard

        -fdata-sections
        -ffunction-sections

        -Wall
        -O0
        -g3
        )

# Linker options
target_link_options(${EXECUTABLE} PRIVATE
        -T${LINKER_FILE}
        -mcpu=cortex-m4
        -mthumb
        -mfpu=fpv4-sp-d16
        -mfloat-abi=hard
        -specs=nano.specs
        -lc
        -lm
        -lnosys
        -Wl,-Map=${PROJECT_NAME}.map,--cref
        -Wl,--gc-sections
        -Xlinker -print-memory-usage -Xlinker
        )

# Optional: Print executable size as part of the post build process
add_custom_command(TARGET ${EXECUTABLE}
        POST_BUILD
        COMMAND ${CMAKE_SIZE_UTIL} ${EXECUTABLE})

# Optional: Create hex, bin and S-Record files after the build
add_custom_command(TARGET ${EXECUTABLE}
        POST_BUILD
        COMMAND ${CMAKE_OBJCOPY} -O srec --srec-len=64 ${EXECUTABLE} ${PROJECT_NAME}.s19
        COMMAND ${CMAKE_OBJCOPY} -O ihex ${EXECUTABLE} ${PROJECT_NAME}.hex
        COMMAND ${CMAKE_OBJCOPY} -O binary ${EXECUTABLE} ${PROJECT_NAME}.bin)
The most important sections/entries are:
- project(<your project name here>): Give your project a name
- set(LINKER_FILE <your linker file here>): specify the linker file name
- set(SRC_FILES <your source files here>): list of source files to compile
- target_compile_definitions(${EXECUTABLE} PRIVATE <compiler defines here>): list of compiler #defines
- target_include_directories(${EXECUTABLE} PRIVATE <list of include dir>): list of include directories
- target_compile_options(${EXECUTABLE} PRIVATE <compiler options>): list of compiler options
- target_link_options(${EXECUTABLE} PRIVATE <linker options>): list of linker options
This completes setting up the configuration for the build.

Configure
Next we are going to build it. Actually we need to ‘configure’ it first. With CMake it is a two stage process: running CMake to create (or configure) the make or ninja files and then I use ‘make’ or ‘ninja’ to build it.
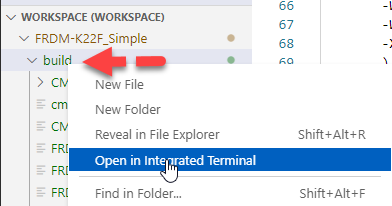
Open a terminal in the build output folder:
If using make: call CMake to generate the make files:
cmake -DCMAKE_MAKE_PROGRAM="make.exe" -G "Unix Makefiles" ..
then build it with:
make

If using ninja: call CMake with the following command line:
cmake -DCMAKE_MAKE_PROGRAM="ninja.exe" -G "Ninja" ..
then build it with:
ninja

An easy way to switch between the two build systems or to start from scratch is to delete the content of the ‘build’ folder. And yes: Ninja is much faster 🙂
Building
Instead calling ‘make’ or ‘ninja’ inside the build folder there following can be used which does the one or the other:
cmake --build .
The advantage of doing it this way is that if there has been a change in the CMakeList.txt it will run a configuration step first too. But it won’t catch a change in the toolchain definition file, but that one should not change frequently anyway.
If doing changes in the structure: make sure you do a configure to make sure things are correctly set up.
Cleaning
A ‘clean-clean’ is to delete all the files inside the build folder. But CMake has a ‘clean’ command too:
cmake --build . --target clean
To do a ‘clean followed by a build’ use the following:
cmake --build . --clean-first
Summary
With this we have set up a project with Visual Studio Code using CMake to build a project for an ARM Cortex using GNU tools. The (maybe shocking?) truth is: Visual Studio Code is here just the editor, nothing else. So you can do the same just with any Editor or IDE you like: imho this is one of the things I like with VSC: it is an assistant and helper and does not enforce me how to do things. The same way you have the freedom to do things the way you like it.
In the next article I’ll show how you could use VSC infrastructure if you don’t want to use the command line not any more.
Happy Building 🙂
LInks
- Visual Studio Code for C/C++ with ARM Cortex-M: Part 1
- Visual Studio Code for C/C++ with ARM Cortex-M: Part 2
- Visual Studio Code for C/C++ with ARM Cortex-M: Part 3
- Visual Studio Code for C/C++ with ARM Cortex-M: Part 4
- Visual Studio Code for C/C++ with ARM Cortex-M: Part 5
- Visual Studio Code for C/C++ with ARM Cortex-M: Part 6
- Visual Studio Code website: https://code.visual
- Template and example files on GitHub: https://github.com/ErichStyger/mcuoneclipse/tree/master/Examples/VisualStudioCode

How can you work with two build folders, like Debug/Release?
LikeLiked by 1 person
just create the folders and call cmake with either -DCMAKE_BUILD_TYPE=Release or -DCMAKE_BUILD_TYPE=Debug
LikeLiked by 1 person
furthermore you can also configure this for usage in vscode. so you select the build type there and the build will happen in the correct folder
LikeLiked by 1 person
see also https://gist.github.com/bearsh/75251a7cb2926ea5f58f6fad5073b3a2
LikeLiked by 1 person
Yes, you can do this, but it is not simple.
The **xPack C/C++ Managed Build Tools** extension makes things a bit easier:
– https://marketplace.visualstudio.com/items?itemName=ilg-vscode.xpack
And you can use exactly the same commands on all platforms and in CLI environments, like CI.
LikeLiked by 1 person
For running the actual build, instead of calling ninja directly, a more portable way is to invoke cmake –build.
LikeLiked by 2 people
Yes, indeed, I make an update (old habits never die)
LikeLike
So for build you have `cmake –build ` and for clean you have `cmake –build –target clean`.
In this way the build and clean commands remain the same, regardless of the actual builder, which need to be specified only in the setup step.
Another detail, it is recommended to always precede the actual build by the setup step, to catch changes in the project structure. Recent versions of cmake tried to automate this with some tricks in the ninja.build files, but it is still better to do it explicitly. Due to the cache, it is quite fast, so the overhead is minimal.
Doing so, you no longer have to add all individual source files to the build, you can safely use the GLOB function to recursively add all source files present in a folder, like in Eclipse, and the build adapts automatically to the new content.
LikeLiked by 1 person
Thanks again for the build (and clean) suggestions, I wanted to add this later on, but I think it makes sense to have it in this article, so I have added it.
LikeLike
Thoughts on using CMakePresets with that approach?
LikeLiked by 1 person
No thoughts yet, because that (https://cmake.org/cmake/help/latest/manual/cmake-presets.7.html) is a new area for me, but it definitely looks promising 🙂
LikeLike
Great! And shocking indeed!🤪
I look forward to the next article.
What advantages does ninja have over make?
LikeLiked by 1 person
It is faster and has no problems with names containing spaces.
LikeLiked by 2 people
I’m using make for most of my projects. I have used ninja for my development with Tensilica cores and it worked well over there, and in general ninja works really well for me. As said: the biggest advantage is that it is really fast (this is for what it has been built for), especially for larger projects. Spaces are indeed a problem for many tools not only make, so it always a good advise not to use any. I would say it is only partially a fault of make, but as well a mistake on the side of developers not properly double-quote paths. But even with systems using ninja you could run into ‘path with spaces’ problems. The other challenge I frequently run into are paths with Umlaut or other non-7bit-ASCII characters, so this something to watch out too.
LikeLike
I took me quite some efforts to fix the Eclipse CDT managed builder to work with spaces (that was long time ago), and, on my Mac, all projects are located in a folder called `My Projects`, so my Eclipse builds run happily in folders with spaces.
But I’m still migrating away from make to ninja, for new projects it makes little sense to stick with make.
LikeLiked by 1 person
Yes, agreed. I feel ninja is the way to go. The make concept is fine, but having different variants (gnu make, mingw make, …) makes it a pain, plus that it can be all kind of cross-platform issues too. It will be take for me a while too to fully adopt ninja, and probably the make based projects will last for a long time because of legacy reasons.
LikeLike
Yes, old projects will probably remain with make for a while, but otherwise, when using modern build system generators, like CMake/meson/xPack, the actual builder is only a parameter in the configure step. Not to mention that meson does not even support make.
LikeLike
The arm-none-eabi-gcc.cmake file is specific to Windows and, even worse, it contains absolute paths to your particular machine, which makes the project non portable to other machines or other platforms.
LikeLiked by 1 person
Yes, it is (for simplicity) and to avoid having it present in the Windows PATH (which would be worse). There are for sure other ways. It would make sense if the GNU ARM Compiler would come with a Cmake toolchain definition (or kit?) so that one could be used. Maybe I just missed it.
LikeLiked by 1 person
There is a toolchain file in NXP SDKs under tools/cmake_toolchain_files that you can use instead of creating your own. It uses an environment variable ARMGCC_DIR that you have to set. I believe you’ll soon be able to set env vars in settings.json for VSCode.
LikeLiked by 1 person
Thanks for the pointer to the toolchain files inside the SDK! I saw them a long time ago, but forgotten about them. I think I could use some of the ideas in there, so this is really good. And I think I know now why I even did not try them, because the instructions ask to use MingGW and to set a global environment variable which I really want to avoid at any price: I see numerous issues in labs and with student machines because of this. Having a way to set an environment in a settings.json would be great, indeed!
LikeLike
Pingback: Visual Studio Code for C/C++ with ARM Cortex-M: Part 1 | MCU on Eclipse
Pingback: Visual Studio Code for C/C++ with ARM Cortex-M: Part 3 | MCU on Eclipse
Pingback: Visual Studio Code for C/C++ with ARM Cortex-M: Part 4 | MCU on Eclipse
Pingback: Visual Studio Code for C/C++ with ARM Cortex-M: Part 5 | MCU on Eclipse
Pingback: Visual Studio Code for C/C++ with ARM Cortex-M: Part 6 | MCU on Eclipse
Pingback: Visual Studio Code for C/C++ with ARM Cortex-M: Part 7 – FreeRTOS | MCU on Eclipse
Since long time I’ve been trying a way to migrate from CodeWarrior to Visual Studio Code and finally I have found this interesting article!
I’m developing on Kinetis KL14 microcontrollers and I have tried to configure “arm-none-eabi-gcc.make” and “CMakeList.txt” files as you reported, when I launch “make” command, executable files are more lighter than the correspective generated by CodeWarrior.
Is there a way to get the exactly compiler/linker definitions from CodeWarrior? (e.g. project properties or build generated files)
LikeLiked by 1 person
Hi Daniele,
I’m happy to hear that you have found my blog :-). As for getting the command line arguments: if you are using CodeWarrior for MCU10 or later, then have a look at the Console view which shows the compiler (and linker) command line.
I hope this helps,
Erich
LikeLike
Hi Erich, I’ve took a look at the Console View (I am using Code Warrior for MCU 11.1) and I have found commands such as post-build command (for SREC/HEX/BIN file generation) but I haven’t found any command of compiler/linker with the options string. Consol View shows command description (e.g. ‘Invoking: ARM Ltd Windows GCC C Linker’) but not the relative options (e.g. “-mcpu=cortex-m0 -mthumb -mfloat-abi=soft…”). Maybe there is a way to enable this kind of information, is it right?
I think I missing something because if I try to print out the code size how you explained in a older post (https://mcuoneclipse.com/2012/09/24/code-size-information-with-gcc-for-armkinetis/) with Visual Code Studio “text” field has zero size.
After “make” command, a warning appear: “cannot find entry symbol __thumb_startup; defaulting to 00000800” (“__thumb_startup” is defined in “__arm_start.c” in Sturtup_Code directory previously included into the list of included directory). May it be the cause of “text” field zero size?
Thank you so much for your help.
LikeLiked by 1 person
Hi Daniele,
for the command line options: you should see in the console that the compiler is using something like this:
>>’Invoking: ARM Ltd Windows GCC C Compiler’
“C:/NXP/CW MCU v11.1/Cross_Tools/arm-none-eabi-gcc-4_7_3/bin/arm-none-eabi-gcc” “../Sources/ProcessorExpert.c” @”Sources/ProcessorExpert.args” -Wa,-adhlns=”Sources/ProcessorExpert.o.lst” -MMD -MP -MF”Sources/ProcessorExpert.d” -o”Sources/ProcessorExpert.o”
The build is using external argument files (@”…args”) so check these files.
LikeLike
Hi Daniele,
for the startup file: you say you listed the directory. But did you list the source file? You need to specify the list of source files to be compiled.
If you are not sure if the file gets compiled: enter an error in it and you should see a build error showing up.
LikeLike
A minor issue, but your “In the next article” link doesn’t link to part 3 — it actually links back to this article. 🙂
LikeLiked by 1 person
Thanks for reporting, link is fixed now.
LikeLike
Pingback: Visual Studio Code for C/C++ with ARM Cortex-M: Part 8 – xPack C/C++ Managed Build Tools | MCU on Eclipse
You wrote:
cmake –build .
The advantage of doing it this way is that if there has been a change in the CMakeList.txt it will run a configuration step first too.
I’m not an expert but my understanding is that ninja or make will have the same effect. I guess the advantage of ‘cmake –build’ is that it is ambivalent of the build tool.
LikeLiked by 1 person
I’m not a cmake expert neither (cmake is so much more complex than make, but well, it is portable, so I guess I have to deal with it). And yes, the main advantage is that you don’t need to care if make or ninja is the underlying build mechanism. I still think you would have to run an extra clean or configuration step if the CMakeList.txt is changed, but I might be wrong.
LikeLike
Hi,
I have a project developed with MCUxpresso, but I want to manually build above way using Cmake for managing test Program and building firmware.
I just modified the generated linker script but it gives an error on finding “libcr_newlib_semihost.a ”
Although I found out this library on Mcuxpresso install tool path, I am not sure how to use it along with installed new Tool chain (GNU Arm Embedded Toolchain\10 2020-q4-major)
mcu – MK66
FPv4-SP (Hard ABI)
Any idea would be helpful.
Thanks in Advance!
LikeLiked by 1 person
You will need to add the path to the library using the linker option. Unfortunately how the linker finds its libraries is kind of obscure, and especially with custom libraries like the NXP RedLib things get more complex. In a nutshell: what NXP provides is some additional intelligence around config files for the linker, finding the correct libraries for semihosting variants and others. Going with ‘bare’ GNU and another library it means that you need to identify the extra libraries ‘by hand’, I don’t see any other way: just list the needed libs either in in the linker script or on the command line. It won’t be fully compatible with what you have in MCUXpresso IDE.
I hope this helps,
Erich
LikeLiked by 1 person
Pingback: Visual Studio Code for C/C++ with ARM Cortex-M: Part 9 – RTT | MCU on Eclipse
This tutorial is really helpful. But I got this errors after executing the “make” cmd. Can you help me to fix it ?
arm-none-eabi-gcc.exe: error: CMakeFiles/FRDM-K22F_Simple.elf.dir/src/main.c.obj CMakeFiles/FRDM-K22F_Simple.elf.dir/device/startup_MK22F51212.S.obj CMakeFiles/FRDM-K22F_Simple.elf.dir/device/system_MK22F51212.c.obj : No such file or directory
LikeLike
Are you using the project I have shared on GitHub? I checked that one and it works for me. It looks to me you have screwed up the files/paths. Can you compare with my shared project?
LikeLike
Pingback: Visual Studio Code for C/C++ with ARM Cortex-M: Part 10 – Assembly Stepping | MCU on Eclipse
Hi Erich
Thank you for this very helpful article.
We are doing something similiar. We are usig CLion (which is also CMake based) to build such a gcc toolchain based project (it is an Azure RTOS project).
Now we need to change the project from C to C++.
In another nice article (https://mcuoneclipse.com/2020/07/11/from-c-to-c-converting-eclipse-c-projekts/) you describe how to do this in MCUxpresso.
But now in this gcc based project, the startup code is in an assembler file startup_MIMXRT1062.S (like in your project). I think this file is specifically for C, not C++.
What do I need to do here?
Thanks and regards,
Daniel
LikeLiked by 1 person
Yes, most likely our startup_MIMXRT1062.S only deals with C, not C++, and therefore does not call the C++ constructors.
What you can do is simply take for example a C startup code (the startup code does not need to be written in assembler) and just add the C++ hooks as in above article. Other than that you could write things I wrote in C in assembler too, up to you.
LikeLike
Hi Erich
Thank you for your answer.
That is what I tried to do. But the startup_mimxrt1062.c file does not compile (or more exactly link) with the linker script of the gcc toolchain example. I am currently trying to figure out how to fix that.
Regards,
Daniel
LikeLiked by 1 person
Erich,
I have a problem on this page. I have CMake 3.2.4. Ninja latest. Toolchain is ARM GNU GCC 11.3rel1. Using the STM32 example and code I get:
“`
C:\Users\USER\Documents\GIT\VSCE\build>cmake -DCMAKE_MAKE_PROGRAM=”ninja.exe” -G “Ninja” ..
— The C compiler identification is GNU 11.3.1
— The CXX compiler identification is GNU 11.3.1
— Detecting C compiler ABI info
— Detecting C compiler ABI info – failed
— Check for working C compiler: C:/Program Files (x86)/Arm GNU Toolchain arm-none-eabi/11.3 rel1/bin/arm-none-eabi-gcc.exe
— Check for working C compiler: C:/Program Files (x86)/Arm GNU Toolchain arm-none-eabi/11.3 rel1/bin/arm-none-eabi-gcc.exe – broken
CMake Error at C:/Program Files/CMake/share/cmake-3.24/Modules/CMakeTestCCompiler.cmake:69 (message):
The C compiler
“C:/Program Files (x86)/Arm GNU Toolchain arm-none-eabi/11.3 rel1/bin/arm-none-eabi-gcc.exe”
is not able to compile a simple test program.
“`
This annoyed me for most of the morning. I decided to try another site’s example and it worked. The difference was adding this line under the arm-none-eabi-gcc.cmake under set system_name and set system_processor.
`set(CMAKE_TRY_COMPILE_TARGET_TYPE STATIC_LIBRARY)`
With this, everything works. The only difference is I see you are using GNU Embedded and not ARM GNU. I have no idea what the practical difference is.
I’m not sure what else it could be. I don’t even really know what the added line does.
Any ideas?
LikeLiked by 1 person
I think it has something to do with the default compiler linker scripts you have with that ARM GNU toolchain. Usually with CMake you build libraries for each ‘subproject’ or ‘subfolder’, so target has to be a library for these.
The CMAKE_TRY_COMPILE_TARGET_TYPE is present from CMake 3.6 on, see https://cmake.org/cmake/help/latest/variable/CMAKE_TRY_COMPILE_TARGET_TYPE.html
I don’t see why you would need to use it, as for sub-projects the add_library() should manage it, at least for my environment?
LikeLike
With the newer version, you have to provide the cmake command with arguments as follows, otherwise it throws some errors at you (double quotes with each .cmake and .exe file):
cmake -DCMAKE_TOOLCHAIN_FILE=”arm-none-eabi-gcc.cmake” -DCMAKE_MAKE_PROGRAM=”ninja.exe” -G “Ninja” ..
LikeLike
Hi Luke,
what version of CMake do you use? I’m using 3.22.5 and I don’t have to put things into double quotes. But adding them for sure does not hurt, so I’m going to update the article for this.
Thanks!
LikeLike