In “Getting Started with Rust on NXP LPC55S69-EVK” I demonstrated how easy it is to run a ‘blinky’ with Rust. I used the Embassy framework.

In this article, I show how one can create a standalone Rust project for an embedded target.
Continue reading
In “Getting Started with Rust on NXP LPC55S69-EVK” I demonstrated how easy it is to run a ‘blinky’ with Rust. I used the Embassy framework.
In this article, I show how one can create a standalone Rust project for an embedded target.
Continue readingThe Rust Programming Language makes its way into the Linux kernel, and is used for embedded tooling. What about using it for Embedded? In this article, I’ll show how you get started with Rust on the NXP LPC55S69-EVK:
Maybe you are using a multi-core device in your projects, but have not tapped into multi-core usage yet? FreeRTOS V11.0 is out, and the big news is that it has finally Symmetric Multi-Processing (SMP) integrated into the mainline. This greatly simplifies FreeRTOS usage, as I finally can use the same RTOS for my SMP targets and boards, and I can easily switch between single-core and multi-core applications.

I’m using the RS-485 field bus in many of my projects: it is very reliable and robust, and easy to implement. And with ModBus there is standardized protocol used in building automation or industrial control applications. For example I’m using the protocol to communicate between battery systems and an EV Charger.
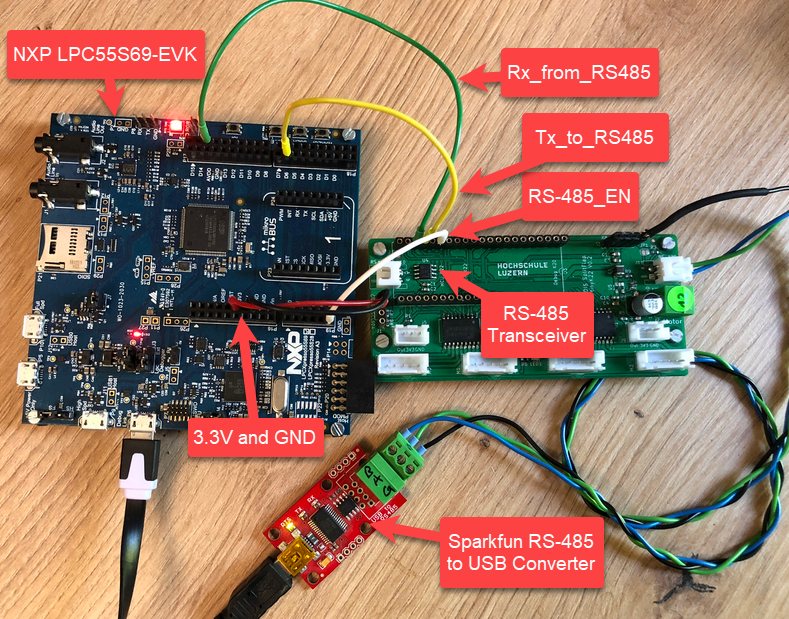
In this article I show you with an example, how the NXP LPC55S69 can be used with RS-485.
Continue readingThe ARM Cortex M architecture has many features which are underused, probably simply because engineers are not aware of it. SWO (Single Wire Output) is a single trace pin of the ARM Cortex-M CoreSight debug block. trace pin uses the ITM (Instruction Trace Macrocell) on ARM Cortex. It provides a serial output channel, at a high speed higher than the usual UART, because it is clocked at half or a quarter of the core clock frequency, depending on the core and implementation.
As such, it is an ideal high speed output channel to send text or data to the host. This is how it is usually used, but what is unknown to many: it can be used in a bidirectional way with the help of the debugger.

The topic of this article: how to redirect standard I/O like printf() or scanf() using the SWO ITM console: means both sending *and* receiving data over the SWO debug channel: that way I can use it as a kind of UART with a single pin only.
Continue readingMCU vendors offer SDKs and configuration tools: that’s a good thing, because that way I can get started quickly and get something up and running ideally in a few minutes. But this gets you into a dependency on tools, SDK and configuration tools too: changing later from one MCU to another can be difficult and time consuming. So why not get started with a ‘bare’ project, using general available tools, just with a basic initialization (clocking, startup code, CMSIS), even with the silicon vendor provided IDE and basic support files?
In this case, I show how you easily can do this with CMake, make and Eclipse, without the (direct) need of an SDK.

While developing applications, it can happen that things go wrong. And in my case I ended up with two LPC55Sxx EVK boards on my desk, which seemed not to be usable any more. The issue: the boards were not accessible with the debug probe, because right after main they muxed the pins in a wrong way :-(.

The standard GDB debug connections (both on-board and off-board) were not able to regain access of the board, because the MCU was running into the fault condition pretty much right out of reset.
Luckily, after a lot of trial-and-error, I have found a way to recover them.
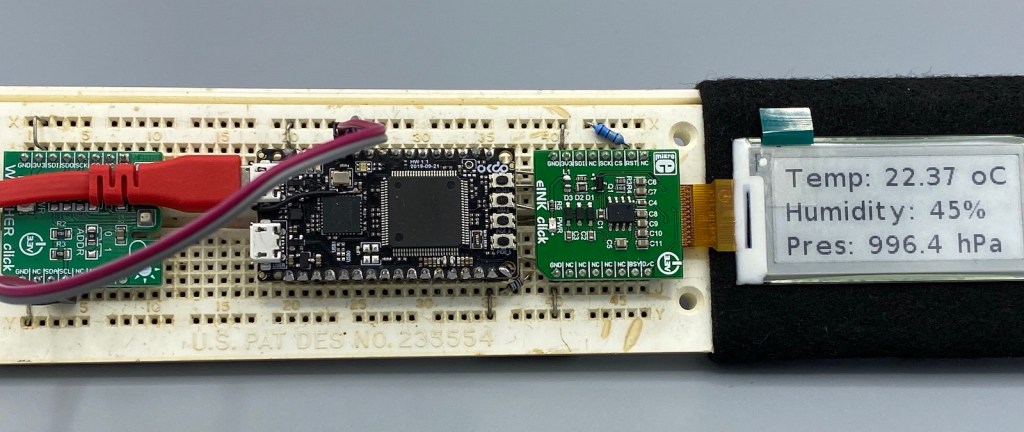
Continue readingI have continued to explore my two hobbies (embedded systems, and Talking About The Weather) during these weeks of lock-down. I have finally got to the point that my Weather Station project can sit on the window shelf of my office, and show me the temperature, humidity and atmospheric pressure on the attached eInk display.

In this blog I’m going to focus on driving that display.
Continue readingIn an earlier tutorial I introduced using I2C with the NXP LPC55S69 on OKdo E1 board to read a Bosch BME280 environmental sensor on a Mikroe Weather Click board. The MCUXpresso Clocks, Pins and Peripheral Config tools were used to get it running. It’s all for my Weather Station project that I’ve been working on during these months of lockdown. It is starting to take shape – as you can see from the photograph:
Now I really need to start reading and writing to the BME280 sensor, and that means using the I2C driver in the lpcxpresso55s69 SDK. And so this week I’ll provide a forensic examination of the most commonly-used I2C function call.
Continue readingI want to share with you a little embedded trick that I use to improve the reliability of my code. And in addition to improving reliability, the technique can be used to schedule any event to occur ‘sometime in the future’. It uses the MicroTick (UTICK) timer found on the NXP LPC55S69 microcontroller, and could be applied to any device with a simple timer.
The MicroTick timer is an elegant, thing of beauty. But there is not a driver example built into the lpcxpresso55s69 SDK, and I believe that the timer is not widely used. That means we need a tutorial!
Continue reading