On-Target Testing with LinkServer Runner and VS Code

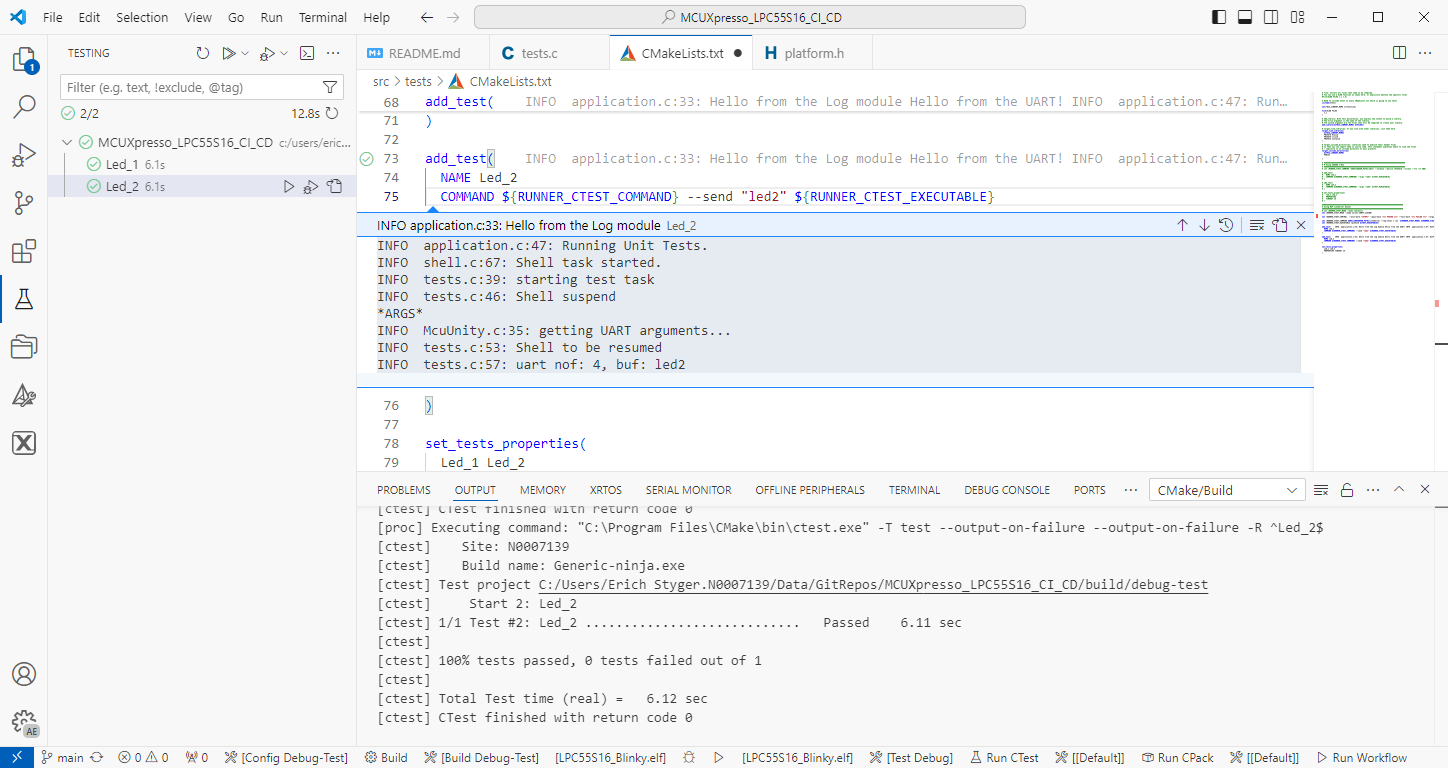
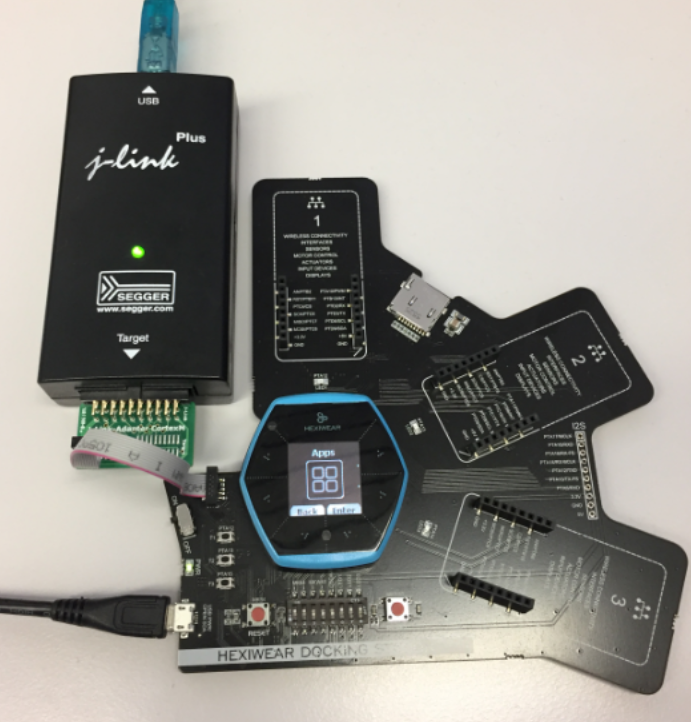
The release 24.9.75 of LinkServer software and tools includes interesting feature: the ability to use the debug probe for automated on-target testing. It includes a ‘runner’ which can program, launch and run the application on the target through a debug probe. While the target is running, it uses semihosting or UART for communication. This makes it a perfect tool for automated testing, especially in a CI/CD environment. One such environment is running automated tests with CMake and CTest in VS Code.

Automated on-target testing with VS Code and LinkServer
Continue reading

NXP LinkServer 24.9.75: New GUI for Flash Programming

NXP has released a new version of the LinkServer software. This is a utility for debugging and using scripting for a wide range of devices and debugging probes. It includes support for the MCU-Link, LPC-Link2, on-board and CMSIS-DAP based debug probes with the ‘LinkFlash’:

Programming with LinkFlash

With the new release, it includes a graphical user interface (GUI) for flash programming. It also includes erasing, verifying, recovery, and saving the memory to a file.

Continue reading

How to Use GNU Coverage (gcov) in a Freestanding Environment for Embedded Systems

The GNU Coverage (gcov) is a source code analysis tool, and is a standard utility in the GNU gcc suite. It works great in a hosted environment (e.g. Linux or Windows), where you have plenty of resources and a file system. But the gcov tools is relevant and usable for restricted embedded systems too. I have used it for years with the help of debug probes and file I/O semihosting. But semihosting does not come for free, depends on a library with support for constructors and destructors, plus relies on file I/O.

Fortunately, there is a way to use gcov without debugger, semihosting, file I/O and special system initialization: using a freestanding environment:

gcov in freestanding environment with embedded target

This article explains how to collect coverage information using a data stream for example over UART or USB-CDC. Key benefits are less code side, no need for a debugger or on-target file system, improved performance, better automation and flexible data collection.

Continue reading

NXP MCU-Link for Rust with probe-rs

The Rust programming language is making its way into the embedded world, and getting more and more popular and not only at the Lucerne University. With Rust, the probe-rs is one of the popular debug choices, as it nicely comes with cargo. On the hardware side, the NXP MCU-Link is $15 debug probe hardware I use for many targets. Why not using the MCU-Link with probe-rs and Rust?

MCU-Link Board Top Side
Continue reading

How to make sure no floating point code is used

Float and double data types area a bad choice for embedded applications. At least in most applications, and can or should be avoided, even with hardware FPU support present.

But how can I be sure that no floating point operations are used?

wrapping float and double runtime routines

This article describes how to configure the GNU toolchain, so that no float or double operations are used, with the example of ARM Cortex-M. What I do? ‘Poisoning’ (!!!) the source code, force the gcc compiler to use software floating point operations and then catch them with the GNU linker :-).

Continue reading

Standalone and Command Line Programmer with MCUXpresso

The MCU-Link is a $10 CMSIS-DAP capable debug probe which works out-of-the box with the MCUXpresso Eclipse based IDE. This is great for development, but how can I programming with the push of a button or a script? The answer is no: there is an easy way to use the debug probe outside Eclipse from a shell script, and you can use that MCU-Link probe to do the job. This is especially useful as with the example below where I have to program 60 boards this week-end :-).

Programming Boards with MCU-Link using command line

Batch Programming Boards with MCU-Link

Continue reading

Flashing and Restoring the Hexiwear Firmware

The Hexiwear device is a great and versatile device with two microcontrollers on it. Developing firmware on a Hexiwear means changing what was originally on it. And sometimes it happens that I’m not sure if the changes are for good. Or that I accidentally destroyed the firmware on the NXP Kinetis KW40 BLE microcontroller :-(. So I had to find a way to restore the original firmware, and this is what this post is about.

Restoring the Hexiwear Firmware with a Segger J-Link

Restoring the Hexiwear Firmware with a Segger J-Link

Continue reading