The MCU-Link-MR is a CMSIS-DAP debug probe for ARM Cortex-M devices with extra features for mobile robot and drone debugging. The project is open source and available on GitHub with KiCAD files and BOM.
I’m using the NXP MCU-Link CMSIS-DAP debug probe in many of my projects. The debub probe from NXP does not come with an enclosure. I’m traveling to work by train, so I designed a new rugged box and enclosure. The box is small and I can keep all parts inside it.
Rugged boxes and enclosure for NXP MCU-Link debug probesContinue reading →
Remote debugging an embedded target is very useful: I don’t need a direct debug probe or USB cable connection. Instead, I’m using a network connection (wired or even wireless) over TCP/IP to talk to the debug probe and target. That way I can place the debug probe and target system away from my desk.
In Remote Debugging with USB based JTAG/SWD Debug Probes I showed how normal USB based debug probes can be used. This approach uses a remote host machine (e.g. desktop machine or notebook). This approach is still expensive, not scalable and the host machine needs a lot of space too.
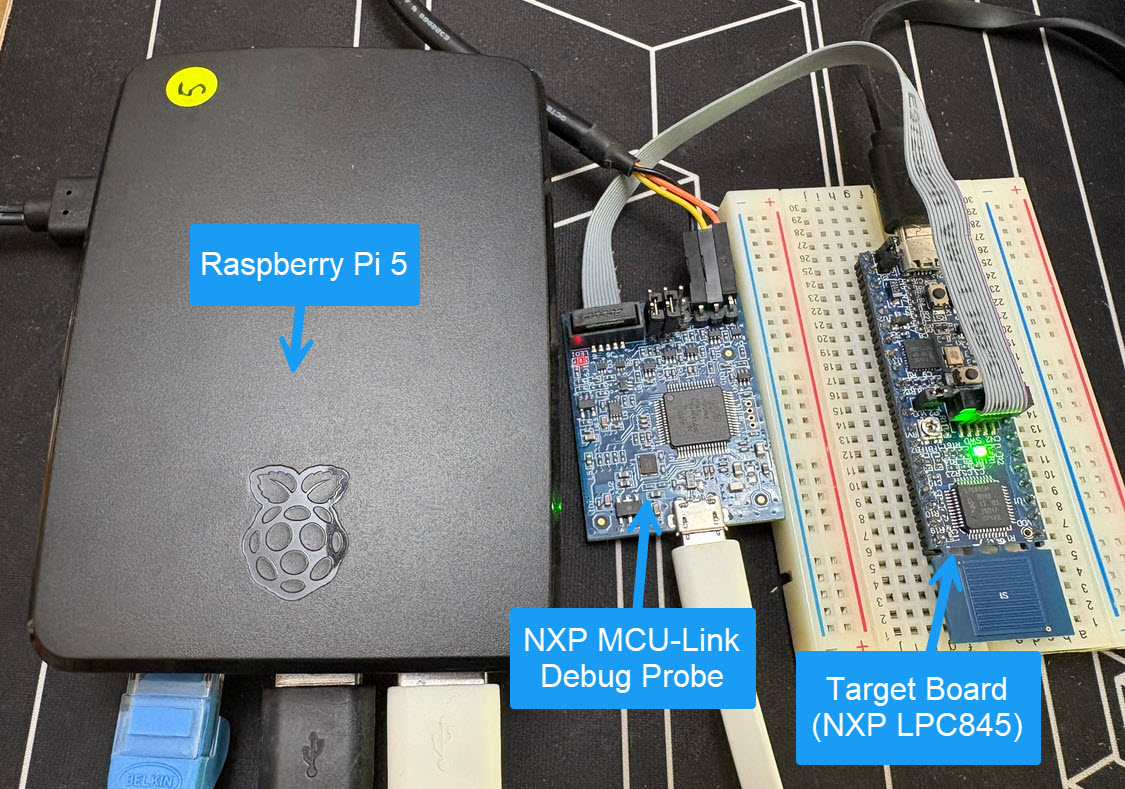
So what if I use a Raspberry Pi instead? The RPi is small, inexpensive and ideal for such a task. Additionally, I can easily use it to build a test or debug farm. In this article, I show the use of the Raspberry Pi for remote debugging. A sub $20 or embedded target debug probe can be employed.
Raspberry Pi with NXP MCU-Link for Embedded Target DebuggingContinue reading →
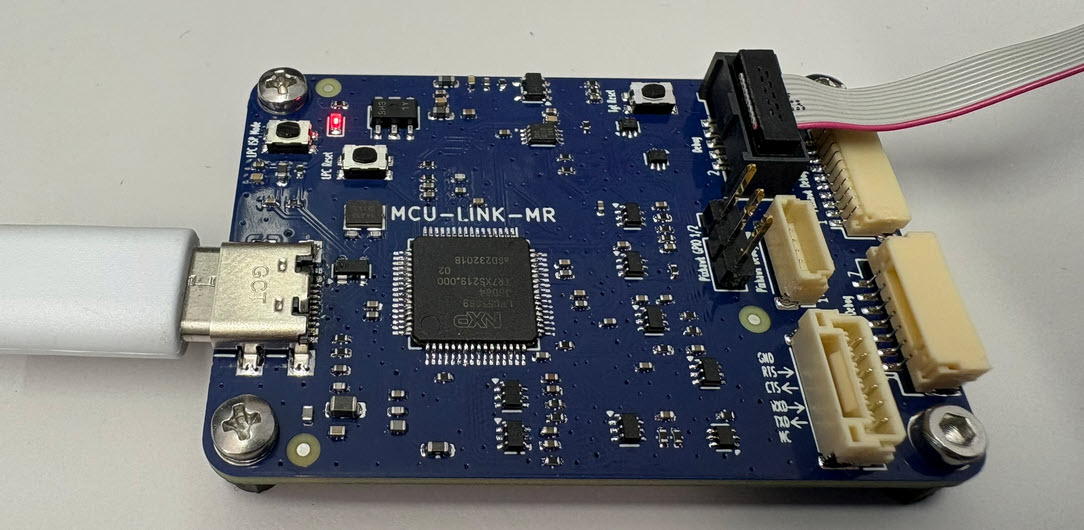
The MCU-Link-MR from NXP is a CMSIS-DAP debug probe. It includes dedicated connection headers found on mobile robotic systems. These systems include the Pixhawk/PX4 drone and robotics hardware.
This week I have received the new PCBs for the MCU-Link MR for drones and robots and have populated the parts on the PCB, and it works fine as UART bridge and debug probe for the PixHawk i.MX RT:
The MCU-Link debug probes are versatile and very useful debug probes from NXP. This article describes how to update the firmware on it, both the ‘traditional’ way with using the ISP jumper, and the new way using a command line script without the need to use a jumper.
Need to debug your robot or drone? In a HSLU university research project I’m using a Pixhawk and PX4 based drone hardware. Pixhawk and PX4 is an open standard for drone hardware and firmware and runs with NuttX RTOS. It is mainly used for drones, but is very capable for any other kind of mobile robots.
With the Pixhawk 6x-RT there is a powerful flight controller, using the NXP i.MX RT1176 dual-core processor. While this and other controller hardware do offer a hardware debug probe, it is not a simple task as there are different pin-outs and connectors, making debugging a mess with different cables and adapters. To simplify this, I have now a unified debug CMSIS-DAP debug probe using the NXP LPC55S69 as processor, with all the different headers and UART adapters included: the MCU-Link-MR (Mobule Robots) debug probe.
The Rust programming language is making its way into the embedded world, and getting more and more popular and not only at the Lucerne University. With Rust, the probe-rs is one of the popular debug choices, as it nicely comes with cargo. On the hardware side, the NXP MCU-Link is $15 debug probe hardware I use for many targets. Why not using the MCU-Link with probe-rs and Rust?
The MCU-Link is a small and inexpensive $10 CMSIS-DAP debug probe from NXP. It can work with OpenOCD, but has better target support using the NXP LinkServer which implements a gdb server. This makes it an ideal combination for scripting or automated testing.