It has been a while since I published my ‘build my own DIY IDE’ (see “DIY Free Toolchain for Kinetis: Part 1 – GNU ARM Build Tools“). I have used that approaches in my classes successfully. Now a new semester is coming up, so time to update the instructions using the latest Eclipse IDE (Mars) and tools (GCC ARM Embedded (launchpad) with GNU ARM Eclipse).
Tag Archives: Building
Tutorial: Using GNU Profiling (gprof) with ARM Cortex-M
I have published a Sneak Preview how GNU gprof profiling looks for an embedded target ARM Cortex-M in an earlier post:

This tutorial explains how to profile an embedded application (no RTOS needed) on ARM Cortex-M devices with GNU gprof. Additionally I explain the inner workings to generate the data necessary for gprof.
Continue readingDebugging STM32F103RB NUCLEO Board with Segger J-Link
The STMicroelectronics STM32F103 (ARM Cortex-M3) Nucleo boards include the on-board ST-Link v2 circuit which allows to debug the board. This circuit is similar to the OpenSDA circuit found on Freescale boards. Unlike the Freescale OpenSDA, the ST-Link is only the ST-Link: it is not possible to load a P&E Multilink or Segger J-Link or firmware on it. Luckily, the ST-Link has a SWD connector, but this connector is a non-standard one. So how can I debug that board with an Eclipse based environment with GNU ARM Eclipse plugins and a Segger J-Link?
GNU Static Stack Usage Analysis
Stack overflows are a big problem: If I see a system crash, the first thing usually is I try to increase the stack size to see if the problem goes away. The GNU linker can check if my global variables fit into RAM. But it cannot know how much stack I need. So how cool would it be to have a way to find out how much stack I need?
And indeed, this is possible with the GNU tools (e.g. I’m using it with the GNU ARM Embedded (launchpad) 4.8 and 4.9 compilers :-). But it seems that this ability is not widely known?
Overview: From Snippets to Code Generation
To build an application for a modern microcontroller today is not a simple thing. Well, it depends what ‘simple’ means. But compared to the ‘old days of 8bit micro controllers’ (which are still in use!) developing for a complex 32bit device is definitely a different thing. Not only the complexity has changed, but as well the breath of tools and helpers. In my view, the only constant is ‘change’, and I have changed the way how to develop several times in my career. In this post I present several different techniques I’m using in my development.
Board Take-Over: Using Segger J-Link to Debug NXP
So NXP has announced that they want to take over Freescale (see this press release). In an earlier post I experimented how Freescale tools could be used in NXP tools, see “Merging NXP LPCXpresso IDE with Freescale Kinetis Design Studio, Processor Expert and Kinetis SDK“. Just for fun, I want to do the acquisition the other way round: Using Freescale (now NXP) software and tools to build and debug the LPC824 from NXP :-).
Sneak Preview: Profiling Bare Metal Microcontroller Applications with GNU gprof
I’m working on a conference paper and presentation, and tonight I had a break-through :-). So how cool is this: Profiling with GNU gprof a bare-metal embedded Cortex-M application (Freescale Kinetis K64F running the Freescale Kinetis SDK) in Eclipse:
Tutorial: Adafruit WS2812B NeoPixels with the Freescale FRDM-K64F Board – Part 4: Timer
This is Part 4 of a Mini Series. In Part 3, I described the software concepts (see “Tutorial: Adafruit WS2812B NeoPixels with the Freescale FRDM-K64F Board – Part 3: Concepts“). In this post I describe how to set-up the timer to trigger later DMA operations. The goal is to drive Adafruit’s NeoPixel (WS2812B) with the Freescale FRDM-K64F board:
Tutorial: Adafruit WS2812B NeoPixels with the Freescale FRDM-K64F Board – Part 2: Software Tools
This is Part 2 of a Mini Series. In Part 1, I described how to set up the hardware (see “Tutorial: Adafruit WS2812B NeoPixels with the Freescale FRDM-K64F Board – Part 1: Hardware“). Now it is time to have the software tools ready. In this post I describe to have the IDE (Freescale Kinetis Design Studio) with the Freescale SDK installed, along with the correct firmware on the FRDM-K64F Board. The goal is to drive Adafruit’s NeoPixel (WS2812B) with the Freescale FRDM-K64F board:
How to use Kinetis Design Studio!!
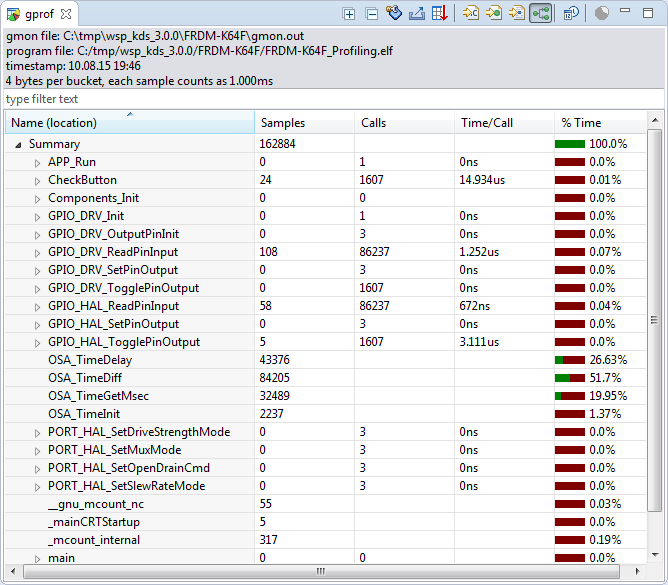
Getting the hands on an embedded project has always been exciting for me. So, here I am again with my blog trying to provide you with an easy to use guide for the Kinetis Design Studio 3.0.0 (KDS_3.0.0). Well, as you all know I am an intern at Freescale working for the first time on KDS, I will tell you what all we can do to start working on it with a perspective of a novice. But personally I feel KDS is one of the most encouraging IDE you can work on. So how do I start with my code for our NeoMatrix board? I am currently working with one of the demo codes for the NeoMatrix:
https://mcuoneclipse.com/2015/07/10/lets-play-with-freescale-frdm-k64f/
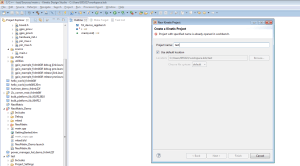
So, my first task is to write the code in KDS for the NeoMatrix_Demo. How do I do that? After opening the KDS 3.0.0, I need to go to File and select New and then Kinetis Project. You can see that the New Kinetis Project wizard appears once you click the File>New> Kinetis Project. Type a name and click next.


