Eclipse has a nice feature to ‘shut up’ dialogs: In many dialogs I can select an option so that dialog does not show up again:
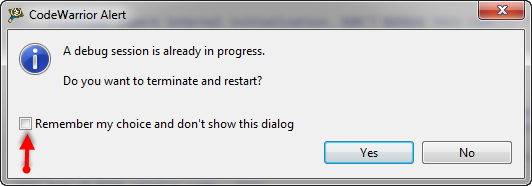
‘Dont’ show Again’ in Dialog
But what if I change my mind later on and what to have this dialog to show up again?
Eclipse has a nice feature to ‘shut up’ dialogs: In many dialogs I can select an option so that dialog does not show up again:
‘Dont’ show Again’ in Dialog
But what if I change my mind later on and what to have this dialog to show up again?
It happens to me many times: I’m stepping with the debugger through my code, and ups! I made one step too far!

Debugging, and made one step over too far
What now? Restart the whole debugging session?
Actually, there is a way to go ‘backwards’ 🙂
Continue reading
“As an engineer, you should ask for the best tools available. Spending money for better tools can make the difference between finding a problem quickly, or wasting days or weeks, and ultimately failing a project.” (unknown)
I had to learn it the hard way: some ‘hard-to-find-problems’ sometimes only can be found with some amount of luck, or with using a good trace solution. CodeWarrior already supports trace, such as using the MTB on the Cortex-M0+. But with this I’m limited to the on-chip trace buffer or on-chip RAM, which is better than nothing. But to solve the real hard problems, a bit of more power and memory is needed. And here where the P&E Tracelink comes into play: with 128 MByte trace buffer it would allow me to record a lot more trace data :-).
I’m using Version Control Systems like Git and SVN on a daily base. Because this gives me the opportunity to revert my changes and go back in time in my project. A VCS is incredible useful as well if I have deleted files or settings: restoring it is just a matter of a few mouse clicks.
But even without using a VCS, Eclipse has a built-in simple version control system: the Local History.

Eclipse History View
I’m recently dealing again with S19 (S-Record) files. I can easily generate S19 files from my ARM .elf files, but what I need is a simple decoder of the file format.
The good thing is: such a decoder is provided with CodeWarrior for MCU10.x 🙂
That capability is built into the Decoder.exe which is delivered with the Freescale S08 (or S12) tool chain, and is located inside the MCU\prog folder:

Decoder.exe inside MCU prog Folder
If you are a frequent reader of this blog, then you know: I’m a big fan of Processor Expert components. While there are many Processor Expert components delivered with CodeWarrior, it lacks many components and device drivers beside of the normal on-chip peripherals. But value gets added to an embedded project with all the external devices, sensors and actuators. That’s why I have created many more components which are available on my GitHub site. Readers of this blog have asked several times to create a tutorial on how to create a Processor Expert component. So why not working on that on a long Easter weekend full of cold rain and snow?
So here we go: a tutorial how to create a Processor Expert component for the MMA8451Q accelerometer found on the FRDM-KL25Z board:

MMA8451Q Accelerometer on the FRDM-KL25Z Board
Many times I have Processor Expert components carefully configured in one project, and then I want to have the same thing in another project. There is actually an easy way to carry out this: to copy components from one project to another.
Using a version control system for software development is a standard procedure today. While things are pretty clear for ‘standard’ Eclipse projects, it is not that easy for Processor Expert projects. I’m using Processor Expert projects with Git and SVN (Subversion). I want to share here tips how to use Processor Expert projects with a version control system. Screenshots and vocabulary are for TortoiseGit and Git, but applicable to any other VCS (Version Control System).

Git Repositories View in Eclipse
If I want a C++ project for my KL25Z Freedom board, I select C++ during the project creation:

C++ Project Creation for GCC
This creates a gcc C++ project with all the needed settings.
This worked fine until I added a *.c file to my project which had code in it which was not accepted by the C++ compiler. Wait! Should the *.c not be compiled in C mode, as I was used to with other compilers? It turned out that things are different with gcc (or g++) :-(: the *.c files in my project are compiled in C++ mode. So the question is: how to compile in C mode with the ARM g++ compiler?
For many of my applications I’m using a PWM (Pulse Width Modulated) signal. One example is the motor driver used in this project where I use one PWM signal for each motor. Another usage of PWM is to control the brightness of an LED. Processor Expert makes usage of the PWM hardware easier. Still, for some settings it is good to have the resulting signals in mind. So in this post I’m showing how the settings impact the PWM signal generated.
