A week ago, the updated FreeRTOS V7.5.0 has been released on FreeRTOS.org. So time to have my Processor Expert FreeRTOS component updated as well :-).

FreeRTOS V7.5.0

A week ago, the updated FreeRTOS V7.5.0 has been released on FreeRTOS.org. So time to have my Processor Expert FreeRTOS component updated as well :-).
FreeRTOS V7.5.0
This is the third part of a tutorial series how to ‘do-it-yourself’ a tool chain for the Freescale Kinetis microcontroller, with the FRDM-KL25Z as example. The tool chain is using GNU ARM gcc plus Eclipse Kepler release. So far I have the following parts:
So far things are very generic. But with debugging it means different hardware, and different hardware connections. And for this connection we need a GDB Server.
Eclipse CDT features a GNU Debugger (GDB), and this is what I want to use here: debugging my microcontroller with GDB inside Eclipse. In order to debug the microcontroller, I need two other things: a GDB Server and a Debug Probe.

GDB with GDB Server
This is the second part of a multi-part tutorial about how to set up an open source tool chain with GNU ARM gcc + Eclipse to build and debug an application for Kinetis ARM devices.

Eclipse Kepler
This is the first part of a multi-part tutorial on setting up a free and functional GNU gcc + Eclipse + debugger environment for use with the Freescale FRDM-KL25Z board.
In this first part, I’m showing how to install the GNU ARM tool chain to build a ‘blinking LED’ application for the FRDM-KL25Z. With 100% free tools 😉

Blinking Red RGB LED made with free tools
For my embedded systems lecture I need a wireless connection to the robot we will develop during that course. So far I have SMAC (IEEE802.15.4) and Bluetooth worked out. But that IEEE802.15.4 (ZigBee) is expensive, and the cheap Bluetooth modules are great for robot-to-host connection, but not for swarm robots which need to communicate to each other. Alex Vecchio (see this post) pointed me to a $2.75 (!) wireless module featuring the Nordic Semiconductor nRF24L01+. Exactly what I needed, with an incredible low price :-).

nRF24L01+ Module Detail
Summer finally has arrived in Switzerland. Yes, I live in a moderate climate zone, but if the outside temperature goes above 28-30° Celsius as these days, then sleeping at night is not that comfortable as it should be in my view. Luckily, I’m in a good constructed house with good insulation, so it takes a few days until it heats up. But I love to keep the temperature below 25° Celsius, especially at night. I do have a heating system which combines geothermal and solar heating. The question is: how can I use it for cooling during hot summer days? The solution: some extra plumbing, a Freescale Tower system and the Freescale FRDM-KL25Z board 🙂

FRDM-KL25Z with Arduino Data Logger Shield controlling Heating/Cooling System
The Freedom boards FRDM-KL25Z RevE and FRDM-K20D50M make it easier to use it as USB Host device, as they come with a special jumper to provide 5V to the USB device, so my earlier ‘hack’ is not needed any more :-). After I had USB MSD Host working for the FRDM-KL25Z, it was much harder to get the USB stack working for the FRDM-K20D50M board, because somehow the example Freescale provided with their USB stack refused to work properly on my board. After debugging it for several nightly hours, I decided to take my working Processor Expert project for KL25Z and added support for the K20. And the good news is: since tonight this is working :-).
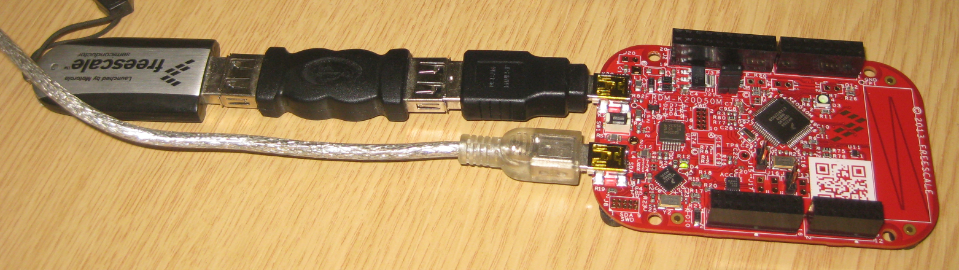
FRDM-K20D50M as USB MSD Host
While working on a project for the FRDM-K20D50M, I faced a problem: I was running out of SRAM for my application. The GNU linker reports: “section `.bss’ will not fit in region `m_data'”: 😦

bss will not fit in region m_data
But my device has 16 KByte of SRAM, and I knew I use much less than 10 KByte. So what is the problem? Continue reading
It took me a while to find the time to upgrade to FreeRTOS V7.4.2, but finally it is done :-). What caused me to move from V7.2 to V7.4 is a low power application on the FRDM-KL25Z board. V7.4 comes with two major new features: Queue Sets and Tickles Idle Mode (see this article). The last one if of interest here.
FreeRTOS runs an IDLE task. This one runs when there is no other active task. That task calls an optional Idle task hook which is a perfect place to put the microcontroller into low power mode:

Task T1 Running
I miss my old DELL laptop. Ok, the new one I received from IT services is not bad. It is faster and has a better screen. But I’m not really happy with the new keyboard. With the previous keyboard I was able to do a ‘PrtnScrn’ with a single key press. With the new one I need to press Fn + PrntScrn. And this is impossible to do with one hand:

Impossible to reach Fn+Prnt Scrn with one hand!
Yes, I have two hands ;-). But many times I need to do ‘print screen’ while having my other hand on the mouse :-(.What else can I do?
