As mentioned in Part 9: There is a new GNU ARM Eclipse plugin 2.1.1, and this one makes project creation for Freescale devices easier than ever 🙂
- Native Kinetis-L project templates for FRDM-KL25Z and FRDM-KL46Z boards
- Easier than ever project creation for Processor Expert projects
GNU ARM Eclipse 2.1.1
Upgrading Plugins
If you already have the GNU ARM Eclipse plugins installed, you can easily upgrade them with the menu Help > Install New Software and then specify
as update site.
New Project for FRDM-KL26Z or FRDM-KL46Z
The new GNU ARM Eclipse plugin 2.1.1 has built-in templates for the popular FRDM-KL26Z and FRDM-KL46Z, in standalone, retargeting or semihosting mode.
New Project for Kinetis KLxx
To create a new project, select the menu File > New C Project (or New C++ Project), give a name, select ‘Freescale Kinetis KLxx C/C++ Project’ with the Cross ARM GCC option:
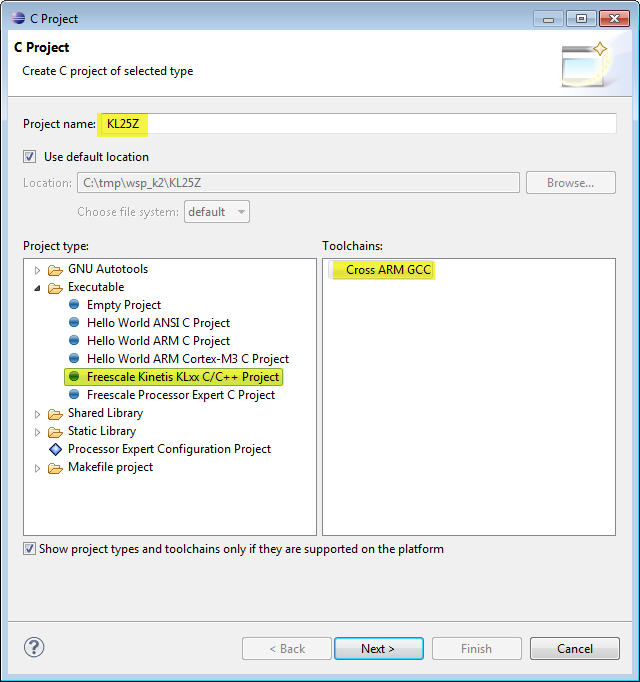
New Freescale Kinetis KLxx C C++ Project
Target Processor
Press Next, and it gives you the choices for your project:
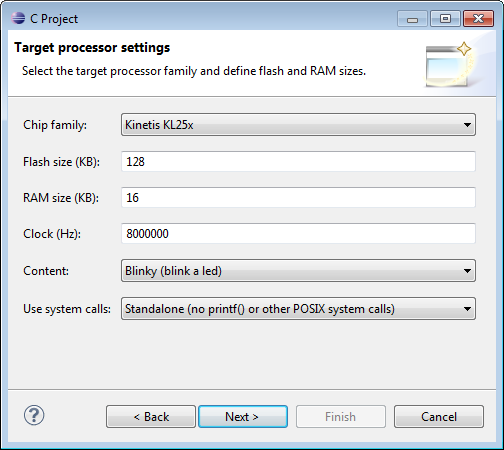
Target Processor Settings
- Chip family (currently KL25Z and KL46Z supported)
- FLASH size
- RAM size
- Clock rate
- Content (empty of blinking LED)
- System calls (standalone (no printf()), redirected printf() to application code, semihosting)
Folder Settings
Pressing Next, I can configure the folder names:
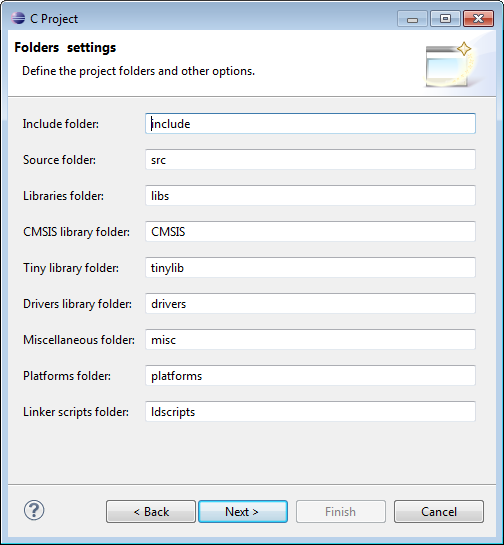
Folder Settings
Configurations
Pressing ‘Next’, I can configure the build configurations:
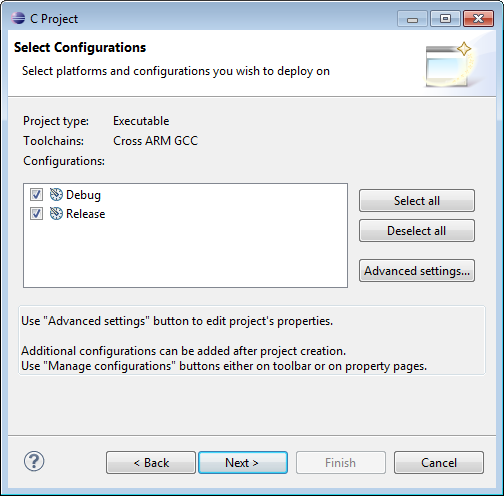
Select Configurations
Cross GNU ARM Toolchain
Pressing next, I have the opportunity the select the tool chain. If this is the first time in a workspace, the Toolchain path is not set yet. Point to where you have the GNU Tools ARM Embedded installed:
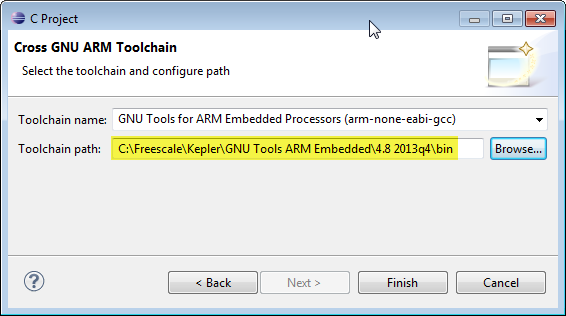
Cross GNU ARM Toolchain
Project Created
Pressing ‘Finish’ and my project gets created:
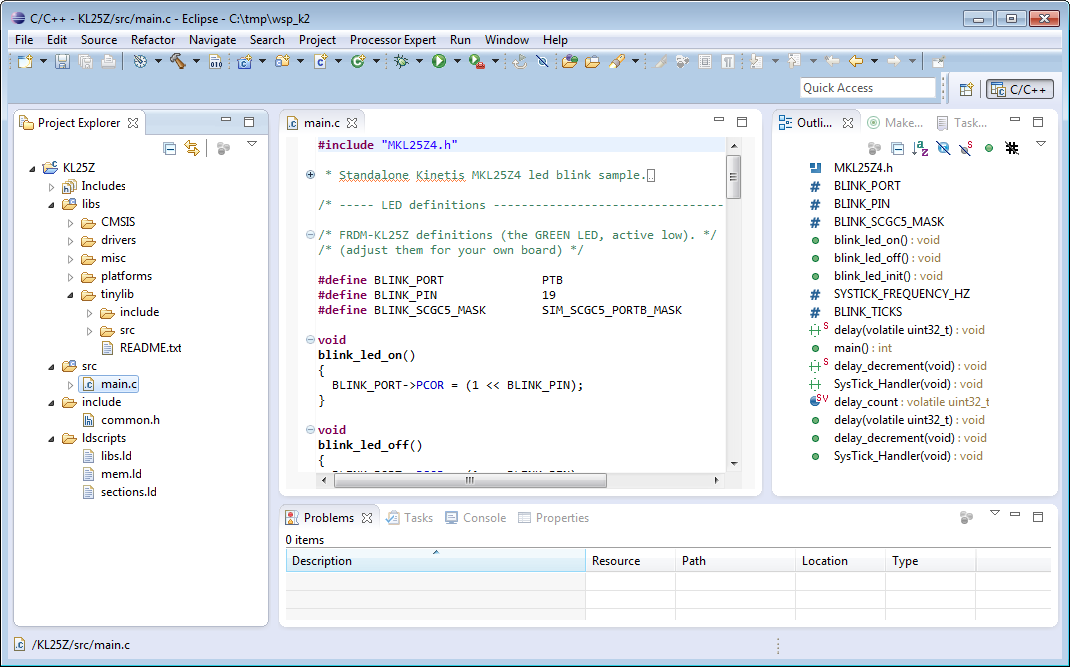
KL25Z Project Created
Debugging
The plugin has easy debugging support added (currently for Segger and OpenOCD). I show here the steps for Segger.
Path to Segger Installation
The GNU ARM Eclipse plugins ‘remembers’ variables for new projects created in a workspace. And it uses the variable ${jlink_path} (see later below). Best if I set up that variable for my workspace with the menu Window > Preferences > Run/Debug > String Substitution where I create a new variable to my Segger binaries:
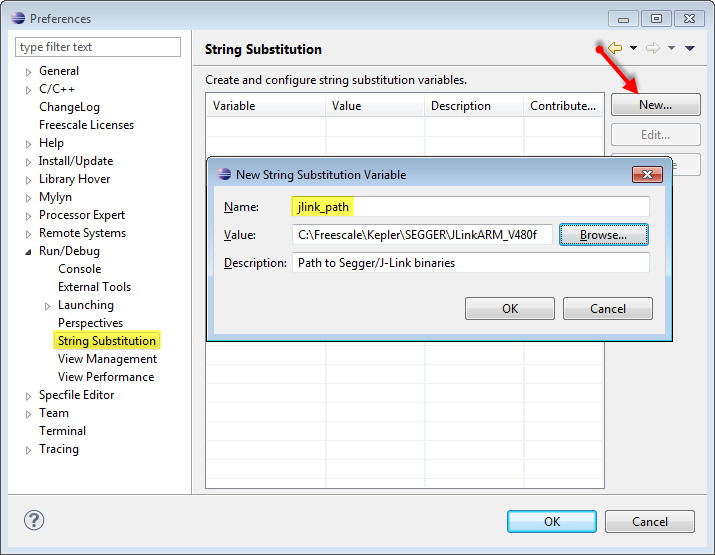
String Substitution
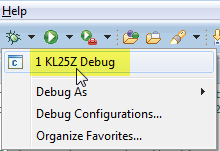
Creating Debug Configuration
The create a debug configuration, I select the project root folder, and then I use the menu Run > Debug Configurations or under the ‘debug’ icon:
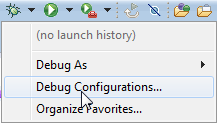
Debug Configurations
J-Link Debugging
I select ‘GDB Segger J-Link Debugging’ and press the ‘new’ button:
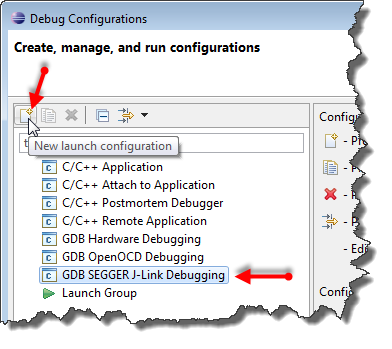
New Segger Debug Configuration
This creates a new launch configuration for the project:
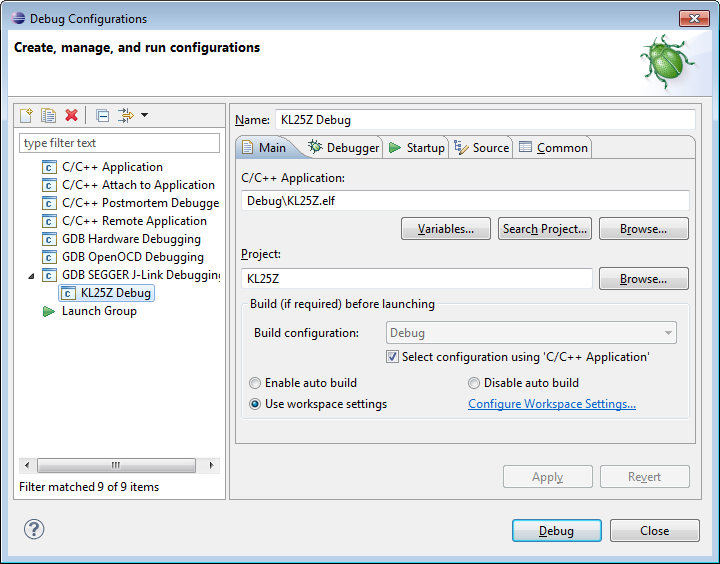
Launch configuration created
Debugger Settings
In the debugger tab, I specify the device (e.g. MKL25Z128xxx4) with disabled SWO (as this is not supported on the FRDM board):
💡 Click on the ‘supported device names’ to get the supported device names from the Segger web page.
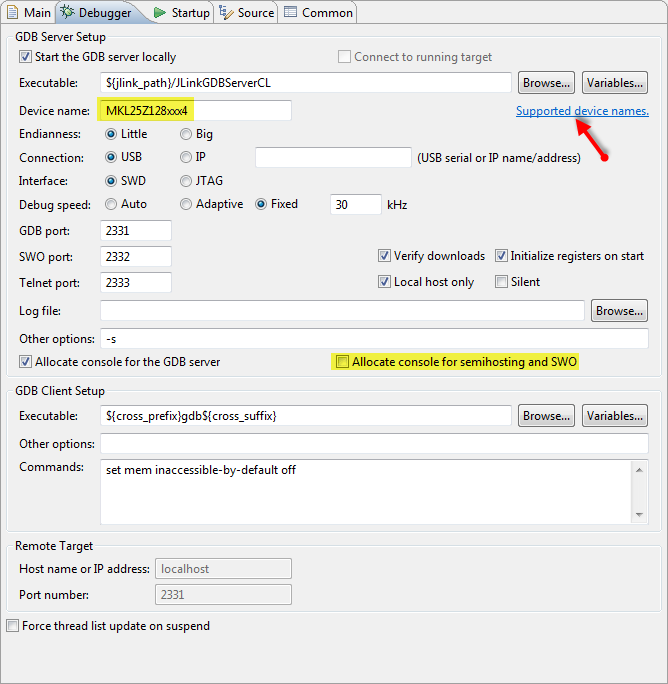
Debugger Tab
💡 Notice the usage of ${jlink_path} to the Segger GDB binaries.
Startup Settings
In the Startup tab, disable semihosting if not supported. Disable SWO as not supported by the FRDM board.
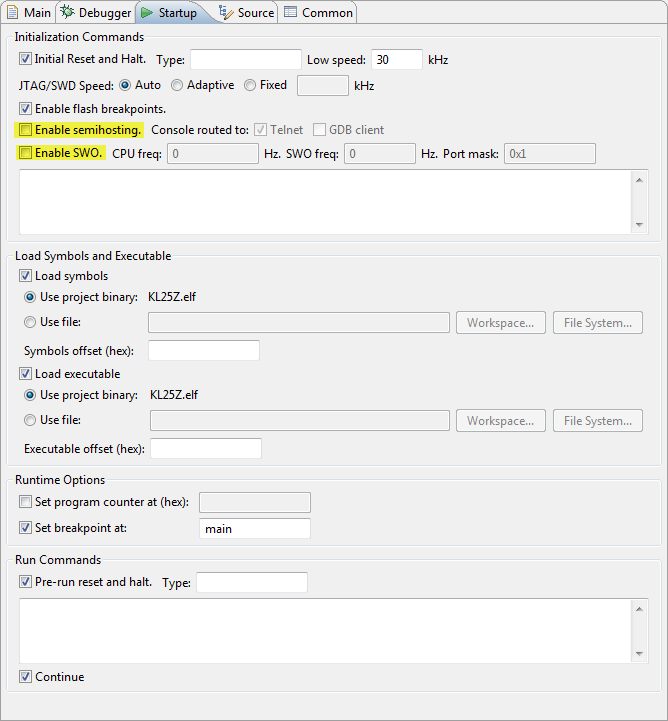
Startup Tab
Now I can save the settings and close the dialog.
Debugging
Do *not* simply press the ‘debug’ button, as this will show the *wrong* dialog:
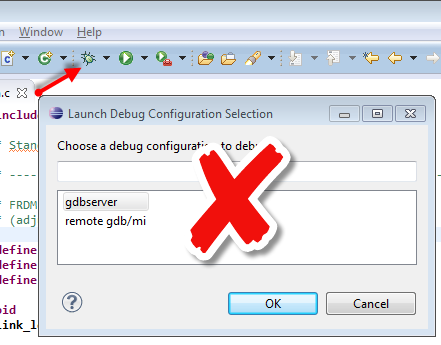
Debugging, how it does not work
Instead, do the first debug from the debug/launch configuration dialog:
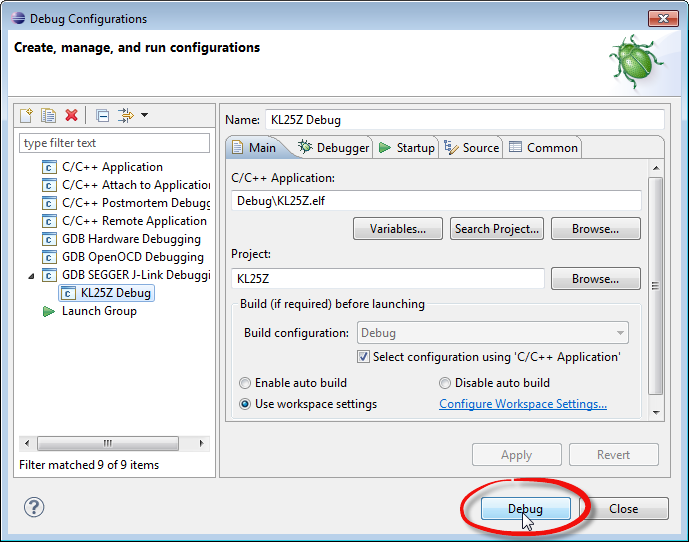
Debug from the Debug Configuration
After that, you can select it from the list:
Debug Launch from List
Processor Expert Project Creation
If you want to create projects for all other Kinetis devices, then this works best with using Processor Expert. With File > New C Project create a new Freescale Processor Expert C Project for Cross ARM GCC:

Freescale Processor Expert Project
Press Next, and until Processor Expert Driver Suite 10.4 is out, go with the default:
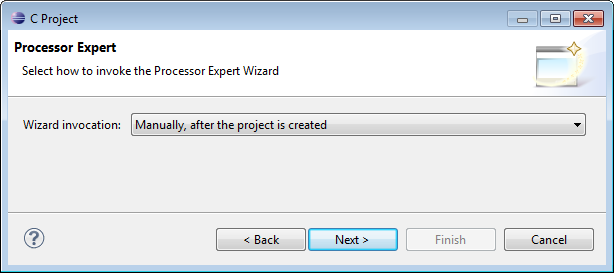
Processor Expert Option
Go through the other dialogs (as shown above). This creates an empty project ready for Processor Expert to be added. That empty project already has the include paths/etc setup for Processor Expert projects:
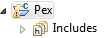
Processor Expert (empty) project
To add Processor Expert, select the project and use the menu File > New > Other. From there, select Enable Processor Expert for Existing Project:

Enable Processor Expert for Existing C Project
From there, go through the wizard and select your device, and ‘GNU C Compiler’:
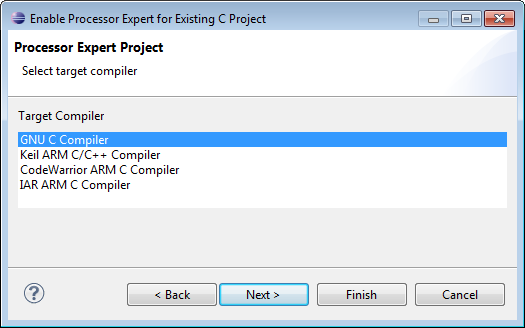
GNU C Compiler
Then finish the wizard, and you have a Processor Expert project with all the needed files (startup code, linker file, components, …):
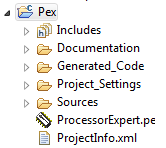
Processor Expert Project Created
What has not been set up properly are some build tool options. Select the project and to the properties. For Kinetis-L, make sure you select ‘cortex-m0plus’ for the ARM family:
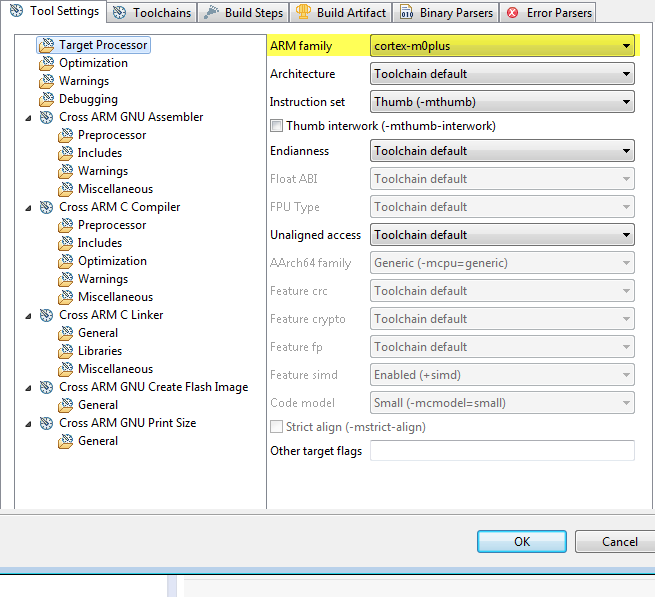
ARM Processor for Kinetis L
For Kinetis K family, select ‘cortex-m4’, and if it has a hardware floating point unit, make sure you select the correct Float ABI and FPU type:
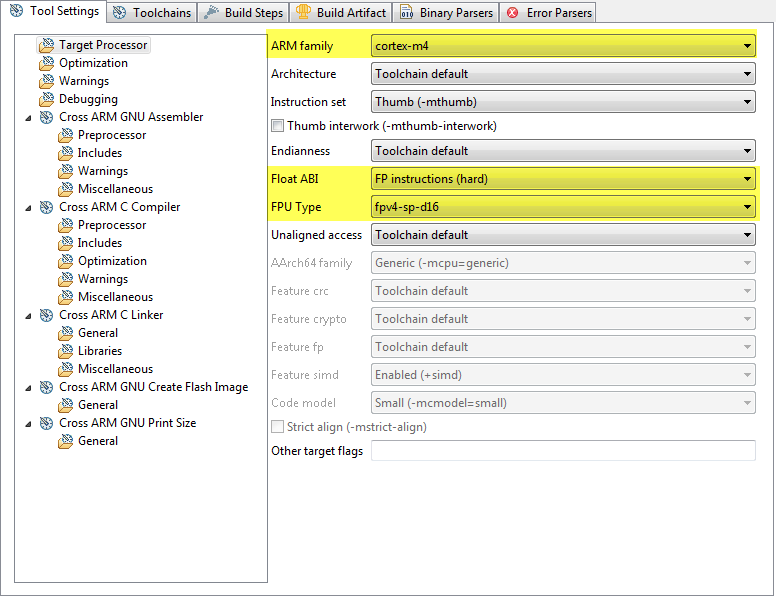
Kinetis K with Floating Point Unit
Summary
The most difficult thing for a new tool chain is to create a starting point project. The GNU ARM Eclipse 2.1.1 plugins make it easier than ever to create projects for Freescale Kinetis devices (and others). It is still some manual process, and does not offer support for all possible devices out of the box. But with the above steps and with the help of Processor Expert, it is easily possible to create now projects for more than 100 Freescale Kinetis devices :-).
List of Tutorials
- Part 1: Setting up ARM GNU tool chain
- Part 2: Setting up Eclipse IDE
- Part 3: Setting up the debugger (P&E and Segger)
- Part 4: Setting up Processor Expert
- Part 5: Setting up FreeRTOS Kernel Awareness
- Part 6: Linux Host Support with OpenOCD and CMSIS-DAP
- Part 7: GNU ARM Eclipse Plugins
- Part 8: Processor Expert with GNU ARM Eclipse Plugins
- Part 9: DIY Free Toolchain for Kinetis: Part 9 – Express Setup in 8 Steps
- Part 10 – Project Creation with GNU ARM Eclipse 2.1.1
Happy Kineting 🙂

“In the Startup tab, disable semihosting if not supported. Disable SWO as not supported by the FRDM board.”
That’s correct, SWO is not supported by the FDRM board, but this does not mandate to disable the setting in the debugger Startup tab. You can leave both semihosting and SWO enabled, they do not waste any significant resources and have no impact on the functionality of the tested board.
And the retargetted variant, with semihosting output, is perfectly functional. If you are concerned about the program size, you can use the newlib-nano library (–specs=nano.specs). In fact I’m currently considering making newlib-nano the default library used by the GNU ARM Eclipse templates.
LikeLike
Thanks for the hint about the nano libs.
LikeLike
Pingback: DIY Free Toolchain for Kinetis: Part 9 – Express Setup in 8 Steps | MCU on Eclipse
Pingback: DIY Free Toolchain for Kinetis: Part 8 – Processor Expert, Eclipse and GNU ARM Eclipse Plugins | MCU on Eclipse
Pingback: DIY Free Toolchain for Kinetis: Part 5 – FreeRTOS Eclipse Kernel Awareness with GDB | MCU on Eclipse
Pingback: DIY Free Toolchain for Kinetis: Part 7 – GNU ARM Eclipse Plugins | MCU on Eclipse
Pingback: DIY Free Toolchain for Kinetis: Part 2 – Eclipse IDE | MCU on Eclipse
Pingback: DIY Free Toolchain for Kinetis: Part 3 – Debugger (GDB Server with P&E and Segger) | MCU on Eclipse
Pingback: DIY Free Toolchain for Kinetis: Part 6 – Linux Host with OpenOCD and CMSIS-DAP | MCU on Eclipse
Pingback: DIY Free Toolchain for Kinetis: Part 4 – Processor Expert for Eclipse | MCU on Eclipse
Pingback: DIY Free Toolchain for Kinetis: Part 1 – GNU ARM Build Tools | MCU on Eclipse
Hi! I’m sorry if this might be a noob question but how do I upload the firmware compiled from Eclipse +GNU Arm toolchain onto the FRDM KL25Z? Does it support drag and drop programming or do I have to use J-Link for SWD programming 🙂 Thank you!
LikeLike
You can do drag&drop programming if you loaded the MSD bootloader firmware on your FRDM board. Or you can use the debug application firmware and then you can debug it with the onboard debugger. Of course you can use different firmware (P&E, Segger, …) or use a SWD debugger.
This article should get you started:
Note that there is an updated firmware (for Windows 8.x) available, see
I hope this helps.
LikeLike
thank you! that was very helpful 😀
LikeLike
Hello,
It’s me again, I tried w/o success to debug on a K20D50M board.
Something does go wrong as I’m getting this error.
SEGGER J-Link GDB Server V4.80b Command Line Version
JLinkARM.dll V4.80b (DLL compiled Jan 17 2014 21:30:14)
—–GDB Server start settings—–
GDBInit file: none
GDB Server Listening port: 2331
SWO raw output listening port: 2332
Terminal I/O port: 2333
Accept remote connection: localhost only
Generate logfile: off
Verify download: on
Init regs on start: on
Silent mode: off
Single run mode: on
——J-Link related settings——
J-Link script: none
Target interface: SWD
Host interface: USB
Target endian: little
Target interface speed: 0kHz
Connecting to J-Link…
J-Link is connected.
Firmware: J-Link OpenSDA compiled Mar 13 2013 11:48:08
Hardware: V1.00
S/N: 621000000
Checking target voltage…
Listening on TCP/IP port 2331
Connecting to target…Connected to target
Waiting for GDB connection…Connected to 127.0.0.1
Reading all registers
Read 4 bytes @ address 0x00000000 (Data = 0xFFFFFFFF)
Target interface speed set to 30 kHz
WARNING: S_RESET_ST not cleared
Resetting target
Halting target CPU…
…Target halted (PC = 0xFFFFFFFE)
R0 = 00000000, R1 = 00000000, R2 = 00000000, R3 = 00000000
R4 = 00000000, R5 = 00000000, R6 = 00000000, R7 = 00000000
R8 = 00000000, R9 = 00000000, R10= 00000000, R11= 00000000
R12= 00000000, R13= FFFFFFFC, MSP= FFFFFFFC, PSP= 00000000
R14(LR) = FFFFFFFF, R15(PC) = FFFFFFFE
XPSR 01000000, APSR 00000000, EPSR 01000000, IPSR 00000000
CFBP 00000000, CONTROL 00, FAULTMASK 00, BASEPRI 00, PRIMASK 00
Reading all registers
Select auto target interface speed (1700 kHz)
Flash breakpoints enabled
Read 4 bytes @ address 0xFFFFFFFE (Data = 0xFFFFFFFF)
Downloading 248 bytes @ address 0x00000000 – Verified OK
Downloading 16 bytes @ address 0x00000400 – Verified OK
Downloading 1652 bytes @ address 0x00000410 – Verified OK
Downloading 36 bytes @ address 0x00000A84 – Verified OK
Writing register (PC = 0x00000745)
Read 4 bytes @ address 0x00000744 (Data = 0xFFFFFFFF)
Read 2 bytes @ address 0x00000420 (Data = 0xFFFF)
Read 2 bytes @ address 0x00000420 (Data = 0xFFFF)
Read 2 bytes @ address 0x00000420 (Data = 0xFFFF)
WARNING: Failed to reset CPU. VECTRESET has confused core.
WARNING: CPU did not halt after reset.
WARNING: S_RESET_ST not cleared
WARNING: CPU did not halt after reset.
ERROR: Error while identifying Cortex-M core.
Resetting target
Halting target CPU…
…Target halted (PC = 0x05FA0004)
R0 = 05FA0004, R1 = 05FA0004, R2 = 05FA0004, R3 = 05FA0004
R4 = 05FA0004, R5 = 05FA0004, R6 = 05FA0004, R7 = 05FA0004
R8 = 05FA0004, R9 = 05FA0004, R10= 05FA0004, R11= 05FA0004
R12= 05FA0004, R13= 05FA0004, MSP= 05FA0004, PSP= 05FA0004
R14(LR) = 05FA0004, R15(PC) = 05FA0004
XPSR 05FA0004, APSR 00000000, EPSR 05000000, IPSR 00000004
CFBP 05FA0004, CONTROL 5000000, FAULTMASK FA0000, BASEPRI 00, PRIMASK 04
Reading all registers
WARNING: Failed to read memory @ address 0x05FA0004
Read 4 bytes @ address 0x05FA0004 (Data = 0xAAAAAAAA)
Setting breakpoint @ address 0x00000420, Size = 2, BPHandle = 0x0000
WARNING: No more breakpoint resources left
Starting target CPU…
ERROR: Can not read register 15 (R15) while CPU is running
…Target halted (PC = 0x00000000)
Reading all registers
ERROR: Can not read register 0 (R0) while CPU is running
ERROR: Can not read register 1 (R1) while CPU is running
…
and it carries one for all the registers.
Maybe I did not configured something right. It’s possible. I did the same with a TriCore at work as I didn’t read correctly the variant. 😦
Have you tried with such a board?
Thank you.
LikeLike
I have not tried it with the K20, but with another ARM Cortex M4.
Make sure you select the right SWO/JTAG settings. And that you upgrade to 480f of the Segger software (they just released a new version with fixes recently).
LikeLike
What name did you use for the Device name: field? Does it match the actual hardware?
LikeLike
I double checked the configuration and the SWO/JTAG settings are correct.
The Device is the right one: MK20DX128xxx5.
After the update to 4.80g it seems to have worked once. It stopped in the Cpu.c @ PE_ISR(Cpu_Interrupt).
After that I came back to the old behavior.
This is strange. It keeps telling me that: “No source file named Y:\Works\KL25Z_WorkSpace\newM4Try\Sources\ProcessorExpert.c” ?!?
And then it opens a new window with the tile: “0x0” and the message: No source available for “0x0”.
:))) Now, not even Ctrl+C or Ctrl+V works in eclipse.
LikeLike
Which ARM compiler are you using? I noticed the same thing about ‘no source file named’, but moving to ARM 4.8 solved that problem with the interrupts and the ‘no source file thing’. It seems that the new gdb in 4.8 and the fixed debug information solves that part. But use the ARM compiler without any optimization (there is a bug in gcc, see https://answers.launchpad.net/gcc-arm-embedded/+question/244113).
The other thing about CTRL+C not working: that’s strange, as I noticed this too: it was coming and going, but not clear to me from where this comes? And it does not only impact Kepler Eclipse, but as well CodeWarrior (or any other Eclipse)?
LikeLike
Hello,
I’m back 🙂
I found the reason for my problems.
It looks like FRDM board -> USB3.0 HUB -> USB 3.0 PCIE card -> some Main Board parts -> Segger JLink does not work as expected 😦
When connected directly to an USB2.0 port it’s all ok.
Good point though about the versions. I would not have checked otherwise.
Thank you and have an excellent weekend.
LikeLike
ah, good point about USB 3.0, I did not think about this as my machine does not have them :-).
LikeLike
Hi,
I try to debug simple LedBlink program on simple self make KL25 board (no FRDM board). When I use CodeWarior everything is OK and LED blink, but when i use Eclispse (with PE) I always receive interrupt PE_ISR(Cpu_INT_NMIInterrupt) and led not blink. What I do wrong?
LikeLike
Hi Michal,
it sound like the startup code is not correct, or the download failded somehow.
Are you using one of my Eclipse/Kepler projects here:
https://github.com/ErichStyger/mcuoneclipse/tree/master/Examples/Eclipse?
LikeLike
thanks for fast replay. No, I used startup.S from https://github.com/ErichStyger/mcuoneclipse because I would like to use PE
LikeLike
Hi Michal,
hmm, that example is using a differnt/older gcc plugin/integration. I moved to the Liviu GNU ARM Eclipse build tool plugins. Would you be ok to use the Liviu plugins too? I think I better change the examples to new plugins. What do you think?
LikeLike
I think, I use it already, but I’m not sure 🙂 How I can check it?
My arm-none-eabi vesion:
C:\Documents and Settings\miki>”C:\Program Files\GNU Tools ARM Embedded\4.8 2
q4\bin\arm-none-eabi-gcc.exe” –version
arm-none-eabi-gcc.exe (GNU Tools for ARM Embedded Processors) 4.8.3 20131129
lease) [ARM/embedded-4_8-branch revision 205641]
Copyright (C) 2013 Free Software Foundation, Inc.
This is free software; see the source for copying conditions. There is NO
warranty; not even for MERCHANTABILITY or FITNESS FOR A PARTICULAR PURPOSE.
Eclipse plugin:
GNU ARM Eclipse Plug-in Version 0.5.5.201310221100
LikeLike
The compiler is looking ok. But the GNU ARM Eclipse plugin looks like a very old one?
LikeLike
I remove eclipse and install it again with all plugins. This solved all my problem 🙂 Now I can debug all applications without any problems. Thanks for help.
P.S.
I have another one question: how to flash hex file into my MCU? Segger command tool have loadbin command, but I don’t have bin file.
LikeLike
Ah, good that this has been resolved 🙂
About .bin/S19 files, see
LikeLike
> GNU ARM Eclipse Plug-in Version 0.5.5.201310221100
Hi Michal,
Please upgrade to the new version and migrate your projects, version 0.5.5 is end of life and no longer maintained.
LikeLike
Pingback: Processor Expert (Driver Suite/Plugins/KDS) V10.4 with new Component Inspector | MCU on Eclipse
Pingback: Binary Files for the mbed Bootloader with Eclipse and GNU ARM Eclipse Plugins | MCU on Eclipse
Pingback: Constructing a Classroom IDE with Eclipse for ARM | MCU on Eclipse
Pingback: Tutorial: DIY Kinetis SDK Project with Eclipse – Startup | MCU on Eclipse
I’ve been working through these tutorials and I believe I have a system set up with all the latest plugins. In some circumstances my Eclipse will fail to open, or a PE project creation will not complete. (I have seen it more than once but report only the latest instance:)
The screenshot here shows the result of following the PE project creation steps in this tutorial: the files are missing and the progress bar stays at 0%
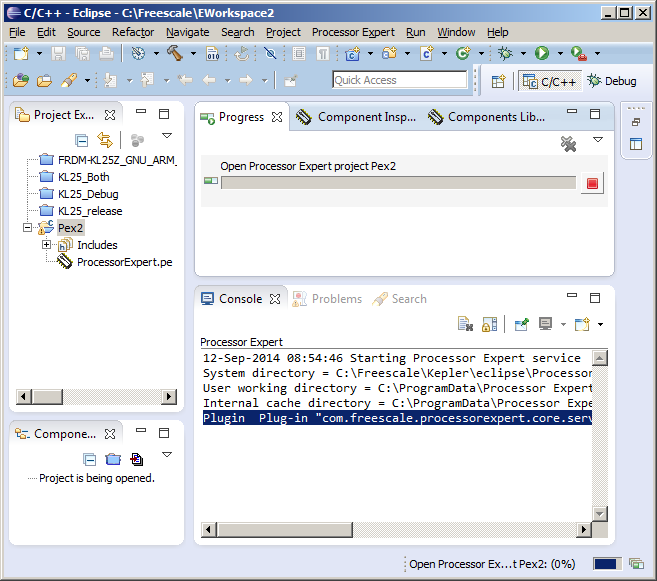
Note also the message: “Plugin Plug-in “com.freescale.processorexpert.core.service” was unable to instantiate class “com.processorexpert.core.client.PEApplicationClient”.
When I close Eclipse I find a dialog box which says “Error initializing Component Development Environment – A valid Component Development Environment Licence was not found”. Google suggest this is from the PE plugin.
I attempted to remove the PE plugin, intending to try to re-install it. The removal step proceeded without error. But when Eclipse restarted, the PE project appeared to have been correctly created, and PE plugin is still present! See: https://www.dropbox.com/s/x66xmhl0iloepgt/Screenshot%202014-09-12%2009.20.26.png?dl=0
I successfully added a PE BitIO component and a Wait component and built a program that blinks an LED on a FRDM-KL25. And I’ve gone through the tutorial another time, without a problem. But I am worried that I don’t have a stable system. Ideas?
LikeLike
That looks strange. Are you on Windows? I saw an issue (need to search for it) in the Freescale Forums under Linux where the CDE plugin was causing a problem. It really looks like it was not able to load the plugin. I asssume you have enough memory available on your system. The thing with the component development license sounds ok, as it does not come with that paid license. You still can use it, but not sell components (which should be fine). So I really don’t know what it could be. I think it might be related just to some types of projects?
LikeLike
Hi Erich – yes, Windows 7 on a fairly new laptop which should have plenty of resources. The problem has cleared now but I have seen it 2 or 3 times. The tools have all been assembled in the last day or two, so (a) the installation is new and (b) I have not had much time to find patterns. I can’t replicate it. The very first manifestation was the dialog box popping up while I was doing something else (can’t recall what). Subsequently the dialog box appeared only after I shut down Eclipse.
I find it very odd that my attempt at uninstalling the PE plugin (a) did not uninstall it and (b) allowed the PE project to set up correctly when Eclipse next started. Perhaps these are unrelated.
Regards – Charles
LikeLike
It seems that the plugins have moved on since this tutorial was written, and there si now a viable way to make a Processor Expert project with File > New > Processor Expert Project.
It would be good to have consistent behaviour between the two routes. With the tutorial method you get entries for Create Flash Image and Print Size, and in Linker > General the “Do not use standard start files” is checked.
The File > New > Processor Expert Project route gives a Tool Settings tab without the Create Flash Image and Print Size (but you can get them by going to the Toolchains tab and checking Create Flash Image and Print Size) – and the “Do not use standard start files” is not checked. Both confused me for a while. (What are these standard start files anyway? Perhaps there are other differences?)
While we are at it, why not make s-records the standard selection for the flash image, to suit the FRDM boards.
LikeLike
Yes, since the articles there has been the 10.5 release which extended things. Basically there is now the same wizard (core) as in KDS (Kinetis Design Studio) which is great. And yes, the routes are somewhat different, as you noticed. The main reason is that for KDS the wizard knows the toolchain to be used (the one in KDS), while for the Driver Suite 10.5 it is simply generic. Previous releases (10.4) even did not create a tool chain project. Now it is cool that it respects the de-facto GNU ARM Eclipse plugins from Liviu.
The ‘standard start files’ means that it will use the startup files in the libraries. They are very generic, and usually is not the recommended way.
About the s-records: yes, that’s a endless debate. I would prefer S19 files too, but mbed and Freescale decided that for the new boards it will be .bin files, so no conclusion or consolidation there 😦
LikeLike
Questions 1/2 on porting from CW10.5 to these new tools:
I could not import a CW project (the Tool Settings tab is empty, and Tool Chain tab is missing and I get an “Orphaned configuration” error). So I did this, which produces an image that appears to run OK:
1 Created a new PE project and copied across ProcessorExpert.pe from the CW project. When I closed and reopened the new project the PE components seemed correct.
2 Deleted all the source files and copied in the source files from the CW project.
I got a linker error “PE_Porting_HBM1_2.elf section `.bss’ will not fit in region `m_data’ region `m_data’ overflowed by 1116 bytes” which I cleared by reducing my over-large FreeRTOS heap size.
Q1 – should I expect to fail to importing a CW project?
Q2 – are steps 1 and 2 a viable approach for porting a CW project from CW?
Q3 – why did I get the linker errors and what can be done over fix that? The source seemed to compile OK on CW, so why do I appear to be short of RAM now?
LikeLike
You cannot import CodeWarrior projects that way: because the tool chains (on one side CodeWarrior specific, on the other side GNU ARM Eclipse specific). They are very similar, but not the same. That’s why you get that ‘orphaned’ message. Your step 1 is the right thing to do. Your step 2 is not good: keep the startup/linker files/etc. Keep everything, and just make the merge in main() (main.c). You get the linker errors because CodeWarrior uses a specific linker file, and matching the startup code.
LikeLike
Questions 2/2 on porting from CW10.5 to these new tools:
The build process gives a number of unexpected errors, as can be seen in the Problems pane here: https://www.dropbox.com/s/3xlulm4um3766kz/Screenshot%202014-09-15%2014.30.46.png?dl=0
1 Three unused functions in startup.c
2 Two unused functions in tasks.c (the source code looks identical between the two IDEs).
3 The Problems window shows various “could not be resolved” errors. However (a) as you see the Console does not show problems, and the image runs as expected and (b) the Problems window only shows the errors after I open the .c source files in the editor.
I suspect these warnings and errors are unrelated. What is causing them and how can I make them go away?
LikeLike
On 1 and 2: this should go away if you would use the Kepler (not CW) startup code, see my previous comment.
Not sure about 3), you might check the console view. It could be that you see subsequent errors (and the first error is the problem).
LikeLike
I wanted to make a simple FreeRTOS project in this new Kepler environment and I decided to try to port this project: https://mcuoneclipse.com/2013/03/06/freertos-on-the-frdm-kl05z-board/
My idea was to create an empty Kepler PE project then copy in the ProcessorExpert.pe file and the 6 files from the Sources folder (and delete main.c which is replaced by ProcessorExpert.c).
Initially I had lots of trouble until I discovered that in both environments (CW10.5 and the Eclipse Kelper) the software crashes if optimisation is turned off (-O0) and in both environment it works with all other optimisation settings. By “crash” I mean the console menu output freezes part way through, there is no LED flashing.
Even when it works, the code sizes are very different. With -O1 the CW build gives:
text data bss dec hex
10764 36 2560 13360 3430
The Kepler build gives:
text data bss dec hex
10452 1116 2692 14260 37b4
Q1: Why does the -O0 build crash?
Q2: Why are the Kepler images so much larger?
Q3: How do I get smaller images?
Q4: Are there other issues to watch out for when bringing across projects from CW?
LikeLike
I adapted the KL05 FreeRTOS project for the FRDM-KL25Z and confirm that it also hangs up with the -O0 setting, regardless of whether it is built on the CW or Kepler IDEs.
LikeLike
The interesting question is: where and why does it hang?
LikeLike
A1: Most of my applications are using -O0, so not sure what problem you are facing. You will need to debug up to the point the problem occurs. Is it a hardfault? something else? Usually code might not work if higher optimizations are used, but this one sounds weird.
A2: CodeWarrior has an optimized library for embedded targets (EWL), while the default on Gnu (NewLib) is rather huge. There is newlib-nano which is much better. Are you using newlib or newlib-nano?
A3: use newlib-nano, at least as a starter. And make sure code and data are in dedicated sections so the linker can dead-strip unused code (linker option -Xlinker –gc-sections and optimization options –function-sections and –data-sections).
A4: The startup code is always a concern, so you might tailor it.
LikeLike
While I understand that -O0 is deprecated, I’ve spent some time trying to understand why the app crashes with this setting, otherwise I would worry that there was a bug with FreeRTOS port, or the compiler. After chasing a lot of dead-ends, I discovered the the problem is that the LED task stack was overflowing, and that this varies with compiler optimisation settings. It would seem that on your original example, with the -O0 setting the 80-word stack overflows and with other settings it does not.
The stack used varies quite a lot with the optimisation setting, and also depends on whether the Code Warrior toolchain or the Eclipse tool chain is used. (There is 38 words difference between the “best case” (-O3 on Eclipse) and “worst case” (-O0 on Eclipse). The “dynamic” performance varies also: after I type “help” the stack highwater mark has changed, but the difference varies between 4 words and 10 words.
When an overflow occurs, FRTOS1_vApplicationStackOverflowHook() code is called when overflow detection method 2 is used but not if method 1 is used – presumably because the single task is never “swapped out”.
I’d be interested to know why there are these differences, and where all the stack is being used in such a simple application. I have placed a longer report and the modified project here:
https://dl.dropboxusercontent.com/u/472780/FreeRTOS_Problems/Stack_Size_Problem.zip
Maybe a tutorial on FreeRTOS stack use?
LikeLike
I had no chance to look at the code, but the stack usage is heavily affected by the compiler optimizations. If optimizations turned on, the compiler tries to keep the local variabes (if not too many) in registers, so it does not use any stack space (or reduced amount) for it. In FreeRTOS, I have the stack size reporting feature turned on, so I can check the amount of free stack in my shell, so I see how much is left over. Keep in mind that the stack is used as well by the interrupt routines, so you always need to add the worst stack size/amount used by the interrupts too. Some processors have a dedicated stack for the interrupts, which makes things better predictable.
LikeLike
The -O0 was intended for Debug configurations, to facilitate debugging. It means ‘no optimisations at all’ and, although it is catastrophic from the code quality point of view, it was the only one considered safe for the debugger.
Latest GCC supports -Og, which is a special optimisation level intended for Debug, in other words it uses some reasonable optimisations, but without confusing GDB.
I recommend -Og for your Debug configuration and -Os for the Release one. (The projects generated by the GNU ARM Eclipse templates use this setting, and I had no problems so far.)
LikeLike
I returned to this problem yesterday: in particular why the GNU tools were giving the large (c. 1k) data size – particularly acute with a KL05 which has only 4k RAM to start with. The solution is to add “-specs=nano-specs” in the “other linker flags” box in the linker settings.
I guess that was what Erich was suggesting in A2 and A3 above, but it took a bit of research to figure out how to do this in practise. With the KL05Z_FreeRTOS project, data size goes down from 1116 bytes to 44.
It looks like the check boxes for Erich’s other optimisation suggestions (A3 above) are ticked by default.
LikeLike
Yes, the standard newlib has a much larger footprint, so using the newlib-nano for sure helps
LikeLike
Hi, I used eclipse more than 1 year and now I can’t because I have a message: “A valid Component Development Environment License was not found”. I only found tutorial from this site: http://cache.freescale.com/files/soft_dev_tools/doc/user_guide/PEXCDEINSTALLUG.pdf
I tried suggestions from 3.3 point of this article but without success.
I use OSX 10.10, reinstall eclipse, PEx and change workspace, but still the same error. Until yesterday everything worked. Any suggestion?
LikeLike
Hi misiek81,
such a license is only needed if you want to develop commercial Processor Expert plugins. Otherwise this should be simply a warning/information message and not block you. But Processor Expert to my knowledge is *not* running on Mac yet. But there should be an upcoming V3.0.0 of KDS which includes Mac OS X support.
LikeLike
Hi,
I use Microcontrollers Driver Suite v10.4 plug-in for existing Eclipse (Kepler). A few days ago everything worked perfect. Hmm I don’t understund
LikeLike
hmm, I don’t understand it neither. I’m really surprised that you say it worked on Mac OS X (natively?)? To my knowledge Mac OS X is not supported yet, you have to use a Virtual Machine (VM) for Windows or Linux to run it.
LikeLike
I reinstalled eclipse and I changed workspace directory – this solutions solved my problem.
PEx work fine on my Mac without any problems (I using it more then one year). I installed eclipse on my Mac, compiler tools, gnu arm plug-in (linaro) for eclipse, PEx plugin, and Your PEx component 🙂
Now KDS is avaliable on Mac but standard Eclipse with plugins is much faster than KDS IDE for me.
Now, I wondering how to create MKL27Z project on eclipse with PEx plugin becouse last supported MCU in PEx (for eclipse plugin) is MKL26z 😦
LikeLike
I’m wondering why standard Eclipse would be faster than KDS IDE on Mac? It should not make any difference in my view. Any idea why?
As for KL26Z: this is only supported with Processor Expert if you select/use the Kinetis SDK. Some of my components work with the SDK (the ones with no connection to the hardware), but unfortunately as the SDK has a different API, others with a dependency on hardware components do not work. It would need substantial work from my side to make these changes.
LikeLike
I’m running into a problem. When i first set up everything and the first time i run processor expert it works fine. But if I exit eclipse and go back in processor expert wont start up, says something about not finding a valid component licence. Thank you in advance for the help.
LikeLike
Hi Trevor, could you post the exact message? If it complains about not having a valid component *development* license, then you can simply ignore it: it checks for a license to develop additional components. Unless you want to do this, don’t worry about this.
LikeLike
What is odd is that processor expert worked the first time I used it after installing everything. Now what happens when I try to create a processor expert project is a message pops up that states waiting for Processor Expert start up. It waits for 10 minutes or more then comes up with this message: A valid Component Development Environment License was not found
After I click ok it doesn’t do anything. It doesn’t load the components for the cpu or anything. I also can’t open the processor expert portion of that first project I made after installing everything.
LikeLike
Hi Trevor,
that’s strange. It seems that somehow something is corrupted. Can you check the Console view in Eclipse (switch to the Processor Expert log). I have (Windows):
26.04.2015 09:39:34 Starting Processor Expert service
System directory = C:\Freescale\KDS_2.0.0\eclipse\ProcessorExpert
User working directory = C:\ProgramData\Processor Expert\PEXDRV_PE5_3
Internal cache directory = C:\ProgramData\Processor Expert\PECache\45089079
Processor Expert license file = not used (no license file)
26.04.2015 09:39:38 Successfully started Processor Expert service
CDE: no license found, using Community Edition License
LikeLike
Above was for KDS, so here is what I have in my native Eclipse Kepler:
26.04.2015 09:40:56 Starting Processor Expert service
System directory = C:\Tools\IDE\eclipse\ProcessorExpert
User working directory = C:\ProgramData\Processor Expert\PEXDRV_PE5_3
Internal cache directory = C:\ProgramData\Processor Expert\PECache\8636016f
Processor Expert license file = not used (no license file)
26.04.2015 09:41:05 Successfully started Processor Expert service
CDE: no license found, using Community Edition License
LikeLike
this is what i found in the console window:
Apr 27, 2015 7:52:06 AM Starting Processor Expert service
System directory = C:\Freescale\Kepler\eclipse\ProcessorExpert
User working directory = C:\ProgramData\Processor Expert\PEXDRV_PE5_3
Internal cache directory = C:\ProgramData\Processor Expert\PECache\62ca9031
Plugin Plug-in “com.freescale.processorexpert.core.service” was unable to instantiate class “com.processorexpert.core.client.PEApplicationClient”.
could it be the last line that is causing the problem?
LikeLike
Yes, that seems to me to cause your problem.
LikeLike
I went through and re-installed everything and processor expert starts up each time so far but i haven’t created a processor expert project yet. I installed the PE for existing eclipse and it’s PE 10.4.
LikeLike
I verified it. as soon as i create my first processor expert project, the next time i open eclipse it will not start processor expert…
LikeLike
Problem solved! I found in another one of your articles where somebody had the same error. Come to find out I had to uninstall JRE 8 and install JRE 7 and now everything is working fine. Thanks for your help 🙂
LikeLike