
There has been many new releases these days: Freescale released Processor Expert Driver Suite 10.3, and Liviu Ionescu released new GNU ARM Eclipse Plugins with new and updated documentation. So time for me to show how this all comes together 🙂

Processor Expert Driver Suite 10.3 Project with GNU ARM Eclipse Build Tools
It is now easier than ever before to use the GNU ARM Eclipse plugins and Processor Expert. There are still some manual steps, and this post is about all the details to get it working as smooth as possible.
List of Tutorials
- Part 1: Setting up ARM GNU tool chain
- Part 2: Setting up Eclipse IDE
- Part 3: Setting up the debugger (P&E and Segger)
- Part 4: Setting up Processor Expert
- Part 5: Setting up FreeRTOS Kernel Awareness
- Part 6: Linux Host Support with OpenOCD and CMSIS-DAP
- Part 7: GNU ARM Eclipse Plugins
- Part 8: Processor Expert with GNU ARM Eclipse Plugins
- Part 9: DIY Free Toolchain for Kinetis: Part 9 – Express Setup in 8 Steps
- Part 10 – Project Creation with GNU ARM Eclipse 2.1.1
Upgrading Processor Expert Driver Suite to 10.3
If you have the Processor Expert Driver Suite not yet installed, now it would be the time to download the 10.3 Eclipse plug-in version as outlined in this post.
If you followed “Part 4: Setting up Processor Expert“, then you probably have Processor Expert Driver Suite 10.2 installed. Now with the version 10.3 available, it is time to update it. And you do not need to uninstall the existing version: you simply can use the ‘Help > Install new software’ menu, use the ‘Add’ with ‘Archive’ button and browse to the archive file:

Install New Software for Processor Expert Drivers Suite 10.3
Then go through the installation process, with a need to restart Eclipse at the end.
GNU ARM Eclipse Project with Processor Expert
In “Part 7: GNU ARM Eclipse Plugins” I created a non-Processor Expert project. With the latest release of the GNU ARM Eclipse plugins it is now possible to use a Processor Expert project.
💡 Processor Expert projects under the Driver Suite do not set up a proper tool chain, at least not up to V10.3. The projects created are more like ’empty tool chain projects’, and the projects are ‘wrapped around’ e.g. with IAR or Keil projects. It would be possible to create an ’empty’ project with Processor Expert and then configure the GNU ARM Eclipse tool chain for it. I tried that, and that seems to work. Well, almost. I was running into subtle issues (‘print size’ or ‘generate s19’ not working properly, ‘clean’ not working. It looks like the project set up by Processor Expert is really not good. Instead, I’m going the other way: creating an empty GNU ARM Eclipse project, and then change it for Processor Expert.
Creating the Project
I’m using an example for the Freescale FRDM-KL25Z board (ARM Cortex-M0+ core), but the steps are very similar for any other microcontroller.
I’m creating first an ’empty’ Eclipse project with the GNU ARM Eclipse plugins. I use the menu File > New > C Project. In the dialog I give a name for the project, and select ‘Empty Project‘ with ‘Cross ARM GCC‘:

Empty Cross ARM GCC project
Pressing ‘Next’ and going through the rest of the dialogs (nothing critical there). This creates an empty project for me:

Empty GNU ARM Eclipse Project Created
Adding Processor Expert to the Project
Next, I’m adding Processor Expert to that project. For this I select the project in the Project Explorer and use the menu File > New > Other and select ‘Enable Processor Expert for Existing Project‘:

Enable Processor Expert for Existing C Project
Pressing ‘Next’ and confirm/select the project to be used for the action:

Selecting Project
Pressing ‘Next’, and I select the processor to be used:

Selecting Processor
Pressing ‘Next’. Depending on the processor selected, I have the choice of packages:

Selecting Package
Pressing ‘Next’, I have to select the ‘GNU C Compiler’ as Target Compiler:

Select Target Compiler
Pressing ‘Next’, it asks me to confirm the folders to be created:

Creating Folders
With ‘Finish’, my project gets ‘Processor Expert Enabled’:
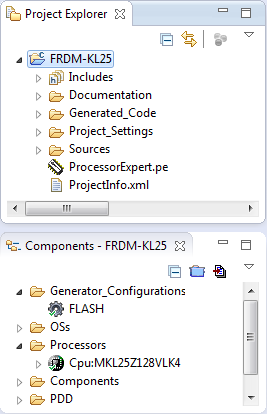
Processor Expert Enabled Project
Now I need to change some of the project settings.
Build Tool Settings
Next I select the C/C++ Build settings (menu Project > Properties).
First I specify the correct ARM family (e.g. ARM Cortex M0+ for Kinetis L, ARM Cortex M4 for K):

ARM Family Settings
Assembler Include Paths
I need to tell the compiler and assembler the path where to search for the header and include files. They depend on the project file structure, but for Processor Expert projects I add these:
../Generated_Code
../Sources
💡 I can copy-paste paths from the clipboard or from other projects.

Assembler Include Directories
💡 Note that I’m using ‘../directory’ notation, and not using an Eclipse variable. The reason is that I want to have the directory name as short as possible. The path is relative to the output (object files/etc) folder which is the ‘FLASH’ subdirectory I have used as Build Configuration name.
Compiler Include Paths
In a similar way, the compiler include paths get specified. Here I have added paths to the Processor Expert library files:
../Generated_Code
../Sources
../Project_Settings/Startup_Code
"${ProcessorExpertPath}/lib/Kinetis/iofiles"
"${ProcessorExpertPath}/lib/Kinetis/pdd/inc"

Compiler Include Paths
Linker
For the linker I need to specify the linker script file.
..\Project_Settings\Linker_Files\ProcessorExpert.ld
And I disable the startup option, as Processor Expert has created the startup file for me:

Linker Settings
With this, the build tool part should be complete, and the project should compile as usual. And I can add Processor Expert component, generate code as usual.
Debugger Settings
What is missing so far are the settings for the debugger: they stay the same as outlined in “Part 7: GNU ARM Eclipse Plugins“, so not necessary to repeat this here again :-).
Summary
With Eclipse, ARM GNU gcc+gdb, GNU ARM Eclipse plugins and Processor Expert a have a very powerful tool chain. It requires some little plumbing, but the reward is a state of the art tool chain which is not only fast, but powerful and very extensible too. And the advantage of the plumbing is that I have control and knowledge about what is going on behind the scenes :-).
Happy Tooling 🙂

Pingback: DIY Free Toolchain for Kinetis: Part 5 – FreeRTOS Eclipse Kernel Awareness with GDB | MCU on Eclipse
Pingback: DIY Free Toolchain for Kinetis: Part 6 – Linux Host with OpenOCD and CMSIS-DAP | MCU on Eclipse
Pingback: DIY Free Toolchain for Kinetis: Part 7 – GNU ARM Eclipse Plugins | MCU on Eclipse
Pingback: DIY Free Toolchain for Kinetis: Part 1 – GNU ARM Build Tools | MCU on Eclipse
Pingback: DIY Free Toolchain for Kinetis: Part 2 – Eclipse IDE | MCU on Eclipse
Pingback: DIY Free Toolchain for Kinetis: Part 4 – Processor Expert for Eclipse | MCU on Eclipse
Hi,
Nice tutorial, really good improvement from the new Processor Expert.
I followed, like a monkey, the tutorial and at the beginning I did not had the Target Processor configuration items. This was because on the Project -> Properties -> C/C++ Build -> Tool Chain Editor it was Cross GCC selected and not Cross ARM GCC. Now it’s all good.
The code compiles and links but does the bare project code compile without warnings? I have warnings in startup.c.
After the, ‘Invoking: Cross ARM C Linker’
… ‘Finished building target:
I’m not seeing the Create Flash Image or Print size. Does it have to run?
I’m also having as output just an ELF file with the project name and no extension.
Thank you.
LikeLike
Hello,
have you 1) created a PEx project and 2) changed the tool chain? I had this way in my original post, and this leaded to the problems you are reporting.
Can you check the latest update of the post where I use 1) create a GNU ARM project and 2) change it to a Processor Expert project?
Can you confirm you did it as this?
LikeLike
Hi,
Thank you for the quick reply.
I did anything once again with a new project and now it works.
I had at this step: https://mcuoneclipse.files.wordpress.com/2014/01/empty-cross-arm-gcc-project.png the Cross GCC selected. Changing later to Cross ARM GCC seems that is does not fully work.
I think I’ll export the current one as template.
Thank you again.
Great work.
LikeLike
The thanks really go to Liviu (the maintainer of the GNU ARM Eclipse Plugins).
And thanks for finding the problem you had. I make a note in the post, as it is easy to select the wrong tool chain.
And changing the tool chain afterwards did not work well for me too.
LikeLike
Hi Erich,
Based on your recommendation I managed to get as far as installation of the GNU ARM cross compiler, Eclipse, the GNU ARM Eclipse plugin and failed on the critical Processor Expert 10.3 eclipse plugin due to a seemingly missing dependency package com.freescale.updater.touchpoint 1.0.0. Some googling about has turned up nothing thus far. It would seem the required package may have been included in PEx 10.2 or earlier and is missing in 10.3. I am running Win8 and will now attempt to install under linux in an effort to rule out Windows.
Any thoughts? Has anyone else experienced a similar dependency problem when clean installing PEx10.3?
Sigh! matb
LikeLike
UPDATE: I solved the above issue by first installing com.freescale.eclipse.3.7.updater.custom.updatesite.zip prior to the Processor Expert 10.3 Eclipse plugin installation. I ended up finding a download for com.freescale.eclipse.3.7.updater.custom.updatesite.zip here (community freescale com/servlet/JiveServlet/download/304336-252686/com.freescale.eclipse.3.7.updater.custom.updatesite.zip).
LikeLike
Thanks for that link! That helps until Freescale puts the link to the file on their web site.
LikeLike
This helped me too, setting up the latest PE for a student and wasn’t working till i found the updater.
LikeLike
Pingback: DIY Free Toolchain for Kinetis: Part 9 – Express Setup in 8 Steps | MCU on Eclipse
Pingback: DIY Free Toolchain for Kinetis: Part 3 – Debugger (GDB Server with P&E and Segger) | MCU on Eclipse
Pingback: DIY Free Toolchain for Kinetis: Part 10 – Project Creation with GNU ARM Eclipse 2.1.1 | MCU on Eclipse
Pingback: GNU Additional Tools: Create Flash Image, Print Size and Extended Listing Options | MCU on Eclipse
Pingback: McuOnEclipse Releases on SourceForge | MCU on Eclipse
Pingback: Adding Processor Expert to Atollic TrueSTUDIO | MCU on Eclipse
Pingback: Tutorial: Web Server with the ESP8266 WiFi Module | MCU on Eclipse
First: Thank you a lot for your detailed tutorial!! 🙂
But I got stuck. When I try to Build the console shows:
“../Sources/main.c:43:1: sorry, unimplemented: Thumb-1 hard-float VFP ABI”
Do you have any suggestions how to deal with this problem? I googled and tried different things but I didnt get it to work.
I use Ubuntu 16.04.; Kinetis Design Studio 3.2.0 and the KL25Z board.
Johann
LikeLike
It looks to me like you are somehow using fPU (floating point) instructions which are of course not supported by the KL25Z (which is a Cortex-M0+ without FPU).
Can you check your project/compiler settings? In KDS (Project > Properties > C/C++ build > settings > Tool Settings) the instructions should be set to ‘Thumb (-mthum)), and oll the other settings to ‘Toolchain default’.
I hope this helps,
Erich
LikeLike
Thank you a lot for your fast response. I solved the problem. I think it is a bug in the ARM GNU toolchain. In Project > Properties > C/C++ build > settings > Tool settings > Target Processor
i could only change
ARM family -> cortex-m0plus)
Achitecture ->Toolchain default
Instruction set -> Thumb (-mthumb)
Endianess ->Toolchain default
Unaligned access -> Toolchain default
everything else was grayed out and I was not able to change it. And Float ABI was per default set to “FP instructions(hard)”. I also tried to set “Other target flags” manually but it failed.
The solution was to first set in the ARM family field a different processor like cortex-m4 (in this case the Float ABI is not grayed out) and set it to “Toolchain default” then I changed the processor back to cortex-m0plus and tadaa! It worked.
Thank you for your very very helpful tutorials and I wish a good evening.
Johann
LikeLike
ok, then really the “FP instructions(hard)” was the root cause of that problem. How did you create that project? Maybe something is configured in a wrong way in the template for that project.
LikeLike
Ah, i think I got my fault.
I did everything as mentioned in your Tutorial but when I “Enable Processor Expert for Existing C Project” there is one different step to yours.
It says “Review the changes that need to be done in the existing project to be compatible with Processor Expert”
And everything is selected by default so I didn’t changed it.
(1) Set toolchain to use Cortex M0+ core (disable if not applicable)
(2) Set toolchain to use Cortex M4 core (disable if not applicable)
(3) Set toolchain to use FPU (disable if not applicable)
(4) Set used FPU type (disable if not applicable)
(5) Use linker file generated by Processor Expert
If I desselect (2),(3),(4) it work as it should.
Thank you!
By the way this also solved another issue I had:
Processor Expert said” Serial_LDD is not supported by selected processor”
LikeLike