Mostly unnoticed (at least for myself), SEGGER has enabled some of the J-Link debug probes to support the CMSIS-DAP debug protocol.

This greatly enhances the use of J-Link debug probes for CMSIS-DAP based tools.
Continue reading
Mostly unnoticed (at least for myself), SEGGER has enabled some of the J-Link debug probes to support the CMSIS-DAP debug protocol.
This greatly enhances the use of J-Link debug probes for CMSIS-DAP based tools.
Continue readingA Triumvirate is or Triarchy is built by three individuals which lead or rule something. In this article I want to rule a project with Eclipse CDT, Visual Studio Code and with building it from the command line for automated builds.
So what if I have an Eclipse project (say MCUXpresso IDE and SDK), and want to build it on a build server, and and I want to use the same time the project with Eclipse IDE and Visual Studio code?
Key to this is CMake: I’m keeping the Eclipse CDT features, adding CMake with Make and Ninja to the fix, and have it ‘ruled’ by three different ’emperor’: Eclipse, Visual Studio Code and from a shell console:

We all should know it: dynamic memory usage can be dangerous. There can be memory fragmentation, use-after-free, out-of-memory and memory leaks. While I do prefer static memory allocation for embedded systems, using a dynamic memory allocation in some applications is not avoidable or just makes sense.
In one of my lecture modules we develop a ‘Boulder’ game, where the player has to collect underground diamonds and avoid moving monsters:

I’ll show you have FreeRTOS memory usage can be tracked and monitored.
Continue readingThe MCU-Link debug probe comes without an enclosure. To protect the hardware against ESD issues, I had created a 3D printed enclosure for it. That one worked fine, but takes some time to print it. If you have to build many enclosures for a full classroom setup, then a laser cutter is much faster. And to create some variations, I have decided to cut it with different materials and colors. To be environment friendly, extra glue is needed, and with recycled PMMA, different colors are possible too.

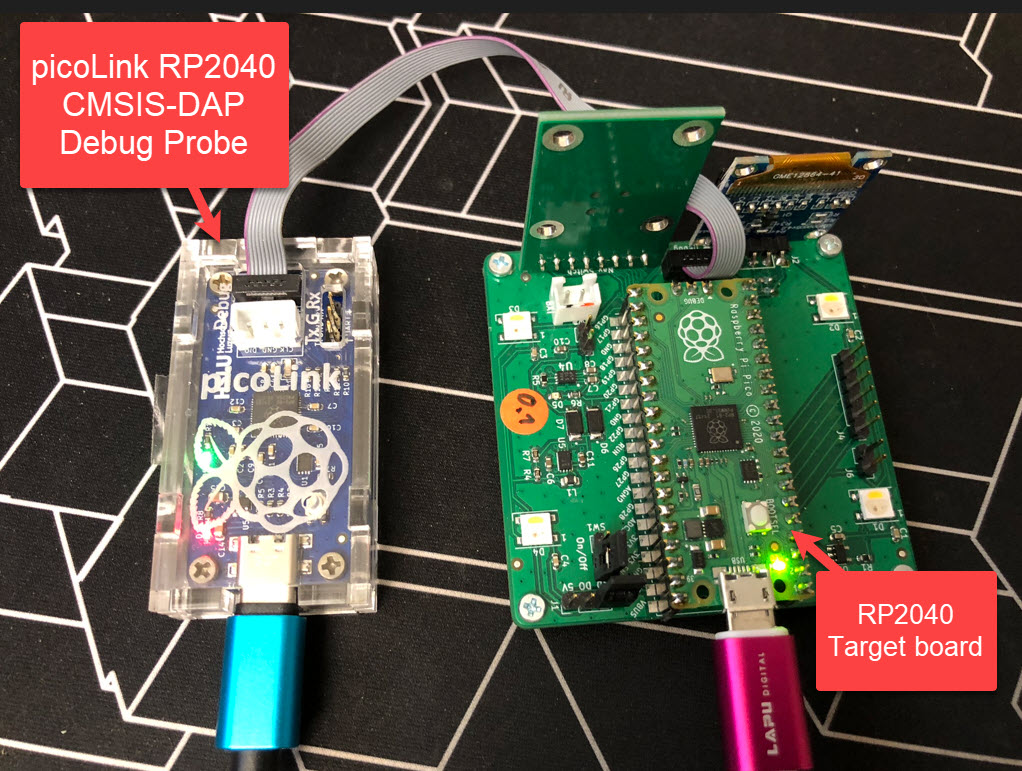
One essential part of embedded development is the ability to debug the target application. The good thing with the Raspberry Pi Pico RP2040 Eco-system is: One can use another RP2040 Pico board as a debug probe to debug other ARM Cortex-M devices.
But instead using a Raspberry Pi Pico board with some wires, why not building a dedicated board? The result is a small, versatile and open source debugging probe which virtually can debug any ARM Cortex-M device as a standard ARM CMSIS-DAP probe:
By default, the debugger cares about the initial register settings after connecting to the target. But for special cases like using a bootloader combined with a loaded application, this requires a bit more than the usually ‘standard procedure’. For example I need to set both a custom program counter (PC) and stack pointer (SP).

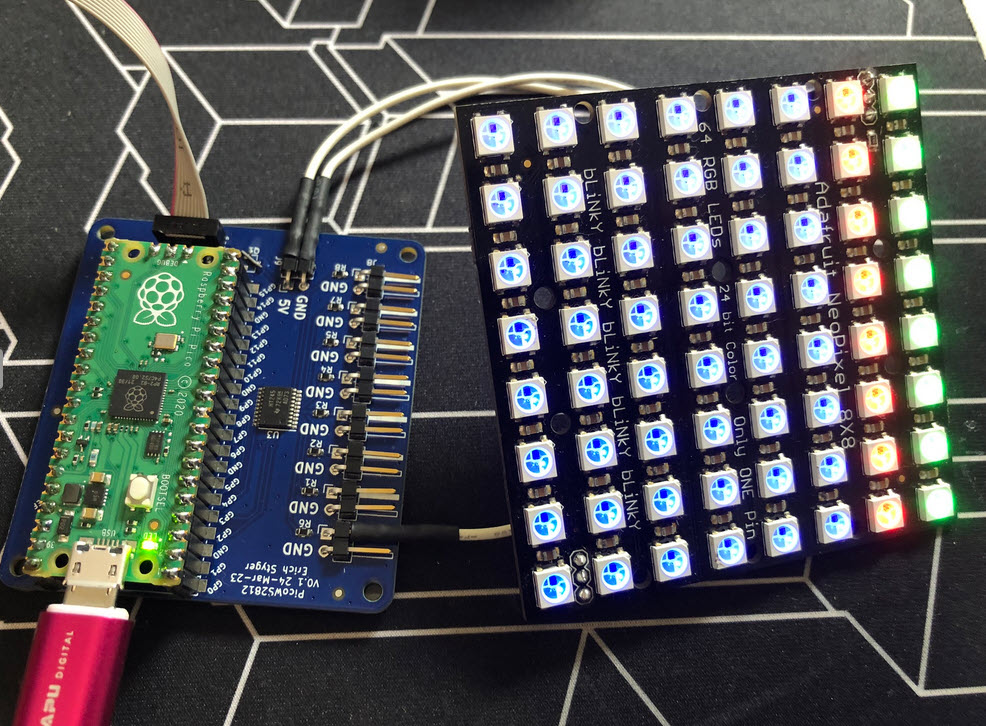
I love the WS2812B (aka SK6812) addressable LEDs: they are inexpensive and available in different packages. I have used them in different projects, including the MetaClockClock one. I used the NXP Kinetis for these projects, but because they are not available any more, for a new project we had to choose a new microcontroller, with the Raspberry Pi Pico RP2040 as the winner.