What could be wrong with this code:
volatile uint16_t myDelay; void wait(uint16_t time) { myDelay = 0; while (myDelay<time) { /* wait .... */ } } void TimerInterrupt(void) { myDelay++; }?

What could be wrong with this code:
volatile uint16_t myDelay; void wait(uint16_t time) { myDelay = 0; while (myDelay<time) { /* wait .... */ } } void TimerInterrupt(void) { myDelay++; }?
One of the ‘goodies’ of the FRDM-KL46Z is the Freescale MAG3110 magnetometer. The MAG3110 is a tiny 2×2 mm device:
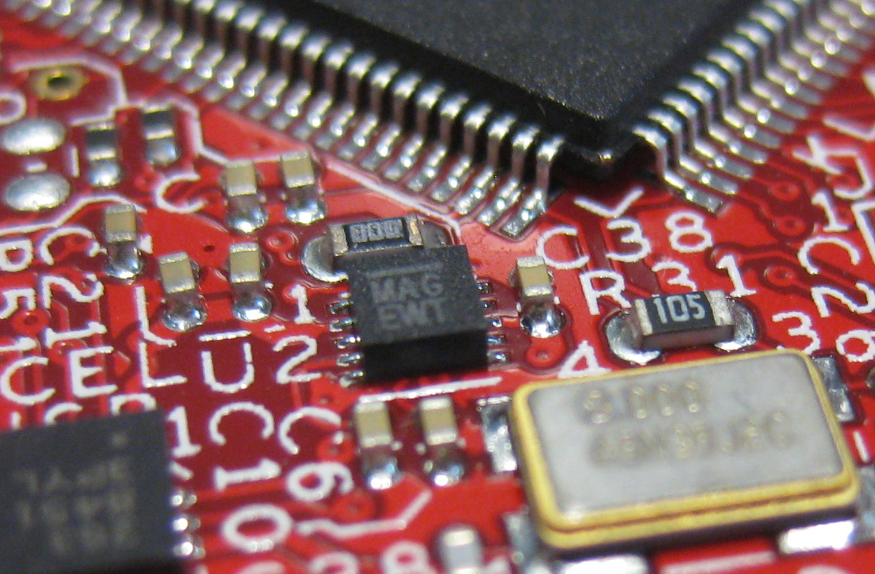
MAG3110 on FRDM-KL46Z
What was missing so far is a Processor Expert component for it. This post is about closing this gap…
So far I have covered in this tutorial series how to install ARM GNU gcc, adding Eclipse, followed by adding GNU GDB debugger, and then adding Processor Expert. I’m using FreeRTOS a lot in my projects, and luckily there is a Kernel Awareness Plugin available for FreeRTOS for GDB in Eclipse. This tutorial is about how to install and use it.

Queues and Tasks
I covered in a previous tutorial how add ARM gcc to Kepler Eclipse to build a DYI toolchain. I’m using Processor Expert a *lot* in my project, because it simplifies and speeds up the development of my embedded applications. What is missing so far is how Processor Expert can be added to Eclipse. As Kepler is as of this writing the latest Eclipse version, this tutorial is using that version.
❗ Eclipse Luna is *NOT* supported in Processor Expert 10.4! Eclipse Luna is expected to be supported in Processor Expert 10.5 coming out in 2015! So if you are using Processor Expert 10.4, then make sure you are using Eclipse Kepler.

Processor Expert Project in Kepler Eclipse
I finally completed my project turning the FRDM-KL25Z board into a USB mouse device :-). The form factor and the capabilities of the Freedom board makes it a great board for implementing it as a ‘custom mouse’. All what I need is the USB stack running on it and have it acting as USB HID Mouse device.
FRDM-KL25Z enumerated as USB HID Mouse Device
A week ago, the updated FreeRTOS V7.5.0 has been released on FreeRTOS.org. So time to have my Processor Expert FreeRTOS component updated as well :-).

FreeRTOS V7.5.0
This is the third part of a tutorial series how to ‘do-it-yourself’ a tool chain for the Freescale Kinetis microcontroller, with the FRDM-KL25Z as example. The tool chain is using GNU ARM gcc plus Eclipse Kepler release. So far I have the following parts:
So far things are very generic. But with debugging it means different hardware, and different hardware connections. And for this connection we need a GDB Server.
Eclipse CDT features a GNU Debugger (GDB), and this is what I want to use here: debugging my microcontroller with GDB inside Eclipse. In order to debug the microcontroller, I need two other things: a GDB Server and a Debug Probe.

GDB with GDB Server
This is the second part of a multi-part tutorial about how to set up an open source tool chain with GNU ARM gcc + Eclipse to build and debug an application for Kinetis ARM devices.

Eclipse Kepler
This is the first part of a multi-part tutorial on setting up a free and functional GNU gcc + Eclipse + debugger environment for use with the Freescale FRDM-KL25Z board.
In this first part, I’m showing how to install the GNU ARM tool chain to build a ‘blinking LED’ application for the FRDM-KL25Z. With 100% free tools 😉

Blinking Red RGB LED made with free tools
For my embedded systems lecture I need a wireless connection to the robot we will develop during that course. So far I have SMAC (IEEE802.15.4) and Bluetooth worked out. But that IEEE802.15.4 (ZigBee) is expensive, and the cheap Bluetooth modules are great for robot-to-host connection, but not for swarm robots which need to communicate to each other. Alex Vecchio (see this post) pointed me to a $2.75 (!) wireless module featuring the Nordic Semiconductor nRF24L01+. Exactly what I needed, with an incredible low price :-).

nRF24L01+ Module Detail
