The Freedom boards FRDM-KL25Z RevE and FRDM-K20D50M make it easier to use it as USB Host device, as they come with a special jumper to provide 5V to the USB device, so my earlier ‘hack’ is not needed any more :-). After I had USB MSD Host working for the FRDM-KL25Z, it was much harder to get the USB stack working for the FRDM-K20D50M board, because somehow the example Freescale provided with their USB stack refused to work properly on my board. After debugging it for several nightly hours, I decided to take my working Processor Expert project for KL25Z and added support for the K20. And the good news is: since tonight this is working :-).
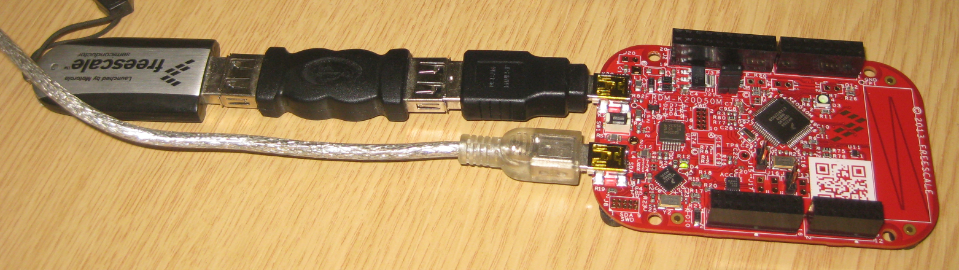
Category Archives: Processor Expert
FreeRTOS Heap with Segmented Kinetis K SRAM
While working on a project for the FRDM-K20D50M, I faced a problem: I was running out of SRAM for my application. The GNU linker reports: “section `.bss’ will not fit in region `m_data'”: 😦
But my device has 16 KByte of SRAM, and I knew I use much less than 10 KByte. So what is the problem? Continue reading
Yet another Bluetooth Firmware: BC04
I was thinking that these common and cheap bluetooth modules have either HC-05 or HC-06 firmware (see this post). Well, I was wrong: there are more! Obviously there many more firmware images available on that British CSR BlueCore4-Ext chip. Mihai Surdeanu contacted me with an updated firmware for a module which has the “BC04” firmware on it. He was so gentle and has sent me an updated Processor Expert component which works with that BC04 firmware :-).
Low Power with FreeRTOS: Tickless Idle Mode
It took me a while to find the time to upgrade to FreeRTOS V7.4.2, but finally it is done :-). What caused me to move from V7.2 to V7.4 is a low power application on the FRDM-KL25Z board. V7.4 comes with two major new features: Queue Sets and Tickles Idle Mode (see this article). The last one if of interest here.
FreeRTOS runs an IDLE task. This one runs when there is no other active task. That task calls an optional Idle task hook which is a perfect place to put the microcontroller into low power mode:
Using the FRDM-KL25Z as USB Keyboard
I miss my old DELL laptop. Ok, the new one I received from IT services is not bad. It is faster and has a better screen. But I’m not really happy with the new keyboard. With the previous keyboard I was able to do a ‘PrtnScrn’ with a single key press. With the new one I need to press Fn + PrntScrn. And this is impossible to do with one hand:
Yes, I have two hands ;-). But many times I need to do ‘print screen’ while having my other hand on the mouse :-(.What else can I do?
Using Keil µVision 4 (ARM-MDK) with Processor Expert Driver Suite
❗ This article has been written for the version 4 of µVision. There is an update for version 5 of µVision here: “Using Keil μVision 5 with Processor Expert“
The good thing with using ARM microcontroller is: there are plenty of tool choices. Even myself, I’m using multiple different tool chains. And while I’m heavily using Eclipse, there are non-Eclipse tool chains which have their advantages too.
The cool thing with CodeWarrior is that beside of Eclipse based, it comes with Processor Expert integrated. And I’m using Processor Expert a lot in my projects. But using Processor Expert does not mean I’m limited to CodeWarrior or Eclipse. So I can use CodeRed or IAR as tool chain with it. And this post is about using Processor Expert with the µVision tool chain from Keil/ARM.
Using the HC-06 Bluetooth Module
After my first post using a Bluetooth module, things have evolved a bit. The challenge with these Bluetooth modules is: they look the same, but having different firmware. I did not fully realize that until I have ordered another bluetooth module from dx.com:
That module comes already on a carrier, so I assumed I can use the same driver as for my other module. I was wrong :-(.
Tutorial: Arduino Motor/Stepper/Servo Shield – Part 2: Timed Servo Moves
You have decided: More than 52% voted in Part 1 that the next topic should be Timed Servo Moves. So here we go :-).
This is about how to move the servos over time, instead of moving it to the given position as fast as possible. I’m using a linear approach here: moving the servos linearly over time.
Tutorial: Arduino Motor/Stepper/Servo Shield – Part 1: Servos
This post starts a small (or larger?) series of tutorials using the Arduino Motor/Stepper/Servo Shield with the FRDM-KL25Z board. That motor shield is probably one of the most versatile on the market, and features 2 servo and 4 motor connectors for DC or stepper motors. That makes it a great shield for any robotic project :-).
Character LCD with 4 Lines
Character LCD’s (like 2 lines with 16 characters each) as in this post are easy to use. Much easier to use compared to full graphical LCDs.
The ones I’m using have either 1 or 2 lines, but I saw that there are 4 line displays too. So far my LCD component only supports one or two lines.


