An important part of every CI/CD pipeline is having a testing phase. In this article I show how to use GNU gcov (coverage) with an embedded target, using Visual Studio Code as front end:
GNU gcov with VS Code
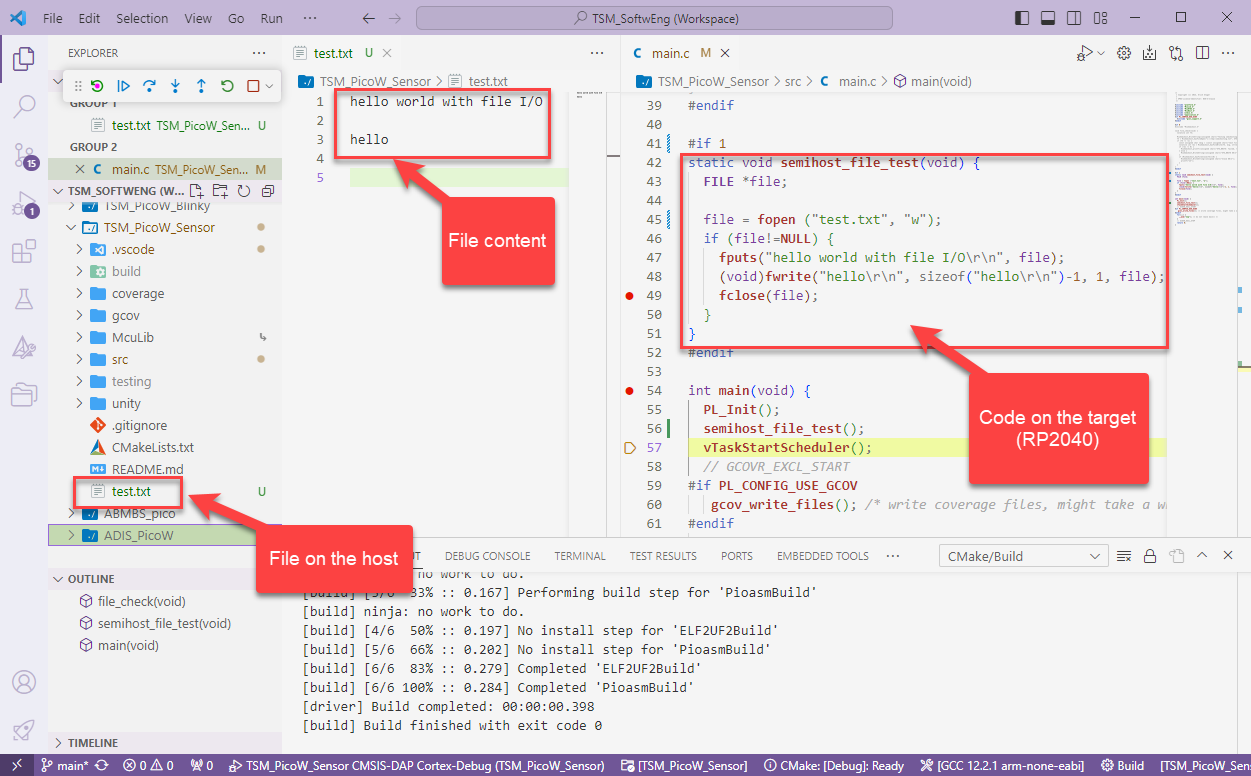
With this, I can run the code on the embedded target which stores the coverage data on the host.
One important thing in using VS Code and CMake projects is that one needs to have a CMake kit assigned to the project. But after a restart of VS Code or if I re-load a project, VS Code has lost the previously assigned CMake kit:
VS Code has forgotten about the previously assigned CMake Kit?
This is very annoying, but luckily I have found a fix for this.
I’m working recently on a new lecture module using the Raspberry Pi Pico (RP2040) board, which highlights several aspects of modern software engineering, including DevOps and CI/CD. An important part of any CI/CD pipeline is testing. For a host application, one could pass arguments to the application, e.g. ‘myapp --test=module1‘, or let it read such information from a configuration file which describes the tests. Or write GNU gcov data to a file to collect coverage information.
Unfortunately, a normal embedded application has no argv[], and many system have no file system. A solution to this problem would be using semihosting with file I/O. Unfortunately for the Raspberry Pi Pico SDK 1.5.1 for the RP2040, there is no semihosting file I/O implemented :-(.
I have now implemented and added file I/O to the SDK, making it possible for the RP2040 to access and use files on the host, among other things. This greatly extends the capabilities of the device, and is very useful for testing, including gathering test coverage information.
In the OOP world, global objects get initialized with a constructor and destroyed at the end with a destructor. Interestingly, the GNU gcc has attributes to mark functions as constructor and destructors, which can greatly simply system startup and shutdown, even if not using C++.
C Function marked as Constructor and called before main()
With the GNU gcc compiler, I can mark functions with an attribute, so they get called before entering main() or after exit of main(). The attribute works both in C and C++, but it especially useful in C to initialize modules in an automated way.
It is interesting to see that modern tools and agile development workflows are getting more and more into the embedded world. CI/CD is a strategy where code changes to an application get automatically integrated, tested and released automatically into a production environment.
In my previous article I showed how to import, build and debug MCUXpresso SDK projects in VS Code. In my lectures and labs we are using a robot based on the NXP Kinetis K22FX512 ARM Cortex-M4F microcontroller, and there is only the v2.13.0 SDK available.
Sumo Robot with K22FX512
The software on the robot uses the latest NXP MCUXpresso SDK v2.3.1. The he Eclipse based MCUXpresso IDE 11.8.0 works fine with all the 2.x SDKs, up to the latest 2.13.0 one.
Upgrading to a newer GNU toolchain always has its risks. That’s why I always recommend to stay on a given toolchain for production code.
But sometimes one needs to upgrade, or gets a code or project that works in one environment, but not in another. Today I have run into a problem with code read-out projection:
Disabled Automatic Placement of Code Read Protection
Well, the code read-out protection is not the root of the problem, but a good example why problems could occur.
VS Code is managing its extensions (see VS Code: MCUXpresso Extension). But to make it usable for embedded development, you need more tools: compiler, linker, debugger, libraries, build system, debug probe support, …
For the experts, this is not a big deal: you know where to get them, and you install them, as shown with another tutorial. But for a class full of students or newcomers to VS Code, this can be a a time consuming and daunting task.
To make the installation easier, NXP has released a ‘dependency checker and installer’ along with their VS Code extension, which makes the setup much easier and simpler.
Don’t worry: despite all the things going on with VS Code, Eclipse is here to stay probably for many more years. The Eclipse foundation is pumping out releases, and so does NXP with their latest MCUXpresso IDE 11.8.0. Lets have a look…
The combination of the NXP MCUXpresso IDE with the NXP MCU-Link Pro debug probe implements a nifty power and energy measurement tool (see New “MCU-Link Pro”: Debug Probe with Energy Measurement). The eclipse based IDE provides a dedicated view to inspect the data collected. It can export and import data, but it is in a binary format. In this article I present a way to export and then convert the data into .csv or any other format for processing or visualizing it in different ways.
Exporting data to gnuplot and csvplot
Using an open source command line tool, the binary data gets converted into a csv format, which then can be consumed by many tools, e.g. gnuplot.