I admit: I love command line interfaces. Because that gives me usually much more control than any GUI (Graphical User Interface). I like the fact that they have put a UART interface on the RIoT board:
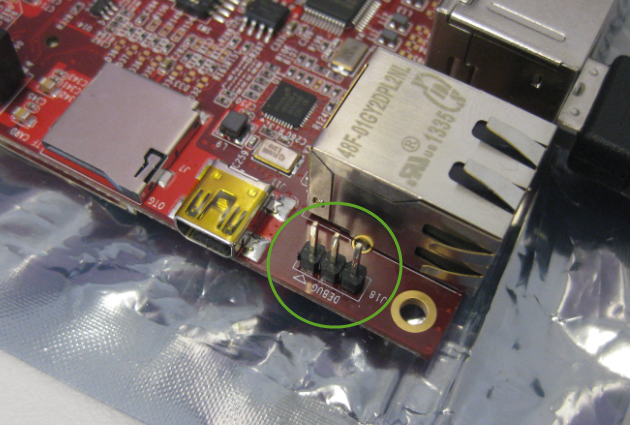
J18 UART on the RIoT Board

I admit: I love command line interfaces. Because that gives me usually much more control than any GUI (Graphical User Interface). I like the fact that they have put a UART interface on the RIoT board:
J18 UART on the RIoT Board
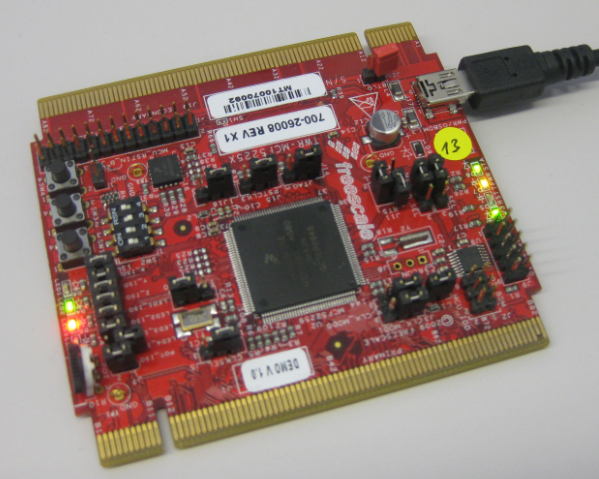
At the university we have several projects with internet connectivity running. Yes, there is a hype around IoT, and in my view many false perceptions around this what it could or should be. Anyway, for these projects in many cases the Raspberry Pi boards are used, and I use a model B board of the Raspy too. I’m very happy with the Raspy, but I wanted to explore different options, so I ordered a RIoT board two weeks ago. When I looked at it the first time, I was thinking that this board could be a better (although larger) board than the Raspberry Pi one: more USB, more GPIO, micro-SD card, more processing power:
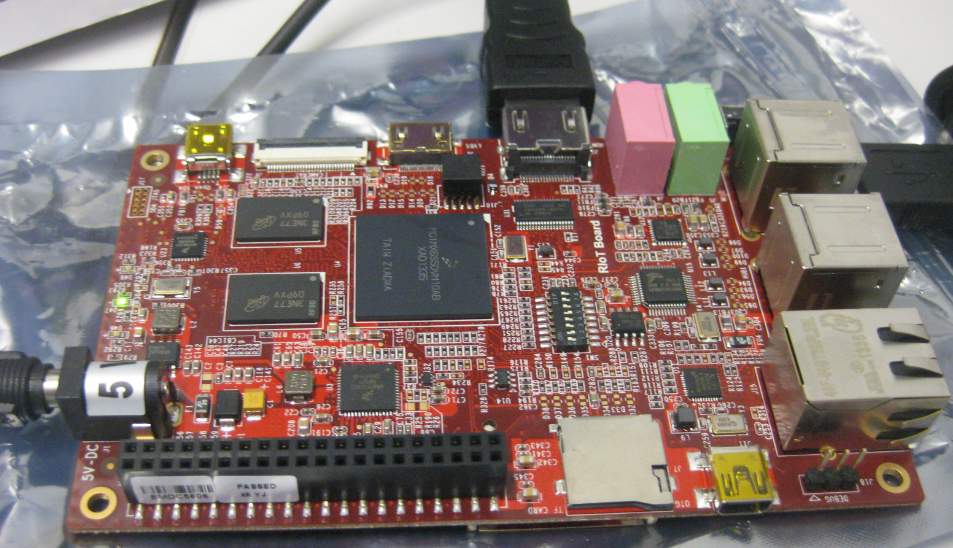
RIoT Board
Well, then this week the new Raspberry Pi B+ came out: more USB, more GPIO, but same processing power as the standard B model.
After the problems with level shifters (see “First Adafruit NeoPixel Blinks with the FRDM Board“) I received the ordered 74HCT245N. Put it on a bread board, wired it up, … only to find out that the device gets very hot… turned off power, and realized that had the device put in with a wrong orientation 😦 oh darn! That’s why I always order things like that in quantities of 3 or more :-). Corrected the mistake, and things are running (or blinking) again 🙂
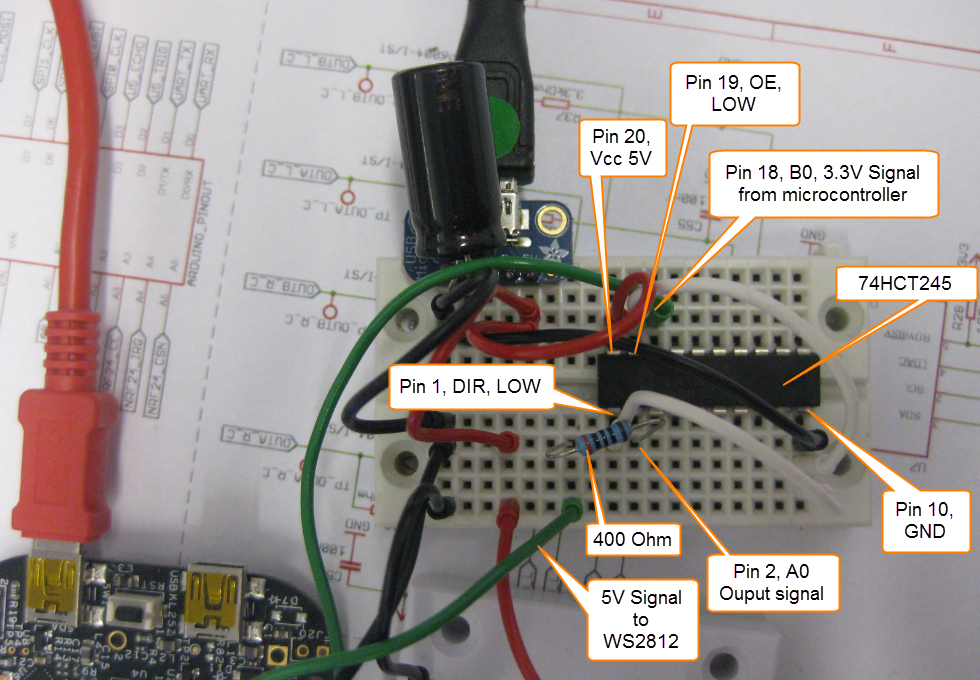
74HCT245 Wiring for WS2812
LEDs are getting smarter these days. An amazing example are the WS2812(B) or ‘NeoPixels’ from Adafruit: RGB LEDs with a built-in constant current controller and shift register! With a single wire data wire hundreds of RGB LEDs can be controlled. Exactly what I need for a project I had in mind for a very long time. So I ordered a bunch of different LEDs from Adafruit to experiment. Exactly the right thing on dark and rainy week-end. And the result is, well: bright and colorful 🙂
Adafruit NeoPixel LED Ring
I had great plans for this Saturday: to work on really cool project. But as so many times, things turned out to be different. Maybe you have read my recent posts about printf()? A colleague wanted to use that article to the same thing with the Kinetis Design Studio on the FRDM-K64F board. I used the FRDM-KL25Z board, so I expected this to work out of the box for him too. Well, turned out that I was wrong about this, and my Saturday was used for debugging and googling about a printf() problem 😦
While things work as expected for the FRDM-KL25Z (ARM Cortex-M0+) and using the standard GNU GCC ARM Embedded from the launchpad, the application traps on the K64F (ARM Cortex-M4F) in initialise_monitor_handles() with KDS:

Trap in initialize_monitor_handles()
The Freescale Kinetis Design Studio (KDS) V1.0.1 beta is using a different GNU ARM toolchain than the ARM Inc. supported one on launchpad (GCC ARM Embedded). Additionally, KDS is using newlib 1.19 and newlib-nano 1.0, while there just has been a new release of the GCC ARM Embedded a month ago with the 4.8.4 update 2 release in June this year. So how to upgrade KDS to the latest and greatest GCC ARM Embedded?
In “Semihosting with Kinetis Design Studio” I’m using the debugger with semihosting to output text with printf(). But how to use a physical serial connection instead?
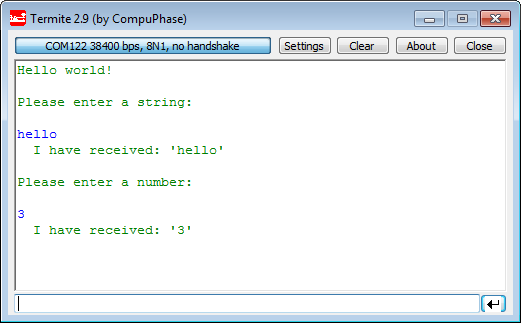
printf() and scanf() in action
This post is about how to enable and use printf() and scanf() with GNU ARM libraries. I show it both for the Freescale Kinetis Design Studio (KDS) and for stock Eclipse Kepler with the GNU GCC ARM Embedded (launchpad) toolchain and libraries. The principles are the same, just the details are different ;-).
While new Freescale boards come with the OpenSDA debug firmware, I still students using boards with the OSBDM/OSJTAG. And with new CodeWarrior tools, it might be that there is a new OSBDM/OSJTAG firmware, and when I download to a board with an older firmware, the tool will prompt me to update the firmware. To me, after doing this several times, not a big deal. But for someone who sees this the first time, it might not be that easy. So to avoid any further questions, here we go with a step-by-step tutorial how to update the OSBDM/OSJTAG firmware.
MCF52259 Tower Board with OSBDM Firmware
Yesterday Friday afternoon, the students at the Lucerne University of Applied Sciences and Arts in Horw showcased their last semester project work to the public at the university. There were many, many interesting projects, so here are a few to give an idea what has been accomplished …
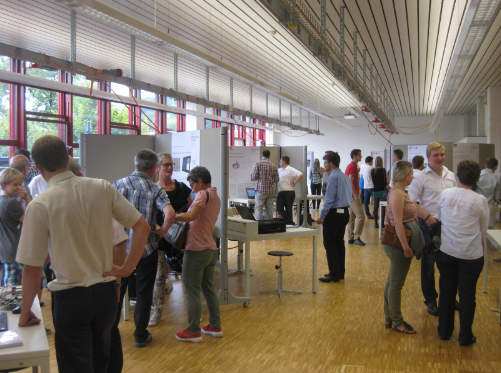
Part of the Exhibition Area
So I have a graphics driver for a Nokia display (see “Zero Cost 84×48 Graphical LCD for the Freedom Board“), I have a joystick shield (see “JoyStick Shield with the FRDM Board“) and I do have a Freescale Freedom board: why not creating a simple game for it? Snake!

Snake Game with FRDM-KL25Z Board