Eclipse is not the fastest and snappiest IDE of the world, but in my view the most versatile and open one. And as with any tool: using it the wrong way does not make it better. Sometimes I have students in my classes which complain that Eclipse is slow, even on a decent machine. Looking at their notebook screens and Eclipse workspace usually tells me right away what they are doing ‘wrong’: there are many, many projects open in the workspace, the most I have seen was more than 50 projects (yikes!!!)!
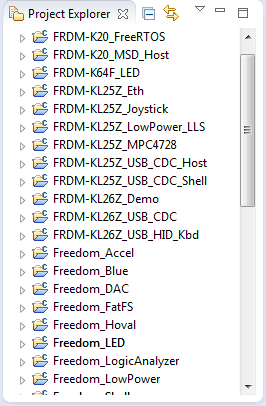
Category Archives: Tips & Tricks
Link to Files and Folders in Eclipse
Eclipse projects have the nice features that they can link to files and folders: so instead of having the physical file, it is just a pointer to a file. This is very cool as that way I can point to shared files, or keep files in a common place referenced from projects, and so on.
As with most things in Eclipse, there is not a single way how to do things. So I’m showing in this post several ways how to link to files and folders.
Overwriting Symbols in the GNU Linker File
I start liking the GNU linker (ld) more and more. Yes, that linker command file syntax needs some time to learn, but it is very powerful. I stumbled over an interesting way how to define linker symbols:
/* Linker file for GNU C Compiler */ /* Entry Point */ ENTRY(Reset_Handler) HEAP_SIZE = DEFINED(__heap_size__) ? __heap_size__ : 0x00000400; STACK_SIZE = DEFINED(__stack_size__) ? __stack_size__ : 0x00000400;
The interesting part is how the HEAP_SIZE and STACK_SIZE symbols are defined.
It checks if e.g. __heap_size__ is DEFINED, and if so, it uses that symbol, otherwise it is using 0x400. Very similar to the C/C++ ‘?’ operator. So I can overwrite the default of 0x400 with my value or symbol. The questions is: from where does the symbol come from?
Hiding a Component in CDE
This post is for the geeks of us: the ones writing Processor Expert components with CDE (Components Development Environment). The problem is the following: In the Components Library view I have all my components listed, such as the USB stack components:
Hacking the Teensy V3.1 for SWD Debugging
I *love* the Freescale Freedom boards, and you probably recognized that with all my projects using them. The Freedom boards are small, inexpensive and can be easily extended with Arduino shields which makes them a great platform for prototyping. But sometimes I just need an ARM microcontroller with some headers, and then the 85mm x 55mm size of the Freedom board is not ideal. That’s nothing new, but I realized that yet again when I did my Adafruit NeoPixel clock: the FRDM board was rather bulky, even if hidden behind that clock. I need something much smaller: the Teensy board!
USB with the TWR-KL25Z48M Board: Check Jumper J18!
When I ordered my first Freedom FRDM-KL25Z board, I placed an order the Tower TWR-KL25Z48M shortly afterwards. But I was so happy with the FRDM-KL25Z, and because the FRDM board is much less expensive and easier to handle, that Tower board was sitting in my board shelf, waiting for a maybe a student project or to get any other use of it. Well, I can tell that my students wanted the FRDM board, not the Tower board ;-). But when I saw this week in the Freescale forum a user asking for a USB example for that Tower board, I thought that now I could at least use that board to help someone out.
Converting S19 Files into Binary Files with GNU objcopy
Typically I can create with my build the file I usually need (like an S19). See “S-Record Generation with gcc for ARM/Kinetis” how to do this in CodeWarrior, or “Binary Files for the mbed Bootloader with Eclipse and GNU ARM Eclipse Plugins” how this works in Kinetis Design Studio. The basis of all this is the GNU objcopy utility (see “S-Record Manipulation with GNU objcopy and Burner Utility”). So what if I just have an S19 (S-Record) file and need it in a different format, e.g. as .bin (binary) file for the mbed bootloader which only accepts .bin (raw binary) files?
LED Clock with Kitchen Hot Pan Protector
When I showed my 60 NeoPixel LED clock prototype to my daughter and her girlfriend, and they both wanted to have one right away :-). Well, that clock was just a proof of concept, with lots of temporary wiring. So I decided this week-end to beautify it and to make it look nice and clean(er). There is nothing like a week-end project with adding a few more LEDs and features :-).
A Compendium: is this what you are looking for?
When I started this blog back on February 1st 2012 with a ‘hello world‘ post, I did not know where and how this well end up. WordPress.com (the host of this blog) counted 1862 views in that first month. 30 months later (time is flying by!), views they are beyond 100k every month! Thanks to you all for commenting and liking posts, which is very encouraging. And there was one suggesting made recently which I would like to address:
Adding the CAM8000-D Camera Module to the RIoT Board
One reason for me to buy the RIoT board was that it has a camera connector. So I had ordered the CAM8000-D module from Farnell (part number 2362812). The Farnell product page was not clear if it comes with the 30pin FPC cable, but luckily, it shipped with it:


