After having imported the repository with the SDK, it is now time to create a first project.


After having imported the repository with the SDK, it is now time to create a first project.
In a previous article I have installed the MCUXpresso extension and used the MCUXpresso Installer to install the necessary development tools.
In this article I’m going to import the SDK.

VS Code is managing its extensions (see VS Code: MCUXpresso Extension). But to make it usable for embedded development, you need more tools: compiler, linker, debugger, libraries, build system, debug probe support, …
For the experts, this is not a big deal: you know where to get them, and you install them, as shown with another tutorial. But for a class full of students or newcomers to VS Code, this can be a a time consuming and daunting task.
To make the installation easier, NXP has released a ‘dependency checker and installer’ along with their VS Code extension, which makes the setup much easier and simpler.

“There is no such thing as a free lunch.”
https://en.wikipedia.org/wiki/No_such_thing_as_a_free_lunch
And this applies to VS Code and many of its extensions. You agree to the licensing conditions, and you pay with your data.
VS Code source code is MIT licensed, but the binaries you can download and install have telemetry built in: you are giving Microsoft your usage data in return for using VS Code.
If you are concerned about this, and looking for free and libre open source binaries of VS Code, then have a look at MIT-Licensed VSCodium.

Now about the biggest reason why everyone loves VS Code: colors!
Seriously, one of the first things you might change is the color theme, and VS Code features this in the getting started:

This is another article in my series about Visual Studio Code. After having it installed (see VS Code: IDE Installation), this one is about starting the IDE
I can start the IDE from the shortcut (if created during the installation) or by typing code in console/command prompt shell (e.g. Windows PowerShell). To be able to use the code command requires VS Code to be present in the PATH.

Nothing has to last forever, and VS Code might not be the right thing for everyone. VS Code can go overboard with all the extensions and things it had proposed to install. Up to a point that one needs to get re-started again. Or because you tasted VS Code, but you did not like it.
That’s OK, you can uninstall it, after you have installed it (see VS Code: IDE Installation). The catch is: the uninstall does not a full removal, as settings and extensions do not get removed.

This article shows how to fully uninstall VS Code.
Continue readingThis is the beginning of an article series about Visual Studio Code. The first step is to download and install it.

I’m using the RS-485 field bus in many of my projects: it is very reliable and robust, and easy to implement. And with ModBus there is standardized protocol used in building automation or industrial control applications. For example I’m using the protocol to communicate between battery systems and an EV Charger.
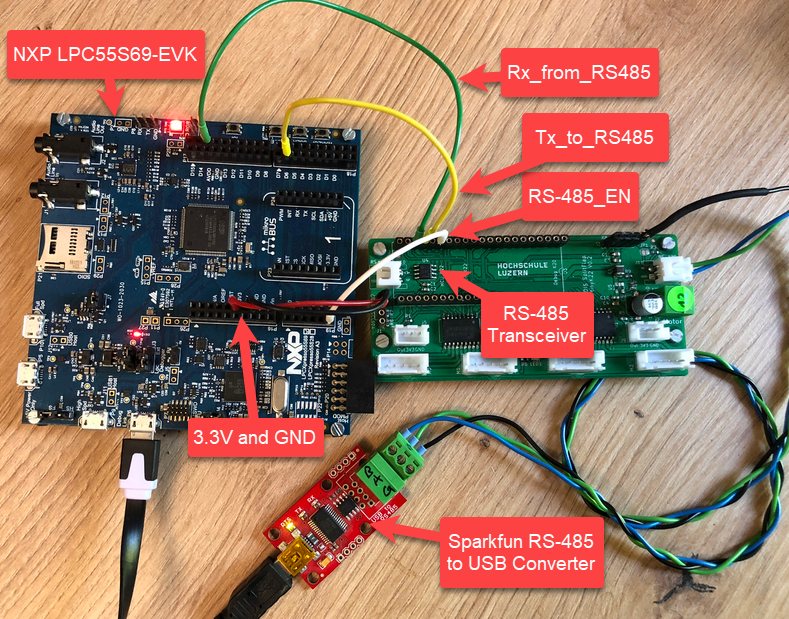
In this article I show you with an example, how the NXP LPC55S69 can be used with RS-485.
Continue readingThe combination of the NXP MCUXpresso IDE with the NXP MCU-Link Pro debug probe implements a nifty power and energy measurement tool (see New “MCU-Link Pro”: Debug Probe with Energy Measurement). The eclipse based IDE provides a dedicated view to inspect the data collected. It can export and import data, but it is in a binary format. In this article I present a way to export and then convert the data into .csv or any other format for processing or visualizing it in different ways.

Using an open source command line tool, the binary data gets converted into a csv format, which then can be consumed by many tools, e.g. gnuplot.
