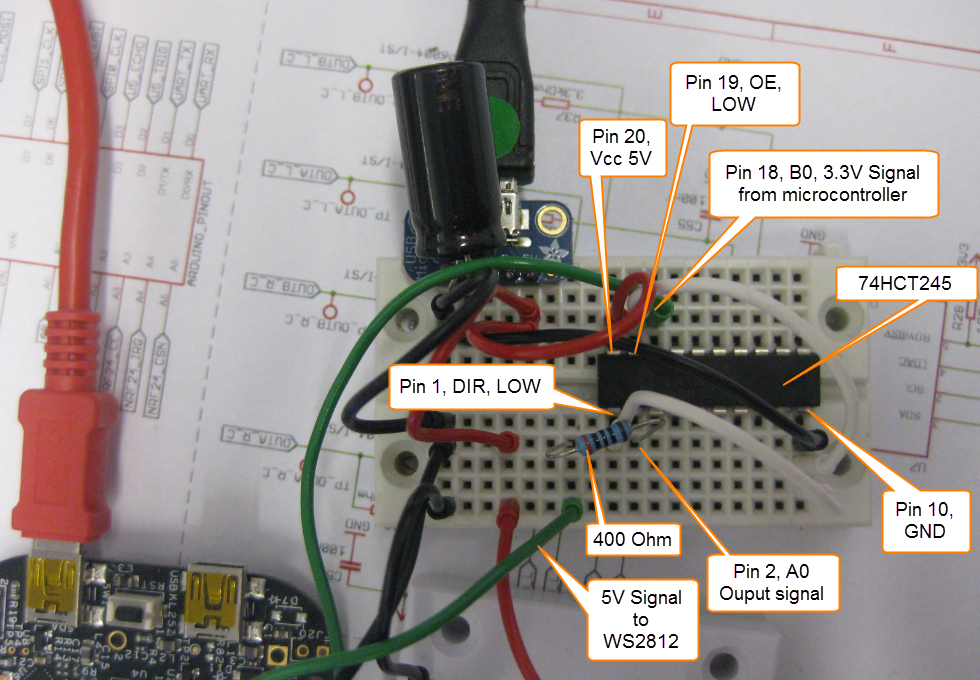
When I showed my 60 NeoPixel LED clock prototype to my daughter and her girlfriend, and they both wanted to have one right away :-). Well, that clock was just a proof of concept, with lots of temporary wiring. So I decided this week-end to beautify it and to make it look nice and clean(er). There is nothing like a week-end project with adding a few more LEDs and features :-).
Category Archives: Boards
Zumo Robot with WiFi and GPS
It always takes longer than expected: actually 4 weeks from the first board out of the reflow oven (“First New Zumo Board out of the Reflow Oven“), until I have it working on the Pololu chassis. But now I have a mobile Robot with WiFi, GPS, Bluetooth, nRF24L01+ and all the stuff I have dreamed off 🙂
Adding the CAM8000-D Camera Module to the RIoT Board
One reason for me to buy the RIoT board was that it has a camera connector. So I had ordered the CAM8000-D module from Farnell (part number 2362812). The Farnell product page was not clear if it comes with the 30pin FPC cable, but luckily, it shipped with it:
Adding the Wi-Pi WiFi Dongle to the RIoT Android Board
The wired Ethernet connectivity works out of the box with the Freescale RIoT board :-). But to make it more ‘IoT’ capable, a WiFi connection would be a big plus. The element14 site did not tell which WiFi dongles are supported, and a thread in the element14 forum on that topic has not really provided much information. With some risks I decided to order the Wi-Pi WiFi dongle which seems to be popular in the Raspberry Pi community (thus that Wi-Pi name?). And as I anyway have a Raspy, my thinking was that if it does not work with the RIoT board, I still can use it with the Raspy 🙂
Flashing a new Android Image to the RIoT Board
I understand the challenges of board vendors: they produce many boards, and typically they have an early/first firmware version on it. And when that board gets shipped to customers, that firmware typically is old and outdated :-(. Same for the RIoT board I have received: I was desperately trying some advanced features, only to realize that the firmware on the board is an older one from this year. So time to update the Android on that board.
Terminal Connection to the RIoT Board
I admit: I love command line interfaces. Because that gives me usually much more control than any GUI (Graphical User Interface). I like the fact that they have put a UART interface on the RIoT board:
First Steps with the RIoT Board and Android
At the university we have several projects with internet connectivity running. Yes, there is a hype around IoT, and in my view many false perceptions around this what it could or should be. Anyway, for these projects in many cases the Raspberry Pi boards are used, and I use a model B board of the Raspy too. I’m very happy with the Raspy, but I wanted to explore different options, so I ordered a RIoT board two weeks ago. When I looked at it the first time, I was thinking that this board could be a better (although larger) board than the Raspberry Pi one: more USB, more GPIO, micro-SD card, more processing power:
Well, then this week the new Raspberry Pi B+ came out: more USB, more GPIO, but same processing power as the standard B model.
Adafruit NeoPixel Clock with 60 LEDs
After the problems with level shifters (see “First Adafruit NeoPixel Blinks with the FRDM Board“) I received the ordered 74HCT245N. Put it on a bread board, wired it up, … only to find out that the device gets very hot… turned off power, and realized that had the device put in with a wrong orientation 😦 oh darn! That’s why I always order things like that in quantities of 3 or more :-). Corrected the mistake, and things are running (or blinking) again 🙂
First Adafruit NeoPixel Blinks with the FRDM Board
LEDs are getting smarter these days. An amazing example are the WS2812(B) or ‘NeoPixels’ from Adafruit: RGB LEDs with a built-in constant current controller and shift register! With a single wire data wire hundreds of RGB LEDs can be controlled. Exactly what I need for a project I had in mind for a very long time. So I ordered a bunch of different LEDs from Adafruit to experiment. Exactly the right thing on dark and rainy week-end. And the result is, well: bright and colorful 🙂
UART printf() for the FRDM-K64F Board and Kinetis Design Studio
I had great plans for this Saturday: to work on really cool project. But as so many times, things turned out to be different. Maybe you have read my recent posts about printf()? A colleague wanted to use that article to the same thing with the Kinetis Design Studio on the FRDM-K64F board. I used the FRDM-KL25Z board, so I expected this to work out of the box for him too. Well, turned out that I was wrong about this, and my Saturday was used for debugging and googling about a printf() problem 😦
While things work as expected for the FRDM-KL25Z (ARM Cortex-M0+) and using the standard GNU GCC ARM Embedded from the launchpad, the application traps on the K64F (ARM Cortex-M4F) in initialise_monitor_handles() with KDS:


