In the age of high-resolution graphical LCDs using a character display might look like a bit anachronistic. But these displays provide a lot of value for me as they are robust, available in different shapes and number of lines. And such a character display can be a better solution for an industrial application.
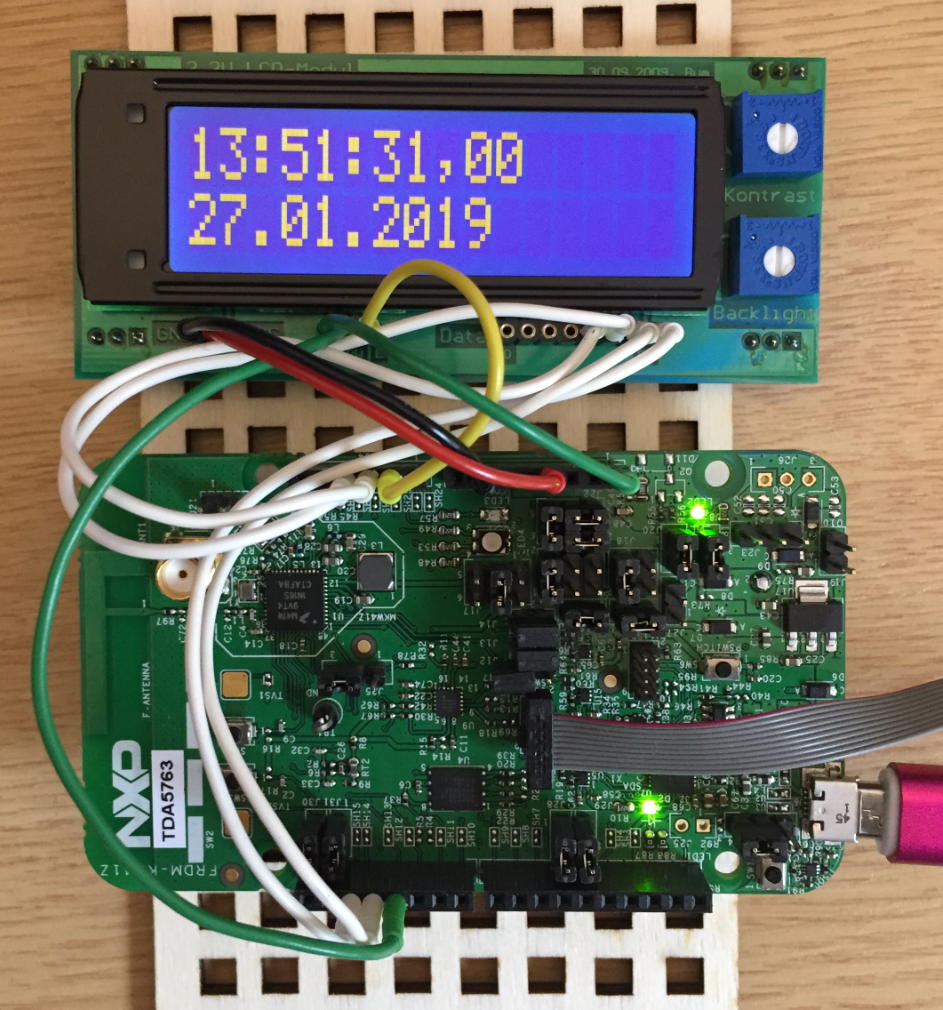
hd44780 display with NXP FRDM-KW41Z Board
In HD44780 2×16 Character Display for Kinetis and Freedom Board I have used Processor Expert to generate the driver. In this article it is about using that driver with the NXP MCUXpresso IDE and SDK.
Outline
This article describes how to use HD44780 (or compatible) character displays with the NXP MCUXpresso SDK and the Eclipse based MCUXpresso IDE. With the help of this article you should be able to use these kind of displays for any NXP MCUXpresso SDK project.
The HD44780 is a commonly used character display controller which can be found in many variants. Just watch out that your display is using the same logic levels (3.3V or 5V) as the microcontroller you want to use with it.
The driver used here has the following features:
- Static configuration of the driver using configuration header files
- Support for 1, 2, 3 or 4 line displays
- 4bit or 8bit GPIO data bus
- Support for reading data from display
- Configurable delays to work with ‘non-standard’ displays
- Variable character width setting
- Configurable pin assignments
- Support for custom character sets
- Special hardware abstraction to work with any SDK and version
For example projects see the links at the end of the article.
Software/Tools
For reference, I have used the following software and tools in this article:
- MCUXpresso IDE 10.3.0 b2200 with integrated MCUXpresso Configuration Tools

mcuxpresso ide 10.3.0
- NXP FRDM-KW41Z Board
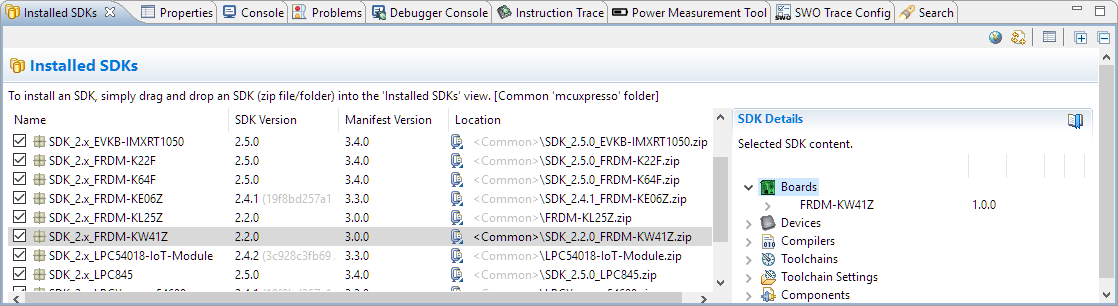
- MCUXpresso SDK for FRDM-KW41Z v2.2.0:

sdk for frdm-kw41z
- McuOnEclipse driver library from https://github.com/ErichStyger/McuOnEclipseLibrary

Project
The first step is to create an ’empty’ project with the default settings:
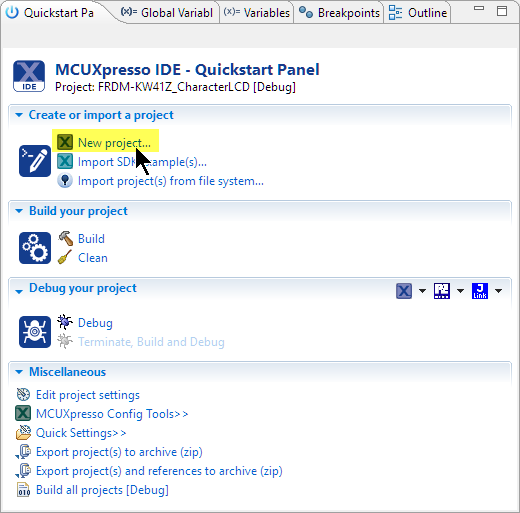
create new project
Clone the GitHub Repository on https://github.com/ErichStyger/McuOnEclipseLibrary or download the files as zip file and place the files into the project:
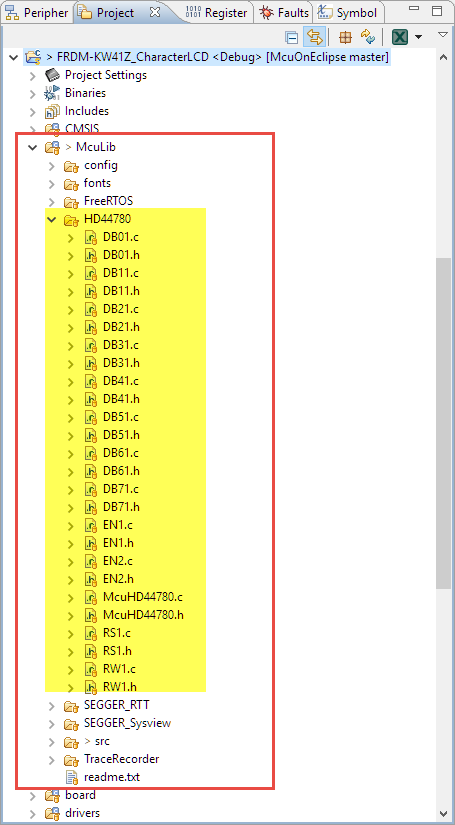
mculib with hd44780 files
The HD44780 files are in a dedicated folder with pin files for each GPIO pin. The configuration header files are located in the ‘config’ folder.
If added a ‘normal’ folder, make sure the folder is *not* excluded from the build:
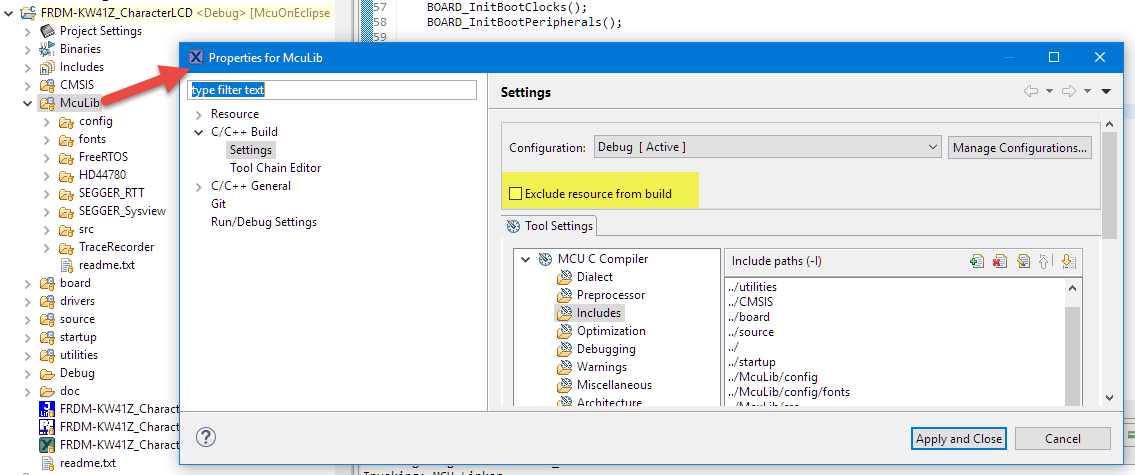
not excluded from build
In the ‘source’ folder there is usually the file ‘semihost_hardfault.c’. This one is not needed as the McuLib comes with its own version for all Cortex-M devices. So you could delete it or exclude it from the build:
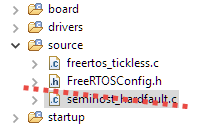
semihost_hardfault.c
The drivers are using GPIO pins, so make sure that have the SDK drivers for GPIO, Port and Sim present in your project with the ‘manage components’ setting:
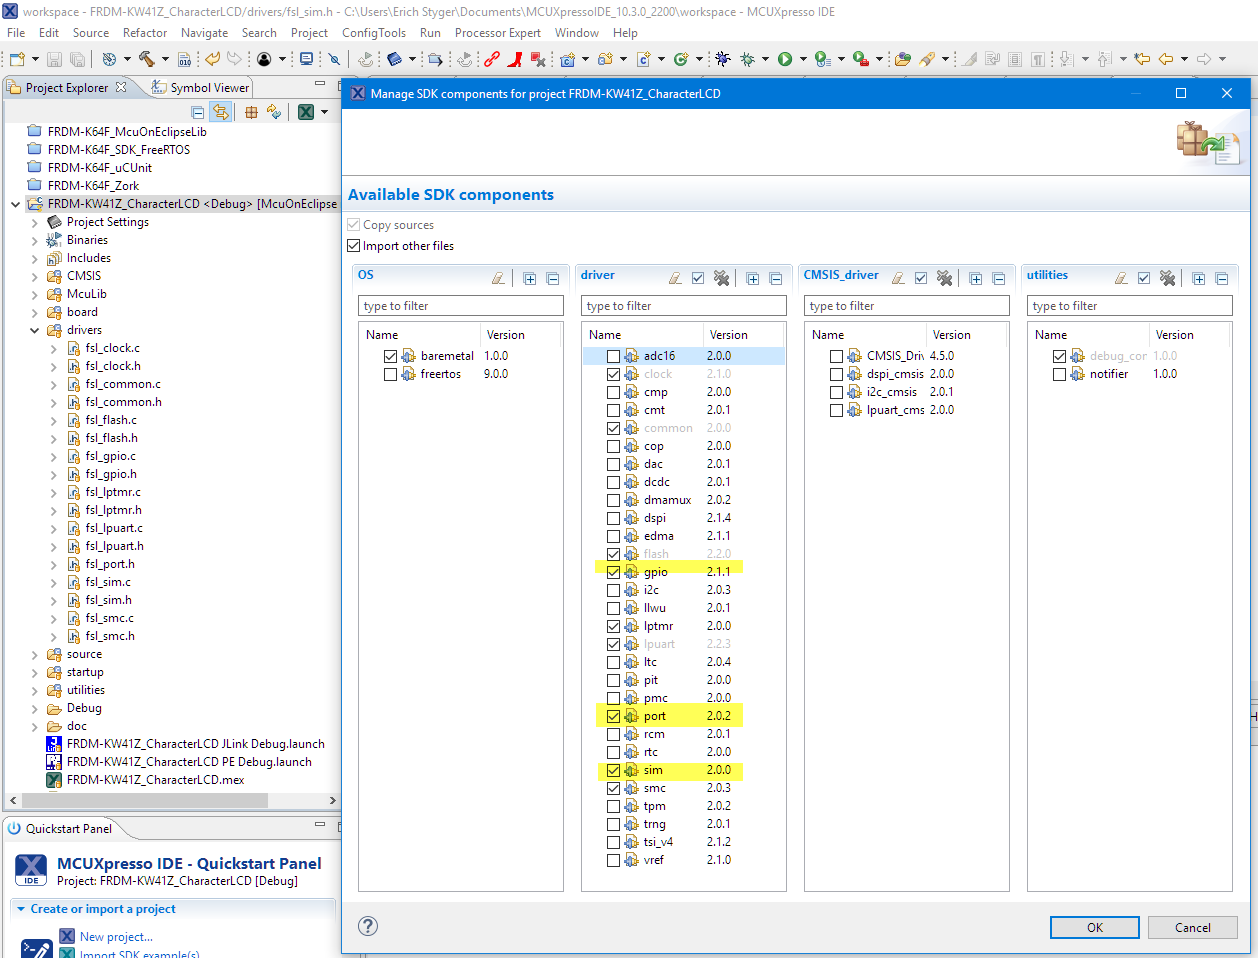
manage components
Compiler Settings
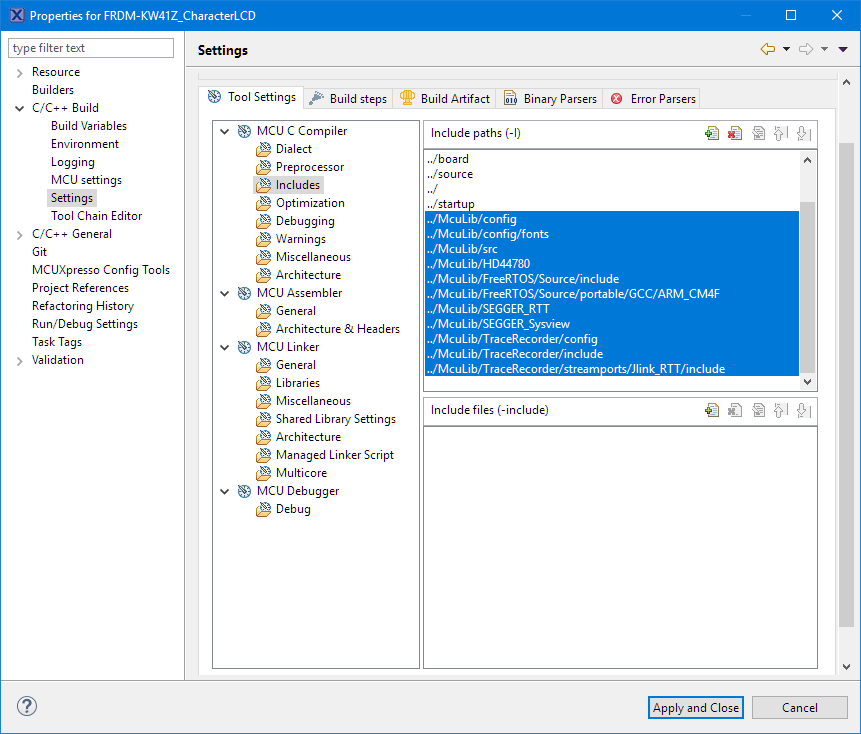
The next step is to tell the compiler where to find the header files. Add the following lines (copy-paste) to the compiler include path settings. This will enable the project to use much more than discussed here (e.g. Segger RTT, SystemView, Percepio Trace, FreeRTOS, …).
../McuLib/config
../McuLib/config/fonts
../McuLib/src
../McuLib/HD44780
../McuLib/FreeRTOS/Source/include
../McuLib/FreeRTOS/Source/portable/GCC/ARM_CM4F
../McuLib/SEGGER_RTT
../McuLib/SEGGER_Sysview
../McuLib/TraceRecorder/config
../McuLib/TraceRecorder/include
../McuLib/TraceRecorder/streamports/Jlink_RTT/include
mculib includes
McuLib Configuration
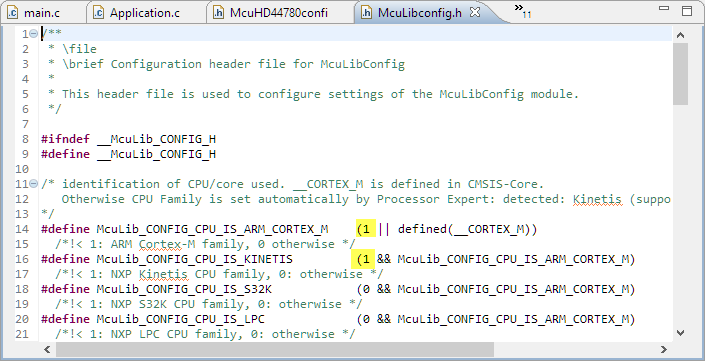
The main library configuration is in config/McuLibconfig.h. This header file allows a very flexible configuration of the drivers so it can adapt to many MCUs and cores.
The first thing is to check the CPU/Core setting. As the MCU on the FRDM-KW41Z is an ARM Cortex-M0+, the following settings are used:
core configuration

cortex m identification
The next thing to check/configure is the SDK used. In my example I’m using the NXP MCUXpresso SDK V2.2.0:
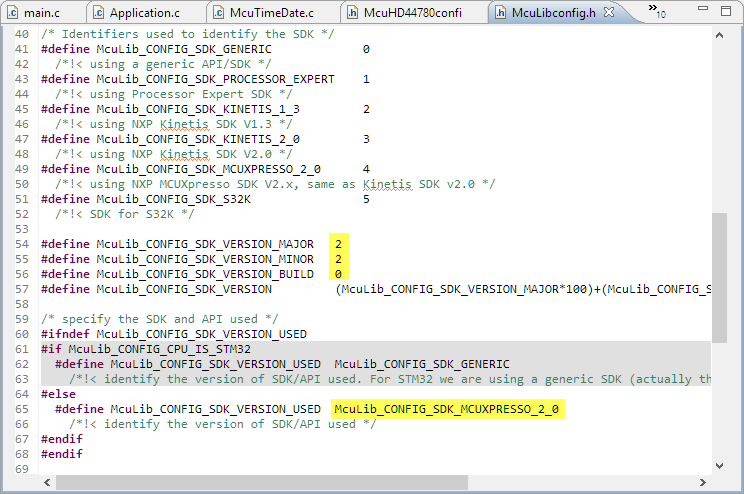
sdk used
Pin Muxing
The driver uses normal GPIO pins: you need at least 4 data GPIO pins with an enable (E) and RS pin (see HD44780 2×16 Character Display for Kinetis and Freedom Board). The easiest way to configure the pins is using the NXP MCUXpresso Configuration tools integrated in the MCUXpresso IDE:

configured lcd pins in mcuxpresso configuration tools
Configure the pins inside the pin configuration header files:

data pin configuration
💡 Note that for above I could directly use the information from the baord.h header file. In order not to add yet another dependency, the pin GPIO/Port setting and pin number is kept in a dedicated header file for each pin for better portability.
Configure all pins depending on your hardware connections (RS, RW, E1, E2, number of data pins.
LCD Configuration
The LCD is configured in config/McuHD44780config.h. Here things as the number of character lines, the number of data pins or read ability or timing of the display can be configured:

hd44780 configuration
Driver Initialization
In the application code, the used drivers have to be initialized. The HD44780 uses the McuWait driver has to be initialized too.
Because every display might be different and might need some time to power-up, I recommend to add a delay before accessing the display.
McuWait_Init();
McuWait_Waitms(50); /* give hardware time to power up */
McuHD44780_Init();
It might need 50 ms, 100 ms or even more, so you have to try this out. The McuHD44780_Init() will initialize all the pins and the display. After that, the display can be used.
Using the Driver
There are functions to clear the display, to write to it or to enable things like blinking cursor. The example code below clears the display and writes the data/time:
  McuHD44780_Clear();
  {
    DATEREC date;
    TIMEREC time;

    buf[0] = '\0';
    McuTimeDate_GetTime(&time);
    McuTimeDate_AddTimeString(buf, sizeof(buf), &time, (uint8_t*)"hh:mm.ss,cc");
    McuHD44780_WriteLineStr(1, (char*)buf);

    buf[0] = '\0';
    McuTimeDate_GetDate(&date);
    McuTimeDate_AddDateString(buf, sizeof(buf), &date, (uint8_t*)"dd.mm.yyyy");
    McuHD44780_WriteLineStr(2, (char*)buf);
  }
hd44780 display with NXP FRDM-KW41Z Board
Summary
I’m using HD44780 displays if a simple display solution with no graphics is all what I need. I’m using the McuLib shown here in many projects: it works with many microcontroller and different SDK versions. The driver uses configuration header file(s) and easily integrates into Eclipse IDE (MCUXpresso IDE), SDK and graphical configuration tools (MCUXpresso Configuration Tools).
Happy Charactering 🙂
Links
- Example project used in this article: https://github.com/ErichStyger/mcuoneclipse/tree/master/Examples/MCUXpresso/FRDM-KW41Z/FRDM-KW41Z_CharacterLCD
- HD44780 2×16 Character Display for Kinetis and Freedom Board
- Character LCD with 4 Lines and up to 64 Characters per Line
- Character LCD with 4 Lines
- MCU library: https://github.com/ErichStyger/McuOnEclipseLibrary
- MCUXpresso IDE: http://www.nxp.com/mcuxpresso/ide
- MCUXpresso SDK: https://mcuxpresso.nxp.com
- FRDM-KW41Z board: https://www.nxp.com/products/processors-and-microcontrollers/arm-based-processors-and-mcus/kinetis-cortex-m-mcus/w-serieswireless-conn.m0-plus-m4/freedom-development-kit-for-kinetis-kw41z-31z-21z-mcus:FRDM-KW41Z

Erich
Some 15 years ago we developed this: http://www.mjbc.ch/eng/VIP/VIP_Panel_3.htm
(or http://www.mjbc.ch/de/VIP/VIP_panel_3.htm in German). For an LCD development a week ago I used it to get refresh my memory on the controls and found it still works to 90% under Widows 10.
Install it and start it and open the design “piccolo.vip” which is in the installation directory: C:\Program Files (x86)\M.J. Butcher Consulting\VIPpanel eng\VIPDesigns\FrontPanels since it has a 2 x 24 line LCD. Or there are a couple of other pre-installed design files too.
In the menu “View | Control Panel” all of the HD44780 commands can be tested and user defined characters created.
It is fun too!
Regards
Mark
LikeLike
Hi Mark,
good old times 🙂
LikeLike
Hi Erich
I got stuck trying to build a new project using your tutorial. I created a blank project, then followed your instructions as far as LCD configuration. Then I tried to use your driver in my own main.c but it wouldn’t build. To see where the problem is, I just copied your main.c, application.c, application.h, and Platform.h into my new project. This gave the following errors when I tried to Build it. (There were more errors of the same sort but I didn’t copy them)
“Building target: KW41Z_LCD_Test.axf
Invoking: MCU Linker
arm-none-eabi-gcc -nostdlib -Xlinker -Map=”KW41Z_LCD_Test.map” -Xlinker –gc-sections -Xlinker -print-memory-usage -Xlinker –sort-section=alignment -mcpu=cortex-m0plus -mthumb -T KW41Z_LCD_Test_Debug.ld -o “KW41Z_LCD_Test.axf” ./utilities/fsl_debug_console.o ./startup/startup_mkw41z4.o ./source/Application.o ./source/main.o ./source/mtb.o ./source/semihost_hardfault.o ./drivers/fsl_clock.o ./drivers/fsl_common.o ./drivers/fsl_flash.o ./drivers/fsl_gpio.o ./drivers/fsl_lptmr.o ./drivers/fsl_lpuart.o ./drivers/fsl_smc.o ./board/board.o ./board/clock_config.o ./board/peripherals.o ./board/pin_mux.o ./CMSIS/system_MKW41Z4.o
Memory region Used Size Region Size %age Used
PROGRAM_FLASH: 12532 B 512 KB 2.39%
./source/Application.o: In function `AppTask’:
C:\Users\steph\Documents\MCUXpressoIDE_10.3.0_2200\workspace\KW41Z_LCD_Test\Debug/../source/Application.c:48: undefined reference to `LEDpin1_NegVal’
C:\Users\steph\Documents\MCUXpressoIDE_10.3.0_2200\workspace\KW41Z_LCD_Test\Debug/../source/Application.c:49: undefined reference to `vTaskDelay’ ……………………”
Am I missing a step, or doing something wrong?
Thanks
Steve
LikeLike
Hi Steve,
I think your folder with McuLib is not compiled (not included in the build). I have added a step/screenshot (plus the thing about the semihosting hardfault) to the article, search for ‘exclude from build’.
I hope this helps,
Erich
LikeLike
Hi Erich
Yes, you were right. I have fixed those errors but now get this error:
“../McuLib/src/McuArmTools.c:82:14: fatal error: fsl_sim.h: No such file or directory
#include “fsl_sim.h” /* system integration module, used for CPU ID */
^~~~~~~~~~~
compilation terminated.”
Sorry to be a pain and thank you for your patience!
Steve
LikeLike
Hi Steve,
I’m sorry, it looks I have skipped steps which are kind of natural for me (‘deformation professionelle’?). You have to manage the components, I have added as screenshot about this to the article.
I hope this helps,
Erich
LikeLike
Hi Erich
Everything works now! Thank you so much. This has been a valuable process of education for me in using MCUXpresso (as well as how to use the LCD). I shall let you enjoy your afternoon now without further interruptions.
Steve
LikeLike
Great to hear that it is working now 🙂 And thanks to your valuable input the article is much more complete and will help many others to go through the process.
LikeLike
Hi Erich,
I’m late to the party in 2022, but I copied and pasted this code into a MK66F at 180MHz project, got the minor compile bugs sorted out – to the point where it doesn’t complain, but that doesn’t mean it’s “correct” (shrug) – and got the LCD display to output “characters,” but they look like the junk you get in a terminal emulator app when the baud is not the same on both sides (am I giving my age away?). I should qualify that with “some of the time.” For example, printing a line of text *mostly* prints what I want, with an occasional character out of whack. The trailing spaces to pad out the row are wonky, generally. I’m pretty sure the LCD modules are operational, because I’ve tested them with an Arduino library with a Teensy 4.1, and they work just fine, there.
In your development testing, did you come across a timing routine that was particularly troublesome, or “touchy”? Any routines that stand out so I can narrow my troubleshooting? Or is this code base just inappropriate for an MK66F?
Hmm. Ok. After a little more testing, it *does* seem like a timing issue. When I put a McuWait_Waitms( 10 ); after each McuHD44780_* command, it seems to be a little more reliable: not perfect, but a bit more consistent.
LikeLiked by 1 person
Follow-up: I needed a wait after the LCD init for it to stabilize:
McuHD44780_Init();
McuWait_Waitms(50);
It worked a bit more reliably – especially for McuHD44780_LoadSoftChar() – and I didn’t need as many waits after each HD44780 command, but there was still a small bit of wonkiness that was probably related to timing. At least I know what to expect, and how to work around it, mostly. Thanks for the library, Erich!
LikeLiked by 1 person
Hi Aaron,
I have to admit that I did not use the library or that display for a long time. But the McuWait_Waitms() had some improvements, in the sense that it waits more accurately (at least on an M4 with cycle counter enabled). So it could be that this affected the driver, because these waits are really some busy/realtime waiting to ensure that the display has enough time. It could be that your display controller somehow is different affecting the timing too.
LikeLike
To add on this: yes, depending on the internal display power supply, you even need to wait up to 100 ms before talking to the display (initializing it). That might help too.
LikeLiked by 1 person
anyone have any proyect where is esp8266 y rs232 with mcuexpreso?… thankss
LikeLiked by 1 person
Yes, I did that, see https://mcuoneclipse.com/2019/09/01/programming-the-esp32-with-an-arm-cortex-m-usb-cdc-gateway/ and https://mcuoneclipse.com/2014/11/30/tutorial-web-server-with-the-esp8266-wifi-module/
LikeLike
Hi Erich,
I want to know how can we import any image to MCUXpresso and display it using LCD. I’m using LPC 1769. If possible can you show how it works?
LikeLike
On the HD44780 you cannot really display images. All what you could do is to create custom characters, which is supported in the driver.
LikeLike
thankyou!! for your response.
LikeLike