
I have used semihosting more and more in my projects. However, there are several disadvantage of using it:
- Without special handlers, it only works with an active debug connection going on. Without a debugger attached, the application blocks otherwise.
- Because it needs debugger interactions, it is rather slow (only several hundreds of bytes per second)
The good news is that Segger supports with their debug probes a faster approach with what they name Real Time Terminal (RTT). And it even runs without a debugger attached to the board: all what I need is a Segger J-Link probe (or Segger J-Link OpenSDA) plus a telnet client.
Segger RTT Viewer
Similar to semihosting, RTT provides a bidirectional channel between the target and the host. This can be used for sending/receiving text and data. Have a look at https://www.segger.com/jlink-real-time-terminal.html to understand how RTT works.
💡 Currently RTT does not support file I/O what is now supported by the Segger Semihosting implementation. So I can send/receive data over communication channels with RTT, but there is no logic implemented to open/store files. Unless I would add a special RTT client on the host. There is a dedicated RTT channel for reading/writing to a file, but this is for a single file only. This is not enough to dump gcov trace and coverage data, as this would need multiple files. Maybe Segger will add generic file I/O in RTT in the future?
The difference between RTT and normal semihosting is that RTT is handled at the probe level, and not at the debugger level. That makes RTT much, much faster.
In the following I describe how to use RTT in an application. I’m using Kinetis Design Studio V3.0.0 with the Kinetis SDK, but the steps can be applied to any other environment.
Using RTT
First, download the Segger RTT Implementation and example files from https://www.segger.com/jlink-real-time-terminal.html (Section “Example Code”).
Add the following files to your project:
- RTT_Syscalls_GCC.c
- SEGGER_RTT_Conf.h
- SEGGER_RTT_printf.c
- SEGGER-RTT.c
- SEGGER_RTT.h
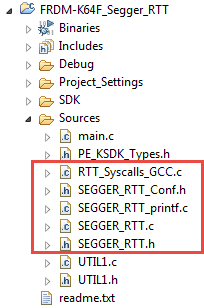
Segger RTT Files in Project
Using RTT in Application
The Segger software package comes with several examples, including using VT100 terminal color codes or implementing a simple menu system.
SEGGER_RTT_WriteString(0, "Hello World from SEGGER RTT!\r\n");
The following functions are present in the API:
| SEGGER_RTT_Read() | Read data from an input buffer. |
| SEGGER_RTT_Write() | Write data to an output buffer. |
| SEGGER_RTT_WriteString() | Write a zero-terminated string to an output buffer. |
| SEGGER_RTT_printf() | Write a formatted string to an output buffer. |
| SEGGER_RTT_GetKey() | Get one character from input buffer 0. |
| SEGGER_RTT_HasKey() | Check if a character is available in input buffer 0. |
| SEGGER_RTT_WaitKey() | Wait for a character to be available in input buffer 0 and get it. |
| SEGGER_RTT_ConfigUpBuffer() | Configure an up (output) buffer. |
| SEGGER_RTT_ConfigDownBuffer() | Configure a down (input) buffer. |
| SEGGER_RTT_Init() | Initialize RTT Control Block structure when using RAM only targets. |
| SEGGER_RTT_SetTerminal() | Set the “virtual” Terminal to use for output on channel 0 via Write and WriteString. |
| SEGGER_RTT_TerminalOut() | Send a zero-terminated string via a “virtual” terminal. |
Telnet Connection
RTT is using a telnet connection on localhost:19021. You can use any telnet client. I’m using a client in Eclipse (see “Serial Terminal View in Eclipse Luna“). This gives me the ‘Target Explorer Terminals’ view:
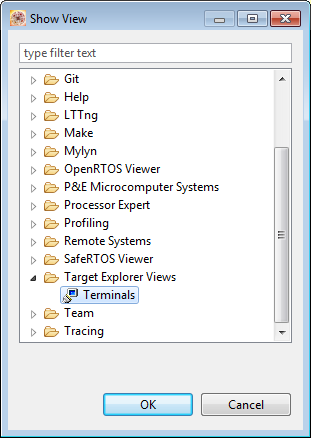
Target Explorer Terminals View
In the view, I open a new Terminal with the icon:
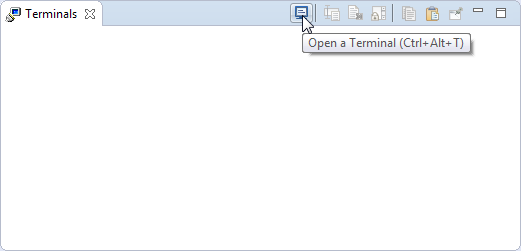
Open New Terminal
Next, I configure that I want to connect to the localhost on telnet port 19021:
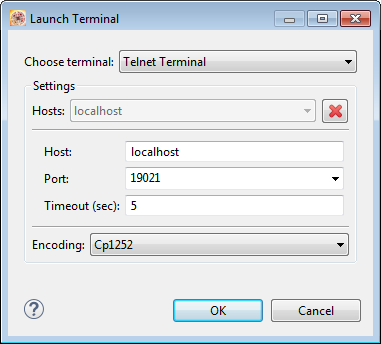
Eclipse Telnet Configuration
With this, I can send and receive strings inside Eclipse:
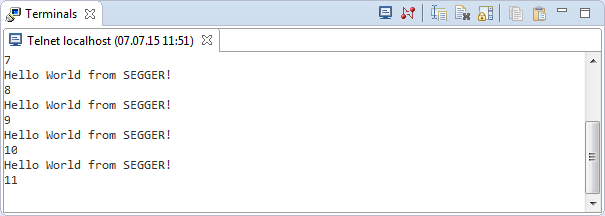
Output to Eclipse Terminals View
Of course it is possible to use any other telnet client.
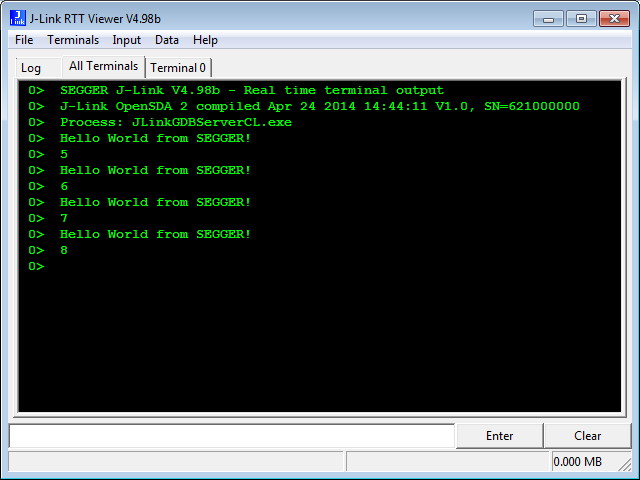
Using Segger JLinkRTTViewer
Another way is to use the Segger RTT viewer, in
c:\Freescale\KDS_3.0.0\segger\JlinkRTTViewer.exe
and then connect to the board/Segger J-Link:
Segger RTT Viewer
Summary
Using the Segger RTT is a better way than normal semihosting, as it is faster and more efficient to use. Yes, it does *not* hook into the normal standard library printf() stuff, but anyway, I want to avoid printf() wherever possible. Yes, it does not support generic file I/O yet, but at least it can read/write one log file. And yes, it depends on having a Segger J-Link or J-Link OpenSDA available. But it is a really cool and convenient feature for anyone using debug probes from Segger.
I have put an example project for Kinetis Design Studio and GNU ARM Embedded (launchpad) tools on Segger RTT Example for FRDM-K64F on GitHub.
Happy Realtiming 🙂

Pingback: FreeRTOS Continuous Trace Streaming | MCU on Eclipse
It does not work in the new version ((;
https://www.segger.com/jlink-rtt.html
LikeLike
New version of J-Link software?
LikeLike
Yes.
LikeLike
Pingback: Tutorial: lwip with the FreeRTOS and the Freescale FRDM-K64F Board | MCU on Eclipse
Pingback: McuOnEclipse Components: 08-Nov-2015 Release | MCU on Eclipse
Pingback: Segger SystemView: Realtime Analysis and Visualization for FreeRTOS | MCU on Eclipse
Pingback: nRF24L01+ 2.4 GHz Wireless Connectivity with the tinyK20 Board | MCU on Eclipse
Right it doesnt work, even though SEGGER_RTT_printf.c compiled OK and header is included,
#include
#include
still getting:
undefined reference to `SEGGER_RTT_printf’
the failing call:
SEGGER_RTT_printf(0, “%sResetting in %d second..%s\n”, RTT_CTRL_BG_BRIGHT_RED, 1, RTT_CTRL_RESET);
LikeLike
Hi Don,
so it seems that the module with SEGGER_RTT_printf is not linked with your application? I have not seen any issues on my side.
LikeLike
I am using the Makefile provided by the sample code in nRF5_SDK_11.0.0_89a8197, sample app: \nRF5_SDK\examples\ble_peripheral\ble_app_gls\pca10028\s130\armgcc, how are you using the linker ?
LikeLike
I’m using Eclipse with the GNU ARM Embedded plugins and with the GNU ARM Embedded (lauchpad) GNU toolchain.
LikeLike
Can you provide the linker command you are using ?
LikeLike
Sure, here is it:
Invoking: Cross ARM C++ Linker
arm-none-eabi-g++ -mcpu=cortex-m4 -mthumb -mfloat-abi=hard -mfpu=fpv4-sp-d16 -O0 -fmessage-length=0 -fsigned-char -ffunction-sections -fdata-sections -Winvalid-pch -g3 -T “linker.ld” -Xlinker –gc-sections -L”../Project_Settings/Linker_Files” -Wl,-Map,”App.map” –specs=nano.specs –specs=nosys.specs -o “App.elf” ./Sources/INTRO_RoboLib/Accel.o ./Sources/INTRO_RoboLib/Application.o ./Sources/INTRO_RoboLib/Buzzer.o ./Sources/INTRO_RoboLib/Debounce.o ./Sources/INTRO_RoboLib/Distance.o ./Sources/INTRO_RoboLib/Drive.o ./Sources/INTRO_RoboLib/Event.o ./Sources/INTRO_RoboLib/Identify.o ./Sources/INTRO_RoboLib/KeyDebounce.o ./Sources/INTRO_RoboLib/Keys.o ./Sources/INTRO_RoboLib/LSM303.o ./Sources/INTRO_RoboLib/Laser.o ./Sources/INTRO_RoboLib/LineFollow.o ./Sources/INTRO_RoboLib/MCP4728.o ./Sources/INTRO_RoboLib/Maze.o ./Sources/INTRO_RoboLib/Motor.o ./Sources/INTRO_RoboLib/Music.o ./Sources/INTRO_RoboLib/NVM_Config.o ./Sources/INTRO_RoboLib/Pid.o ./Sources/INTRO_RoboLib/QuadCalib.o ./Sources/INTRO_RoboLib/RNet_App.o ./Sources/INTRO_RoboLib/Reflectance.o ./Sources/INTRO_RoboLib/Remote.o ./Sources/INTRO_RoboLib/RoboShield.o ./Sources/INTRO_RoboLib/SPI.o ./Sources/INTRO_RoboLib/Shell.o ./Sources/INTRO_RoboLib/ShellQueue.o ./Sources/INTRO_RoboLib/ShellTrace.o ./Sources/INTRO_RoboLib/Sumo.o ./Sources/INTRO_RoboLib/Tacho.o ./Sources/INTRO_RoboLib/Test.o ./Sources/INTRO_RoboLib/Timer.o ./Sources/INTRO_RoboLib/Trigger.o ./Sources/INTRO_RoboLib/Turn.o ./Sources/INTRO_RoboLib/Ultrasonic.o ./Sources/INTRO_RoboLib/VS1053.o ./Sources/Events.o ./Sources/main.o ./Project_Settings/Startup_Code/startup.o ./Generated_Code/ADC_Bat.o ./Generated_Code/ASerialLdd1.o ./Generated_Code/BT1.o ./Generated_Code/BUZ1.o ./Generated_Code/BitIoLdd1.o ./Generated_Code/BitIoLdd10.o ./Generated_Code/BitIoLdd11.o ./Generated_Code/BitIoLdd12.o ./Generated_Code/BitIoLdd13.o ./Generated_Code/BitIoLdd14.o ./Generated_Code/BitIoLdd15.o ./Generated_Code/BitIoLdd16.o ./Generated_Code/BitIoLdd17.o ./Generated_Code/BitIoLdd2.o ./Generated_Code/BitIoLdd21.o ./Generated_Code/BitIoLdd22.o ./Generated_Code/BitIoLdd25.o ./Generated_Code/BitIoLdd26.o ./Generated_Code/BitIoLdd27.o ./Generated_Code/BitIoLdd28.o ./Generated_Code/BitIoLdd29.o ./Generated_Code/BitIoLdd3.o ./Generated_Code/BitIoLdd33.o ./Generated_Code/BitIoLdd34.o ./Generated_Code/BitIoLdd35.o ./Generated_Code/BitIoLdd36.o ./Generated_Code/BitIoLdd37.o ./Generated_Code/BitIoLdd38.o ./Generated_Code/BitIoLdd4.o ./Generated_Code/BitIoLdd5.o ./Generated_Code/BitIoLdd9.o ./Generated_Code/Bit_D10.o ./Generated_Code/Bit_D11.o ./Generated_Code/Bit_D12.o ./Generated_Code/Bit_D5.o ./Generated_Code/Bit_D6.o ./Generated_Code/C12.o ./Generated_Code/C13.o ./Generated_Code/C23.o ./Generated_Code/C25.o ./Generated_Code/CD1.o ./Generated_Code/CDC1.o ./Generated_Code/CE1.o ./Generated_Code/CLS1.o ./Generated_Code/CS1.o ./Generated_Code/CSN1.o ./Generated_Code/Cpu.o ./Generated_Code/DCS.o ./Generated_Code/DIRL.o ./Generated_Code/DIRR.o ./Generated_Code/DREQ.o ./Generated_Code/EVNT1.o ./Generated_Code/ExtIntLdd1.o ./Generated_Code/FAT1.o ./Generated_Code/FRTOS1.o ./Generated_Code/GI2C1.o ./Generated_Code/HF1.o ./Generated_Code/I2C1.o ./Generated_Code/I2CSPY1.o ./Generated_Code/IFsh1.o ./Generated_Code/IR1.o ./Generated_Code/IR2.o ./Generated_Code/IR3.o ./Generated_Code/IR4.o ./Generated_Code/IR5.o ./Generated_Code/IR6.o ./Generated_Code/IRQ1.o ./Generated_Code/IntFlashLdd1.o ./Generated_Code/KIN1.o ./Generated_Code/KSDK1.o ./Generated_Code/LED1.o ./Generated_Code/LED2.o ./Generated_Code/LED_IR.o ./Generated_Code/LEDpin1.o ./Generated_Code/LEDpin2.o ./Generated_Code/LEDpin3.o ./Generated_Code/MCS.o ./Generated_Code/MMA1.o ./Generated_Code/MOTTU.o ./Generated_Code/PCA1.o ./Generated_Code/PE_LDD.o ./Generated_Code/PTA.o ./Generated_Code/PTE.o ./Generated_Code/PWML.o ./Generated_Code/PWMR.o ./Generated_Code/PwmLdd1.o ./Generated_Code/PwmLdd2.o ./Generated_Code/Q4CLeft.o ./Generated_Code/Q4CRight.o ./Generated_Code/QuadInt.o ./Generated_Code/RApp.o ./Generated_Code/RF1.o ./Generated_Code/RMAC.o ./Generated_Code/RMSG.o ./Generated_Code/RNET1.o ./Generated_Code/RNWK.o ./Generated_Code/RPHY.o ./Generated_Code/RStack.o ./Generated_Code/RStdIO.o ./Generated_Code/RTT1.o ./Generated_Code/RTT_Syscalls_GCC.o ./Generated_Code/Radio.o ./Generated_Code/RefCnt.o ./Generated_Code/Rx1.o ./Generated_Code/SD1.o ./Generated_Code/SEGGER_RTT.o ./Generated_Code/SEGGER_RTT_printf.o ./Generated_Code/SEGGER_SYSVIEW.o ./Generated_Code/SEGGER_SYSVIEW_Config.o ./Generated_Code/SEGGER_SYSVIEW_FreeRTOS.o ./Generated_Code/SM1.o ./Generated_Code/SMasterLdd1.o ./Generated_Code/SS1.o ./Generated_Code/SW1.o ./Generated_Code/SYS1.o ./Generated_Code/Serial1.o ./Generated_Code/TMOUT1.o ./Generated_Code/TRG1.o ./Generated_Code/TRIG.o ./Generated_Code/TU_QuadInt.o ./Generated_Code/TU_US.o ./Generated_Code/TimerIntLdd1.o ./Generated_Code/TmDt1.o ./Generated_Code/Tx1.o ./Generated_Code/USB0.o ./Generated_Code/USB1.o ./Generated_Code/UTIL1.o ./Generated_Code/Vectors.o ./Generated_Code/WAIT1.o ./Generated_Code/croutine.o ./Generated_Code/event_groups.o ./Generated_Code/ff.o ./Generated_Code/heap_1.o ./Generated_Code/heap_2.o ./Generated_Code/heap_3.o ./Generated_Code/heap_4.o ./Generated_Code/heap_5.o ./Generated_Code/list.o ./Generated_Code/port.o ./Generated_Code/queue.o ./Generated_Code/tasks.o ./Generated_Code/timers.o ./Generated_Code/usb_cdc.o ./Generated_Code/usb_cdc_pstn.o ./Generated_Code/usb_class.o ./Generated_Code/usb_dci_kinetis.o ./Generated_Code/usb_descriptor.o ./Generated_Code/usb_driver.o ./Generated_Code/usb_framework.o ./Generated_Code/wdt_kinetis.o
LikeLike
Thanks, same as what we did, but the map file was still missing the symbol for SEGGER_RTT_printf. You did anything else to get it to work ?
LikeLike
No, I did not do anything special. The function SEGGER_RTT_printf() is in SEGGER_RTT_printf.c. Can you check that you have this, and that you link this file?
LikeLike
i have some question..
when the Power Supply of the target ON->OFF->ON, in other words, maybe the target reset many times, How to ensure that every reset informations are complete, how to ensure the RTT can autoconnected by jlink when target reset…
LikeLike
Segger might be able to answer this. From what I see is that the J-Link is checking and polling the target.
LikeLike
Hi,
I tried to use other telnet program – putty, secureCRT
but it keep refused to be connected.
Could you plz tell me the phase to use other telnet program?
Thanks in advance
LikeLike
Are you sure you are connecting to telnet port 19021?
LikeLike
Hello
I can’t find the “RTT_Syscalls_GCC.c” file. The only file I have similar to that is one called “SEGGER_RTT_Syscalls_GCC.c” but when I add it to the project I get the following:
../rtt/SEGGER_RTT_Syscalls_GCC.c:63:21: warning: ‘struct _reent’ declared inside parameter list
int _write_r(struct _reent *r, int file, char *ptr, int len);
^
../rtt/SEGGER_RTT_Syscalls_GCC.c:63:21: warning: its scope is only this definition or declaration, which is probably not what you want
../rtt/SEGGER_RTT_Syscalls_GCC.c:98:21: warning: ‘struct _reent’ declared inside parameter list
int _write_r(struct _reent *r, int file, char *ptr, int len) {
^
../rtt/SEGGER_RTT_Syscalls_GCC.c:98:5: error: conflicting types for ‘_write_r’
int _write_r(struct _reent *r, int file, char *ptr, int len) {
^
../rtt/SEGGER_RTT_Syscalls_GCC.c:63:5: note: previous declaration of ‘_write_r’ was here
int _write_r(struct _reent *r, int file, char *ptr, int len);
^
rtt/subdir.mk:24: recipe for target ‘rtt/SEGGER_RTT_Syscalls_GCC.o’ failed
make: *** [rtt/SEGGER_RTT_Syscalls_GCC.o] Error 1
Do you know what could be the problem?
Thanks!!
LikeLiked by 1 person
Hi Manuel,
the compiler messages seem to come from the fact that you don’t have the header file included in a proper way.
As for the Segger RTT files I’m using (for Processor Expert), see the Segger folders on https://github.com/ErichStyger/McuOnEclipse_PEx/tree/master/Drivers
LikeLike
Hi Erich
Do I have to use that folder you are referring to? Because I’m using the files from the SEGGER installation.
Thanks!
LikeLike
Hi Manuel,
I pointed to them as a reference. Have a look at these files on GitHub here:
https://github.com/ErichStyger/mcuoneclipse/tree/master/Examples/KDS/FRDM-K64F120M/FRDM-K64F_Segger_RTT
They are using the files from the Segger distribution.
Erich
LikeLike
Hello Erich
I still don’t understand. You say that the files on https://github.com/ErichStyger/mcuoneclipse/tree/master/Examples/KDS/FRDM-K64F120M/FRDM-K64F_Segger_RTT are from the segger distribution but I’ve just installed the j-link 5.12 and performed a beyond compare between the files and there are some important differences. Why are there differences? I mean, why the files found in the segger website are different than yours? I mean, why can’t I use the files from the j-link 512 installation?
Thanks!!
LikeLike
Hi Manuel,
the files I have used in that project are the version 2.10 one. Later versions I have incorporated into the McuOnEclipse components, see https://mcuoneclipse.com/2016/04/03/mcuoneclipse-components-3-apr-2016-release/.
As I’m using mostly the components, I have not updated that project. I think what is failing on your side is some simple include problem. You might need to produce a preprocessor listing to check what is wrong on your side, see https://mcuoneclipse.com/2015/11/23/preprocessor-listing-for-gnu-gcc-with-gnu-arm-eclipse-plugins/
LikeLike
Pingback: Tutorial: Using Single Wire Output SWO with ARM Cortex-M and Eclipse | MCU on Eclipse
Hi Erich,
Using the RTT component it gives me the option to have more up and down channels.
I Tried to actually use another up channel (1), and just have the wordy debug prints going there, and using channel 0 for the shell interface, both up and down.
This didn’t work for me. It did also look like I needed to allocate another up buffer with this
SEGGER_RTT_AllocUpBuffer(sName, pBuffer, 120,SEGGER_RTT_MODE_DEFAULT);
But that still didn’t work. Have you used more than one up buffer for terminal output?
[It also looks like the segger system view uses another channel – I have that included but not sure how that interacts with my attempt using a second terminal channel. I have 3 up and 3 down channels set in the component]
Brynn
LikeLike
Hi Brynn,
I have used just one channel for terminal output so far, plus one for Segger SystemView and one for Percepio Trace (so a max of three channels).
If you want to use your own channel, you have to configure it including the buffers: have a look how the initialization for SystemView and/or Percepio Trace is done.
The number of e.g. 3 only sets up how many slots are available, but does not configure them directly. I was considering to extend this, but had no time (yet).
I hope this helps,
Erich
LikeLike
Ah, I did some reading at Segger and all you have to do to get text to come out on one of the virtual terminals other than 0 is to use the RTT1_TerminalOut(1,sbuff); function with the first arg your virtual terminal and the second your string ptr.
As I understand it, it is still going out on ‘up buffer 0’ so No need to mess with allocating buffers and stuff, and even bump the number of up and down channels is not needed.
I tested it too, it works 🙂 Now if I can get all my other problems fixed…
LikeLike
Ah, great! I did not realize that the same buffers could be used.
LikeLike
Hi Erich,
We have another project going on that uses the LPC4088 so we can have a color LCD.
We are using the latest LPCXpresso IDE and a Segger J-link.
Will the code in this article work okay in the LPCXpresso IDE so we can get the debug prints to come out to a tera-term window or the J-link RTT viewer?
Also, will we be able to use your processor expert components at all?
Brynn
LikeLike
Hi Brynn,
Yes, that RTT code you can use with any IDE/environment as it is basically normal C code.
RTT can be used with the Segger RTT viewers (GUI and command line version), or with a telnet connection (as outlined in this article). But not to a normal terminal program (unless it supports a telnet connection, like putty).
You can use Processor Expert with LPCXpresso, see https://mcuoneclipse.com/2015/05/27/merging-nxp-lpcxpresso-ide-with-the-freescale-kinetis-design-studio-processor-expert-and-kinetis-sdk/.
Otherwise, you can use the sources directly from the McuOnEclipse Library project here: https://github.com/ErichStyger/McuOnEclipseLibrary
LikeLike
Hi Erich,
i find it a little bit troublesome that i have to connect the terminal session, every time i start a debug session. The same for the Segger System View , is there a way to automatically connect ? I have also the Problem that Segger System View (2.50 [FreeRTOS 9.0 ]) crash when i stop the debug session before stopping the recording.
Do you have a solution for that or is that a problem with my configuration ?
Michael
LikeLike
Hi Michael,
I’m not aware of a way to automatically connect.
As for your problem with the Segger SystemView: I’m using 2.42 and I don’t see that problem (I have not installed 2.50). Have you reported that to SEGGER already? You might give V2.42 a try.
LikeLike
Pingback: Internal and External Debug Options for the NXP LPC55S69-EVK Board | MCU on Eclipse
Pingback: Open Source LittlevGL GUI Library on Adafruit Touch LCDs with NXP LPC55S69-EVK | MCU on Eclipse
Pingback: World Stepper Clock with NXP LPC845 | MCU on Eclipse
Pingback: FatFS, MinIni, Shell and FreeRTOS for the NXP K22FN512 | MCU on Eclipse
Pingback: Tutorial: Adding FreeRTOS to where there is no FreeRTOS | MCU on Eclipse
Pingback: McuLog: Logging Framework for small Embedded Microcontroller Systems | MCU on Eclipse
Pingback: FreeRTOS V10.4.1 with SEGGER SystemView V3.12 | MCU on Eclipse
Pingback: New MetaClockClock V3 finished with 60 Clocks | MCU on Eclipse
Pingback: Debug Firmware Switching for the LPC4322 | MCU on Eclipse
Pingback: Using FatFS and MinINI with the NXP LPC55S16 EVK | MCU on Eclipse
Pingback: Visual Studio Code for C/C++ with ARM Cortex-M: Part 9 – RTT | MCU on Eclipse
FYI: Segger RTT wrapped as an Arduino stream, so Arduino users feel more at home.
https://github.com/koendv/Arduino-RTTStream
LikeLiked by 1 person
thanks for the link, this could be indeed useful for Arduino users.
LikeLike
Hi,
I’m working on K64 micro and tried using segger RTT.
It’s printing printf message on terminal. I didnt’s use debug message in loop but it’s writing same message continuously to terminal.
In MAIN.c:
int i =0;
SEGGER_RTT_printf(0, “printf Test: %d \r\n”, i++);
OUTPUT ON J-LINK Viewer:
printf Test: 0
printf Test: 0
printf Test: 0
printf Test: 0
printf Test: 0
printf Test: 0
printf Test: 0
printf Test: 0
Could you please help to understand what is happening?
LikeLiked by 1 person
It looks your target is constantly resetting. Have you used the debugger already to see what’s happening?
LikeLike