
In “Freelink LPC4322JET100 based Debug Circuit on NXP i.MX RT1064-EVK Board” I described how to change the factory firmware from OpenSDA to the LPC-Link2 one.

Now it is possible to use a Segger J-Link firmware too, or to switch back to the factory default one.
Outline
The NXP i.MX RT1064 EVK board includes an on-board debug circuit based on the LPC4322 which comes by default with an ‘OpenSDA’ debug firmware. In Freelink LPC4322JET100 based Debug Circuit on NXP i.MX RT1064-EVK Board I described how I can change that default firmware to the much faster and better LinkServer (LPC-Link2) firmware. Here I describe how to change the firmware to a J-Link or revert back to the factory firmware.
I’m using here the RT1064 board, but the same steps could be used for any other board with the LPC4322 device on it.
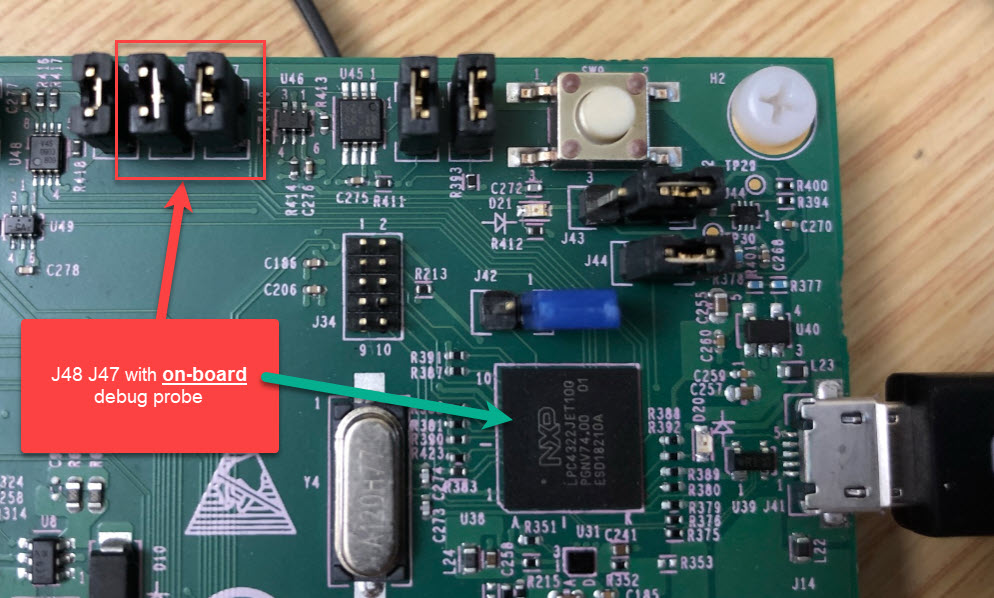
Jumpers: on-board or off-board debug probe
The i.MX RT1064 EVK board can be used either with the on-board or an external debug probe. Below the jumper settings for both scenarios:

LPCScrypt
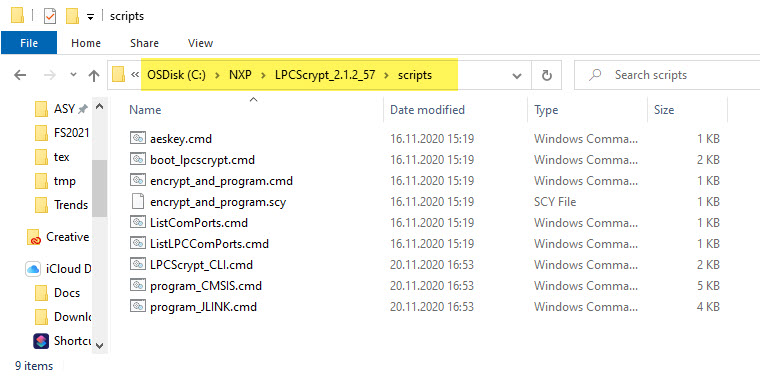
To program the LPC based debug circuits, NXP provides the LPCScrypt tool available from https://www.nxp.com/lpcscrypt. This is a command line to program the device and upgrade the firmware. Make sure you download the latest version (V2.1.2 at the time of this article) as the tool includes the latest firmware files.

The installation includes scripts to program a firmware. Locate the scripts directory in the installation:
Then launch a command prompt in that location (hint: enter cmd in the Windows explorer and press enter):
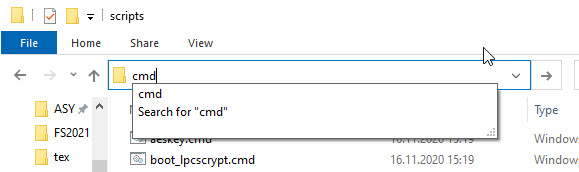
With this I have a command shell running in that directory:

DFU Boot Mode Jumper
The LPC4322 needs to be put into DFU (Device Firmware Update) mode. Locate the DFU jumper for your board. For the i.MX RT1064 it is J42:
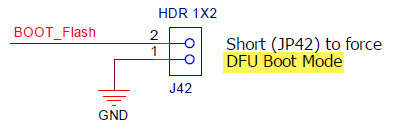
Locate the jumper on the board and put a jumper on it:

Power cycle the board with the DFU jumper on: the red LED shall remain ON as in the above image to indicate the LPC4322 is in DFU mode.
Loading new Firmware
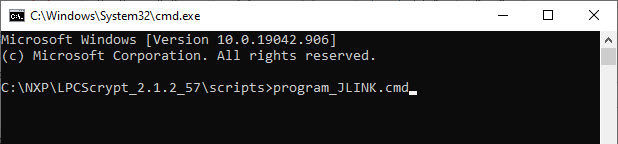
With the LPC4322 in DFU mode, execute LPCScrypt with a command to update the firmware:
- program_JLINK.cmd: SEGGER J-Link firmware
- program_CMSIS.cmd: LPC-Link2 CMSIS-DAP firmware
Press CTRL-C to quit the LPCScrypt.
Remove the DFU jumper, power cycle the board and you can use it as LPC-Link2 or J-Link.
With this you can enjoy a blast in speed in features: I measured around 5 KByte/se flash programming speed with the factory firmware and more than 100 kByte with LPC-Link/J-Link :-). Additionally stepping is much much faster too.
Power Switch
One thing to keep in mind is that the debug circuit on the board has a power switch to turn on/off 5V to the target:
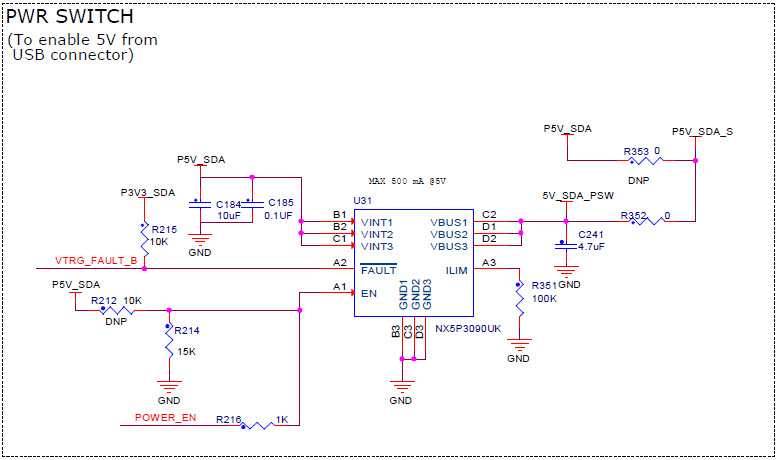
This power switch is used by the factory debug firmware, but not supported by the LPC-Link or J-Link Firmware. This means that on the i.MX RT1064 EVK I have to use the power 5V barrel connector to power the board and cannot use the USB debug port.
This sounds like a disadvantage, but my recommendation is to use always an external power supply for for i.MX boards: there are to many issues trying to power these boards with a normal USB port: use good external power supply instead!
Restore Factory Debug Firmware
Actually I don’t see a real reason why you would go back to the factory default firmware is it is very slow. But anyway, here is how you could do it:
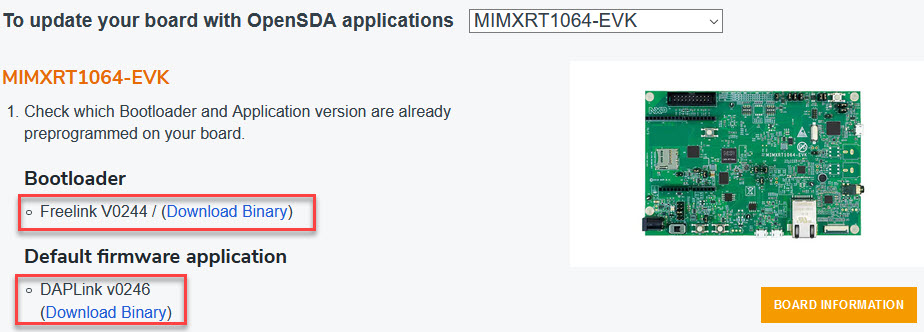
- Download the bootloader and DAPLink firmware from https://www.nxp.com/opensda
- Place the two files into the ‘scripts’ folder of the lpcscrypt installation
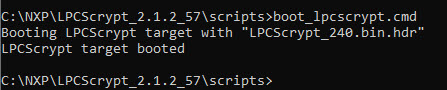
- Put the board into DFU mode with the DFU jumper installed and board power cycled
- Run the boot command ‘boot_lpcscrypt.cmd’:
- Erase the flash memory (ignore the errors):
..\bin\lpcscrypt.exe erase all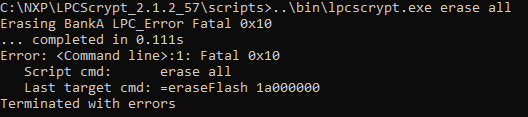
- Program the binary with:
..\bin\lpcscrypt.exe program lpc4322_bl_crc_20180810.bin BANKA
- Power cycle the board without DFU jumper
- Drag&Drop the firmware image file ‘lpc4322__mimxrt1064_evk_if_crc_20180810.bin’ to the MAINTENANCE USB MSD device, or use the ‘Send to’ context menu in the Windows Explorer.
- Power Cycle the board again
With this the factory (very slow) debug firmware is installed again.
Which On-Board Debug Firmware?
With this I have the choice between three different on-board firmware variants to choose from (choices are always good, right?):
- Factory ‘FreeLink’ firmware
- NXP LPC-Link2 (CMSIS-DAP) firmware
- SEGGER J-Link firmware
The factory firmware supports ‘drag&drop’ programming to the USB device which personally I never use. The feature that it is able to power the board with a power circuit is problematic to me anyway. Debugging with it is so slow that except for small programs it is not usable at all. So no reasons for me to keep the factory one.
Both the LPC-Link2 and J-Link firmware are much faster (depending on the application, I measured a 20-25x improvement). I prefer the J-Link firmware because it implements ‘unlimited’ flash breakpoints, stepping is very fast and implements a gdb server so I can easily script it. Plus the Segger system comes with many useful tools and utilities like RTT or SystemView.
On the other side the LPC-Link2 firmware supports SWO while the on-board J-Link does not (the external J-Link do support SWO). So if I want to use SWO with the on-board firmware then I would use the LPC-Link2 firmware.
UPDATE: After checking with SEGGER, SWO indeed *is* supported with the on-board debug probe. Probably I did something wrong when I tried it out, but it is definitely working :-).
Beside of using a on-board debug firmware: my preference is to use an external debug probe. I use the P&E Multilink Universal, the Segger J-Link (Plus, EDU and EDU mini) and external debug probes from NXP (LPC-Link2 and MCU-Link): they are not only typical faster and more robust without side effects, I can switch probes in seconds and don’t have to re-program on-board firmware and I can use them for other boards. Plus they match what I will have later in the board development phase anyway.
Summary
Switching the factory debug firmware to either a LPC-Link2 or J-Link is a must for me: it gives gives me a huge speed improvement, and with a J-Link I can use all the very useful tools like RTT or SystemView with my projects. Switching between LPC-Link2 and J-Link firmware is easy with using LPCScrypt, and there is still a way to go back to the factory firmware (possible, but does not make any sense to me, but is good to have it). Personally I prefer the onboard J-Link firmware over the LPC-Link firmware, except if using SWO. Other than that: I recommend using external debug probes, but if you don’t have one then the on-board one is useful too.
Happy debugging 🙂
Links
- Freelink LPC4322JET100 based Debug Circuit on NXP i.MX RT1064-EVK Board
- First Steps with the NXP i.MX RT1064-EVK Board
- NXP i.MX RT1064 EVK: https://www.nxp.com/support/developer-resources/run-time-software/i.mx-developer-resources/mimxrt1064-evk-i.mx-rt1064-evaluation-kit:MIMXRT1064-EVK?&tid=vanMIMXRT1064-EVK

Thanks for the great post!
Here are some troubleshooting tips for people:
lpcscrypt seems to be incompatible with dfu-util 0.10, which changed its output.
Downgrading to dfu-util 0.9 made it work.
Also, another issue is when any other serial interfaces are currently connected, so disconnect those 🙂
LikeLiked by 1 person
Hi Michael,
thanks for the very useful tips! I have used lpcscrypt for updating debug probe firmware only, as otherwise I’m not using any of the supported LPC devices. I have LPCScrypt 2.1.2_57 installed, and it comes bundled with dfu-util v0.8, so I should be ok?
LikeLike
That should be fine! The lpcscrypt for Linux does not seem to come with dfu-util bundled, hence the possibility for incompatible version combinations…
LikeLiked by 1 person
Ok, that makes sense then. I used it on Windows, not Linux.
LikeLike
Hi
If I upgrade to work as a Segger Jlink, will I be able to use Segger’s J-Flash program to write the microcontrollers ?, it is a program that works autonomously without MCUXpresso, I use it to burn the microcontrollers from the binary or the HEX.
Does it have limitations or does it behave the same as Segger’s Jlink programmer?
Regards
LikeLike
See https://www.segger.com/products/debug-probes/j-link/models/other-j-links/lpc-link-2/
LikeLike
OK thanks.
So it looks like it’s like EDU version, so it won’t support J-Flash utility to burn microcontrollers autonomously without using MCUXpresso.
LikeLike
You always can use the J-Link Flash lite (non-production). But did you know that Segger implemented a GDB server? That way you can do everything including flashing from the console, see https://mcuoneclipse.com/2015/08/26/batch-programming-with-gdb-segger-j-link-and-pe-multilink/ and https://mcuoneclipse.com/2015/03/25/command-line-programming-and-debugging-with-gdb/
LikeLike
>>So it looks like it’s like EDU version,
No, not really. Check the licensing terms. The EDU license is different (educational/hobby only) while the OEM license limits you to the device on that board (only for NXP devices, for that eval board only so no off-board one, no production, no warranty).
LikeLike
Thankyou. I’ve been waiting for this for EVK106x boards. I tried and it works great with Segger Embedded Studio.
LikeLike
I somehow missed that there is a J-Link firmware for the LPC4322 debug circuit, because it was not available at the time I received my board. I really works great is is so much an improvement over the original firmware (I have used an external J-Link most of the time instead). And ‘it just works’ with the NXP MCUXpresso IDE too.
LikeLike
Yes, Segger give you OpenSDA firmware replacements for the 105x and 1020 dev boards, but not the 106x. This is a solution I have been waiting for as it means I dont have to carry around my J-Trace. Segger Embedded Studio, unlike MCUXpresso ONLY works with J-Link. All I need now is my laptop, a usb cable and my EVK1060 and I can code anywhere including my favourite cafe! 🙂
LikeLike
Don’t forget the second USB cable/charger to power the board.
LikeLike
Pingback: Visual Studio Code for C/C++ with ARM Cortex-M: Part 4 | MCU on Eclipse
Pingback: Using FatFS and MinINI with the NXP LPC55S16 EVK | MCU on Eclipse
Pingback: SWO with ARM Cortex-M33 | MCU on Eclipse