The Seeed Studio ‘Arch Mix’ board is a small and versatile development board with an NXP i.MX RT1052 on it, and it costs only $29.90. So I was not able to resist and just have ordered one so I can explore it.

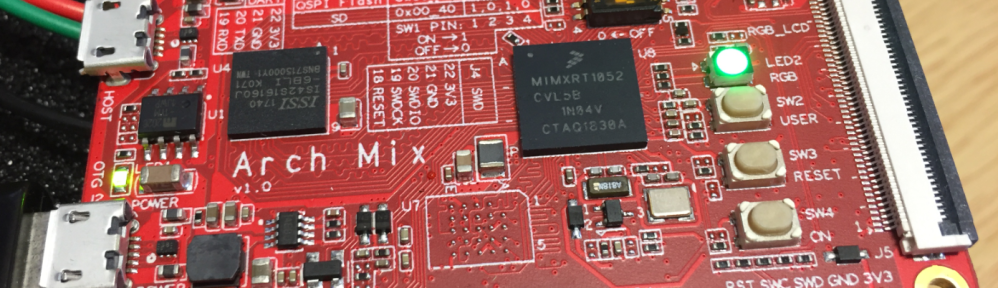
Seeed Arch Mix Top Side
It comes with a pre-installed RT-Thread realtime operating system and with built-in MicroPython. The RT-Thread is a kind of ‘FreeRTOS from China’, but for now I’m more than covered with FreeRTOS, so this might be something to look at in the future.
The board is small (70×44 mm). It has an LCD connector, 3 buttons (User, reset and power on/off). Using a 4-pin DIP switch the boot source (Hyperflash, SPI flash, SD card) an be configured, but the Hyperflash is not populated. There is dedicated USB port for powering the board plus one host/device USB port. The pins are nicely labeled and the board has 4 useful mounting holes.
Seeed Arch Mix Top Side
On the bottom there is a connector for the RTC battery and the micro-SD card connector:

Seeed Arch Mix Bottom Side
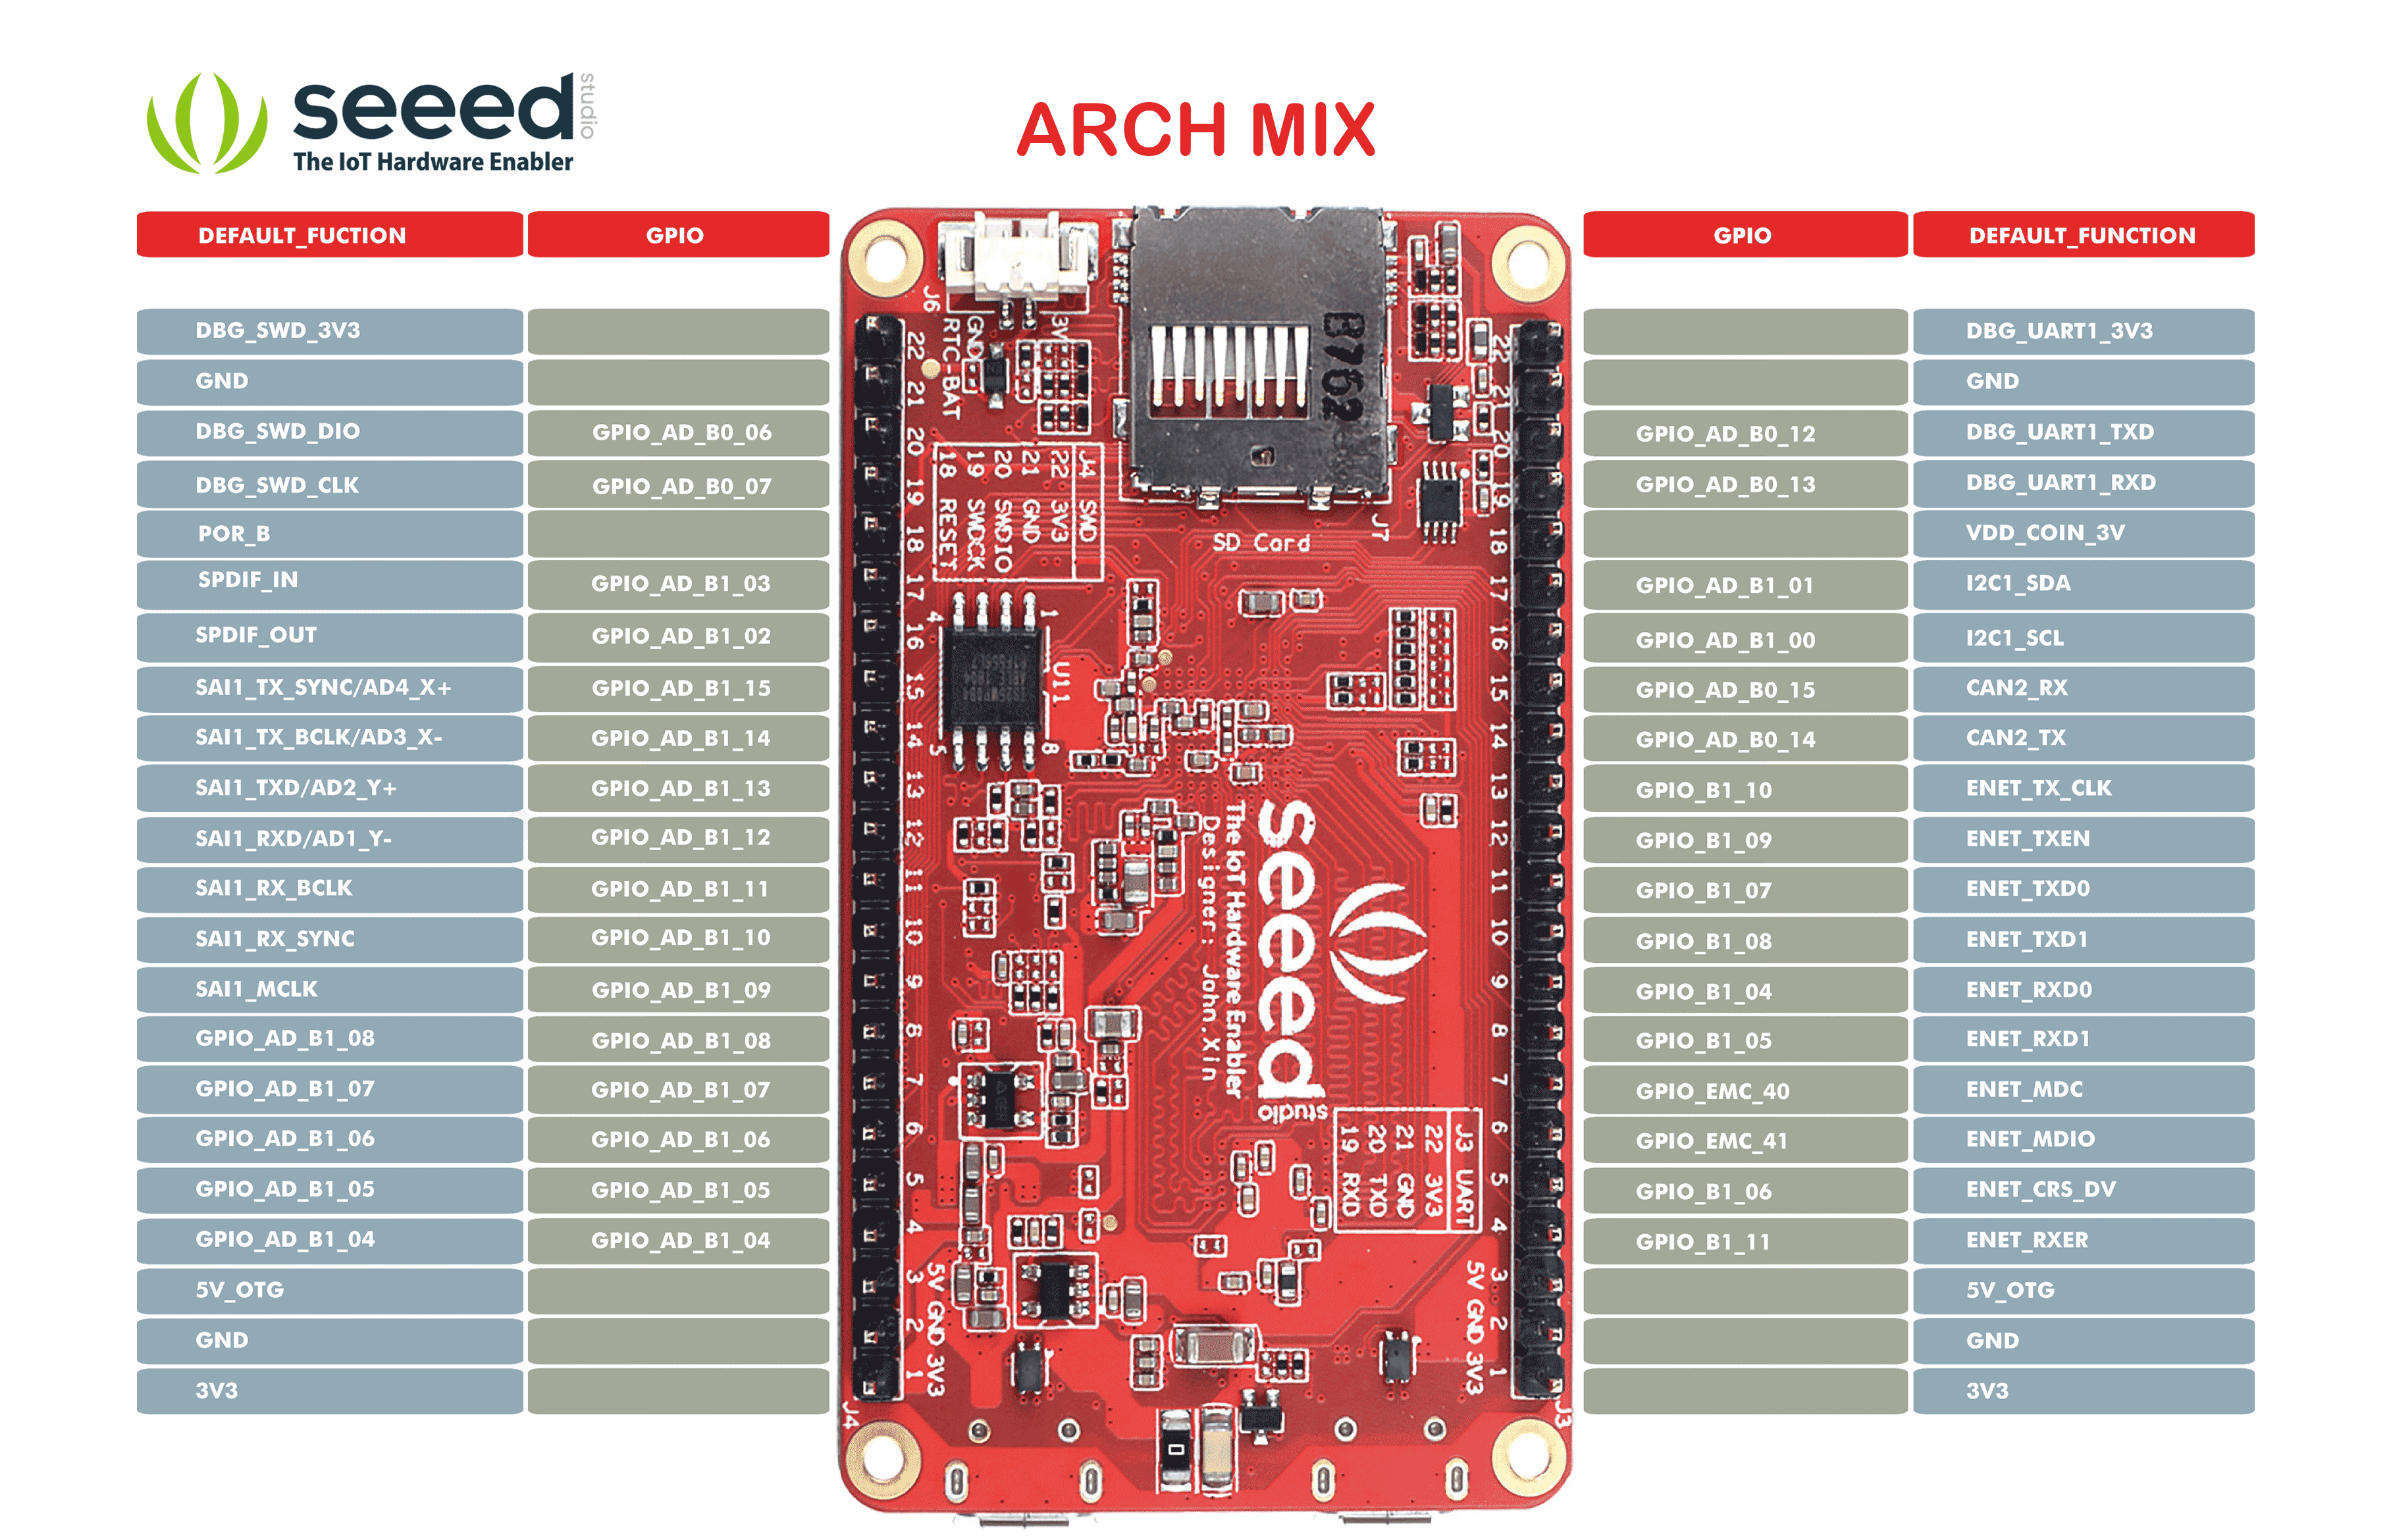
The board is bread-board friendly with the pins mapped to the sides of the board:

Seeed Arch Mix Pinout (Source: https://raw.githubusercontent.com/SeeedDocument/Arch_Mix/master/img/pinout.png)
💡 I have not found a schematic for this board at Seeed Studio, but I have asked for it if I have missed it.
💡 UPDATE: Seeed has uploaded the schematics of the board to http://wiki.seeedstudio.com/Arch_Mix/
With a UART-2-USB cable I connect to the board with GND, Rx and Tx:

UART Connection
After pressing the reset button, the board writes the boot messages to the console:

Arch Mix i.MX RT Boot Messages
Below the full log of the messages:
sdram heap, begin: 0x80000000, end: 0x81e00000
sram heap, begin: 0x20006e8c, end: 0x20020000

 \ | /
- RT -     Thread Operating System
 / | \     4.0.0 build Dec 21 2018
 2006 - 2018 Copyright by rt-thread team
[1B][32m[I/[FLEXSPI]] NorFlash Init

[1B][0m[1B][32m[I/[FLEXSPI]] Vendor ID: 0x16

[1B][0m[1B][32m[I/[FLEXSPI]] NorFlash Init Done

[1B][0m[D/FAL] (fal_flash_init:61) Flash device |                norflash0 | addr: 0x00000000 | len: 0x00800000 | blk_size: 0x00001000 |initialized finish.
[1B][32;22m[I/FAL] ==================== FAL partition table ====================[1B][0m
[1B][32;22m[I/FAL] | name     | flash_dev |   offset   |    length  |[1B][0m
[1B][32;22m[I/FAL] -------------------------------------------------------------[1B][0m
[1B][32;22m[I/FAL] | bl       | norflash0 | 0x00000000 | 0x00040000 |[1B][0m
[1B][32;22m[I/FAL] | env      | norflash0 | 0x00040000 | 0x00001000 |[1B][0m
[1B][32;22m[I/FAL] | pt       | norflash0 | 0x00041000 | 0x00001000 |[1B][0m
[1B][32;22m[I/FAL] | app      | norflash0 | 0x00042000 | 0x00100000 |[1B][0m
[1B][32;22m[I/FAL] | download | norflash0 | 0x00142000 | 0x00100000 |[1B][0m
[1B][32;22m[I/FAL] | fs       | norflash0 | 0x00242000 | 0x00000000 |[1B][0m
[1B][32;22m[I/FAL] =============================================================[1B][0m
[1B][32;22m[I/FAL] RT-Thread Flash Abstraction Layer (V0.3.0) initialize success.[1B][0m
[1B][36;22m[I/OTA] RT-Thread OTA package(V0.2.2) initialize success.[1B][0m
[Flash] (packages\EasyFlash-latest\src\ef_env.c:152) ENV start address is 0x00000000, size is 262144 bytes.
[Flash] (packages\EasyFlash-latest\src\ef_env.c:821) Calculate ENV CRC32 number is 0xD808A5B2.
[Flash] (packages\EasyFlash-latest\src\ef_env.c:833) Verify ENV CRC32 result is OK.
[Flash] EasyFlash V3.2.3 is initialize success.
[Flash] You can get the latest version on https://github.com/armink/EasyFlash .
Hit any key to stop autoboot : 1
Hit any key to stop autoboot : 0

run application

0x60042000
sdram heap, begin: 0x80000134, end: 0x81e00000
sram heap, begin: 0x200066d4, end: 0x20020000

 \ | /
- RT -     Thread Operating System
 / | \     4.0.0 build Dec 25 2018
 2006 - 2018 Copyright by rt-thread team
[1B][32m[I/[FLEXSPI]] NorFlash Init

[1B][0m[1B][32m[I/[FLEXSPI]] Vendor ID: 0x16

[1B][0m[1B][32m[I/[FLEXSPI]] NorFlash Init Done

[1B][0m[D/FAL] (fal_flash_init:61) Flash device |                norflash0 | addr: 0x00000000 | len: 0x00800000 | blk_size: 0x00001000 |initialized finish.
[1B][32;22m[I/FAL] ==================== FAL partition table ====================[1B][0m
[1B][32;22m[I/FAL] | name     | flash_dev |   offset   |    length  |[1B][0m
[1B][32;22m[I/FAL] -------------------------------------------------------------[1B][0m
[1B][32;22m[I/FAL] | bl       | norflash0 | 0x00000000 | 0x00040000 |[1B][0m
[1B][32;22m[I/FAL] | env      | norflash0 | 0x00040000 | 0x00001000 |[1B][0m
[1B][32;22m[I/FAL] | pt       | norflash0 | 0x00041000 | 0x00001000 |[1B][0m
[1B][32;22m[I/FAL] | app      | norflash0 | 0x00042000 | 0x00100000 |[1B][0m
[1B][32;22m[I/FAL] | download | norflash0 | 0x00142000 | 0x00100000 |[1B][0m
[1B][32;22m[I/FAL] | fs       | norflash0 | 0x00242000 | 0x005be000 |[1B][0m
[1B][32;22m[I/FAL] =============================================================[1B][0m
[1B][32;22m[I/FAL] RT-Thread Flash Abstraction Layer (V0.2.0) initialize success.[1B][0m
[Flash] (packages\EasyFlash-latest\src\ef_env.c:152) ENV start address is 0x00000000, size is 4096 bytes.
[Flash] (packages\EasyFlash-latest\src\ef_env.c:821) Calculate ENV CRC32 number is 0xD808A5B2.
[Flash] (packages\EasyFlash-latest\src\ef_env.c:833) Verify ENV CRC32 result is OK.
[Flash] EasyFlash V3.2.3 is initialize success.
[Flash] You can get the latest version on https://github.com/armink/EasyFlash .
[1B][32;22m[I/FAL] The FAL block device (fs) created successfully[1B][0m
[1B][32;22m[I/FAL] The FAL char device (download) created successfully[1B][0m
File System on fs_part initialized!
build time: Dec 25 2018 09:03:15
msh />
The codes at the beginning of some lines are color codes for the terminal, so here is the same with the SmarTTY:

boot process with SmarTTY
This shows the running RT-Thread OS with the built-in micro-python. The RT-Thread comes with a command line interface:

RT-Thread Shell commands
The built-in MicroPython REPL is nice, but unfortunately did not work for me:

Micropython
UPDATE: got it working 🙂 Here is how:
- Use PuTTY
- start python with
msh />python
- Press CTRL+E to enter paste mode
- Paste code block with pressing right-mouse button (on Windows)
- Press CTRL+D to exit paste mode and to start code execution
- Press CTRL+C to stop executing the code
- Type exit() to end python
The board has the SWD debug pins available on the header. I tried to use a J-Link EDU mini (but that failed for unknown reasons). What worked out-of-the-box was using a NXP LPC-Link2 debug probe. I have to use an adapter and to connect GND, VddSense, SWDIO and SWDCLK (see here for a similar connection).
💡 Do *not* install the jumper JP2 (provide power to the target), as with this debugging most likely will fail.

SWD Debug Connection with LPC-Link2
And voilà: I’m able to debug the board with the NXP MCUXpresso V11.0.0 Eclipse IDE:-). Below is a NXP MCUXpresso SDK RAM based application running with the IDE on the board:
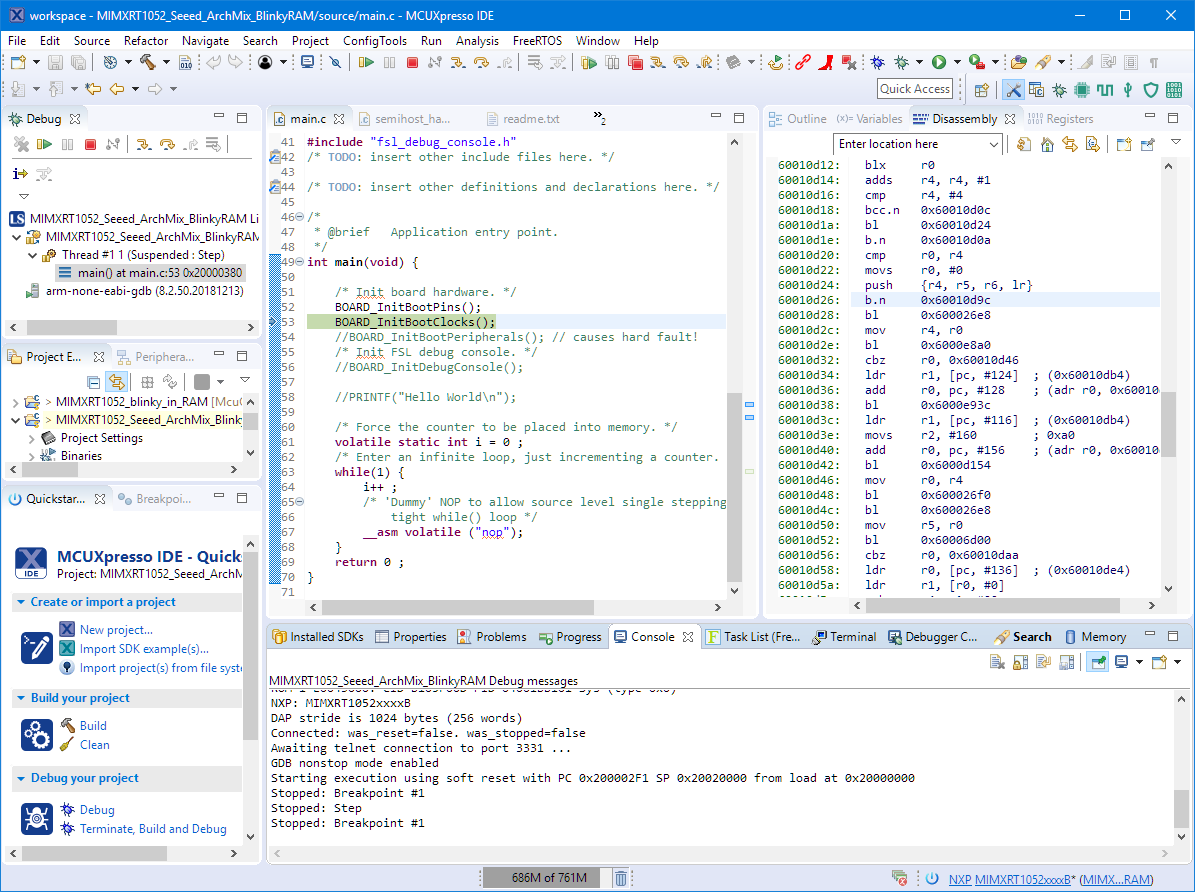
Debugging Seeedstudio Arch Mix with MCUXpresso
This is for now an application in RAM. I have to change it to use the external SPI Flash. More about this (hopefully) later. You can find the project on GitHub.
I like this inexpensive and small i.MX RT board: finally a RT board to be used in my projects. And if time permits: I’m going to order an LCD for that LCD connector: that will be fun :-).
Happy ArchMixing 🙂
Links
- Seeed Studio Arch Mix: https://www.seeedstudio.com/Arch-Mix-p-2901.html
- RT-Thread: https://github.com/RT-Thread/rt-thread
- Seeed Studio Arch Mix Wiki: http://wiki.seeedstudio.com/Arch_Mix/
- MicroPython REPL (Interactive Command Interpreter): http://docs.micropython.org/en/v1.9.2/pyboard/reference/repl.html
- Community article about using SPI Flash with the RT1052: https://community.nxp.com/thread/477615
- GitHub: https://github.com/ErichStyger/mcuoneclipse/tree/master/Examples/MCUXpresso/i.MX%20RT1052%20Seeed%20Arch%20Mix

Hi Erich,
If you run TeraTerm (or something that handles ANSI aka VT240) all those
[1B][32;22m funny strings will colorize the output.
To bad it doesn’t have a camera connector… Still very interesting board – do they provide the schematic?
Brynn
LikeLike
ANSI/VT240: Yes, I have posted another screenshot with a different terminal. I like the Termite because it is very simple and easy to use. But has limited features of course. I love the SmarTTY too, especially because of the SSH and file transfer intergration. But SmarTTY had problems with that board and the microPython interpreter copy-paste function. It worked better with PuTTY. I find PuTTY hard to use, so I’m juggling with 2-3 different terminal programs depending on my needs :-).
LikeLike
Schematics: I did not find them somehow, so I have asked Seeed about it.
LikeLike
I see they posted the schematics for you/us(from your next blog article). I also see from the schematic that the J4 expansion header has all the CSI pins (The camera interface), so that makes the boards even more interesting for my camera project.
I really like TeraTerm, it also has the ability to emulate the ancient Tek terminals.
I needed to display some waveforms in a project recently, and found you can easily put TeraTerm into Tek mode and draw oscilloscope like vector graphics. – all from the (USB CDC) serial port on a K22.
Brynn
LikeLike
Yes, I was asking Seeed to provide the schematics, and after a few days they responded :-). I have ordered a matching LCD for that connector ($100, yikes!), so hopefully it is worth that money.
LikeLike
The schematics are now posted in the Seeed Wiki page: http://wiki.seeedstudio.com/Arch_Mix/
LikeLike
Pingback: Debug and Execute Code from FLASH on the Seeed Arch Mix NXP i.MX RT1052 Board | MCU on Eclipse
I think your MicroPython REPL executed error is by you keyboard input. Please don’t using any key input when using paste mode. Just copy the code to REPL and press CTRL+D to execute it.
😉
LikeLike
Thanks for the hint! I tried it now again, carefully not doing any other keyboard input, and now it works :-). I have updated the article with the exact order of steps, just for the next time.
LikeLike
Pingback: Restoring Default Firmware on Seeed Arch Mix NXP i.MX RT1052 Board | MCU on Eclipse
Pingback: Using SEGGER J-Link with QSPI FLASH on NXP i.MX Boards | MCU on Eclipse
Hello Erich!
Which LCD do you pick to use with this board? Could share the name/link ?
Thanks!
LikeLike
The wiki https://wiki.seeedstudio.com/Arch_Mix/ shows the display type.
I ordered mine from Mouser, but did not had a chance yet to use it.
It is a LCD8000-43T, search for this on Mouser.com.
LikeLike
I haven’t understood yet how to upload code to the board. I’ve downloaded your projects on Github and opened them in MCUxpresso, but I’m new to MCUxpresso, and also don’t understand how to use it to upload code to RAM or anything…
Also, is this special Segger debugger necessary, isn’t it possible to use SWD from ARM over a standard TTL-USB adapter?
It’s interesting, thank you for sharing. You are apparently the only person on the web who understands this board, as I’ve not found any resources on it and Seeed Studio seems to think that Micropython REPL will be great for embedded computing, but even there I don’t see how to load code beyond this copy-paste LOL…
LikeLike
The i.MX RT has a serial bootloader which can be used to load applications, but it is not possible to debug the board that way. So I’m using JTAG/SWD debugging instead and have created an adapter board to make the connection easier: https://mcuoneclipse.com/2019/07/27/debug-and-execute-code-from-flash-on-the-seeed-arch-mix-nxp-i-mx-rt1052-board/ . It should be possible to boot even from an SD card, but I have not used this with the Seeed board, but with another one: https://mcuoneclipse.com/2019/01/22/tutorial-booting-the-nxp-i-mx-rt-from-micro-sd-card/.
I really recommend to use that Segger debug adapter: without it there is no good way to do real development on any of these boards, and the $20 are worth the investment.
LikeLike
Thank you, Erich!
LikeLike
Hi Erich,
Question for you. I’ve got the Seeed Studio RT1052 board, and I was able to flash the arduino bootloader using the NXP Boot Utility:
https://wiki.seeedstudio.com/Arch_Mix/#using-nxpbootutility-to-flash-arduino-bootloader
https://github.com/JayHeng/NXP-MCUBootUtility
So it seems it may possible to upload firmware over the USB link without need for serial cable or debugger. Now I’d like to change from arduino bootloader to normal C environment of RTOS. How would I use NXP Boot Utility to restore the default bootloader, or install firmware? I’m trying to put together a toolchain which only uses the USB cable. Is it possible? Do you have any advice?
Thankyou!
LikeLiked by 1 person
You could use the ROM bootloader for this, no needed to load any different bootloader. And yes, you can program the device using USB and/or blhost. But keep in mind that with such a toolchain you won’t be able to debug your code which is essential to any development.
LikeLike
Hi Erich, you should give MicroPython another try. With MicroPython v1.18 this board is supported by the mimxrt port and with it many of its features.
LikeLiked by 1 person
Thank you for that note!
LikeLike