
In “Seeed Studio Arch Mix NXP i.MX RT1052 Board” and “Debug and Execute Code from FLASH on the Seeed Arch Mix NXP i.MX RT1052 Board” I have used the NXP LPC-Link2 to debug the Seeed Arch Mix board with the NXP i.MX RT1052, because the SEGGER J-Link does not work out-of-the box with the i.MX RT using QSPI Flash. This article shows how the J-Link connection can be changed from HyperFlash to work with QSPI Flash.

J-Link EDU Mini with Seeed i.MX RT1052
Depending what external FLASH memory is used (SPI Flash, HyperFlash, …) the debug connection needs to know about it so it can use the correct driver to access and program the memory. The NXP LPC-Link2 debug connection has a flexible way to load the needed flash driver using a setting the Eclipse (MCUXpresso) IDE project properties:
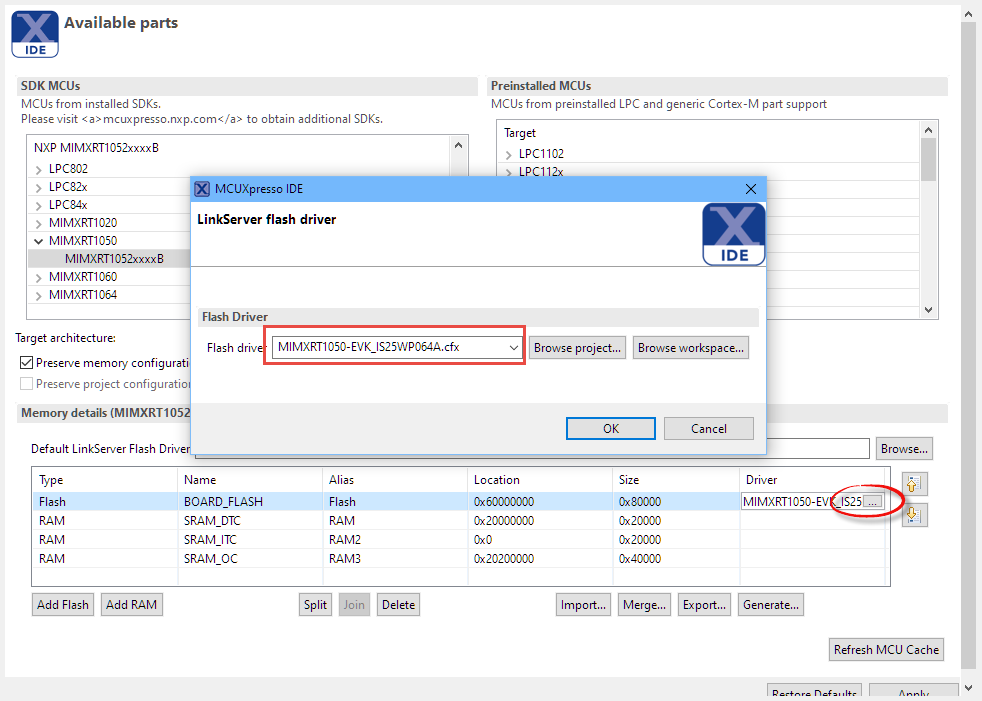
Flash Driver Setting
That way the debugger connection can load the appropriate flash driver. That above flash drive is specific for the LPC-Link2 debug connection.
For the SEGGER J-Link one would expect that the needed driver could be specified on the command line starting the debug connection, as it is for example for the core/device under debug. But instead the external flash driver setting is configured in a global JLinkDevices.xml file.
By default (probably because the first NXP boards for i.MX RT1052 were using HyperFlash), the default is using that FLASH technology. To change, it, locate the JLinkDevices.xml file. On Windows this should be in
C:\Program Files (x86)\SEGGER\JLink
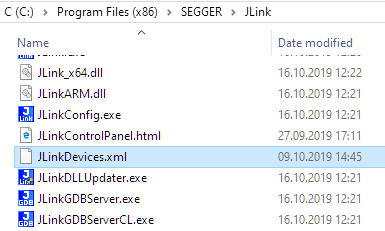
JLinkDevices.xml
UPDATE: SEGGER has moved the JLink Devices XML, please check https://wiki.segger.com/J-Link_Device_Support_Kit#JLinkDevices_folder
Open the file with a text editor to edit it (you might need administrative rights).
💡 Note that this file is *global* and changing it will not allow you to connect to a board with HyperFlash and vice versa. If having different boards with different FLASH memory on it means always changing that XML file. Best if using a batch file to switch between different FLASH variants.
Search in the JLinkDevices.xml the device used. In my case it is the MCIMXRT1052 which is shown in the J-Link connection console:

Target Device used by J-Link
Search for that device in the XML file:
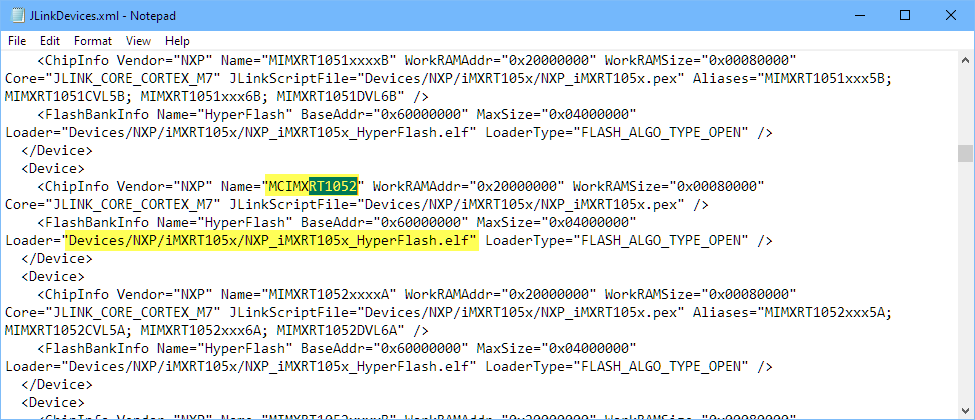
Loader to program the flash
The loader identifies the driver to program the flash, plus the memory range. The J-Link FLASH drivers are inside the ‘Devices’ folder of the J-Link installation folder:

Segger J-Link Flash Drivers for i.MX RT105x
In my case I change it to use the QSPI Flash instead:

Setting to use QSPI Flash
With this, I can download and debug the i.MX RT1052 Seeed board with QSPI Flash in Eclipse 🙂

Debugging i.MRT with QSPI FLASH
Summary
To switch to a different (non-default) FLASH with the SEGGER J-Link, I must manually edit and change the JLinkDevices.xml file inside the JLink installation folder. That works fine, but do not forget to switch back if using a different board with a different FLASH memory device on it. And do not forget to make the change again after installing a new J-Link version.
Happy Flashing 🙂

Good day Erich,
Thank you for your always excellent posts! Just a heads up on a couple of items with regards to the new RT parts. Firstly, the RT1052 was mentioned in a thread on the NXP Community forum where modification to the jlink setup was needed if the flash is connected to the secondary pinmux location: https://community.nxp.com/thread/509297… which may be helpful and/or of interest to other RT105x users
The second point and this is not related to the RT1052, but the RT1021… but it looks as if there are issues with NXP’s current software tools when the serial flash is connected to the secondary pinmux location on the RT1021. I say this, as I have been battling this for weeks and have now abandoned the secondary pinmux connection for the serial Flash on the RT1021. I mention this, as your posts reach a lot of readers and I wanted to give them and you the heads up should you be looking at or considering this flash connection location on the RT1021 devices.
Cheers,
Sam
LikeLike
Hi Sam,
thanks for the heads-up! I’m currently not using the RT1021, but that piece of information is definitely I have to keep in mind, as I think it is not only RT1021 related, and this different SPI muxing could affect other RT devices too?
Erich
LikeLike
Hello Erich,
I struggled also a bit with the external-Flash memory of the iMXRT-Family.
Is it not completely true, that editing the JLinkDevices.xml is the only way to specify the Loader which is used by J-Link. Admittedly I can’t tell a different way, but other development environments like IAR or (my favorite embedded IDE) Rowley Crossworks can specify which Loader to use with a Segger-J-Link (or other).
I had also some problems with the external memory of the iMXRT in particular the variety of interface-types and protocol dialect.
It becomes always difficult if you come up with solutions on your own board which is a bit exotic. Therefore, I’ve written an own Loader for this controller family. With this I’m able to adapt to any configuration and Flash-devices.
If you like to take a look: https://github.com/Masmiseim36/iMXRT
It is not working together with MCUXpresso, but if you like to try a different IDE … 😊
Best regards
Markus
LikeLike
Hi Markus,
I cannot comment much on the IAR way, as I’m not using IAR tools any more. But if I remember it correctly, IAR had implemented their own drivers, that way they were able to control and do what they want. Not sure if this is still the case. And thanks for the link to your GitHub repo, but so far for me I’m very happy with Eclipse 🙂
LikeLike
Hi Erich
It should also be possible to copy the relevant entries in the xml-file and changing the Name-attribute to something like “MCIMXRT1052 QSPI”. That way, you should be able to select both variants without having to change the xml file back if you need support for Hyperflash again in the future.
Also, at least the gdb-server from Segger can be configured to use an xml-file other than the one in the installation-directory. You can invoke it using the parameter “-JLinkDevicesXMLPath “, so that you don’t have to modify the file in the install-dir.
Regards
Christian
LikeLike
Hi Christian,
thank you, I did consider that approach with having a new name added to the XML file, but did not try it out. Are you saying you are doing it that way and it works?
Good suggestion about using a differnt XML file path, I was not aware of that. That’s definitely a way to use it I think.
LikeLike
I added new entries in the xml-file and they do show up in the device-selection dialog as expected, so it should work (couldn’t test both configurations though, because my board is already modified to use QSPI).
There is more information about extending the built-in device database on https://wiki.segger.com/Open_Flashloader#General_Procedure.
Apparently, the command-line parameter -JLinkDevicesXMLPath seems to work only with the JLink GDB-Server. For other tools, like the JLink Commander, you should be able to use the corresponding JLink command-string with the path to the xml-file as described in the link above.
LikeLike
great, thank you!
LikeLike
Hi, Erich,
You should update this article with information about where SEGGER has moved the JLink Devices XML file: https://wiki.segger.com/J-Link_Device_Support_Kit#JLinkDevices_folder Thanks for your helpful guides 🙂
Dana M.
LikeLike
Hi Dana,
thank you very much! I have updated the article with that information.
LikeLike