
In the IoT world, it is all about security, connectivity and low power. LoRaWAN with the Things Network is able to connect devices over several kilometers, and I’m running my gateway for it already (see “Contributing an IoT LoRaWAN Raspberry Pi RAK831 Gateway to The Things Network“). This tutorial is about building a BLE+LoRaWAN+GPS sensor node with GNU tools and Eclipse:
LoRa+BLE with RAK813 and LPC845
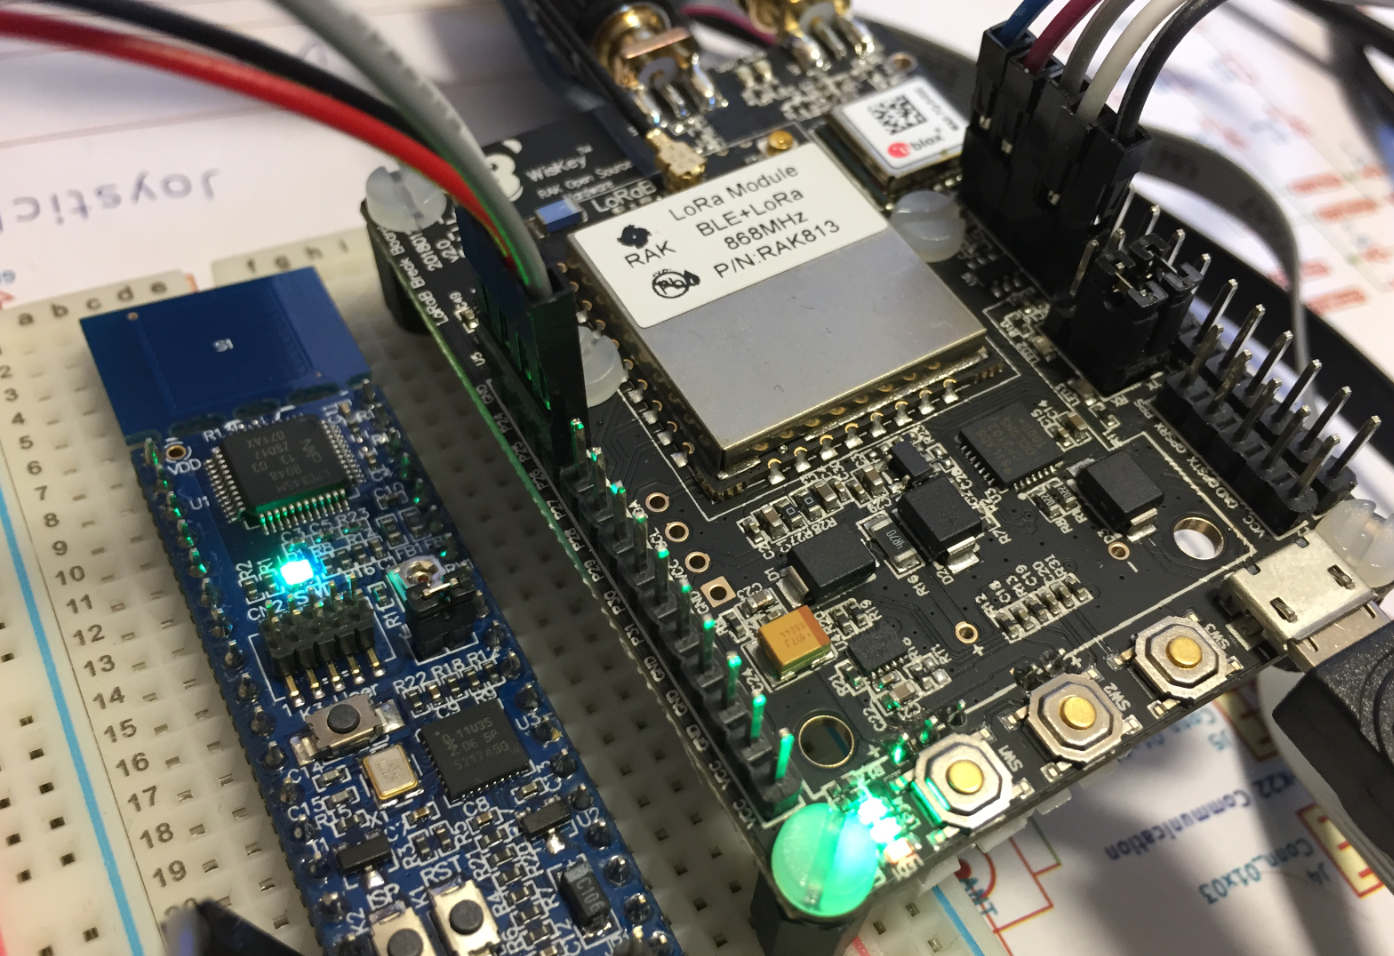
As hardware I’m using the RAK815 board which features the RAK813 BLE+LoRaWAN module from RAK Wireless.
I ordered the RAK815 board from AliExpress as a kit (EU868) for $52 which includes everything to get started:
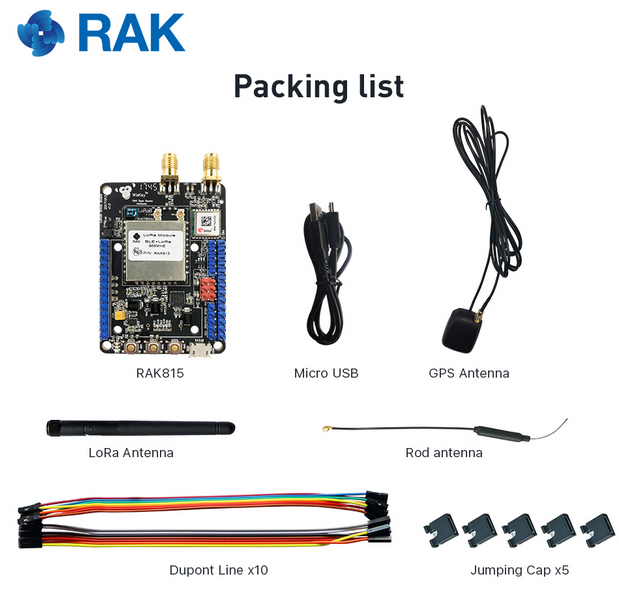
RAK815 Kit
The board features the RAK813 module (nRF52832+SX1276), a uBlox GPS module, the SHT31 humidity/temperature sensor plus the LIS3DH accelerometer.
Setup
For this tutorial you need:
- Eclipse IDE: the IDE we are going to use
- GNU MCU Eclipse Plugins: Eclipse plugins to use the GNU toolchain for ARM
- GNU toolchain for ARM: the GNU toolchain
- nRFgo Studio: used to flash the Nordic SoftDevice
- RAK815 board with RAK813 module (search on AliExpress: “RAK815”)
- SEGGER J-Link (e.g. SEGGER J-Link Mini with a the debug Adapter from Adafruit).
To setup the IDE+toolchain, see this tutorial how to setup a DIY IDE.
The picture below shows my setup. The RAK815 includes a nRF52832 (ARM Cortex M4F with 512KByte FLASH and 64 KByte RAM). I’m using it in combination with the NXP LPC845-BRK board:
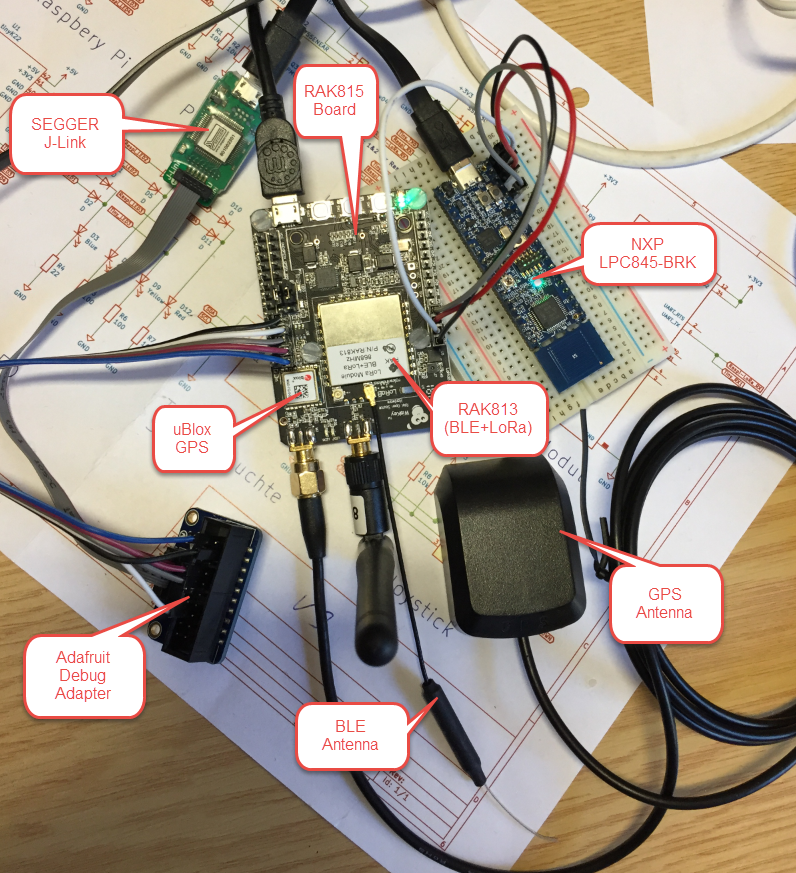
Hardware Setup
Because the original projects provided by RAK Wireless are for IAR and Keil only, I have ported them to Eclipse: that way free-of-charge IDE and compiler can be used.
The complete project is available on GitHub (see the links at the end of this article).
Below are the porting steps:
Creating Project
First, clone the repository from https://github.com/RAKWireless/RAK813-BreakBoard
Then, create an empty project for GNU ARM Embedded
Add the Apps, Board, LoRa_Lib and nRF_Lib folders as linked folders to the project. Add startup code and System files:
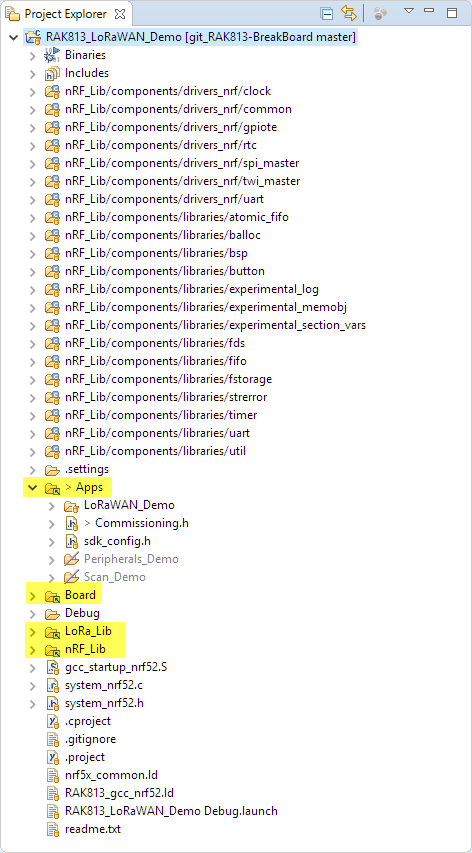
Linked Folders
Files not used have to be ‘excluded from build’, see “Exclude Source Files from Build in Eclipse“.
In the project settings, use the ARM Cortex-M4 with FPU:
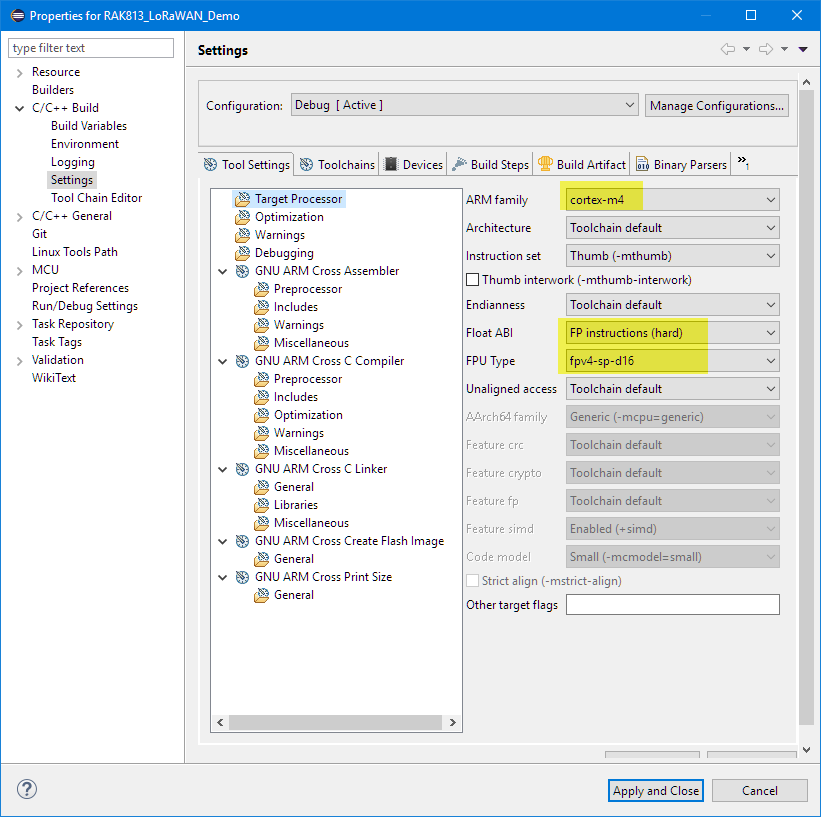
ARM Compiler Settings
Add the following folders to the compiler include settings:
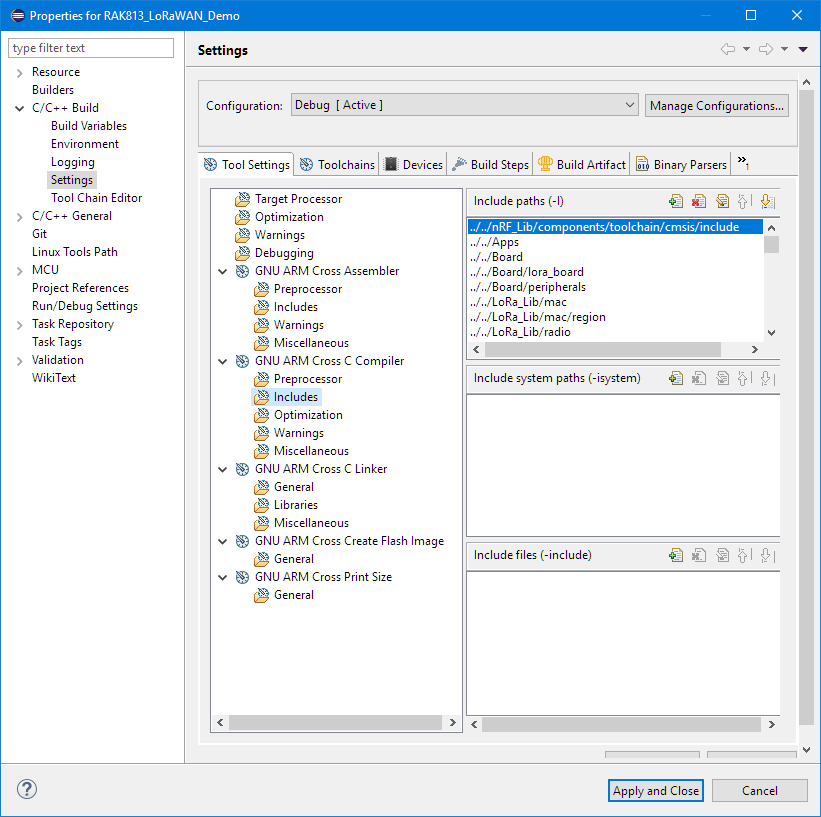
Compiler Includes
../../nRF_Lib/components/toolchain/cmsis/include
../../Apps
../../Board
../../Board/lora_board
../../Board/peripherals
../../LoRa_Lib/mac
../../LoRa_Lib/mac/region
../../LoRa_Lib/radio
../../LoRa_Lib/radio/sx1276
../../LoRa_Lib/system
../../LoRa_Lib/system/crypto
../../nRF_Lib/external/fprintf
../../nRF_Lib/external/segger_rtt
../../nRF_Lib/components/boards
../../nRF_Lib/components/device
../../nRF_Lib/components/ble/ble_services/ble_nus
../../nRF_Lib/components/toolchain
../../nRF_Lib/components/softdevice/common
../../nRF_Lib/components/softdevice/s132/headers
../../nRF_Lib/components/softdevice/s132/headers/nrf52
../../nRF_Lib/components/drivers_nrf/clock
../../nRF_Lib/components/drivers_nrf/common
../../nRF_Lib/components/drivers_nrf/gpiote
../../nRF_Lib/components/drivers_nrf/rtc
../../nRF_Lib/components/drivers_nrf/spi_master
../../nRF_Lib/components/drivers_nrf/timer
../../nRF_Lib/components/drivers_nrf/uart
../../nRF_Lib/components/drivers_nrf/twi_master
../../nRF_Lib/components/libraries/balloc
../../nRF_Lib/components/libraries/bsp
../../nRF_Lib/components/libraries/util
../../nRF_Lib/components/libraries/button
../../nRF_Lib/components/libraries/experimental_log
../../nRF_Lib/components/libraries/experimental_memobj
../../nRF_Lib/components/libraries/fds
../../nRF_Lib/components/libraries/fifo
../../nRF_Lib/components/libraries/fstorage
../../nRF_Lib/components/libraries/uart
../../nRF_Lib/components/libraries/experimental_section_vars
../../nRF_Lib/components/drivers_nrf/hal
../../nRF_Lib/components/libraries/strerror
../../nRF_Lib/components/libraries/experimental_log/src
../../nRF_Lib/components/libraries/timer
../../nRF_Lib/components/drivers_nrf/delay
../../nRF_Lib/components/libraries/atomic
../../nRF_Lib/components/libraries/pwr_mgmt
../../nRF_Lib/components/ble/common
../../nRF_Lib/components/libraries/mutex
../../nRF_Lib/components/ble/ble_advertising
../../nRF_Lib/components/drivers_nrf/wdt
../../nRF_Lib/components/ble/nrf_ble_gatt
../../nRF_Lib/components/libraries/mem_manager
../../nRF_Lib/components/ble/ble_db_discovery
../../nRF_Lib/components/ble/peer_manager
../../nRF_Lib/components/libraries/atomic_fifo
Define the following in the compiler Preprocessor defined symbols:
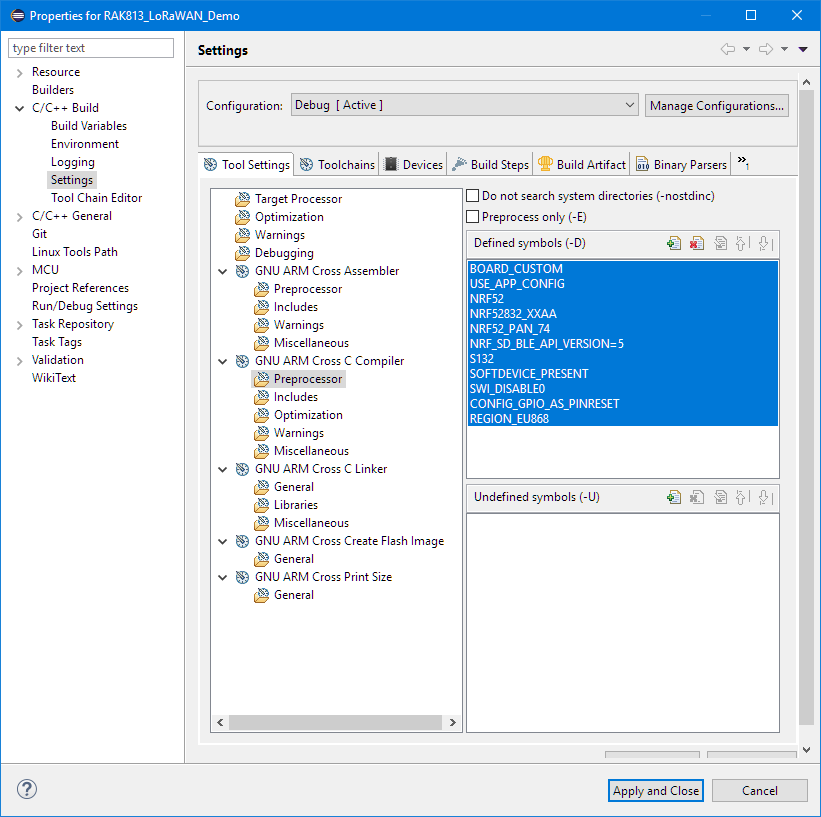
preprocessor Settings
BOARD_CUSTOM
USE_APP_CONFIG
NRF52
NRF52832_XXAA
NRF52_PAN_74
NRF_SD_BLE_API_VERSION=5
S132
SOFTDEVICE_PRESENT
SWI_DISABLE0
CONFIG_GPIO_AS_PINRESET
REGION_EU868
Specify the linker file:
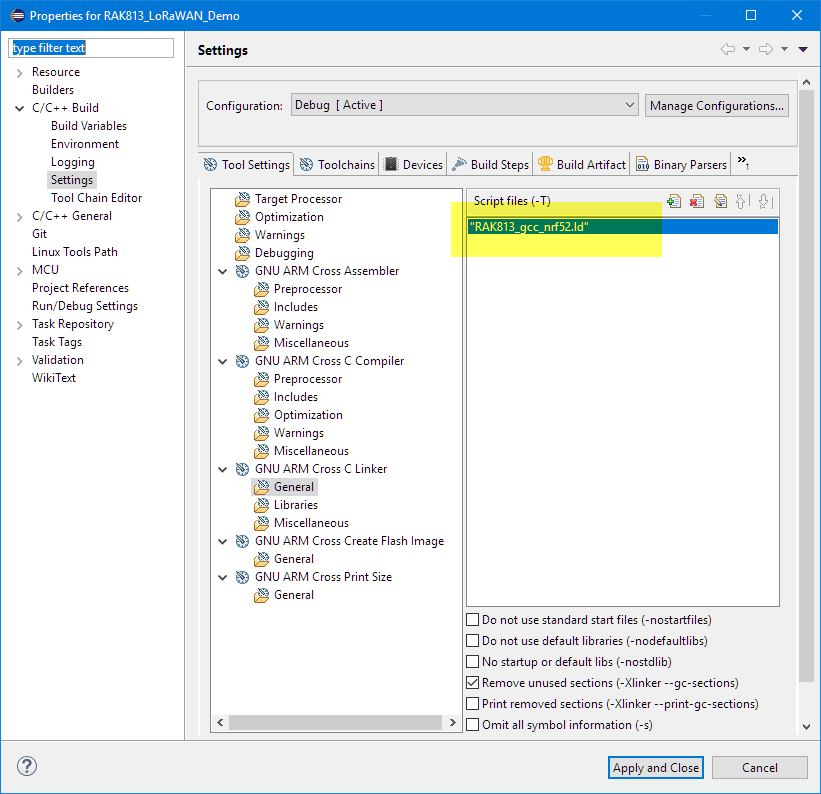
Linker File
Link the Math library and use ‘..’ as library path to find the linker file:
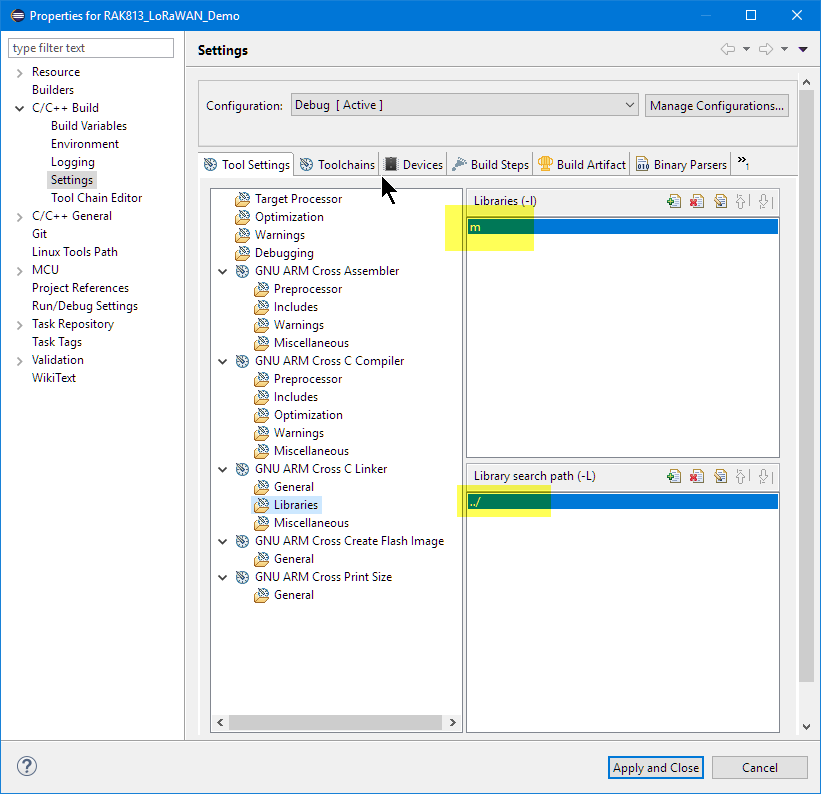
Math Library
Use the newlib-nano without syscalls:
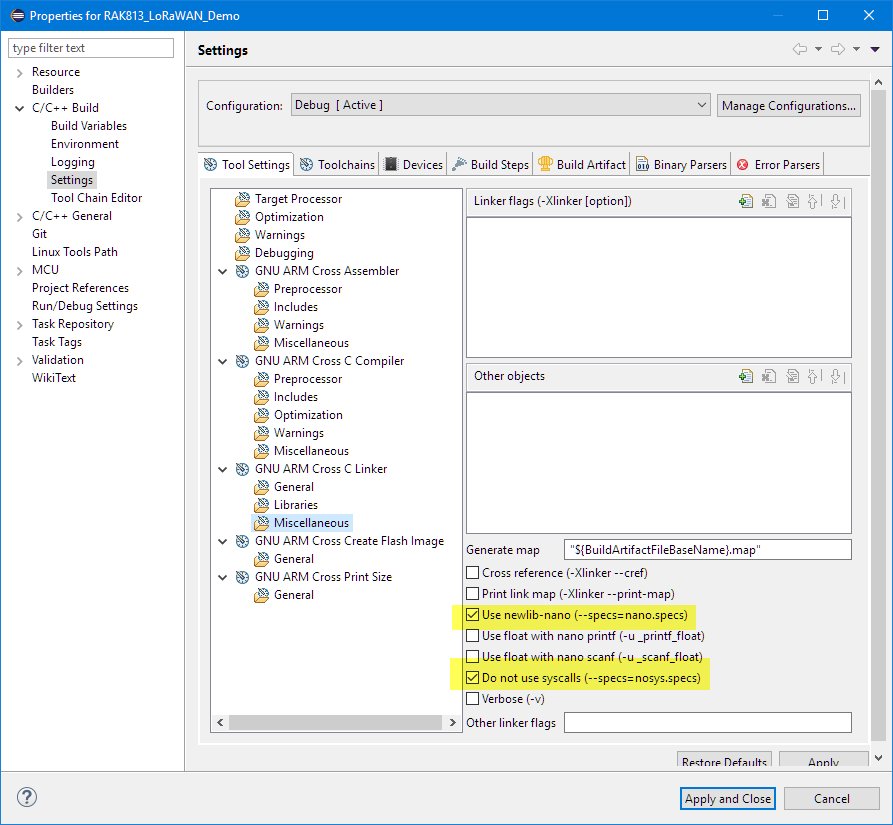
Library Options
The linker file needs to match the size of the SoftDevice. Using the S123, the start address for the application is 0x23000:
MEMORY
{
  FLASH (rx) : ORIGIN = 0x1c000+0x7000, LENGTH = 0x64000-0x7000
  RAM (rwx) :  ORIGIN = 0x20002a68, LENGTH = 0xd598
}
With this, the application should build just fine 🙂
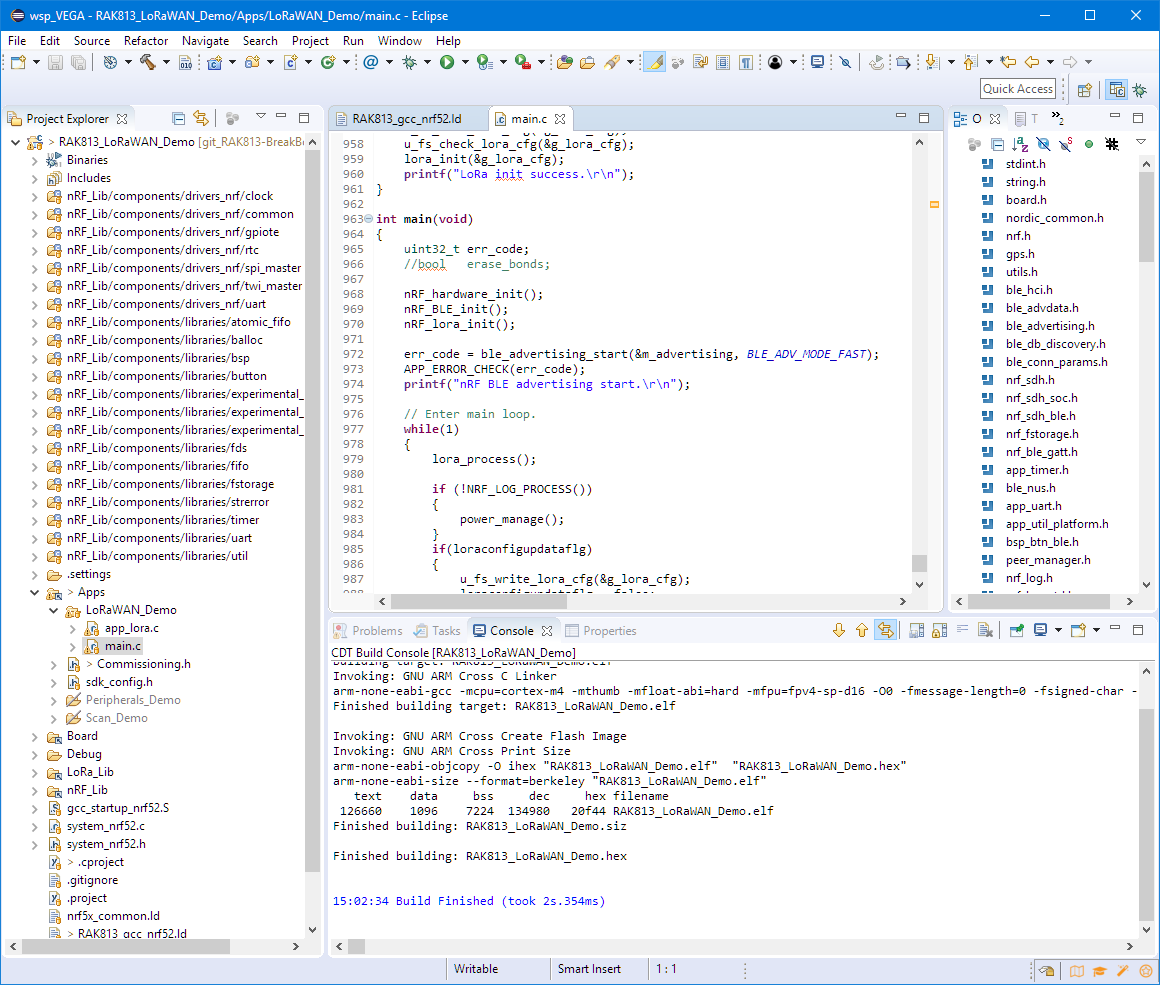
Application Build with Eclipse
Debug Connection
The board does not have a standard debug header :-(, so I have to build an adapter:

SWD Debug Header (Source: RAK815 Schematics)
I’m using the J-Link Mini which has the 10pin mini SWD/JTAG connector. With the Adafruit Debug adapter I can connect the wires:
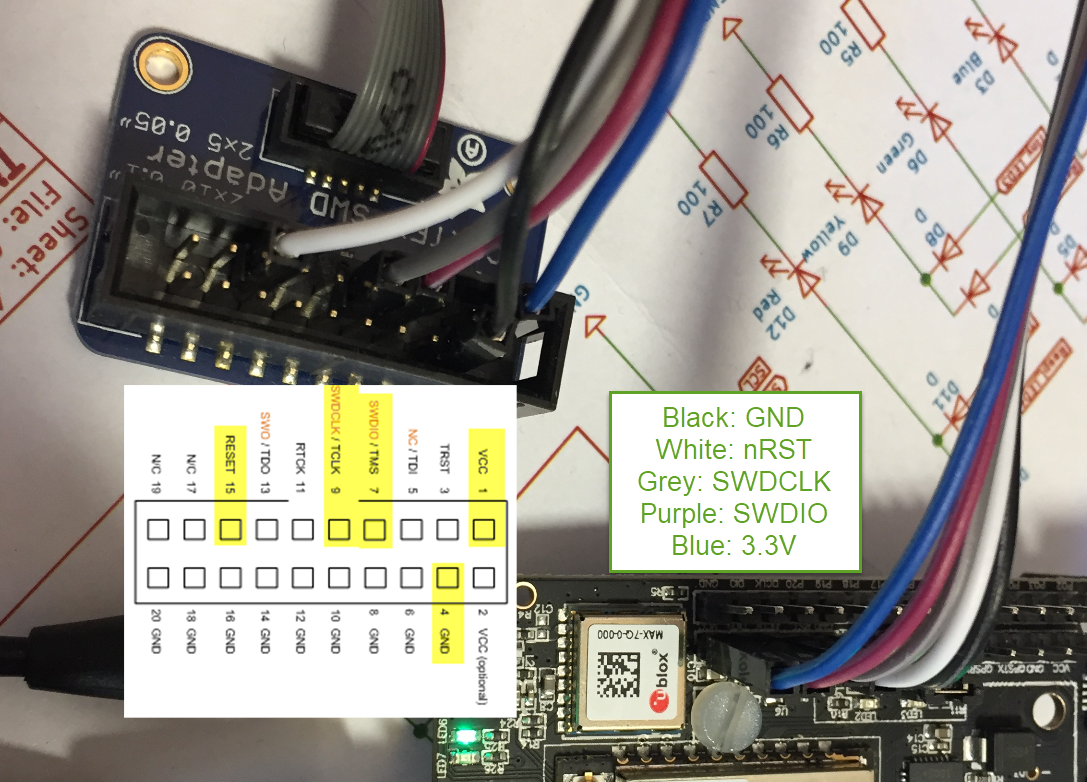
Debug Connection
SoftDevice
As a first step, the SoftDevice needs to be programmed. Use the nRFgo Studio and use the following SoftDevice file:
<repo>/nRF_Lib/components/softdevice/s132/hex/s132_nrf52_5.0.0_softdevice.hex

programming SoftDevice with nRFgo Studio
Notice that the SoftDevice will use the Region 1 up to 0x23000: this is how we have configured the linker file.
Debug
Now we can use GDB to download and debug the target. Create a new .launch Debug configuration. Check that it is pointing to the correct Segger Client and GDB server:

Debug Configuration
With this I’m debugging the application:
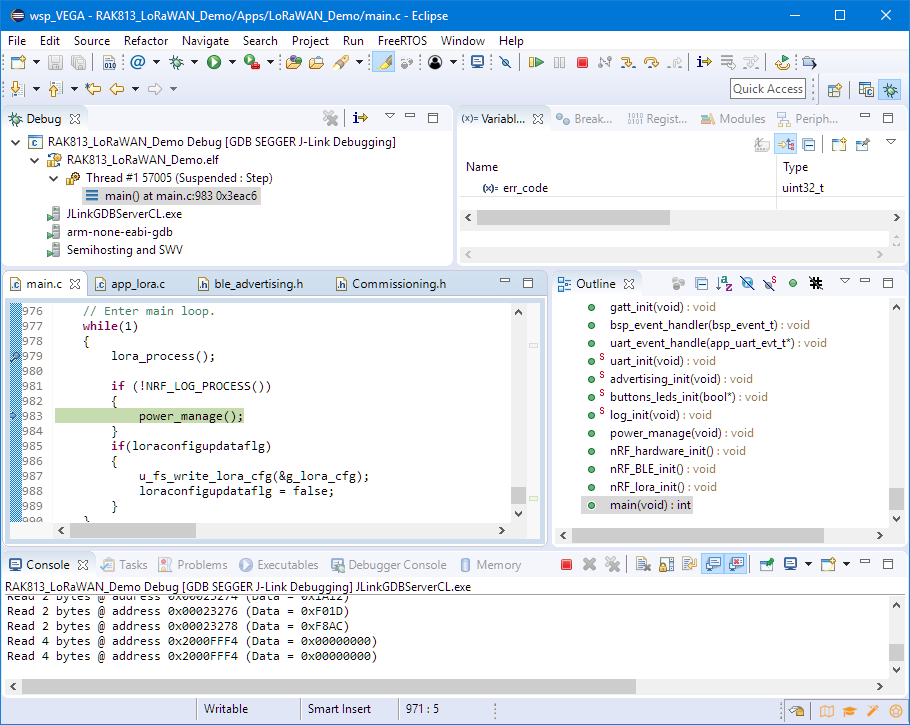
Debugging LoRaWAN Application
It reports the status to the serial console:
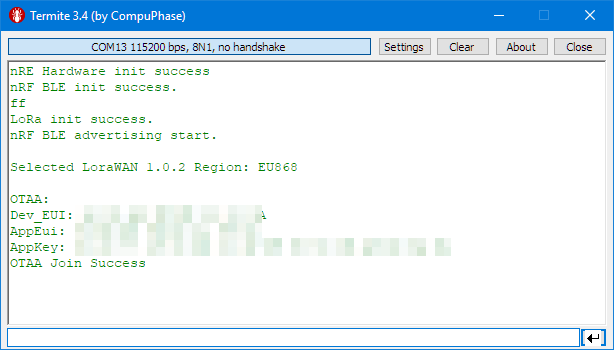
console output
Note: the EUI’s and keys are defined in Commissioning.h or can be configured with the smartphone using the BLE connection.
Success 🙂
Summary
It took me a while to build that LoRaWAN+BLE demo application, but now I have the power of Eclipse to develop it further. The RAK815 board comes with everything I need to start a first prototypes for a larger application. With the BLE I can connect to a smartphone (using a virtual UART), and with the LoRaWAN I can communicate to the gateways in my area. The board includes a SSD1306 I2C LCD interface which I plan to add in a next step.
Happy RAKing 🙂
Links
- Project discussed in this article: https://github.com/ErichStyger/RAK813-BreakBoard
- RAK813 GitHub: https://github.com/RAKWireless/RAK813-BreakBoard
- Getting Started with RAK815 (Ardinuno): https://www.hackster.io/naresh-krish/getting-started-with-rak815-tracker-module-and-arduino-1c7bc9

Pingback: Log2Ram: Extending SD Card Lifetime for Raspberry Pi LoRaWAN Gateway | MCU on Eclipse
Pingback: Seeed Studio Arch Mix NXP i.MX RT1052 Board | MCU on Eclipse
Great job. Now I’m trying to use FreeRTOS. Have you implemented FreeRTOS for RAK813 BreakBoard ?
LikeLike
Yes, see Eclipse\McuLib\FreeRTOS
LikeLike
Now I tried to compile the RAK original files. I did this, but the board restarts everytime. In other hand with McuLib the board doesnt do that. How do you correct this ?
LikeLike
I did not bother with the original FreeRTOS in the RAK distribution, but moved on to the latest and greates FreeRTOS instead.
LikeLike
Pingback: Building a Raspberry Pi UPS and Serial Login Console with tinyK22 (NXP K22FN512) | MCU on Eclipse
Hi Erich
Thanks for the inspiration. This is a project for a specific nRF52832/SX176 combination (RAK813), but I wonder if you have suggestions for generalising this to other boards using nRF528xx and SX12xx, and with up-to-date libraries.
It looks like the RAK813 repository contains snapshots of old libraries. It looks like the /nRF_Lib directory is the /components directory from Nordic Semiconductor SDK, v14.2.0 (latest version is 16.0.0 I think). And it looks like the /LoRa_Lib directory is derived from the LoraMAC stack described at http://stackforce.github.io/LoRaMac-doc/ (but is 2 years old?).
What about this approach:
1 Set up Eclipse so it works with the latest Nordic SDK and builds their examples, then my own simple projects (I have this already).
2 Add the current LoRaMAC library.
3 Follow the LoRaMAC porting guide to add nRF52832 as a new board, using the RAK /RAK813-BreakBoard/Board/lora_board/ code where possible.
4 Add the Apps code and try to compile one!
Comments?
Thx – Charles
LikeLike
Hi Erich
Just some background information before my question I am an extreme beginner in embedded systems and testing the waters in the Lora world. Also I feel like I need to mention, reading through some of your other posts, it is some amazing work that you do and the fact that you share your vast knowledge is pretty remarkable.
I am trying to achieve a simple task to compile the lorawan demo project.
1. Now I’ve added the Apps, Board, Eclipse, Lora_Lib and nRF_Lib folders into the project
2. I’ve included the library folders mentioned in your explanation
3. I’ve used the linker file found in your GIT repo.
4. In the Apps folder I’ve excluded the two folders containing the peripherals demo and the scan demo.
I compile it and it just gave me errors for missing libraries with subsequently I searched through the folders and included them in the project settings. There is one particular error in the problems log that keeps coming up.
Type ‘conn_mw_item’ could not be resolved conn_mw.c
Am I adding more folders to the project that it requires? Am I adding the wrong libraries? Is there something additional I should be doing? Am I asking the wrong questions?
Any assistance or guidance would be extremely appreciated. Thank you in advanced.
LikeLike
Hi Sebastian,
did you use the same repository as used in the article? This still works as expected for me.
Erich
LikeLike