The McuOnEclipse GitHub repository hosts many Processor Expert projects and is very popular (cloned more than 1000 times, thank you!). Processor Expert is a powerful framework which generates driver and configuration code, simplifying application development for a wide range of microcontroller and families. But Processor Expert won’t be developed further by NXP and is not part of MCUXpresso IDE. While it is possible to install Processor Expert into MCUXpresso IDE 10.2, how can these projects used ini an IDE *without* Processor Expert? This article describes how to port an existing Processor Expert project into the NXP MCUXpresso IDE.
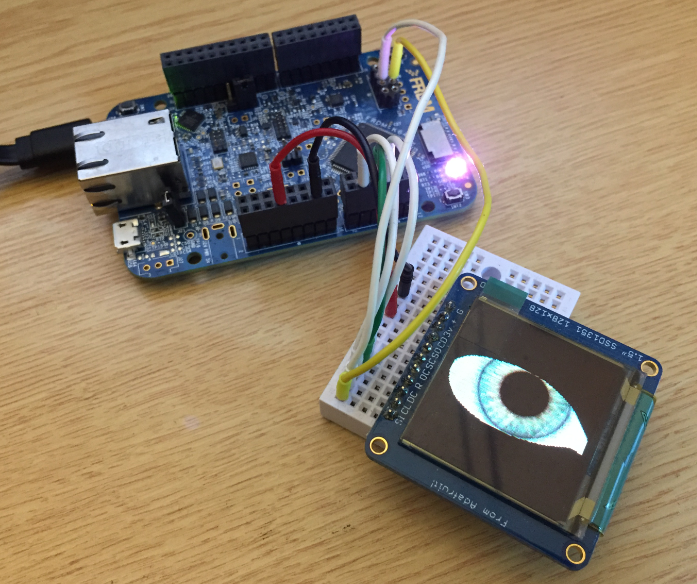
Ported Project with FRDM-K64F using Adafruit SSD1351 and Processor Expert
Outline
Processor Expert is a configuration and code generation utility originally developed by Unis in the Czech Republic. This technology has been widely used in CodeWarrior IDE and later in Eclipse based Kinetis Design Studio IDE or S32 Design Studio. Processor Expert has been replaced by its successor, the MCUXpresso Configuration Tools. The new approach is not compatible with the old Processor Expert, so I keep (and have to keep) my existing Processor Expert projects alive for an extended period (for automotive projects 10-15 years are not that unusual). And for this I usually keep tool chains, IDE and projects inside that original environment.
However, sometimes it makes sense to move over a project to a new environment. In this article I describe how to port an existing Processor Expert project to the MCUXpresso IDE.
There are the following approaches possible to deal with the Processor Expert transition:
- Use the MCUXpresso SDK and Configuration tools: This means basically doing things from scratch, I recommend this for new projects where the microcontroller is supported by the SDK and the Configuration Tools. This is the cleanest solution, but requires more work. I call it the ‘clean start’ way.
- Install Processor Expert and the GNU ARM Eclipse into MCUXpresso IDE: With this the projects can be re-used-as-is, not extra work needed. The same time it allows you to work with both worlds, and the most important McuOnEclipse components work as well with the SDK and configuration tools.See “MCUXpresso IDE: Installing Processor Expert into Eclipse Neon” which works as well for MCUXpresso IDE 10.2 (Oxygen based) However this route is not guaranteed in the future and not supported by NXP. I call it the ‘bridge‘ way.
- Use the McuOnEclipse Library: This is a library on GitHub which is is the generated code from many custom components, but available as normal source files with configuration settings in header files. This approach is ideal if you don’t want to use it for any ARM Cortex microcontroller, independent of microcontroller vender, IDE or tools. I call it the ‘unchained‘ way.
- Port over the Processor Expert generated files: With this I continue to use the Processor Expert source files in the new IDE, but not using Processor Expert any more. That way all the advanced MCUXpresso IDE and build features can be used. The MCUXpresso SDK is in conflict with the API used by Processor Expert, so the SDK code has to be removed, additionally the startup code has to be tweaked to work with the vector table generated by Processor Expert. This approach means leaving Processor Expert behind, so I all it the ‘burning bridges‘ way.
This article is about the ‘burning bridges’ approach.
💡 if there is any special interest in the other approaches, leave a comment at the end of this article.
Preconditions
The approach described in this article is about porting source files from a Processor Expert project (assuming Kinetis Design Studio 3.2.0) to MCUXpresso IDE 10.2.0. It requires that
- Your ‘source’ project is working and includes the Processor Expert generated code
- Your source device is supported by the MCUXpresso IDE and SDK
- You have loaded the corresponding MCUXpresso SDK into the MCUXpresso IDE
Approach
The porting used the following steps:
- Create new MCUXpresso SDK project in the MCUXpresso IDE
- Copy over all the needed from the source project (Generated_Code, Static_Code)
- Include the copied folders into the build process
- Update the compiler include paths for the new directories added (Generated_Code, Static_code
- Remove the SDK and CMSIS files
- Add main.c, events and application code
- Merging vector/interrupt table and startup code
In this article I’m porting an application for the NXP FRDM-K64F board with the Adafruit SSD1351 display to the MCUXpresso IDE.
The original source project is on GitHub (https://github.com/ErichStyger/mcuoneclipse/tree/master/Examples/KDS/FRDM-K64F120M/FRDM-K64F_Adafruit_SSD1351) as well the result in MCUXpresso IDE ().
Step 1: Create new project in MCUXpresso IDE
In the IDE, create a new project for the device using the Quickstart Panel:
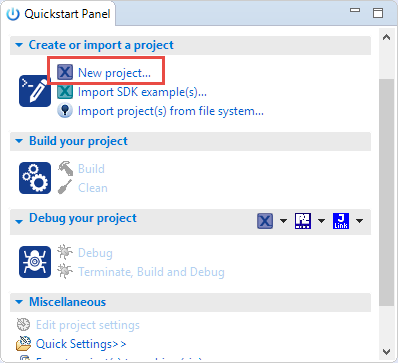
Quickstart new Project
Create a new ‘baremetal’ project with default settings:
💡 Make sure the package type matches your original project! Otherwise the header files for the peripherals might not match.
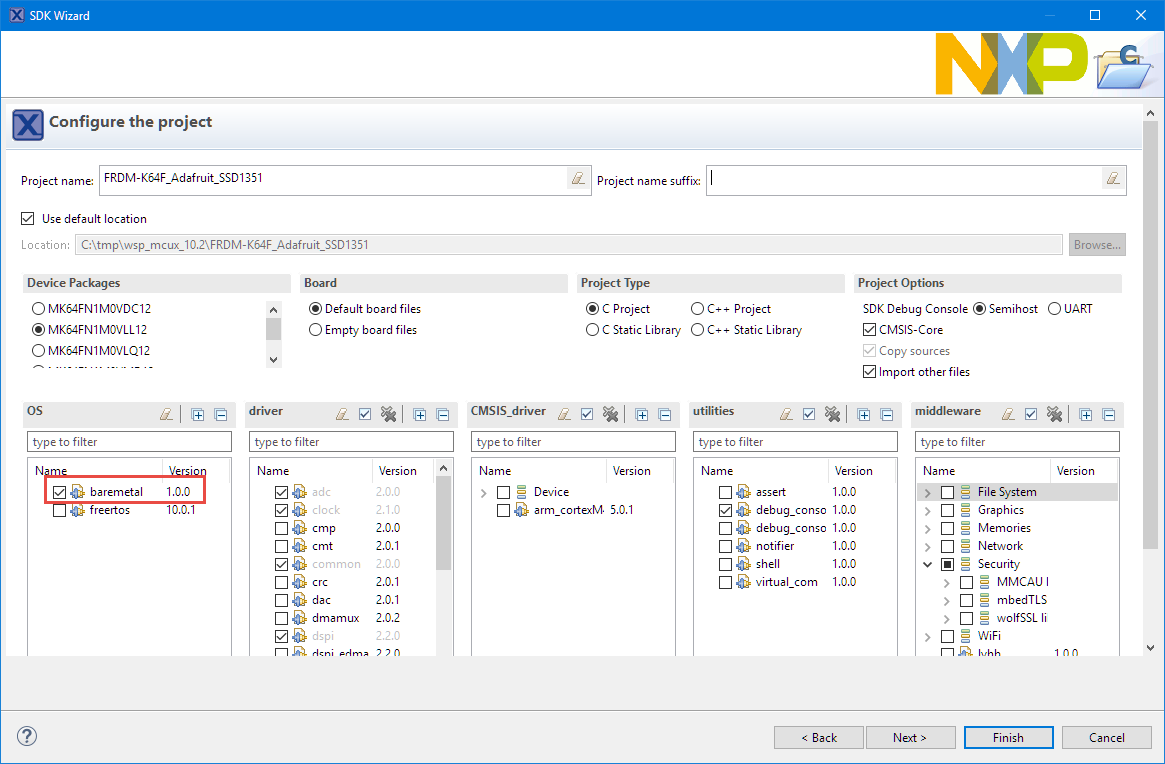
FRDM-K64F baremetal project
With this, we have the base for our project to be ported.
New Project created
💡 Now it would be a good idea to build and debug that project, just to make sure everything works as expected.
Step 2: Copy generated code
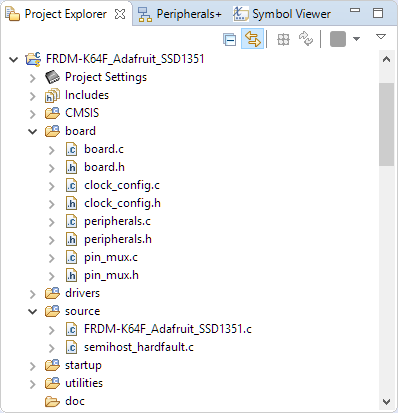
Copy the following folders from the original project to the new MCUXpresso project:
- Generated_Code: this contain all the generated code from the components
- Static_Code: this directory has all the PDD macros
Below shows them added to the project:
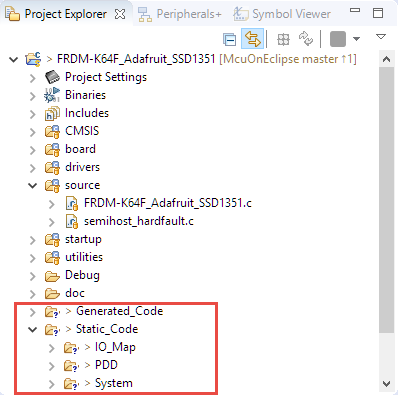
Copied generated files
Step 3: Include into build
By default the files and folders might not be included for the build/to be compiled. This can be seen as there is not small blue ‘c’ in the icon decorator.

Folders included or not in the build
Include the ‘Generated_Code’ and ‘Static_Code’ folders into the build with changing the folder properties (right-click on each folder and use the ‘Properties’ context menu):

Unchecked Exclude Resource from build
Do this for both folders:

Included Folders into Build
Step 4: Add Include Paths
Now we need to tell the compiler that there are extra folders to search for header files. Add the following paths/directories (you can copy-paste them) into the compiler include path settings of the project:
../Generated_Code
../Static_Code/IO_Map
../Static_Code/PDD
../Static_Code/System
../Static_Code/Peripherals

Added Processor Expert Folders to Include Paths
Step 5: Remove the SDK and CMSIS files
The next step is necessary because the Processor Expert API is not compatible with CMSIS and the SDK in the project (such as the header files for the peripherals are slightly different). The easiest way is to remove the files and folders marked in yellow below:
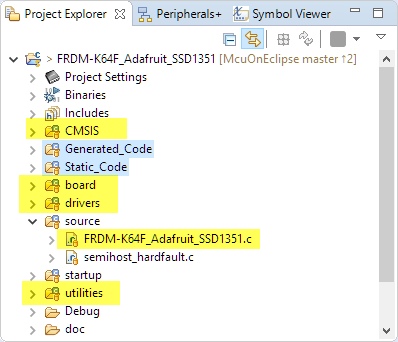
Remove files and folders
Consequently, we can remove the following marked include paths in the compiler settings:

removed include paths
Next, remove the following entry from the compiler settings as we are not using CMSIS:
__USE_CMSIS
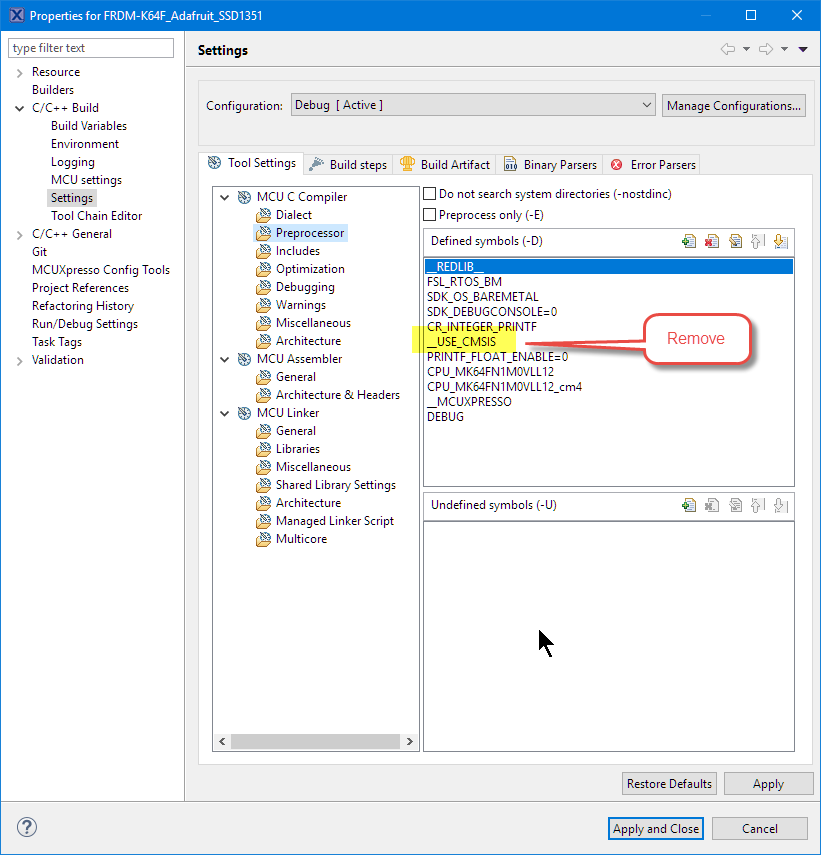
Remove __USE_CMSIS
Step 6: main(), events and application code
Now we can add/copy the application code. Copy as well the main() file and events.c and events.h from the original project:

Added Application Files
Step 7: Startup code and vectors
This step is probably the most complicated, because here I’m going to use the MCUXpresso SDK startup code with the vector table created by Processor Expert. That way I get the feature having MCUXpresso IDE to manage the linker files. The challenge is that different names are used by the SDK and Processor Expert for the reset routine and the initial stack pointer.
First, I have to change the names used in the vector table generated by Processor Expert. For this I add the following to Generated_Code/Vectors_Config.h:
#if 1 /* needed by SDK startup */
extern void _vStackTop(void);
extern void ResetISR(void);
#endif
Then I change the symbols
#if 0 /* original Processor Expert code */
#define VECTOR_SP_MAIN    &__SP_INIT                            /* 0x00 -    ivINT_Initial_Stack_Pointer    used by PE */
#define VECTOR_1          (tIsrFunc)&__thumb_startup            /* 0x01 -    ivINT_Initial_Program_Counter  used by PE */
#else /* needed by SDK startup */
#define VECTOR_SP_MAIN    &_vStackTop                           /* 0x00 -    ivINT_Initial_Stack_Pointer    used by PE */
#define VECTOR_1          (tIsrFunc)&ResetISR                   /* 0x01 -    ivINT_Initial_Program_Counter  used by PE */
#endif
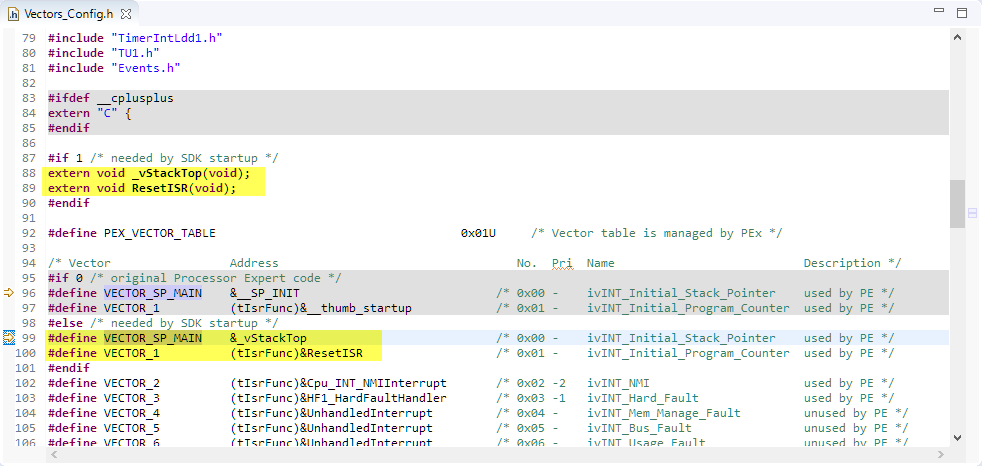
Changes for SDK in Vectors_Config.h
💡 Depending on your project and Processor Expert, you might need to edit the file Generated_Code\Vectors.c in a similar way.
The SDK expects the vector table in a special named section (“.isr_vector”) with a dedicated name (g_pfnVectors). Modify accordingly Static_Code\System\Vectors.c:
#if 0
__attribute__ ((section (".vectortable"))) const tVectorTable __vect_table = { /* Interrupt vector table */
#else /* SDK needs special sector name and section name */
__attribute__ ((section (".isr_vector"))) const tVectorTable g_pfnVectors = { /* Interrupt vector table */
#endif

Vector section name and vector table name
The name of the vector table needs to be updated in Static_Code\System\CPU_Init.h:
extern const tVectorTable g_pfnVectors;

Name of Vector table ini CPU_Init.h
and its usage in Static_Code\System\CPU_Init.c:
SCB_VTOR = (uint32_t)(&g_pfnVectors); /* Set the interrupt vector table position */
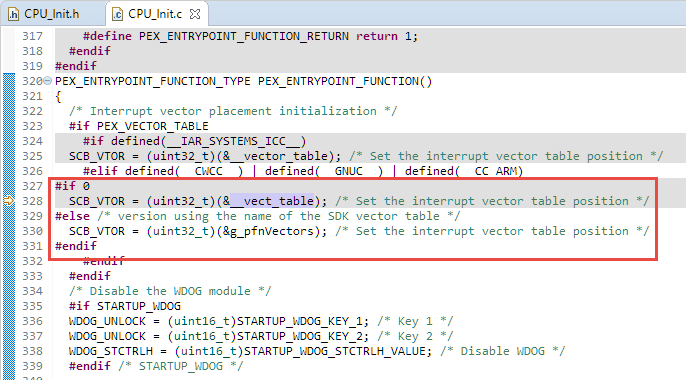
Vector table usage in CPU_Init.c
The next step is to change the SDK startup code in startup\startup_mk64f12.c:
💡 the file name depends on the device used.
Here disable (or remove all the lines which deal with the interrupt vectors. It starts here:
Start of disabled vectors
and ends here:

End of disabled vectors
Next we disable the vector table itself which starts here:
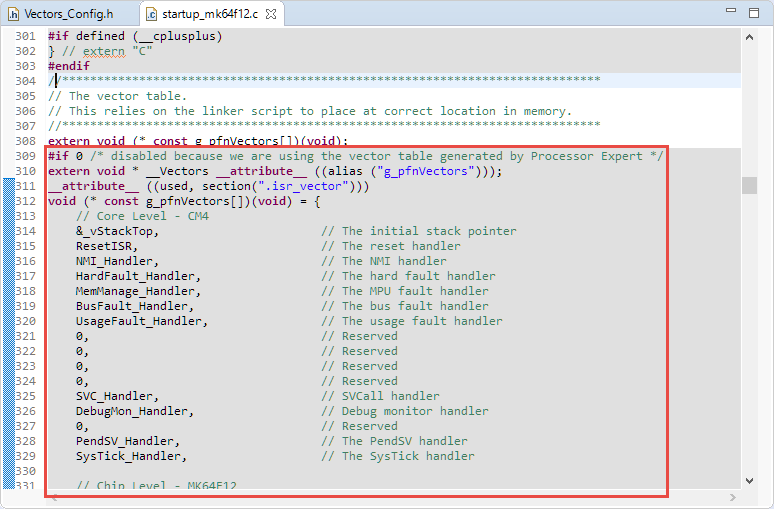
Start of disabled vector table
and ends here:

End of disabled vector table
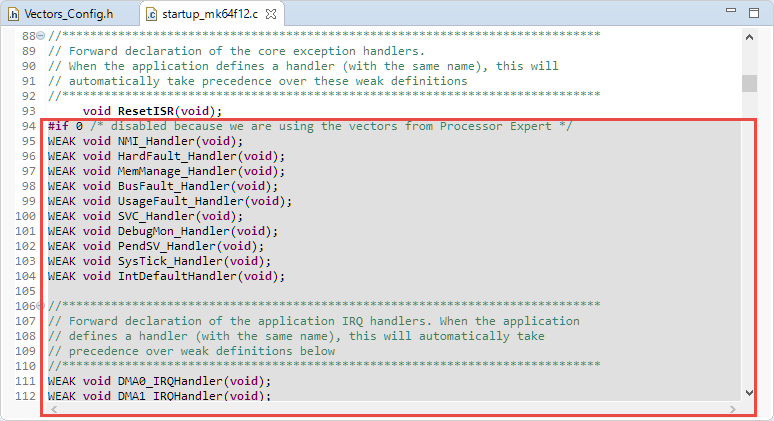
Finally we disable the weak interrupt handlers, starting with:

Start of Disabled Weak Vector Stubs
and ends here:
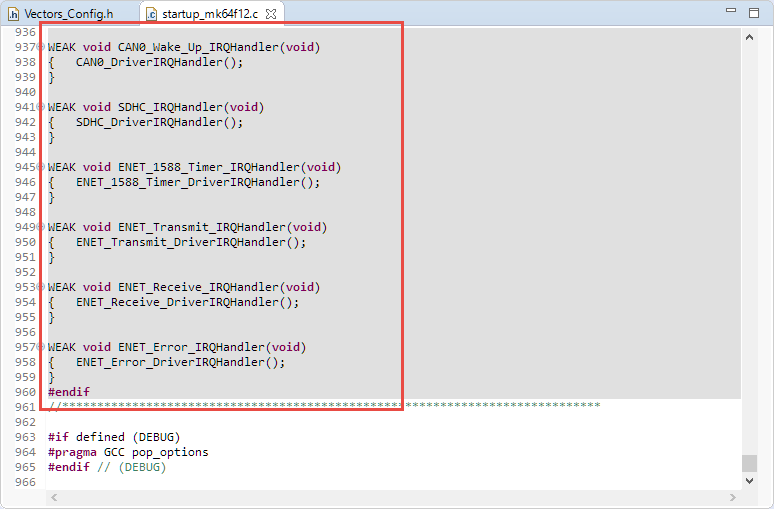
End of disabled weak vector stubs
As a last step, we need to call the CPU initialization code which sets the clocks. Add a prototpye:
void __init_hardware(void); /* prototype of Processor Expert hardware initialization function */
and call it from the startup code:
__init_hardware(); /* all Processor Expert CPU initialization code */

__init_hardware() call in startup code
Finally….
That’s it. Build/compile (which hopefully just works fine if I have not missed anything) and I can run and debug my application without Processor Expert with MCUXpresso IDE:

Ported Application
Summary
Porting a Processor Expert project to MCUXpresso IDE requires a few changes dealing with the vector table and startup code. But otherwise it is pretty much working the ‘create a new project and add your source files to it’ way.
Happy Porting 🙂
Links
- McuOnEclipse GitHub Repository: https://github.com/ErichStyger/mcuoneclipse
- MCUXpresso IDE: Installing Processor Expert into Eclipse Neon
- MCUXpresso IDE web: https://www.nxp.com/mcuxpresso/ide
- CodeWarrior IDE: http://www.nxp.com/cwmcu10
- Kinetis Design Studio IDE: http://www.nxp.com/kds

Thanks Erich for another info filled article.
LikeLike
Thanks for the post. I’ve managed to do this for a couple of major projects. My goal now is to try to eventually port them to the SDK. Mostly for the sake of the USB stack – I’m stuck on the 5.0 bare metal ‘beta’ stack that was abandoned prior to the SDK. It has bugs (I’ve squashed a couple) and doesn’t have a connector for FreeRTOS, and it isn’t clear if its RTOS integration is functional anyway.
As far as I can tell, the only way to use the new USB stack is through an example project – there seems to be no option to add it to a new project.
LikeLike
I had no time (or chance) to adopt the 5.0 USB stack as I was pretty happy with the 4.1.1 version (not so happy with the licensing terms of it, but that’s something different). As for ‘adding to a new project’ of the SDK USB stack: I believe it is not implemented in the wizard (yet?) because it is rather complex (interrupts, linker file, memory mapping, initialization code). I have plenty of things on my plate right now, but switching over to the SDK USB stack has been on my list for a long time. Is there some value if I would investigate and describe the (manual) steps to add the SDK USB stack to a non-USB stack SDK project?
LikeLike
Thanks for the post Erich.
With these steps I could port over the Processor Expert generated files into MCUXpresso. Now if I want to use this project for undertaking driver changes that may come in future during the product development. Is it possible ?
LikeLike
great!
But I’m not sure what you mean with ‘driver changes’? Can you provide some details about it?
LikeLike
We are in the phase of “Product development” where in we need to do some changes in the driver files (Auto-generated codes). For ex. Change settings for existing ADC component, add a new Timer component etc.
Is it possible to do such changes if we port the PE project in ‘burning bridges’ way? or do we need to do a “clean start” with MCUXpresso?
LikeLike
Just in case you are not aware: there is a way to use Processor Expert in MCUXpresso IDE without the ‘burning bridges’: https://mcuoneclipse.com/2017/04/09/mcuxpresso-ide-installing-processor-expert-into-eclipse-neon/
Either way: you can disable code generation or with the ‘burning bridges’ way just change the source code directly. For longer term projects I would say that start using the SDK is a more sustainable way.
You might have a look at the ‘McuLib’ I’m using: basically this is a combination of Processor Expert code combined with the SDK.
The library is here: https://github.com/ErichStyger/McuOnEclipseLibrary
A project using it is is here: https://mcuoneclipse.com/2019/05/05/building-a-raspberry-pi-ups-and-serial-login-console-with-tinyk22-nxp-k22fn512/ and has the link to the files on GitHub
LikeLike