
In Using Raspberry Pi and MCU-Link for Remote Embedded Debugging I created a remote server for debugging. I did order the NXP FRDM-IMX93 a few weeks ago, and did not had a chance to use it. So why not doing the same?
Here is how it can be uses as remote debug server,
Outline
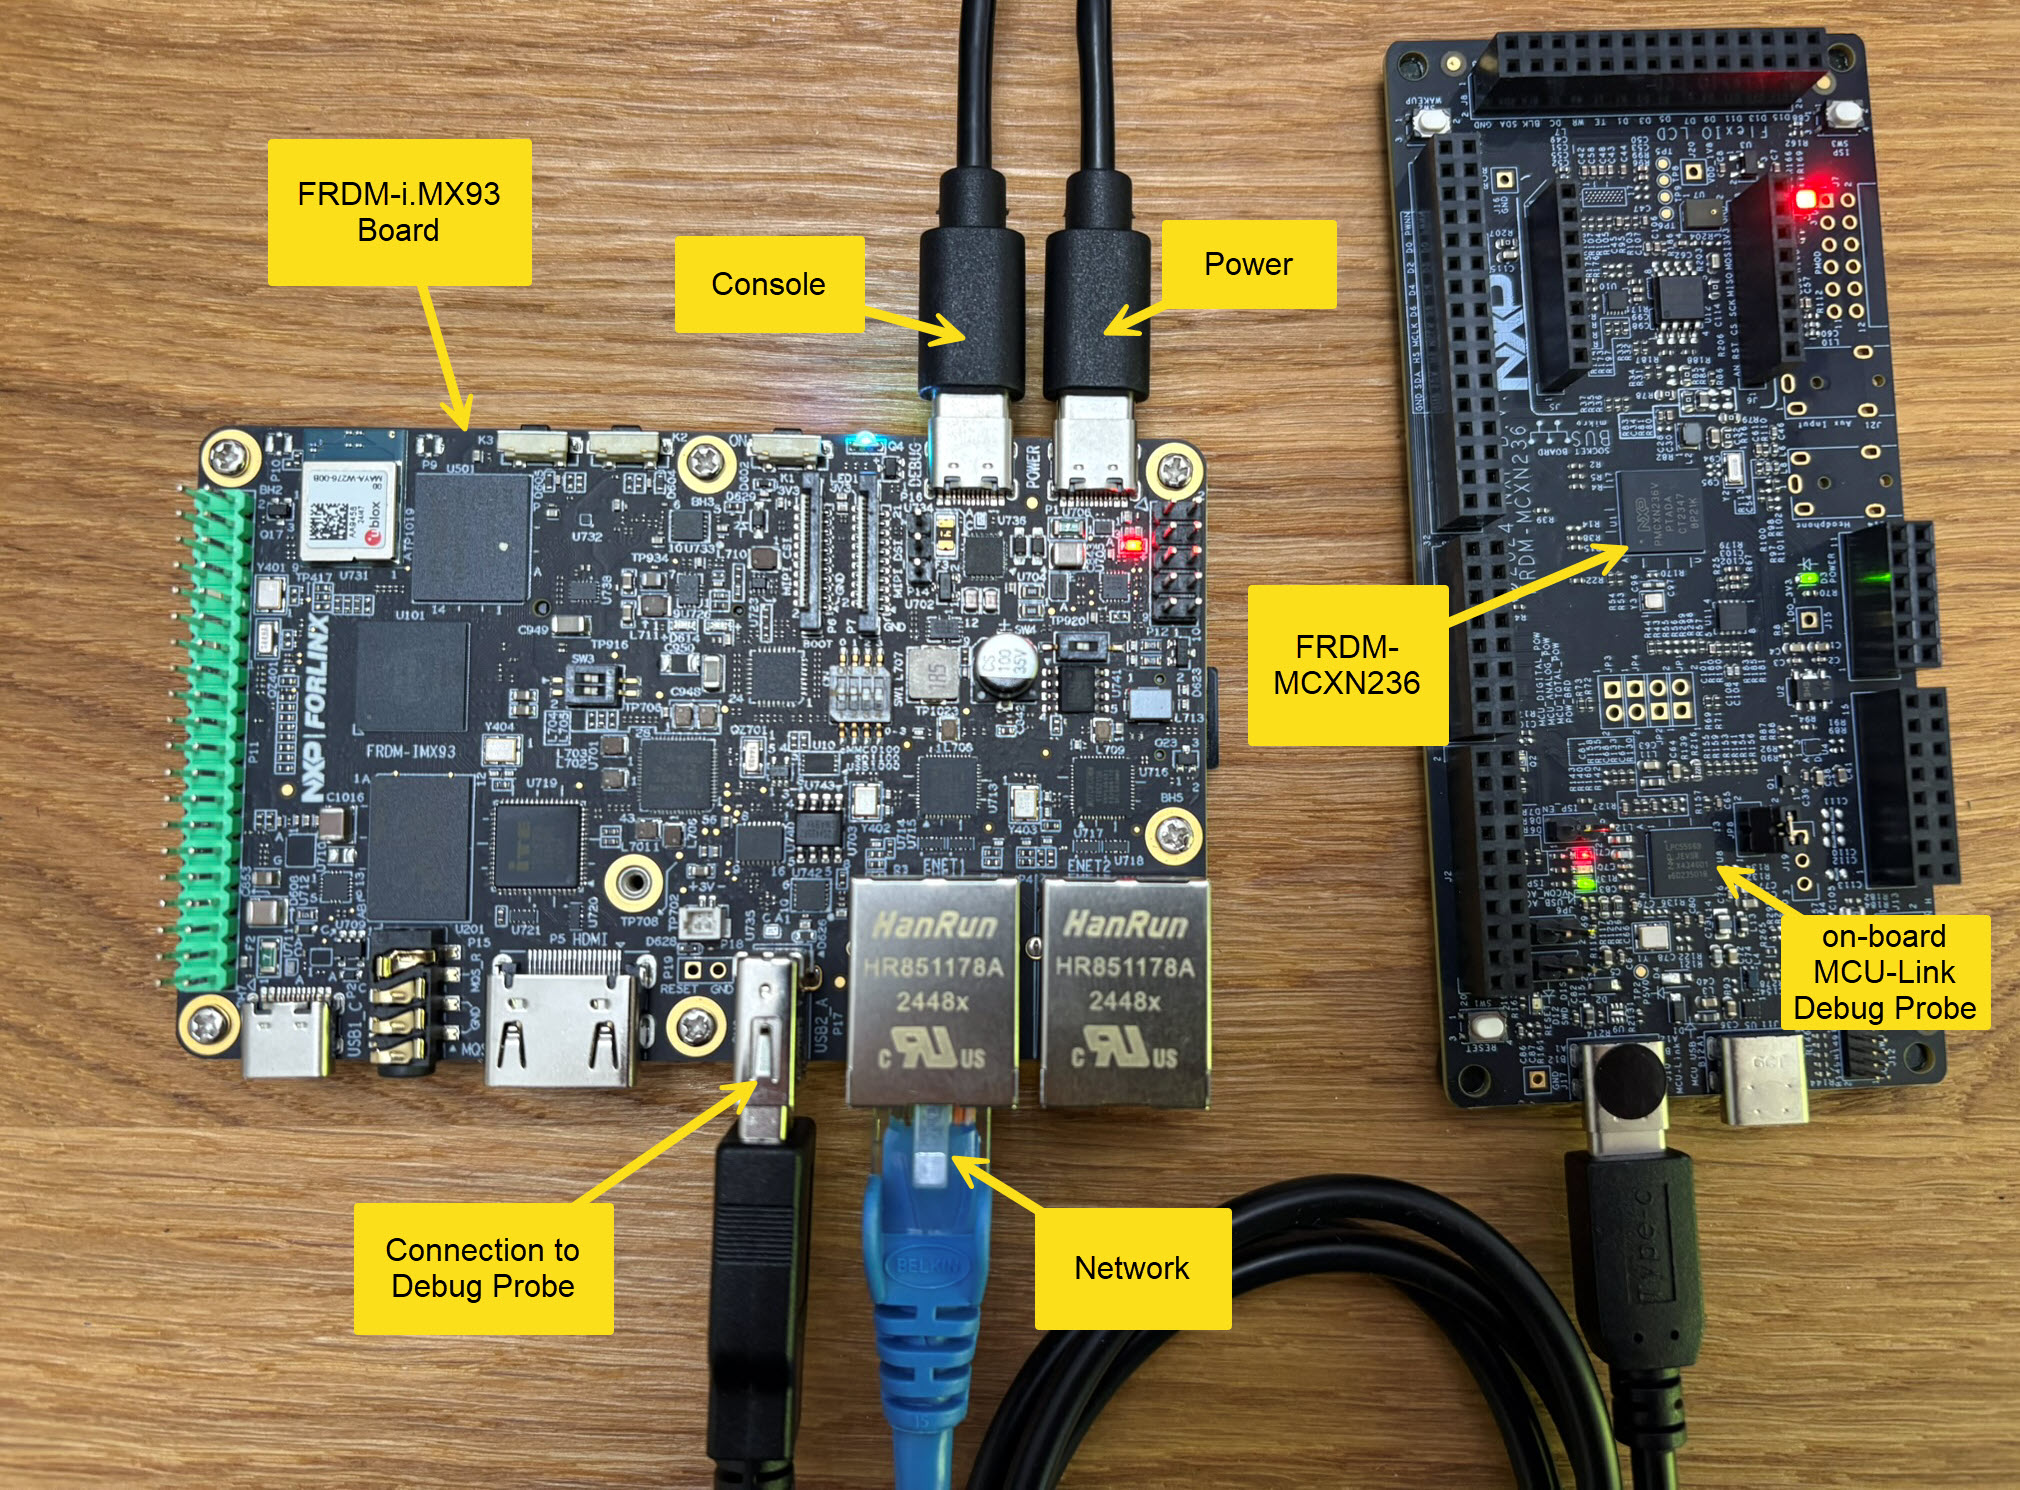
The NXP FRDM i.MX93 board is priced around $80. The i.MX93 is a dual-core Cortex-A55 (1.7GHz) with a Cortex-M33 (250 MHz). It includes an ARM NPU. On the memory side it has 2 GB RAM and 32 GB eMMC. I can boot with a serial bootloader, from the micro-SD card or from eMMC. It features two Ethernet ports, WiFi/BLE/ plus 802.15.4 (ZigBee) connectivity. As it is less power hungry than a Raspberry Pi, and I can power it from my laptop USB port.
In this article, I’ll show the setup. I’ll also explain the steps to allow the FRDM-IMX93 to be used as a remote debug server. I’m using the NXP MCU-Link debug probe. That debug probe exists on-board (OB) or standalone (MCU-Link Base, MCU-Link Pro or MCU-Link MR).
In the example here I’m using the MCXN236 as target device: you can use any other device too.
Getting Started
To get familiar with the board, use the Getting Started Guide. The provided images do not enable the WiFi/Bluetooth/Zigbee radios.
System Setup
The board comes with a pre-installed Linux system on the onboard eMMC. I recommend to use an updated image instead.
I have downloaded the LF_v6.6.36-2.1.0_images_FRDM_4.0_IMX93 and stored it on an SD card with the UUU (Universal Update Utility):
- Insert a micro-SD card on the back of the FRDM-IMX93 board
- Connect a USB cable with USB1 (P2, that’s the USB-C connector near the audio connector) to the host
- Set the DIP-Switch (SW1) to 0001 to enable the serial downloader
- Power the board
- Run UUU utility on the host:
uuu -b sd_all imx-image-full-imx93frdm.rootfs.wic.zst
This will flash the image to the SD card on the back. This will take several minutes. So be patient.
WiFi
There is a Connectivity Training which I recommend to go through. To keep things simple, just used the wired Ethernet connection.
Here are the steps (as root) to use WiFi on the FRDM-IMX93:
Edit the /etc/wpa_supplicant.conf and add the SSID login information. Below is an example for using EDUROAM and normal PSK:
ctrl_interface=/var/run/wpa_supplicant
ctrl_interface_group=0
update_config=1

network={
        ssid="EDUROAM-SSID"
        scan_ssid=1
        key_mgmt=WPA-EAP WPA-EAP-SHA256
        eap=PEAP
        identity="your login name"
        password="your password"
}

network={
        ssid="your SSID"
        psk="your password"
        key_mgmt=WPA-PSK
}
The next steps or commands need to be executed after each reboot:
$ modprobe moal mod_para=nxp/wifi_mod_para.conf
$ ifconfig mlan0 up
$ killall wpa_supplicant
$ wpa_supplicant -imlan0 -Dnl80211 -c /etc/wpa_supplicant.conf -B
$ udhcpc -i mlan0
Check your connection with
$ ifconfig mlan0
$ iwconfig mlan0
Somehow DNS does not work correctly for me. After every reboot I have to add the google name server (8.8.8.8) to /etc/resolv.conf:
$ nano /etc/resolv.conf
Add the next line:
nameserver 8.8.8.8
User account
The image comes with a root account without password. I recommend to add a password for root:
$ passwd
Then add a user account (replace <user> with your user name):
$ useradd <user>
And give it a password:
$ passwd <user>
To enable <user> to use ‘sudo’: add it to the ‘sudo’ group:
$ sudo usermod -a -G sudo <user>
And add it to the ‘sudoer’ list:
$ nano /etc/sudoers
and add the next line:
<user> ALL=(ALL) NOPASSWD: ALL
The next thing is USB. By default, only root has access to the USB device. We have to add a custom udev rule. See https://github.com/pyocd/pyOCD/tree/main/udev).
$ nano 50-mculink.rules
and add the next line:
SUBSYSTEM=="usb", ATTRS{idVendor}=="1fc9", ATTRS{idProduct}=="0143", MODE="0666"
Then reload the rules:
$ udevadm control --reload-rules
$ udevadm trigger
With this I have added a password for root. And I created a new user I can use and sudo with it. Plus I can access the MCU-Link USB device as user.
The next steps assume I have logged in as this new user.
Installing pyOCD
Create a virtual python environment:
$ python3 -m venv ./venv
Install pyOCD:
$ ./venv/bin/python3 -m pip install -U pyocd
To install the packs for your device(s) (update/change the list for your device list):
$ ./venv/bin/pyocd pack install lpc845 mcxn236 k22
Using pyOCD
With pyOCD, I can directly flash or program a device.
To program a binary:
$ ./venv/bin/pyocd flash -t mcxn236 application.elf
Erase and flash:
./venv/bin/pyocd erase --chip -t mcxn236 application.elf
pyOCD GDB Remote Server
To use the FRDM-IMX93 as remote debug server, I launch a gdb server on it:
$ ./venv/bin/pyocd gdbserver -t mcxn236 --persist --allow-remote
To program a binary using gdb, I can use the a script (gdb_script_pyocd.txt):
# Usage:
#  gdb <elf-file> -x <script>

# connect to remote target
target remote localhost:3333

# halt the target
monitor halt

# flash application file
load

# reset target
monitor reset

# detach from target
detach

# exit gdb
quit
Change ‘localhost’ to the network/hostname of the FRDM-IMX93 or its IP address, and call it like this:
$ gdb application.elf -x gdb_script_pyocd.txt
I can run gdb like above on the FRDM-IMX93. Alternatively, it can be run from any remote machine having a network connection to the FRDM-IMX93.
With this, I have a remote client-server connection with GDB and can do command line debugging. For more about this topic, see Command Line Programming and Debugging with GDB.
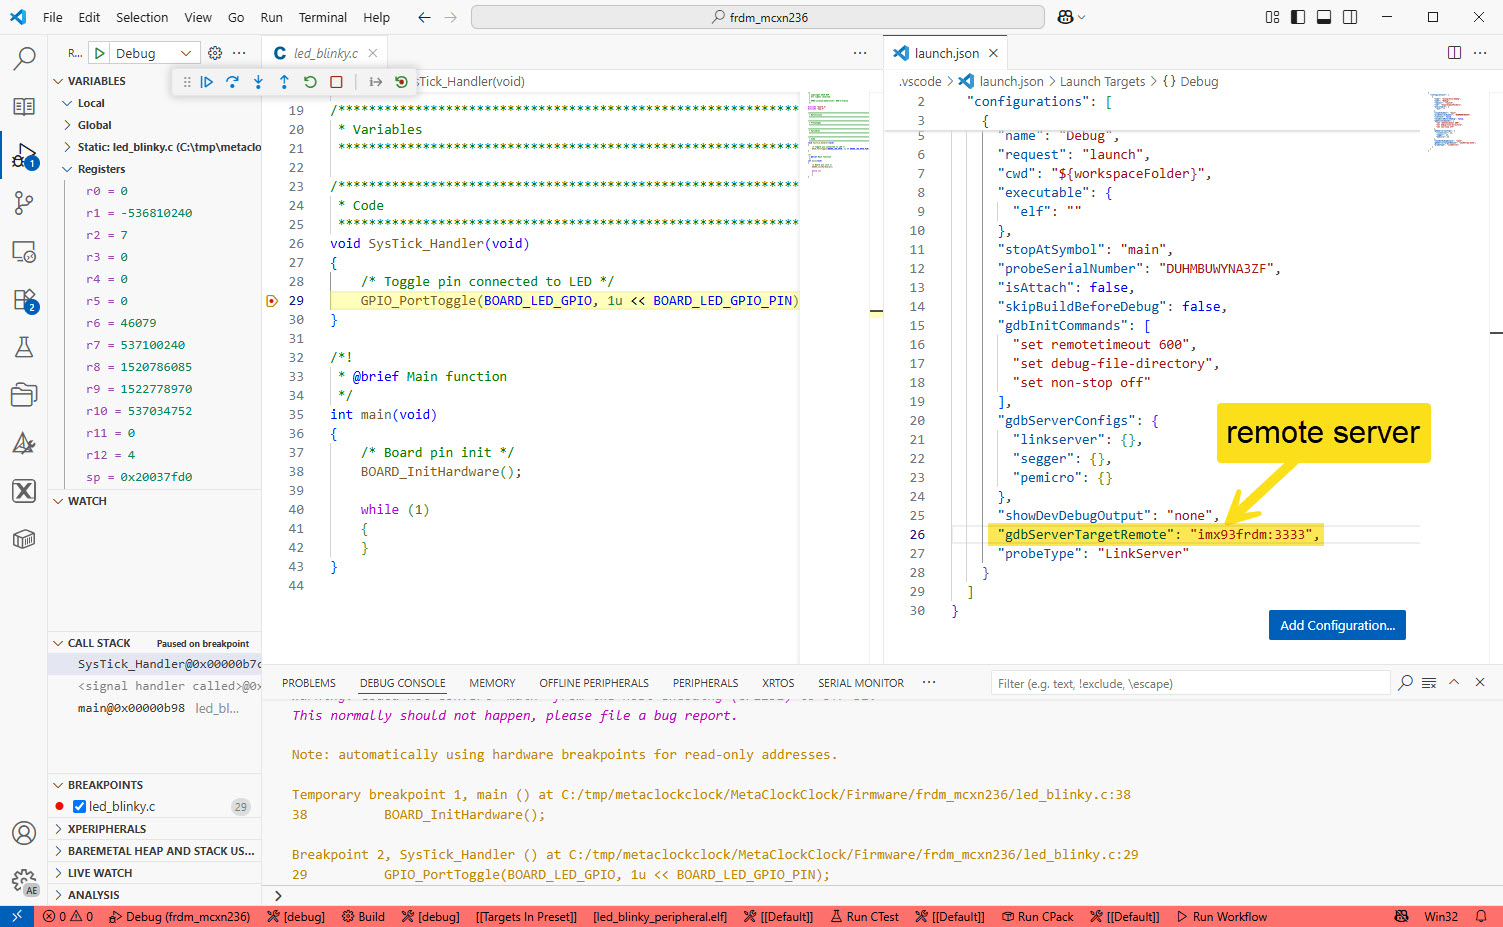
VS Code
Run the debug server on the i.MX93:
./venv/bin/pyocd gdbserver -t mcxn236 --persist --allow-remote
Set the connection to the GDB server in the launch.config:
"gdbServerTargetRemote": "imx93frdm:3333",
With this, I can debug with using the FRDM-IMX93 remote debug server:
Summary
With a few steps, I can use the NXP FRDM-IMX93 board as a remote debugging server for MCU-Link. It works very well with the wired Ethernet cable. Using WiFi is more complex, but maybe a future image will have wireless backed in. Compared to a Raspberry Pi 5, it does consume less power. I can power it from the normal USB ports of my laptop. That makes it a good alternative to be used in test farms: less power used, less heat. Sure it is not the same as an expensive networking debug probe. But on the other side it provides a lot of flexibility at reasonable costs.
Happy iMXing 🙂

Very nice write-up, Eric. You cover the Linux aspects of it very well.
As for the FRDM-IMX93, what exactly is that for? Is it a competitor of the Raspberry Pi 5, and BeagleBone Black, or something? More power for less watts, though?
LikeLike
It is a development board for the NXP i.MX93. So it is not really a competitor of the Raspy or BeagleBone, it is really intended as development platform or for evaluation.
LikeLike