In this time where many micro-controllers have 100+ weeks estimated delivery time, it makes sense to look at alternatives. So it is not a surprise that the Raspberry Pi RP2040 gets used more and more in projects. It is not only inexpensive, it is (at least for now) available which makes all the difference. The RP2040 is the first microcontroller from Raspberry Pi: a dual-core ARM Cortex-M0+ running up to 133 MHz, 264 KByte on-Chip RAM and up to 16 MByte external FLASH.

It is a very versatile microcontroller, with a rich eco-system and set of tools. It can be easily used with C/C++ or MicroPython, and the Raspberry Pi Pico board only costs around $5. There are plenty of tutorials out there, for example how to use the Pico board as debug probe to debug another Pico board. While this is great, there is an easy way to use any existing J-Link and Eclipse IDE too, so this is what this article is about.
Hardware Connection
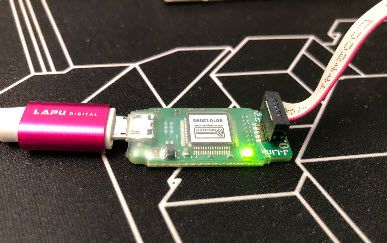
As debug probe, any J-Link can be used. I’m using here the J-Link EDU Mini which is well worth the $20.
The Raspberry Pi Pico includes a 3-pin debug header with GND, SWDIO and SWDCLK:

Because the Pico does not use a standard 2×5 pin debug header, I have to connect the pins including VCCsense with an adapter board. I’m using the JTAG/SWD breakout board from Adafruit: https://www.adafruit.com/product/2094. Additionally 4 jumper wires are needed.
Connections are as below:

Setup & Tools
Several software tools are required. I’m using Windows 10 in this article. Use the following links to download and install the software, if not already installed:
- git: https://git-scm.com/
- cmake: https://cmake.org/
- Python: https://www.python.org/downloads/release/python-31010/
- GNU Make: I recommend the XPack version for Windows: https://github.com/xpack-dev-tools/windows-build-tools-xpack/releases/
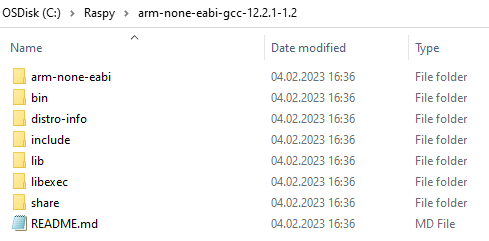
- ARM Toolchain: https://github.com/xpack-dev-tools/arm-none-eabi-gcc-xpack/releases: download the zip (I’m using xpack-arm-none-eabi-gcc-12.2.1-1.2-win32-x64.zip and have place the toolchain into C:\Raspy\arm-none-eabi-gcc-12.2.1-1.2)
- Eclipse: https://www.eclipse.org/downloads/, or if using NXP parts: https://www.nxp.com/mcuxpresso/ide/download
- J-Link Software: https://www.segger.com/downloads/jlink/
My toolchain is installed in C:\Raspy:
The versions I’m using are:
- git version 2.30.0.windows.2
- cmake version 3.22.5
- gcc version 12.2.1-1.2 (xpack version)
- GNU Make 4.3.90
- Eclipse IDE 2022‑06, NXP MCUXpresso IDE 11.5.1
- J-Link V7.86b
- Python3: v3.10.10
Make sure that git, make and cmake are available in your PATH or system environment.
💡 The Cmake build requires native gcc tools present on the host, otherwise building ELF2UF2 and PIOASM can fail, see https://github.com/raspberrypi/pico-sdk/pull/935. What I have on my system installed and on the PATH is the gcc tools coming with https://strawberryperl.com/.
💡 You need a recent (e.g. 4.3 or later) version of make, or you fill face errors as
‘..’ is not recognized as an internal or external command,
pointing to a shell interface issue with make and the surrounding OS. Check the version of make and install a newer version as needed.
In Eclipse, use the menu Help > Install new software and point to the following update site:
https://download.eclipse.org/embed-cdt/updates/v6/
From there, install the Embedded C/C++ GDB JTAG Debugging and Embedded C/C++ J-Link Debugging.

Raspberry Pi Pico SDK
First, the Pico SDK needs to be installed. For details see https://datasheets.raspberrypi.com/pico/getting-started-with-pico.pdf which requires git installed.
Create a new empty directory: in the following sequence I create a new directory ‘pico’ in which I clone the SDK and the examples in a console:
mkdir Raspy\pico
cd Raspy\pico
git clone -b master https://github.com/raspberrypi/pico-sdk.git
cd pico-sdk
git submodule update --init
cd ..
git clone -b master https://github.com/raspberrypi/pico-examples.git
Set the following environment variables, pointing to the Pico SDK and the toolchain to be used:
setx PICO_SDK_PATH "c:\Raspy\pico\pico-sdk"
setx PICO_TOOLCHAIN_PATH "C:\Raspy\arm-none-eabi-gcc-12.2.1-1.2\bin"
After that, close the console and open a new one.
💡 Instead of using the setx command, one can use the System Control in Windows to set the environment variables (recommended).
💡 There has been reports that the environment variables might need to be set at system (not user) level, see https://github.com/raspberrypi/pico-examples/issues/56
To be able to import the examples into Eclipse, I have to convert them. Create a new folder on the same level as ‘pico-examples’ and convert the projects for Eclipse:
💡 Note that this step is only needed if you do not have already an Eclipse project with .project and .cproject
mkdir pico-examples-eclipse
cd pico-examples-eclipse
cmake -G"Eclipse CDT4 - Unix Makefiles" -DCMAKE_BUILD_TYPE=Debug ../pico-examples
With this, we have everything in place. Next we are going to use Eclipse for building and debugging.
Import as Eclipse Project
The converted examples can be imported as ‘make file projects’ into Eclipse, using File > Import > C/C++ Existing Code as Makefile Project:

Alternatively, I can import the project with File > Import > General > Existing Projects into Workspace.
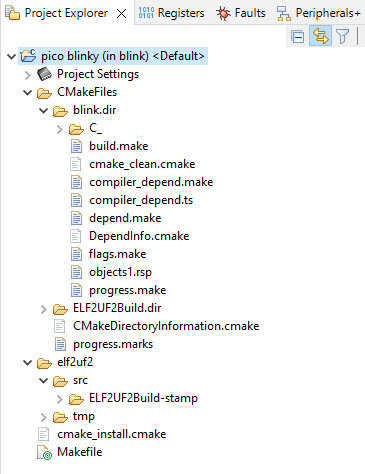
Now I have a normal make/cmake project I can use in Eclipse with ‘build’ or ‘clean’ commands:

Create a new Project
To create a new and fresh project, you can follow the steps below:
Create a new folder for the project:
mkdir myProject
cd myProject
In that folder, create a new file (main.c) with the following ‘blinky’ content:
#include "hardware/gpio.h"
#include "pico/stdlib.h"

#define LED_PIN   (25)

int main(void) {
    gpio_init(LED_PIN);
    gpio_set_dir(LED_PIN, GPIO_OUT);
    while (true) {
        gpio_put(LED_PIN, 1);
        sleep_ms(250);
        gpio_put(LED_PIN, 0);
        sleep_ms(250);
    }
    return 0;
}
Create a new file CMakeLists.txt, with following content:
cmake_minimum_required(VERSION 3.13)

include(pico_sdk_import.cmake)

project(test_project C CXX ASM) # sets ${CMAKE_PROJECT_NAME}
set(CMAKE_C_STANDARD 11)
set(CMAKE_CXX_STANDARD 17)

pico_sdk_init()

add_executable(${CMAKE_PROJECT_NAME}
  main.c
)

pico_add_extra_outputs(${CMAKE_PROJECT_NAME})
target_link_libraries(
  ${CMAKE_PROJECT_NAME}
  pico_stdlib
)
Copy the file pico_sdk_import.cmake into the folder, from pico-sdk\external.
Within the ‘myProject’ folder, call cmake:
cmake -G"Unix Makefiles" -DCMAKE_BUILD_TYPE=Debug .
Now the project is ready to be built with:
make
To use the project with Eclipse, import it with File > Import > C/C++ > Existing Code as Makefile Project.

Debug Configuration
To debug the project, create a normal Eclipse debug configuration for it (menu Run > Debug Configurations). If needed, check the following settings:
Use the project and the .elf output file:
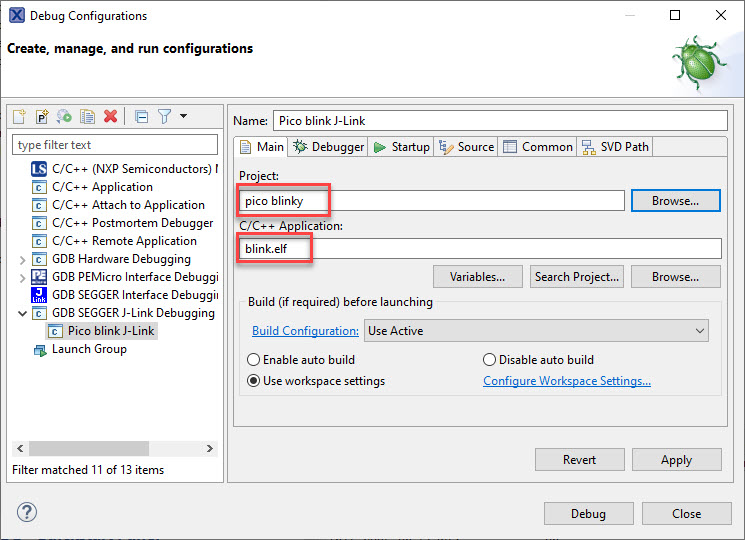
Use the JLinkGDBServerCL with SWD and RP2040_M0_0 device and the gdb from the tool chain:
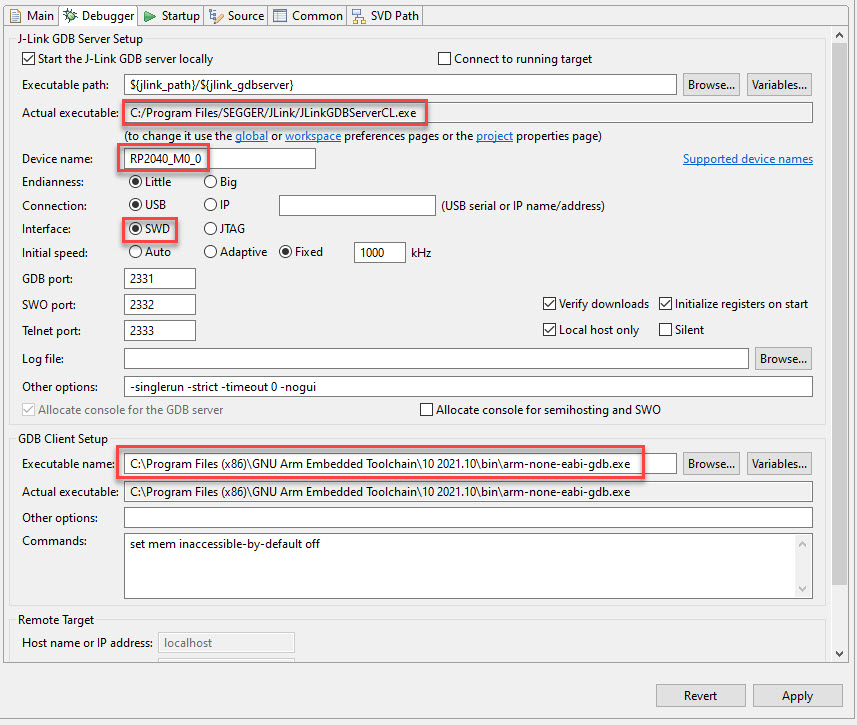
Note: instead of the absolute path in above screenshot for the gdb.exe, use the following:
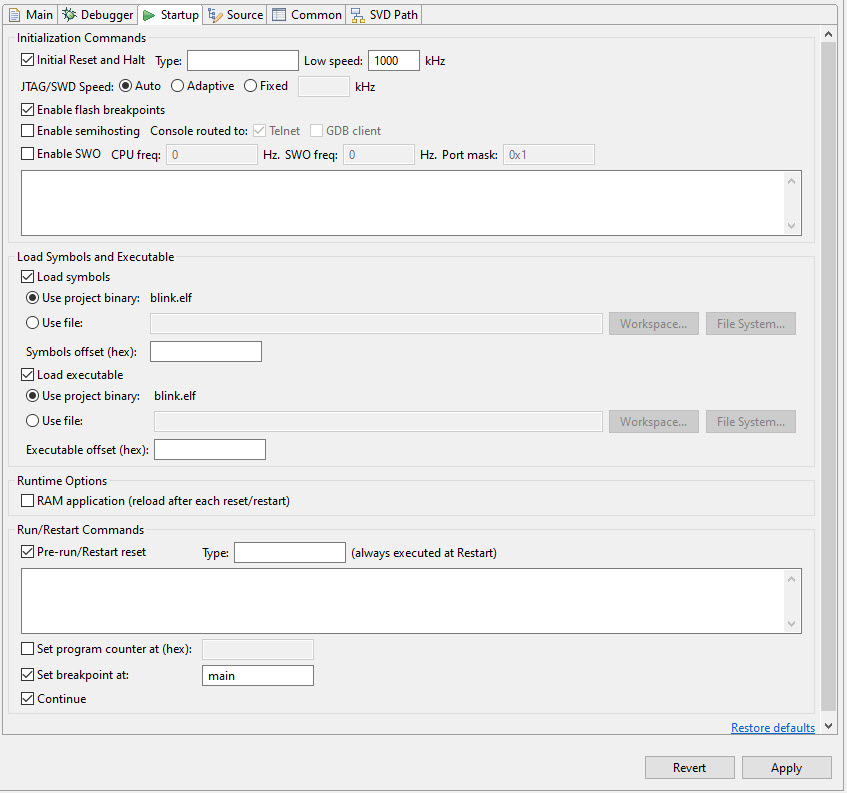
"${PICO_TOOLCHAIN_PATH}\arm-none-eabi-gdb.exe"Startup settings can be the default:
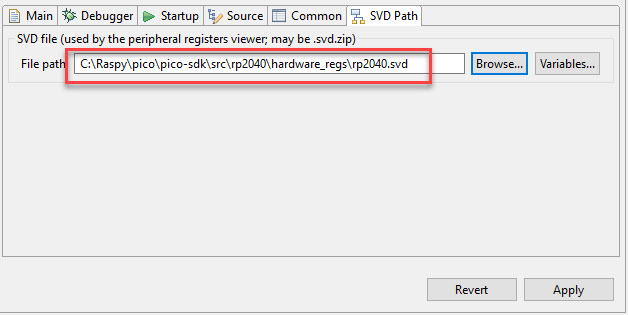
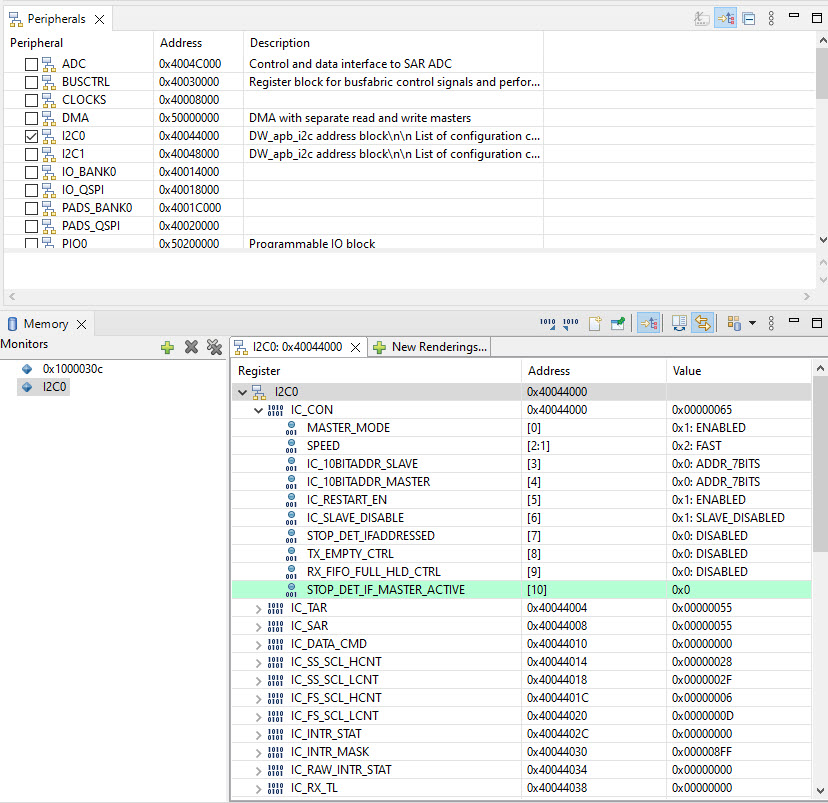
To be able to see the hardware peripheral registers, specify the path to the SVD file:
Debugging
With this, press ‘Debug’:
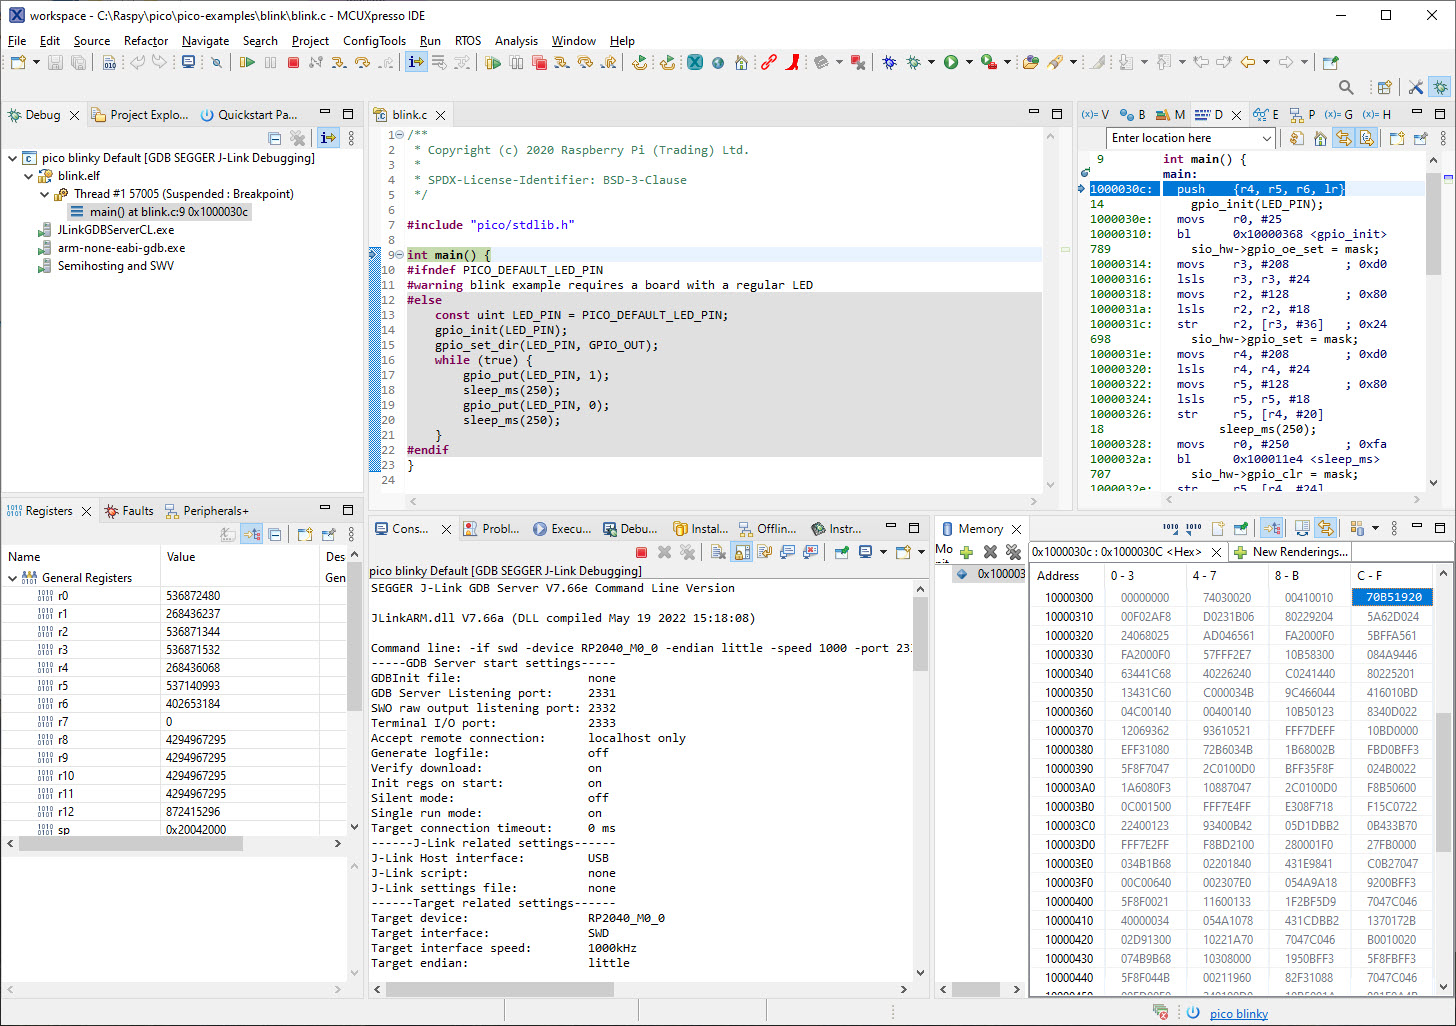
With the SVD file set, I can inspect the hardware peripherals with the debugger
Summary
It is very simple and easy to use the RP2040 with Eclipse and cmake. The output binaries include the file for the the UF2 bootloader. But doing real developing needs real tools and debugging capabilities. The combination of Eclipse with the J-Link makes a perfect development environment for me: it is easy to use and the Eclipse hardware debugging capabilities are excellent. Compared to other IDEs and debugging solution, it is much closer to the hardware, and debugging FreeRTOS applications on the RP2040 is easy with the Eclipse plugins.
Happy pico’ing 🙂
Links
- RP2040: https://www.raspberrypi.com/documentation/microcontrollers/
- SEGGER: https://www.segger.com/downloads/jlink/
- Eclipse Embedded CDT: https://eclipse-embed-cdt.github.io/plugins/install-alternate/
- Git Version Control: https://git-scm.com/

Thanks for this Eric. I’d started to look at the Pico a little while ago, but had only got as far as the VSCode examples before I had to give up. This should be good for getting me a bit further on!
LikeLiked by 1 person
Apologies for the mis-spelling of Erich!
LikeLiked by 1 person
No worries, that’s the alternative spelling anyway 🙂
LikeLike
Yes, there are many examples with VSC out there, but it is by far not up to the overall experience with Eclipse, especially debugging. The VSC editor engine is great, but debugging and embedded features is by far behind. This might change over time, and Microsoft seems to make small steps into the right direction.
LikeLike
Looking back at the message I posted on the Pi Pico forum (https://forums.raspberrypi.com/viewtopic.php?t=329752) it looks like the cmake step may have been the missing link. CMake is one of those things I really should learn more about, but I haven’t had a genuine need to (yet) so, as I mentioned in that thread, it’s something I’ve used to create GNUMakefiles for FOSS packages I use, but not something I’ve had to make myself.
Thanks again.
LikeLiked by 1 person
Yes, compared to make, CMake is very complex to start with. The important thing to remember about CMake is that it is just a ‘front-end’ to make/ninja/nmake/etc. So CMake basically is a generator for the builder used after that. And you have to run CMake initially to generate all the needed files. CMake has improved a lot over the recent years, and there are more and better documentation around it. I learned it the hard way with ESP32 projects migrating from make to cmake+ninja: if it works, then of course it is great: if there are issues, you have to deal with multiple tools and their settings. Definitely not an easy.
LikeLike
I used command line for the Pico – build and debugging – but if you want maximum frustration with VSCode and embedded development, trying playing with the Sony Spresense. Ugh! I got it working, but even after that, Sony’s “menu” system of setting parameters to use for chip functions is . (There’s no emoji, there; imagine there is.) There’s a level of masochism, there.
LikeLiked by 1 person
I have not looked into the Sony Spresense at all. I’m all for transparent tools with command line commands working in the background. a menu or GUI system is a cool thing to start with, but later you want to have the choice of development way. IMHO this is one part of why VSC is pretty good, as you can do all things behind it with cmd commands. It is just that it tends to make simple tasks very hidden and obscure, if you do not know where exactly it is. But I think this is true for any system at least at the beginning of a learning phase.
LikeLiked by 1 person
Given the current situation, I expect the Pico to also run out of stock, sooner rather than later. 😦
LikeLiked by 1 person
Yes, I fear the same, as for the WLSCP devices (https://mcuoneclipse.com/2022/07/14/are-wlcsp-the-solution-during-silicon-shortage/) happened recently. It might be less of an issue because the RP has no flash protection feature, making it less attractive for many products/companies. But I see lots of companies moving away from NXP, TI and STM to the RP one, because the other vendors have deeply disappointed them in the last years with their communication and delivery rules. Clearly, there are no guarantees for the RP supply, but at least they are available in quantities. What I observe as well are many small and medium companies are investing into independent RISC-V silicon: this is not only a thread to ARM Inc. (already impacted by that), but as well to the traditional MCU vendors.
LikeLike
I’ve noticed more noise, lately, about RISC-V: seeed Studio has a number of offerings. But the problem with seeed is that they push stuff out, and then abandon it – they’ve burned me – so I’m leery of buying their stuff.
LikeLiked by 1 person
Yes, I have the same feelings about Seeed on this. But this is exactly why I see ‘mid-size’ companies designing their own RISC-V device, tailored for their needs. It seems that for a few 10k$ you are able to get our own device manufactured. For sure this won’t play well if you just need a few MCUs. But having your own custom MCU, and have it available in your hand these days is a true competitive advantage to me.
LikeLiked by 1 person
Very nice writeup! I love the Pico. My kid bought one for me for last Christmas, and I was like, “Huh. What is this thing? Well, he got it for me, I’ll play with it.” After I got it working – all command line, at that point, including arm-none-eabi-gdb – I changed my mind: This is a pretty cool chip, and how did I not know about this for a year?! I ended up buying 3 or 4 more, just because they’re so cheap – and dual cores! He got the Pimoroni Unicorn shield for me, as well, so since Christmas, it’s been running as a desktop clock, but I need to find something more useful for this chip. I’ll have to see how difficult it is to port these instructions to a Mac.
LikeLiked by 1 person
Yes, the P2040 is a really cool device. It does not have the most advanced peripherals compared to NXP or STM devices: but they are pretty straight-forward and I feel have less issues then the ‘over-engineered’ counter parts. I have not really tapped into the multi-core of the RP2040, but for sure I will sometimes in the near future.
LikeLiked by 1 person
Thank you for the post Erich. What about the reset line for the SWD program/debugging? This is required by jlink in M0+ devices. Here it seems not necessary as you use only 4-wire debug connections but I don’t know why.
LikeLiked by 1 person
The reset line is optional for SWD debugging. The SWD command set allows to reset a target. Of course if the target does not respond to this, a reset through the reset line is required. But it is not mandatory.
LikeLike
Finally! I can use Eclipse with the Pico. I’ve been using MicroPython which is perfect for the Pico (no need for an RTOS). And it’s easy to run a thread in each of the cores. Now I need to create some C module libraries for MicroPython and this is the perfect solution. I especially like the ability to use Eclipse by itself without loading the NXP XPresso package. Thank you!
Is it possible to import an Arduino sketch into Eclipse? I believe this is possible with Studio 7 (which is based on VSC).
As mentioned in an earlier post, there is no flash security with Pico. However, you can use an external ATECC608 security device to validate your hardware and software (well, you used to before they become unavailable). The new Arduino Pico comes with it. Both Adafruit and Sparkfun offer ATECC608 Qwicc boards (out of stock, of course). This might be a good topic for a future article (hint, hint).
Another suggestion is a plug-in for Eclipse that will automatically generate the required CMakeLists.txt file. Or perhaps a future article on CMake.
Cheers…
LikeLiked by 2 people
Hi Brad,
the external security device only can be used to store your secrets there (keys, certificates, etc), but it cannot prevent hijacking your RP2040 device or prevent reading out the (external) flash content. So it won’t address the needs for FLASH security (see https://mcuoneclipse.com/2014/06/22/preventing-reverse-engineering-enabling-flash-security/), unless I’m missing something?
LikeLike
It depends on the level of security you want. Just don’t want to see something I develop available on AliExpress for 1/3 the price. Disassembling an image is possible, but not easy. The secret key can be obfuscated in the image, so finding that is even more difficult. Even MCUs with OTP storage for secrets can be hacked for a few thousand dollars.
LikeLike
Hi Brad,
agreed. Creating ‘clone’ products cannot easily prevented. Disassembling or reverse engineering is probably not the most critical danger, as you won’t store secrets in that way. And with ChipWhisperer and the like (as you say) virtually no device is secure anyway, it is just a lot harder.
LikeLike
Thank for the wonderful articles. These are the foundations that every new programmer must understand before start using any IDE.Regarding component shortage one lesson I have learned is that single sourcing is very dangerous . I have a product running requiring some thousand kinetics parts every year . the last answer I got was ‘we are very sorry for the inconvenience but we can’t provide you the parts’. As for the Asian market you can find the chips I was buying 1usd for 150 usd on average .So my advise is think very well before you invest time money and effort learning new things to single source solutions..
LikeLiked by 2 people
A single source is always a problem for critical components. This includes hardware and software/tools. That’s why Eclipse is so popular, because there are so many vendors or distributions available, up to the point that you can create a DIY version because open source. VSC is popular too, but it is not fully open source (Microsoft keeps the most important parts closed). But at least in the IDE world there are many different options. As for the build tools, with GCC and commercial compilers you have choices too, same for debug (OpenOCD, J-Link, …). The most difficult part to change remains the MCU, but with a good software architecture this is not that hard as well. You just need to be prepared and having multiple choices at hand all the time.
LikeLike
Hey Erich,
Great minds think alike. I just got my rPico this weekend and pulled it out of the box on Saturday and started to play with it.
Thank you for the Eclipse set up explanation – it really came through at the perfect time! Let’s hope they stay in stock, I also got a rPi 4 (2GB) to play around with as well.
I hope you’re keeping well and keep your chin up!
myke
LikeLiked by 1 person
I’m using the Pico for 6 months now, but only recently it got ‘real’ with several projects running with it. I really hope that the chip will continue to be available. So far it is doing far better than any of the ‘big’ silicon providers on that subject.
LikeLike
Hey Erich, thank you for an excellent tutorial.
With the scarcity of the SEGGER J-Link EDU Mini, and the ridiculous prices being ask for the few available, is there an alternative(s) that you will recommend in the $20 range that will compatible with the tutorial?
LikeLiked by 1 person
Hi Ryan, let me check some options, and hopefully I can present an alternative for you in a few days. OK?
LikeLike
you can use another Pico with OpenOCD running on it. The outputs connect to the SWD on the target Pico. There are several youtube videos on how to do this. But you need another Pico, which could be an issue.
LikeLiked by 1 person
Hi Brad,
the point here might be: how to setup OpenOCD with Eclipse here. I did use it for ESP32, not for RP2040 yet. I hope I’ll find some time in the coming days….
LikeLike
FYI, I’m now able to debug the RP2040 using another RP2040 pico board, using Eclipse and OpenOCD 🙂
LikeLike
Hi Ryan, I have you covered with another article here: https://mcuoneclipse.com/2022/09/17/picoprobe-using-the-raspberry-pi-pico-as-debug-probe/
LikeLike
Thank you for the great and well written article. I like Eclipse and have used it professionally for years. Just starting to play with the pico. Apparently, I missed something in the instruction. I’ve review it several times and still can’t find my mistake. When I try to build the “pico blinky” project I get errors about undefied “CMAKE_C_COMPILER” and “CMAKE_CXX_COMPILER”. Can you help me figure out what I did wrong?
FYI, many versions have updated so what I’ve downloaded is newer versions than what you list. Also I had previously done an installation for visual code.
Thanks for you help.
LikeLike
Hi Dan,
thank you for your kind feedback! Not sure what I have missed to describe. But I do have a few projects up on GitHub:
https://github.com/ErichStyger/mcuoneclipse/tree/master/Examples/RaspberryPiPico
Maybe you could try them and compare them with what you have, to see what is missing?
The missing symbols you have indicate that it is not able to find the C and C++ compiler for you.
Erich
LikeLike
FYI, I tried setting the environment variables like the error message said and that didn’t help.
C:\Users\ocdan>set CMAKE_C_COMPILER
CMAKE_C_COMPILER=C:\Program Files (x86)\GNU Arm Embedded Toolchain\10 2020-q4-major\bin\arm-none-eabi-gcc.exe
C:\Users\ocdan>set CMAKE_CXX_COMPILER
CMAKE_CXX_COMPILER=C:\Program Files (x86)\GNU Arm Embedded Toolchain\10 2020-q4-major\bin\arm-none-eabi-g++.exe
C:\Users\ocdan>
LikeLike
You need to have cmake recognize the toolchain, setting environment variables usually does not help (much).
This is why for example with a VSC Cmake environment I had to use a tool chain file as I described in https://mcuoneclipse.com/2021/05/04/visual-studio-code-for-c-c-with-arm-cortex-m-part-2/, maybe something like this would help in your case?
LikeLike
Thanks Erich, I’ll take a look at that example.
Over a year ago I played with an Uno and installed the Neutrino tools. I also played with a Pico but couldn’t find a way to build with Eclipse so I installed Visual Studio Code.
Now I want to play with a Pico-W. I’m guessing with all those prior installations that I now have some incompatibility with the latest installation. If I can’t figure it out I’m thinking to remove all the installations and start fresh with your instructions.
Dan
LikeLike
Hi Erich,
Thanks for the quick response. I’ll look at your projects. I doubt that you missed anything in your description. Since I’m the only one asking for help, it must be something unique to me or my setup/installations.
Dan
LikeLike
I finally got it working after several days of trying things, uninstalling, and reinstalling. What seemed to help was to uninstall everything, delete any left over environment variables and paths, remove left over Eclipse and Visual Studio Code folders, and then reboot my PC. Only doing some of those steps continued to get failures. Making sure I did them all seemed to do the trick.
Thanks for your support.
Dan
LikeLike
Hi Dan,
excellent that you have it it working now! I don’t feel it is Eclipse which had changed your environment, at least on my side it never changed or set environment variables. CMake environments are in my experience very difficult in a ‘diverse’ environment where multiple tools are installed.
LikeLike
The article is great, but gcc version 11.2.1 20220111 does not seem to be available to download. I’ve tried other versions changing PICO_TOOLCHAIN_PATH, but Im getting – CMake was unable to find a build program corresponding to “Unix Makefiles” error evey time. Can you advise please.
LikeLiked by 1 person
Hi Michael,
that gcc version is part of MCUXpresso IDE 11.5.0 (not 100% sure, but this is what I had installed at that time).
As for CMake: this is a common problem with Cmake, that it does not find a toolchain. As noted in the article, you might try to install the StrawberryPerl as noted in the article.
LikeLike
Thanks,
in the end I just uninstalled everything, deleted the directories and started again. Maybe I made an error the first time, but it went like clockwork the second time.
LikeLike
Hi Michael,
that’s great, thanks for reporting!
LikeLike
Hi Michael,
I have found it: that version is available from https://developer.arm.com/downloads/-/arm-gnu-toolchain-downloads
LikeLike
> gcc version 11.2.1 … not available
You can also find the Arm toolchains (since GCC 7) at:
– https://github.com/xpack-dev-tools/arm-none-eabi-gcc-xpack/releases
LikeLike
Thanks Erick
LikeLike
Hi Erich !
Rasbery PI not used CMake, only Eclipse IDE for Embedded C/C++ Developers.
LikeLike
The Raspberry Pi RP2040 SDK is using CMake as a building way of their SDK and examples. Yes, not for the ‘classic’ Raspberry Pi based on Cortex A cores.
LikeLike
On a link the person does not use CMake.
Pure eclipse.
LikeLike
link https://hamlab.net/mcu/raspbery_pi_pico_rp2040.html
LikeLike
Link missing in original post (((;
LikeLike
Ah, I see now what you mean (with google translate of that web page).
Yes, certainly you can do it that way too, without cmake, just adding the files ‘manually’.
CMake is really hard the first time using it, and is imho a major blocking point for lots of developers starting with an embedded target.
But after a while you get used to it and one can see the benefit, not be depending on a special project format.
LikeLike
I did it differently.
Installed Eclipse Embedded CDT version 2022-12 in a separate folder, put precompiled elf2uf2.exe and pioasm.exe in the same folder (no need to pre-set paths).
Installed GNU Arm Embedded GCC chain from 2021.
With the latest versions of the problem
https://stackoverflow.com/questions/73742774/gcc-arm-none-eabi-11-3-is-not-implemented-and-will-always-fail
LikeLike
Hi,
JFlashLite says your hardware can not support multi drop…
Do you use j-link hardware version 11 later ? Is this not issues on your board?
LikeLike
Yes, I saw the same message when using my older J-Link Plus 10.0. I’m not sure why SWD multidrop cannot be supported by that J-Link version. So I’m using J-Link 11.0 (J-Link EDU) or J-Link EDU mini with RP2040 project.
LikeLike