The new semester is approaching in a very fast way, and so is the new lecture and lab module ‘Advanced Distributed Systems’ at the Lucerne University. For that module we are going to build a new ‘Sumo’ style robot with WLAN capabilities using the ESP32 chip. It will be a new robot PCB, and below is the current robot (based on NXP K22FX512) with the WLAN module connected to it:

Zumo connected to TTGO ESP32 module
The new robot will have the NXP K22FN512 on it, same device as on the tinyK22 board, with the extension of a Raspberry Pi. The wireless module used is the LILYGO TTGO Wi-Fi/Bluetooth module from http://www.lilygo.cn which is about 45% smaller than typical ESP32 modules. That module includes the ESP32 PICO-D4 from Espressif in a nice and convenient package including antenna:

TTGO module on DIY adapter
Because the new boards are not ready yet, I had to start software development with the NXP MCUXpresso IDE and SDK using the old platform. Because the Wi-Fi module only needs UART Rx, Tx and two control lines (reset and bootloader mode), the wiring is pretty simple. Programming the ESP32 firmware is done through the NXP Kinetis part using USB CDC and is working fine. That way the Wi-Fi module can be programmed easily from the host using the standard Espressif tools or even with using the Arduino IDE. But that might be subject of a different post :-). The TTGO Micro-32 module is available on AliExpress for less than $5.
The current Espressif documentation integrating with Eclipse are kind of broken and did not work for me (they are changing from make files to use CMake).
The good news is that I have found a way to easily integrate the IDF with Eclipse which is documented below. Because I’m using the ESP32 in combination with the NXP Kinetis and SDK, it makes sense to have everything in the MCUXpresso IDE (I’m using the Version 11.0.0).
💡 Doug Schaefer documented the steps how to use Eclipse with CMake in 2018 (see https://cdtdoug.ca/2018/07/02/cdt-for-esp32.html), but somehow this does not work correctly in Eclipse 2019-06.
Preconditions
I assume a working IDF installation/setup. I’m using:
- Windows 10, 64bit
- NXP MCUXpresso IDE V11.0.0
- Python 2.7.16
- CMake V3.15.1 with ninja v1.9.0
- Git: 2.21.0.windows.1
- MenuConfig: v4.6.0.0
- Xtensa ESP32 toolchain: xtensa-esp32-elf-gcc8_2_0-esp32-2019r1-win32
- Espressif IDF v4.0-dev-1443-g39f090a4f
The IDF requires the following (with my own settings shown):
- Environment variable pointing to the IDF installation:
IDF_PATH=C:\esp\esp-idf
- CMake and Ninja binaries in the PATH:
C:\esp\cmake\bin
- Toolchain in the PATH:
c:\esp\toolchain\xtensa-esp32-elf\bin
- MenuConfig in the PATH:
C:\esp\mconf-v4.6.0.0-idf-20190628-win32
The following steps describe how to use the ‘hello world’ project with the Eclipse IDE.
- Create a folder where to place the project. Note that the path shall *not* include any spaces. Example:
c:\esp\projects\idf_hello_world
- Copy the files from the IDF example projects into that folder, e.g. from
C:\esp\esp-idf\examples\get-started\hello_world
- Because we are going to use CMake, the make files (Makefile and main\component.mk) can be deleted
- In the Eclipse IDE, create a new ‘Makefile Project with Existing Code’:

Makefile Project with Existing Code
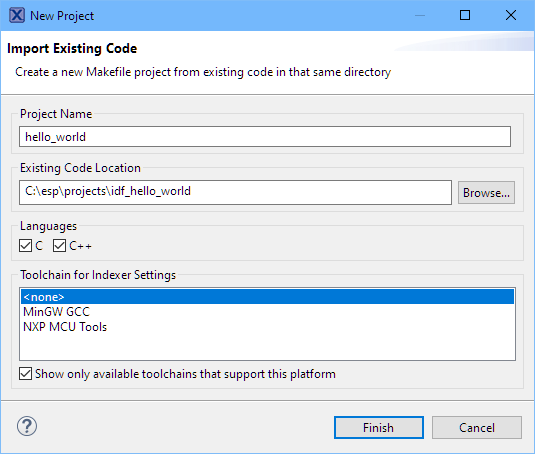
- Give the project a name and point to the folder created:

New Project
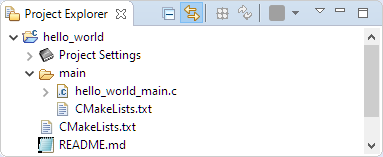
- This creates the project:

Project in Project Explorer
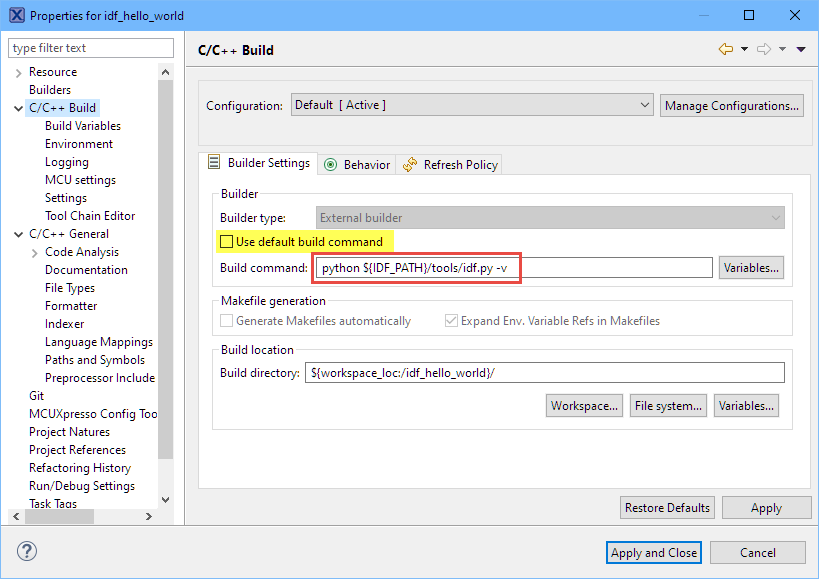
- In the project properties, C/C++ Build uncheck ‘Use default build command’ and use the following instead. Make sure you use the ‘verbose’ flag:
python ${IDF_PATH}/tools/idf.py -v
Builder Settings
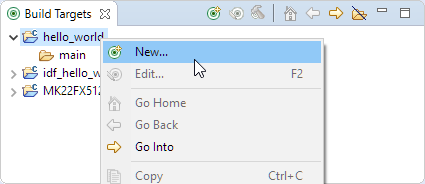
- Open the ‘Build Targets’ view and add a new target for the project:

New Build Target
- Add a new build target and use build for the name:

build build target
- The same way, add targets for clean and fullclean
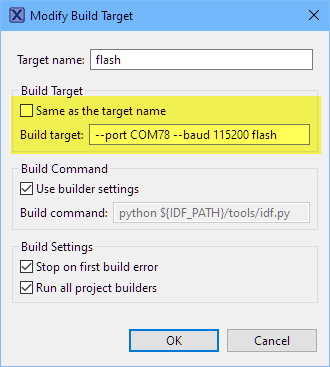
- For programming, add a new target ‘flash’ with the following arguments (update the COM port for your system):
--port COM78 --baud 115200 flash

Flash Builder Settings


Now I have all the needed targets I can double-click to build, clean and flash the ESP32 application:

ESP32 IDF Project in Eclipse
The targets call the idf.py as I would do it on the command line, and all the output is written to the Eclipse Console:

IDF build with Eclipse and Console Output
The same way I can flash the application:

Programming ESP32 from Eclipse
The Eclipse built-in terminal can be used for the serial connection to the target. In my case this is a USB CDC connection through the NXP Kinetis to the ESP32 module:
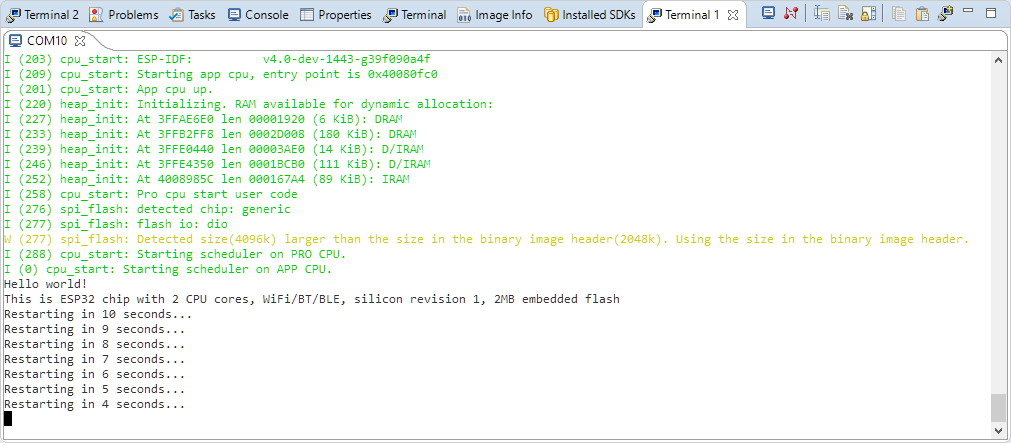
Serial connection to ESP32
With this we have all the needed parts working. But there are a few things to tweak for a better experience, explained in the next sections.
Unresolved Inclusion: ‘Naive’ way
UPDATE: there is a better way using a ‘verbose’ build (see above, added -v to the build command) and using ‘Preprocessor Include Path’ provdiers (see below). So you can skip this section and jump to the ‘Using Providers’ one 🙂
Because we have setup the project without toolchain, the Eclipse IDE editor will report unresolved includes:

Unresolved Includes
This can be solved with adding entries to the Paths and Symbols project settings.
It makes sense to have a variable ESP32TOOLCHAIN pointing to the Xtensa ESP32 toolchain folder:
C:\esp\toolchain\xtensa-esp32-elf
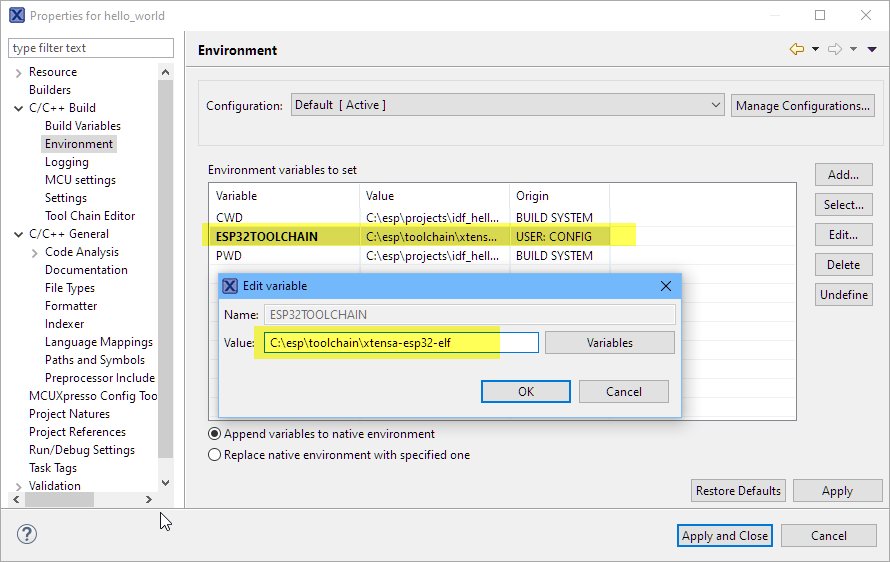
Environment
Then I can add the following include paths:
${IDF_PATH}/components/freertos/include
${IDF_PATH}/components/spi_flash/include
${IDF_PATH}/components/esp_common/include
${ESP32TOOLCHAIN}/xtensa-esp32-elf/include

Path and Symbols
It is painful to add all the missing paths, but so far the best solution I have found so far.
Using ‘Providers’
There is a way to let Eclipse parsing the include paths from the compiler command line. For this, the build has to be done with the -v option:
Builder Settings
Enable in the Providers tab of the Preprocessor Include Path the ‘CDT GCC Build Output Parser‘ and set the following compiler command line pattern:
(.*?)xtensa-esp32-elf-(gcc|g\+\+|c\+\+|cc|cpp|clang).exe

CDT GCC Build Output Parser
The idea is to parse a command line as below. The RegEx will parse the beginning of the line and recognize the compiler call:
[816/828] C:\esp\toolchain\xtensa-esp32-elf\bin\xtensa-esp32-elf-gcc.exe -DMBEDTLS_CONFIG_FILE=\"mbedtls/esp_config.h\" -Iconfig -IC:/esp/esp-idf/components/wifi_provisioning/include -IC:/esp/esp-idf/components/wifi_provisioning/src -IC:/esp/esp-idf/components/wifi_provisioning/proto-c -IC:/esp/esp-idf/components/wifi_provisioning/../protocomm/proto-c -IC:/esp/esp-idf/components/newlib/platform_include -IC:/esp/esp-idf/components/freertos/include -IC:/esp/esp-idf/components/heap/include -IC:/esp/esp-idf/components/log/include -IC:/esp/esp-idf/components/soc/esp32/include -IC:/esp/esp-idf/components/soc/include -IC:/esp/esp-idf/components/esp_rom/include -IC:/esp/esp-idf/components/esp_common/include -IC:/esp/esp-idf/components/xtensa/include -IC:/esp/esp-idf/components/xtensa/esp32/include -IC:/esp/esp-idf/components/esp32/include -IC:/esp/esp-idf/components/driver/include -IC:/esp/esp-idf/components/esp_ringbuf/include -IC:/esp/esp-idf/components/esp_event/include -IC:/esp/esp-idf/components/tcpip_adapter/include -IC:/esp/esp-idf/components/lwip/include/apps -IC:/esp/esp-idf/components/lwip/include/apps/sntp -IC:/esp/esp-idf/components/lwip/lwip/src/include -IC:/esp/esp-idf/components/lwip/port/esp32/include -IC:/esp/esp-idf/components/lwip/port/esp32/include/arch -IC:/esp/esp-idf/components/vfs/include -IC:/esp/esp-idf/components/esp_wifi/include -IC:/esp/esp-idf/components/esp_wifi/esp32/include -IC:/esp/esp-idf/components/esp_eth/include -IC:/esp/esp-idf/components/efuse/include -IC:/esp/esp-idf/components/efuse/esp32/include -IC:/esp/esp-idf/components/app_trace/include -IC:/esp/esp-idf/components/protocomm/include/common -IC:/esp/esp-idf/components/protocomm/include/security -IC:/esp/esp-idf/components/protocomm/include/transports -IC:/esp/esp-idf/components/nvs_flash/include -IC:/esp/esp-idf/components/spi_flash/include -IC:/esp/esp-idf/components/mbedtls/port/include -IC:/esp/esp-idf/components/mbedtls/mbedtls/include -IC:/esp/esp-idf/components/protobuf-c/protobuf-c -IC:/esp/esp-idf/components/mdns/include -IC:/esp/esp-idf/components/console/. -IC:/esp/esp-idf/components/json/cJSON -mlongcalls -Wno-frame-address -ffunction-sections -fdata-sections -fstrict-volatile-bitfields -nostdlib -Wall -Werror=all -Wno-error=unused-function -Wno-error=unused-but-set-variable -Wno-error=unused-variable -Wno-error=deprecated-declarations -Wextra -Wno-unused-parameter -Wno-sign-compare -ggdb -Og -std=gnu99 -Wno-old-style-declaration -D_GNU_SOURCE -DIDF_VER=\"v4.0-dev-1443-g39f090a4f\" -DGCC_NOT_5_2_0 -DESP_PLATFORM -MD -MT esp-idf/wifi_provisioning/CMakeFiles/__idf_wifi_provisioning.dir/src/wifi_config.c.obj -MF esp-idf\wifi_provisioning\CMakeFiles\__idf_wifi_provisioning.dir\src\wifi_config.c.obj.d -o esp-idf/wifi_provisioning/CMakeFiles/__idf_wifi_provisioning.dir/src/wifi_config.c.obj -c C:/esp/esp-idf/components/wifi_provisioning/src/wifi_config.c
💡 unfortunately I have not found a dialog in Eclipse to check if the regular expression is workign properly. So you have to trust that one 🙂
Enable as well the CDT GCC Built-in Compiler settings with the following specs:
xtensa-esp32-elf-gcc ${FLAGS} -std=c++11 -E -P -v -dD "${INPUTS}"
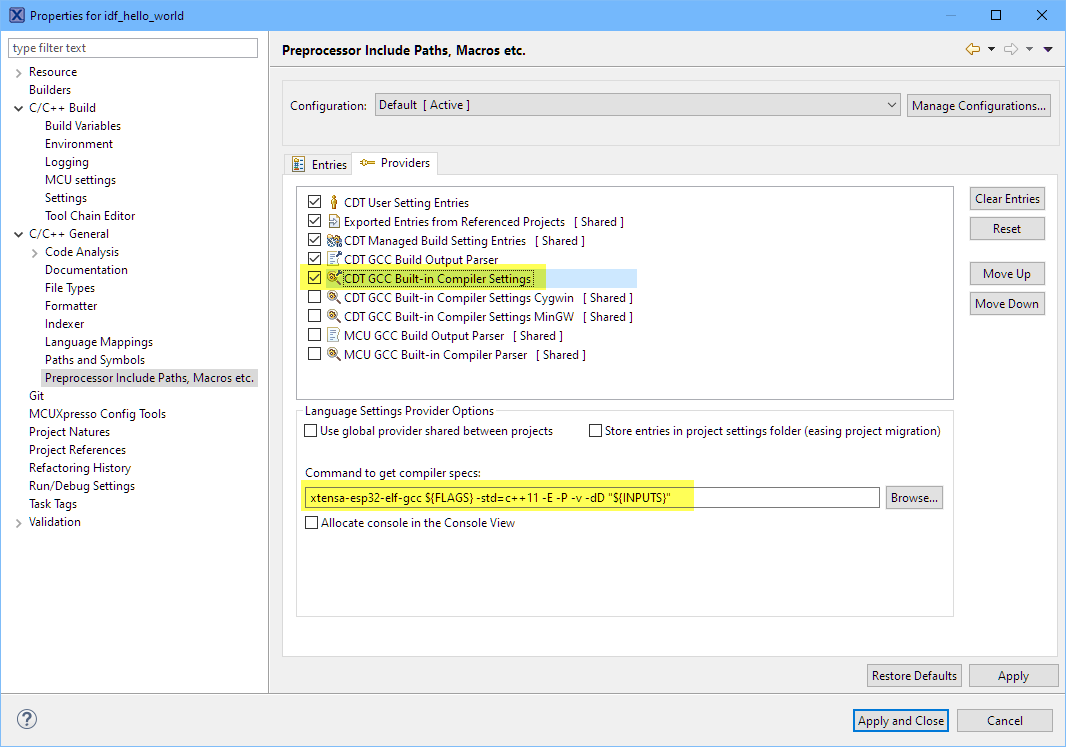
CDT GCC Build-in Compiler Settings
Now with a -v (verbose) build, the includes should show up resolved in the editor.
💡 you might need to turn off heuristics (see “Fixing the Eclipse Index“) and to rebuild the Index for the project.
As noted above, the collected items of the build output parser cannot be verified. But at least the one for the Built-in compiler settings are available here:
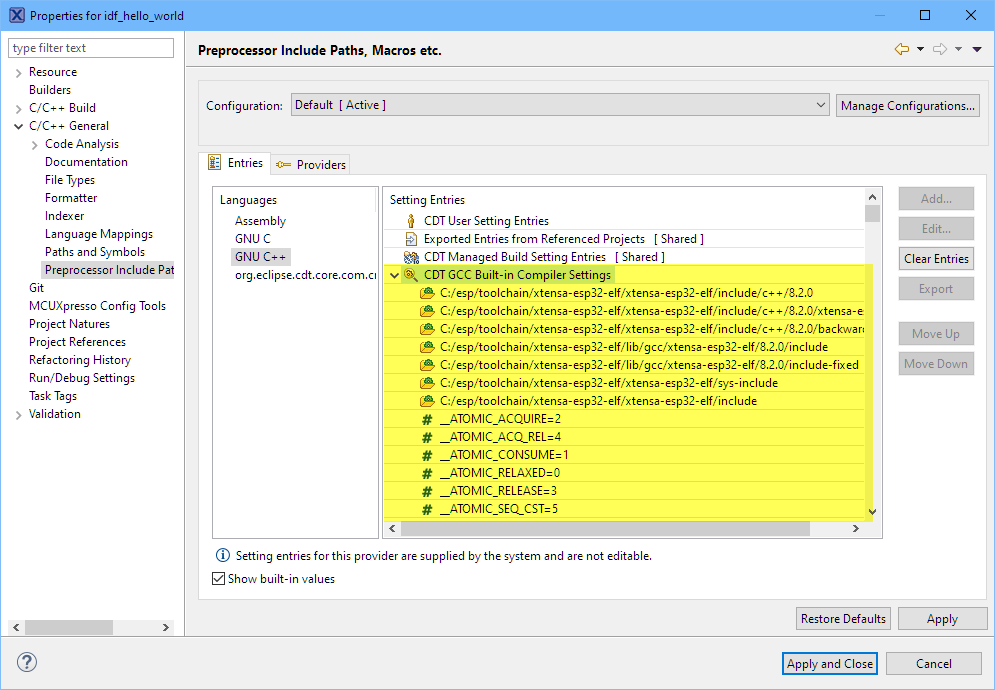
Entries
Summary
The Eclipse support for CMake and Espressif ESP32 did not work for me with Eclipse 2019.06: it can work initially, but after a workspace reload the projects report errors, plus the include paths are not resolved. So I ended up with a simple and working solution using make file projects in Eclipse which call the idf.py using CMake: so using CMake with make projects which are not using make :-). Serial connection to the ESP32 module is with the Eclipse built-in Terminal. What is not working within Eclipse is using the idf.py menuconfig, but maybe a reader has an idea how to enable this?
💡 Post a comment if you have additional tips. If I find an even better way, I will update this article.
Happy ESPing 🙂
Links
- TTGO module: http://www.lilygo.cn
- TTGO module on AliExpress: https://www.aliexpress.com/item/32882694790.html
- TTGO Micro-32 GitHub: https://github.com/LilyGO/TTGO-micro32-V2.0
- Using CMake for ESP32 with Eclipse: cdtdoug.ca/2018/07/02/cdt-for-esp32.html
- Espressif Pico Kit: https://docs.espressif.com/projects/esp-idf/en/latest/hw-reference/get-started-pico-kit.html
- tinyK22 with NXP K22FN512: First tinyK22 Board with NXP K22FN512 ARM Cortex-M4F
- NXP MCUXpresso IDE V11: New NXP MCUXpresso Eclipse IDE v11.0
- Makefile projects with Eclipse: https://mcuoneclipse.com/2017/07/22/tutorial-makefile-projects-with-eclipse/

Instead of manually adding include path you can tell eclipse to parse them from the compiler invocation.
Go to project ‘settings->c/c++ general->preprocessor include paths,…’, select the ‘providers’ tab and make sure ‘cdt gcc build output parser’ is selected. also make sure the ‘compiler command pattern’ below is something like ‘(.*g?cc)|(.*[gc]\+\+)’.
then eclipse should be able to get all include directories from the compiler invocation. in the same tap also make sure that ‘cdt cross gcc built-in compiler settings’ is checked and the ‘command to get compiler specs’ is ‘xtensa-esp32-elf-gcc ${FLAGS} -E -P -v -dD “${INPUTS}”‘.
now do a full clean and rebuild the project. perhaps you also have to rebuild the index (right click on the project then ‘index->rebuild’)
LikeLike
Hi Martin,
that’s actually a very cool idea and I saw a similar thing on the Espressif web site. But I believe this only works with normal make files where the compiler command line is put into the console view: in my case I’m using the CMake system (called from the idf.py) and I don’t see the includes written to the console. That’s why I think your approach does not work here. But still a cool idea!
LikeLike
I don’t use the idf.py tool, I still use the good old makefile… but you may try to call idf.py with the -v switch (-v, –verbose Verbose build output). ninja at least *is* able to print the command if it is called with the -v switch
LikeLiked by 1 person
And again a great information! I have now added the -v option, and it shows the command line. Now only to tweak things that it gets properly recognized….
LikeLike
Thats really weird. I’m setting the provider options as described.
I’m also seeing the xtensa-esp32-elf includes, being added to the project.
but includes from the esp-idf package are not resolved 😦
how can I check if the build output parser is working at all?
LikeLike
I experimented a bit more and the build output parser seem to work if I use a more absolute string for the “compiler command pattern” field:
cd /home/user1/esp/ble_spp_server/build/esp-idf/main && /home/user1/.espressif/tools/xtensa-esp32-elf/esp32-2019r1-8.2.0/xtensa-esp32-elf/bin/xtensa-esp32-elf-(gcc|g\+\+|c\+\+|cc|cpp|clang)
as the lines with a gcc invocation in the build console are built up like this.
at least it’s working now…
the compiler pattern strings discussed here can also be found on this espressif site:
https://docs.espressif.com/projects/esp-idf/en/latest/get-started-legacy/eclipse-setup.html
I’m curious what’s coming up with the hopefully better cmake integration in eclipse.
LikeLike
Hi Peter,
I saw inconsistent results on my side too. It seems that the project kept some includes from trial-and-error steps. I have updated the artcile with my much better working solution:
– adding by default the -v to the ‘build/make’ commmand
– changed the RegEx for the compiler command line pattern to properly parse the line
the uggly thing is that on my Windows system the compiler command line includes the .exe. So on Windows/Linux you need to remove it.
I hope this helps,
Erich
LikeLike
There is the ‘Entries’ tab in that same dialog, but I only see the build-in settings there. Nothing for the build output parser.
LikeLike
I haven’t quite completed my software setup, I started by installing openOCD because I want to debug the esp32 chip with breakpoints and stuff. I am not planning to interface with any other chip, am building a board with only esp32 chip. I will see what works best in Linux and let you know. Following this closely.
LikeLike
I had bad experience with OpenOCD on other ARM Cortex-M, so not sure how stable it is on ESP32. What I would like to do is using the J-Link for debugging instead. Not sure how well this will work.
LikeLike
Pingback: Programming the ESP32 with an ARM Cortex-M USB CDC gateway | MCU on Eclipse
Pingback: Eclipse JTAG Debugging the ESP32 with a SEGGER J-Link | MCU on Eclipse
Pingback: JTAG Debugging the ESP32 with FT2232 and OpenOCD | MCU on Eclipse
Hey guys, as of 28th April 2020 the unresolved includes are still being reported.
However, if I create for instance a simple project from an esp-idf template and run an initial ‘build’ the code compiles without errors and the unresolved warnings stop.
This may be related to this https://github.com/espressif/idf-eclipse-plugin/issues/60.
I can confirm that the above procedure works on:
esp-idf commit d85d3d969ff4b42e2616fd40973d637ff337fae6 ( Date: Tue Apr 14 20:19:48 2020 +0800 )
esp-idf eclipse plugin: commit 891c8fe
eclipse Version: 2020-03 (4.15.0) Build id: 20200313-1211
Hope this helps
LikeLike
Thank you, this is indeed interesting. Thanks for pointing to the issue reported on GitHub.
LikeLike