
The ‘Verkehrshaus der Schweiz‘, the ‘Swiss Museum of Transport’ is Switzerland’s most popular museum.
In April 2023, it opened up a new building and the ‘Experience Energy!’ exhibition. For the opening event we created a unique construction kit to explore energy: from harvesting to storing and up to distributing and using energy.
Outline
The project started back in summer 2022 with the goal to have a construction kit available for the new building opening in April 2023: Visitors and schools can build something and then take it home, exploring and experiencing the topic energy:
- It should be easy to build, sustainable, not be a throw-away thing: valuable, useful and usable for many years.
- It is used to demonstrate renewable energy, energy storage and usage of electrical energy.
- It should be energy efficient. The same time it shall teach that it takes some time to harvest energy. And that depending on usage and storage, it can last longer.
- It should have extra features: using it as environment sensor, solar powered night light, ability to write your own firmware or extend it.
- Grow over time: Featuring an expansion port, connect multiple kits together, add more energy sources (solar, wind turbines, …) or storage.
- Using it in MINT classes: learn programming, building hardware, doing circuit design.
The final result can be seen in the video below:
Opening Event
The kit has been successfully used at the opening event.

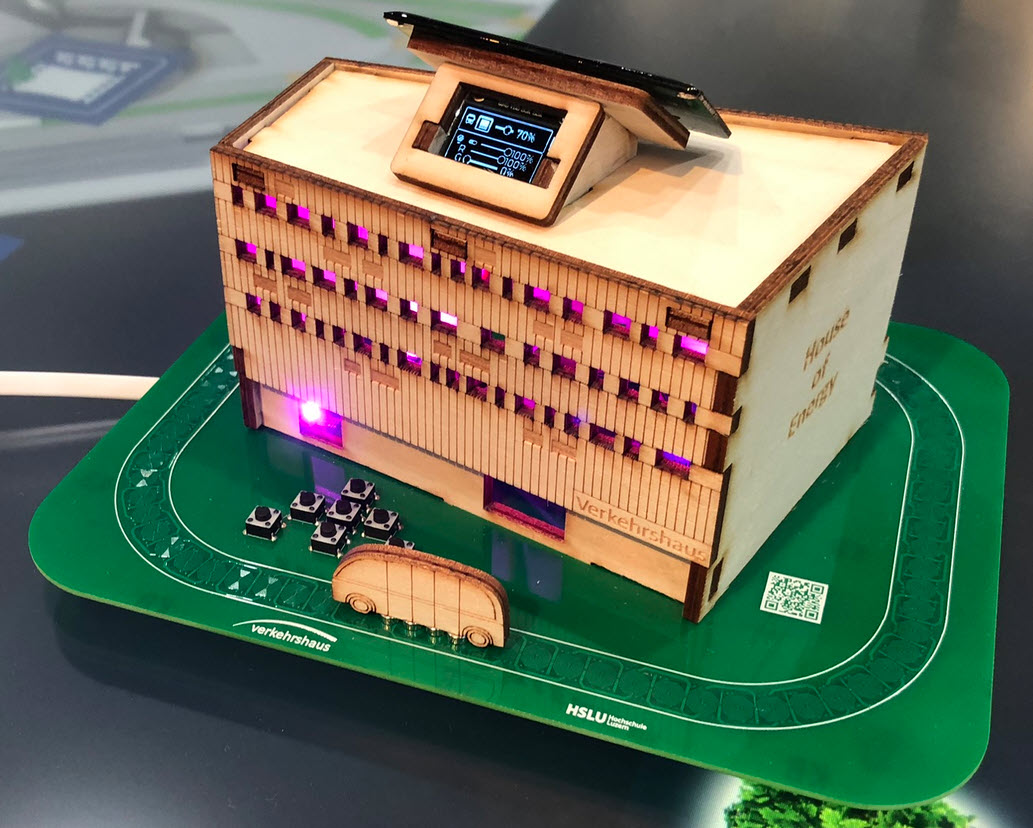
The kit includes all the parts (PCB, OLED, solar cell, super cap, cables, buttons, …) plus the parts for the house of energy. All SMD parts are already populated, so the participants assemble and solder all through-hole (THT) components. They assemble the house made of wood, then load the first firmware with the MSD boot-loader.
A bigger model of the kit is used as guidance and example during the workshop. Participants learn about energy harvesting, storage and energy usage.

Evolution
Naturally, because the project run over nearly a year, the project has been developed in evolutionary steps.
The first concepts were with a generic house with laser-cut birch plywood and the RP2040 Pico board:

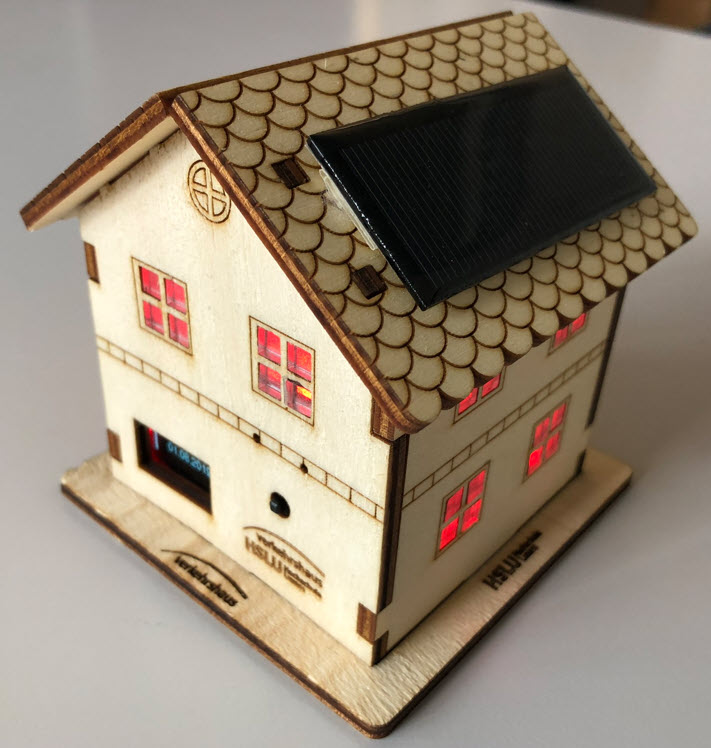

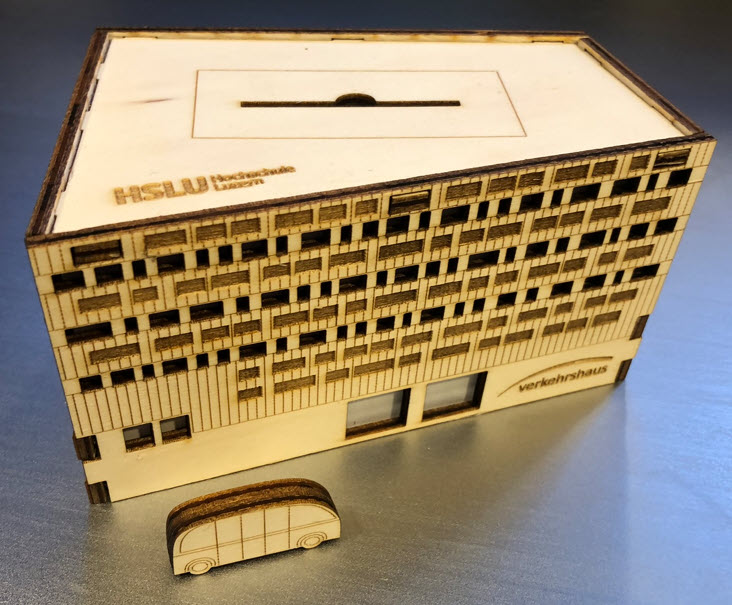
That concept worked fine, but did not had the vehicle added. To make a closer connection the new building at the Verkehrshaus, an new ‘house’ was created, based on the building construction plans, as the building was still under construction. That new design was undergoing multiple iterations too, because it had to be ‘manufacturable’ with a laser cutter.
The circuit on the PCB is generating a magnetic field which moves forward or backward, pushing the permanent magnets of a small vehicle. Different sizes of magnets and vehicle material, including 3D printed had been tried out. With the laser-cut plywood working the best:

The first PCB designs were using the Raspberry Pi Pico RP2040 boards. But the Pico did not meet the low power and USB-C requirement:

For the building and vehicle, three different materials have been explored: Birch plywood, recycled PMMA and (wood) MDF.


All the parts including the standoffs for the PCB are laser-cut:

The wood/plywood one was evaluated to be the most sustainable and environment friendly one. Still a few PMMA ‘eye-catcher’ ones have been produced.
In addition, a larger fully functional model for the exhibition has been created. That one was used in the workshops too for display:


Below the final ‘small’ version with a PMMA building, using laser-engraved and laser-cut material:

The plywood variant has the most natural look and feel, comes as well with the greatest variations.

Hardware
The hardware is based around the Raspberry Pi RP2040, and has been developed by Christian Jost. Below the final PCB:

The hardware has been developed with the open source KiCAD. To reduce the amount of energy to power the coils, they are divided into two segments, powered by TI DRV8839 stepper motor drivers. The firmware keeps track of where the vehicle is located and only needs to power one half of the coils. The Super-Capacitor is able to store 70F.

For debugging, a TAG Connect is present on the PCB. The SWD debug signals are available on the USB C connector too, so hardware debugging over the USB cable is possible and no TAG connect is needed. The design is optimized for low power design: the RP2040 monitors the USB connection and powers down automatically. An external RTC (NXP PCF85063) with combination of the center navigation switch is used to power down and wake-up the MCU as required, making it possible to be in standby mode for more than a year without a charge. Additionally a state-of-charge is calculated and powers down the circuit automatically to prevent under-voltage situations. The sensor power (Sensirion SHT40, temperature and humidity) as well the OLED display power supply are managed by the MCU to power it down and up to save energy.
Firmware
The software has been developed with Eclipse and VS Code as IDE, implemented mostly in C and runs with FreeRTOS as RTOS. To optimize energy usage, the RTOS runs in tickless idle mode and shuts down to reduce energy usage after a timeout period.

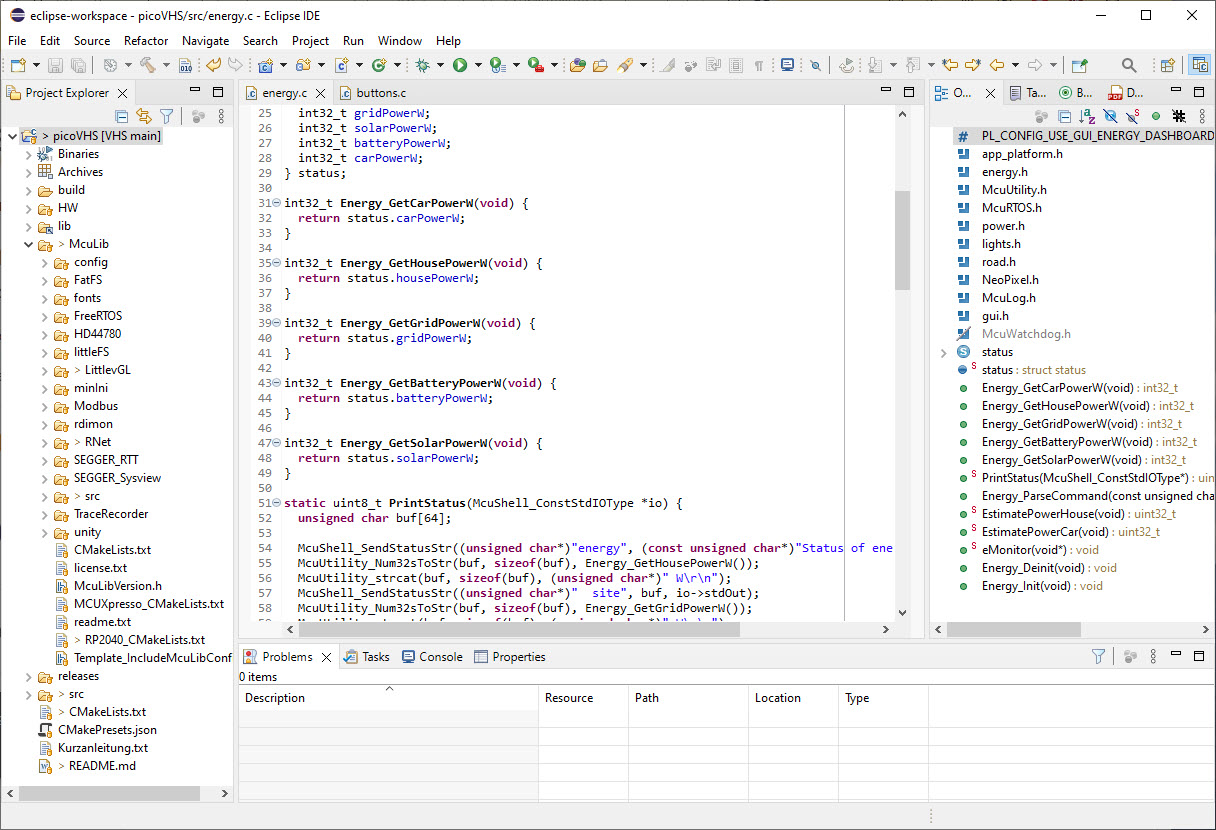
The default firmware includes a command-line interface:
--------------------------------------------------------------
picoHouse
--------------------------------------------------------------
McuShell                  ; Group of McuShell commands
  help|status             ; Print help or status information
McuRTOS                   ; Group of McuRTOS commands
  help|status             ; Print help or status information
  tasklist                ; Print tasklist
McuArmTools               ; Group of McuArmTools commands
  reset                   ; Performs a software reset
  help|status             ; Print help or status information
McuTimeDate               ; Group of McuTimeDate commands
  help|status             ; Print help or status information
  time [hh:mm:ss[,z]]     ; Set the current time. Prints the current time if no argument
  date [dd.mm.yyyy]       ; Set the current date. Prints the current date if no argument
  dateToSec <datetime>    ; Convert date/time int UNIX timestamp (seconds after 1970)
  secToDate <secs>        ; Convert UNIX timestamp to date/time
light                     ; Group of light commands
  help|status             ; Print help or status information
  on|off                  ; Turn light on or off
  suspend|resume          ; Suspend or resume light task
  color <rgb>             ; Set light color
  brightness <val>        ; Set light brightness (0-100%)
  mode <val>              ; Set light mode (0: normal, 1: random, 2: rainbow)
SHT40                     ; Group of SHT40 commands
  help|status             ; Print help or status information
analog                    ; Group of analog data commands
  help|status             ; Print help or status information
road                      ; Group of road commands
  help|status             ; Print help or status information
  on|off                  ; start/stop driving
  speed <val>             ; Set speed (0..100)%
  mode <m>                ; Set mode: 0: fw, 1: bw, 2: auto
  en <n> (on|off)         ; Turn enable signal on or off)
  coil <n> (on|off)       ; Turn coil on or off)
  step <n>                ; Perform number of steps (forward, backward)
  pos <n>                 ; Set position counter
  switchseg on|off        ; Segment switching on or off
  segstep <n>             ; Set number of steps in segment
  segoverlap <n>          ; Set number of overlaps crossing segment
  sleep on|off            ; Put drivers into sleep mode or not
pwmled                    ; Group of PwmLed commands
  help|status             ; Print help or status information
rtc                       ; Group of PCF85063 RTC commands
  help|status             ; Print help or status information
  reset                   ; Send software reset command to device
  write ram <val>         ; Write a byte value to the RAM
  write ctrl1 <val>       ; Write a byte to the Control_1 (00h) register
  write ctrl2 <val>       ; Write a byte to the Control_2 (01h) register
  write offset <val>      ; Write a byte to the Offset (02h) register
  time [hh:mm:ss[,z]]     ; Set the current time
  date [dd.mm.yyyy]       ; Set the current date
  alarm s|m|h <v>         ; Set alarm value for second, minute or hour
  alarm on|off s|m|h      ; Enable alarm for second, minute or hour
  alarm AIE on|off        ; Enable alarm interrupt for second, minute or hour
  alarm reset AF          ; Reset alarm interrupt flag
McuFlash                  ; Group of flash ini commands
  help|status             ; Print help or status information
  dump <start> <size>     ; Dump memory data
  erase <addr> <size>     ; Erase memory at address
McuMinINI                 ; Group of McuMinINI commands
  help|status             ; Print help or status information
  read <f> <s> <k>        ; Read a key from a section in a file
  write <f> <s> <k> <v>   ; Write a key with value to a section in a file
  delkey <f> <s> <k>      ; Delete a key in a section of file
  delsec <f> <s>          ; Delete a section in a file
ini                       ; Group of flash ini commands
  help|status             ; Print help or status information
  dump                    ; Dump data information
  erase                   ; Erase data information
McuLog                    ; Group of McuLog commands
  help|status             ; Print help or status information
  level <level>           ; Set log level, 0 (TRACE), 1 (DEBUG), 2 (INFO), 3 (WARN), 4 (ERROR), 5 (FATAL)
  quiet <on|off>          ; Set quiet mode for console
  color <on|off>          ; Set color mode
power                     ; Group of power commands
  help|status             ; Print help or status information
  on|off                  ; Turn En_Pwr on or off
  ps on|off               ; Turn DC converter power saving on or off
  vcc2 on|off             ; Turn Vcc2 pin on or off
  vcc2 suspend|resume     ; Shutdown or restart Vcc2 devices, including Vcc2 pin
gui                       ; Group of GUI commands
  help|status             ; Print help or status information
  saver on|off            ; Turn screensaver on or off
energy                    ; Group of energy commands
  help|status             ; Print help or status information
unittest                  ; Group of unit test commands
  help|status             ; Print help or status information
  light                   ; Perform light/LED tests
  nav                     ; Perform navigation button tests
  sensor                  ; Perform SHT sensor tests
  rtc                     ; Perform RTC tests
  power                   ; Perform power tests
  all                     ; Perform all tests
app                       ; Group of application commands
  help|status             ; Print help or status information
The user interface uses push buttons and an SHT1106 OLED (128×64) OLED. The GUI is implemented with the open source LVGL framework. This makes using the UI very intuitive:
- Navigation: up, down, back, forward, middle button to enter values
- Icons for status and actions: no translation needed (Switzerland has four official languages)
- Sliders for settings
- Scrolling through multiple items to extend the screen area
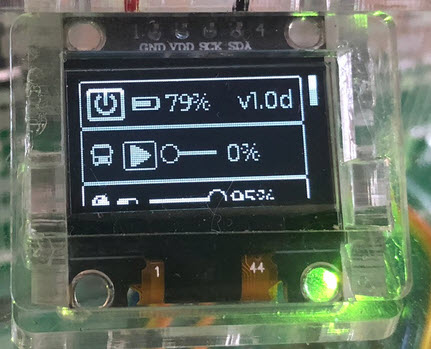


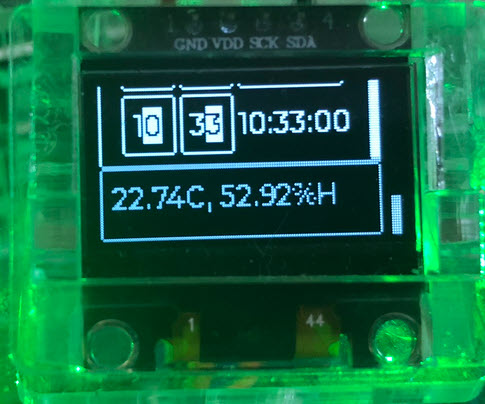
With that GUI it is possible to configure the most important settings of the system.
Summary
It has been an exciting journey and a blast to create the ‘House of Energy’ for the event. Making the RP2040 ultra-low power was a challenge. And there had been the usual supply issues, as we had to change parts multiple time. Plus some of the Super-Capacitors arrived damaged from Mouser. But at the end, everything worked out on time, and the opening event was a big success. Many thanks to everyone involved, including the team at the museum!
And: there are ideas and extensions planned, and updates coming for the ‘House of Energy’. And if you are ever visiting Lucerne or the area, don’t miss to stop by the Verkehrshaus and the new exhibition.
Happy energizing and Happy New Year 2024 🙂
Links
- Verkehrshaus der Schweiz: https://www.verkehrshaus.ch
- House of Energy construction kit: https://www.verkehrshaus.ch/en/visit/energy-at-the-museum-of-transport/house-of-energy-construction-kit.html

Pingback: The ‘House of Energy’ Construction Kit @McuOnEclipse « Adafruit Industries – Makers, hackers, artists, designers and engineers!
Hi Erich,
I like the magnetic train 🙂
I’d like to reproduce it. Can you provide me with information about it ?
Regards,
Nicolas
LikeLike
Hi Nicolas,
At least for the moment, I cannot share the design files for it.
Erich
LikeLike
Hi Erich,
No problem. This is the kind of answer I expected but who knows, better ask 😉
Nicolas
LikeLike