
The tools and IDE market is constantly changing. Not only there is every year at least one new major Eclipse IDE release, the commercial tool chain and IDE vendors are constantly changing the environment too. For any ARM Cortex-M development, the combination of Eclipse with the GNU tool chain provided by ARM Inc. is the golden standard. But this does not mean that things can be easily moved from one IDE package to another.
While moving between Eclipse versions and GNU versions is usually not a big deal at all, moving between the Eclipse build tool integration is usually not simple. While the GNU MCU Eclipse plugins are widely used (see Breathing with Oxygen: DIY ARM Cortex-M C/C++ IDE and Toolchain with Eclipse Oxygen), the Eclipse based IDEs from the silicon vendors or commercial Eclipse toolchain vendors are using their own GNU toolchain integration. Which means the project files are not compatible :-(.
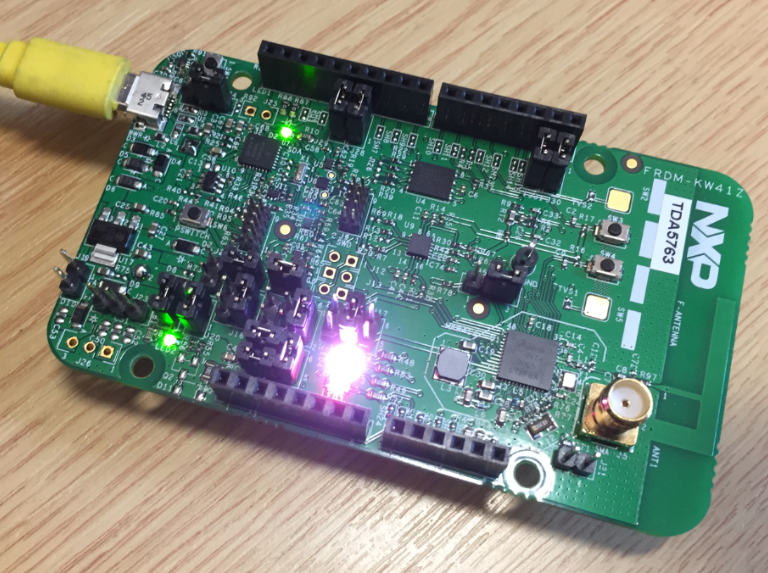
NXP FRDM-KW41Z Board
As a result, projects need to be ported from one build tool integration to another. In general, I avoid porting existing projects to a new tool chain and IDE. But sometimes there is no way around this. And this post explains the needed steps.
Outline
With the MCUXpresso IDE 10.0.2 out, this is the de-facto standard for any ARM Cortex based NXP Kinetis and LPC devices. I general I do not recommend moving existing projects to a newer IDE. I still have many legacy CodeWarrior 6.x projects running, and some projects are around for more than 10 years and still running in that original environment. Switching an IDE and especially changing the compiler and build tools in the middle of a project is not something to take easily. Starting a new project with a new state-of-the art IDE and toolchain usually is a logical choice.
But what if there is an existing project example and I want to use that in a new IDE? Like I have a Kinetis Design Studio Project and I want to port it to the MCUXpresso IDE? This is very well doable and can be done quickly, but it requires an understanding about the differences between IDE’s and tool chains.
💡 Any porting because of different build tool integration can be avoided using make file based projects, see Tutorial: Makefile Projects with Eclipse.
While in this article I’m using the NXP Kinetis Design Studio and the MCUXpresso IDE, many points are applicable to different IDE combinations too.
💡 In this article I’m porting a MCUXpresso/Kinetis SDK v2.x project to the MCUXpresso IDE, so keeping the same SDK major version number. Porting a project to a different SDK version (e.g. V1.3 to V2.x) is something very complex as the API is very different. For such a thing consult the documentation of the SDK.
The result of this article and porting work can be found on GitHub: https://github.com/ErichStyger/mcuoneclipse/tree/master/Examples/MCUXpresso/FRDM-KW41Z/hid_device_frdmkw41z
Process
For porting a project from one (source) IDE to another (destination), I recommend the following:
- Ensure that the project builds and works fine in the source IDE. This ensures that I have a working base.
- In the destination IDE, create a new (’empty’/bare metal) project which I can debug. This ensures that I have a working base project in the destination IDE.
- Copy over the source files from the source IDE to the destination IDE.
This assumes both IDE’s installed which usually should be the case. If you don’t have the other IDE installed, things will be tricky as it will not be easy to understand the different options unles you understand reading the .cproject file.
If the source project is a ‘linked files and folder’ project, then you should read and follow “Transforming Eclipse Linked Projects into Standalone Projects” first.
Differences between Kinetis Design Studio and MCUXpresso IDE
To port a project from one IDE to another, it is important to understand the differences between them. The following lists the differences between KDS and MCUXpresso IDE for porting projects between them.
Eclipse: Both IDE’s are Eclipse based. KDS is Eclipse Luna, and MCUXpresso IDE is Neon based. Luckily, for Eclipse projects the Eclipse version does not really matter, except you want to use the same project in both IDEs.
Build Tools: Both IDE’s are using GNU tools for ARM Cortex M. KDS V3.2.0 is using the GNU Tools for ARM Embedded (launchpad) Version 4.8. The MCUXpresso IDE 10.0.2 is using the GNU Tools for ARM Embedded Processors 5 – Q3 2016 release. While the version is different, the build tools are very much the same. That would be otherwise an issue with assembly code or if specific pragmas or __attribute__ are used in the sources. With both using GNU for ARM tools, this means that sources and linker scripts should be compatible.
Linker Scripts: Both IDE’s are using the GNU Linker Scripts, but the MCUXpresso IDE has to feature to automatically generate and configure the linker script (managed linker scripts).

Managed Linker Script in MCUXpresso IDE
As long ‘normal’ linker scripts are used, I don’t have to do anything in MCUXpresso IDE as it will generate the matching linker script for my device.
💡 It is possible to use manged linker scripts with a powerful extension mechanism. Have a look at the ‘<installationfolder>\ide\Wizards\linker’ which has snippets of used linker files. Use a folder name ‘linkscript’ inside the project root and place template files into it to affect the linker file generated.
Libraries: KDS has the option to choose between newlib and newlib-nano libraries, with or without semihosting. The MCUXpresso IDE has many more choices including the Redlib libraries:
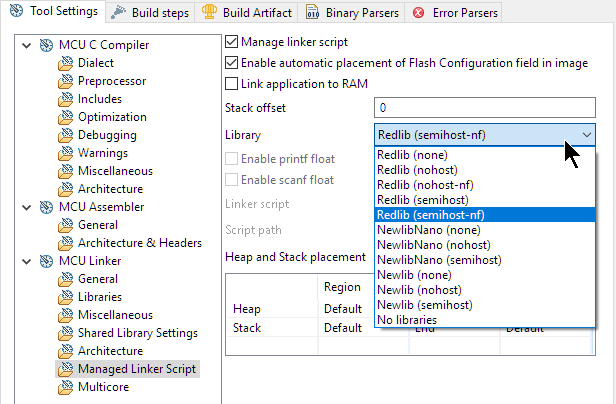
MCUXpresso IDE Library Options
Redlib is a special library optimized more for embedded usage than newlib or newlib-nano. As long as the application not depend or use any of the library calls (printf() and the likes), it should not make a difference. If in doubt, use the same library as in the source IDE.
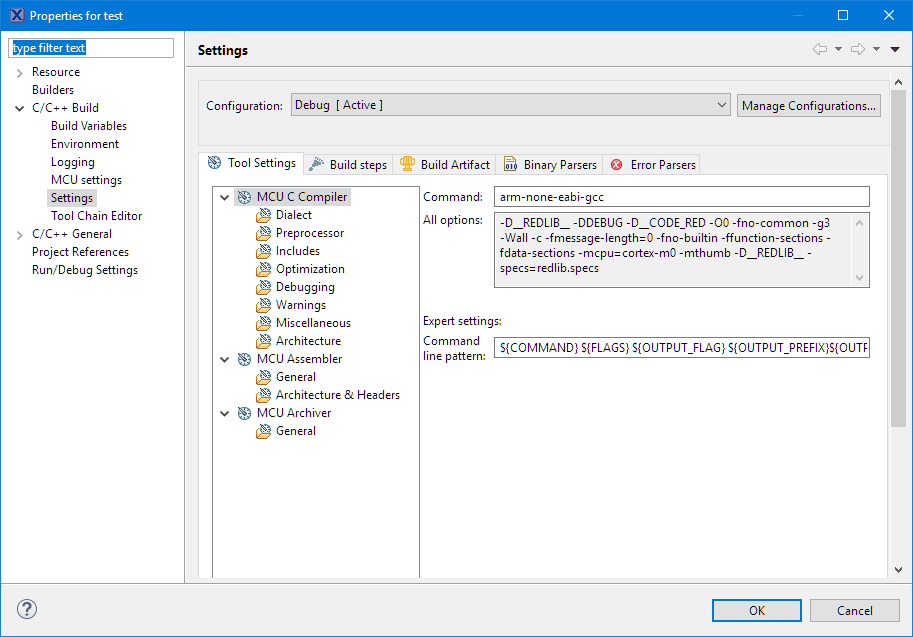
Build tool integration and Project Files: The biggest difference between the two IDE’s is the project file format and the build tools integration. Eclipse uses two XML project files to describe the project: the .project and the .cproject file:

Eclipse project files
The .project is for the Eclipse overall framework and describe the high level project name and folder. The .cproject is the Eclipse CDT project file and describes the files to compile plus all the build tool and compiler options.
Kinetis Design Studio uses the GNU ARM (now MCU) Eclipse plugins, while the MCUXpresso IDE used the same project description format as the NXP LPCXpresso. That makes the .cproject file different and not compatible between the two IDEs.
Project settings in MCUXpresso IDE

Project Settings in KDS
That means that the build settings and options between the two projects are similar, but not 1-to-1 compatible.
💡 If you consider to load KDS projects ‘as is’ in MCUXpresso IDE, there is an article for that: MCUXpresso IDE: Importing Kinetis Design Studio Projects
Processor Expert: There is no Processor Expert support in MCUXpresso IDE. I can move over the source code (as any source code) but will lose the code generation ability. There is a way to use Processor Expert in MCUXpresso IDE, but this one is not supported by NXP.
Debugger: Both IDE’s using similar debugging connections, with the MCUXpresso IDE having the Linkserver debug connection in addition. Unless the source project uses very specific debugging scripts, the debugger should not be any problem for the porting effort.
Kinetis Design Studio Project
In this tutorial, I’m using the SW4223 software download:

SW4223 software
This is a project which loads and builds in Kinetis Design Studio V3.2.0:
Project in KDS V3.2.0
I’m going now to port that project to the MCUXpresso IDE.
Create new Project
The first step is to create a new project in the target IDE for the device used. For the MCUXpresso IDE it means that I need the SDK loaded.
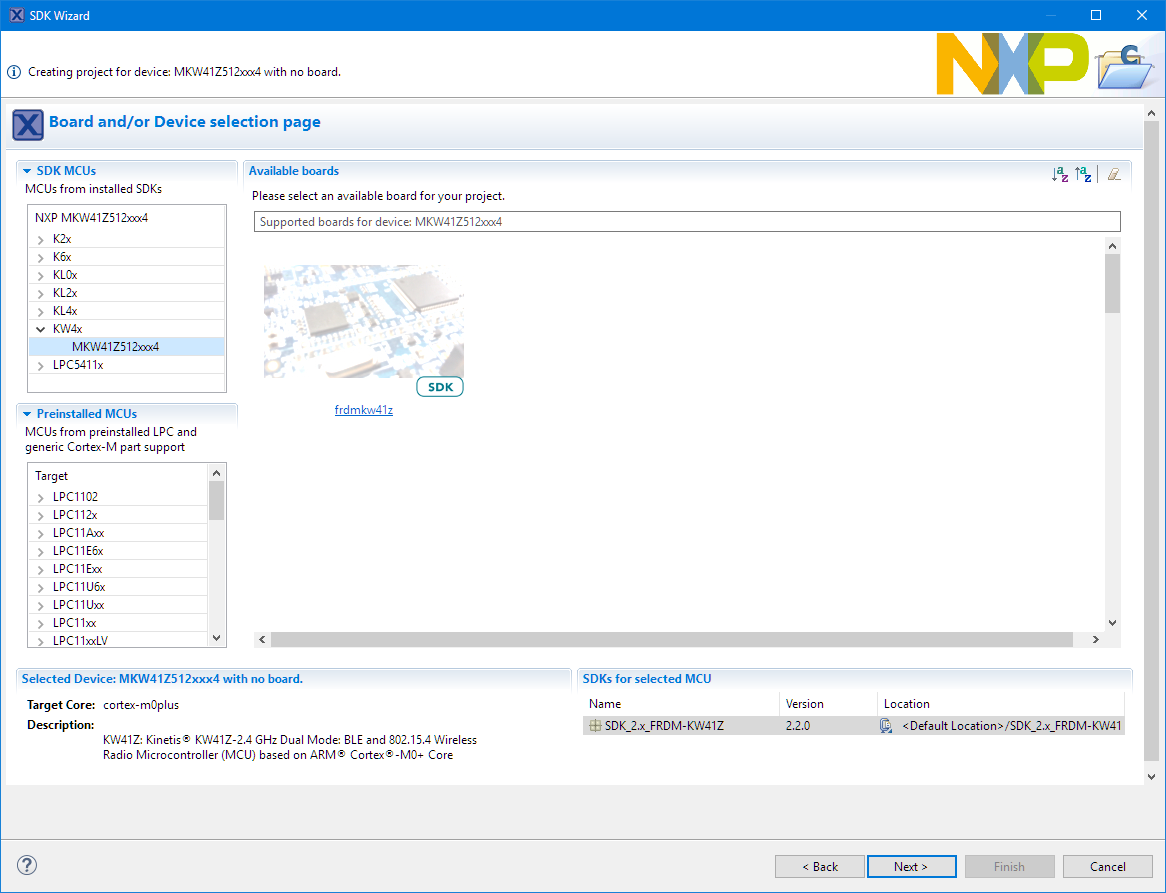
Creating new project for the FRDM-KW41Z
Create a minimal bare metal project:
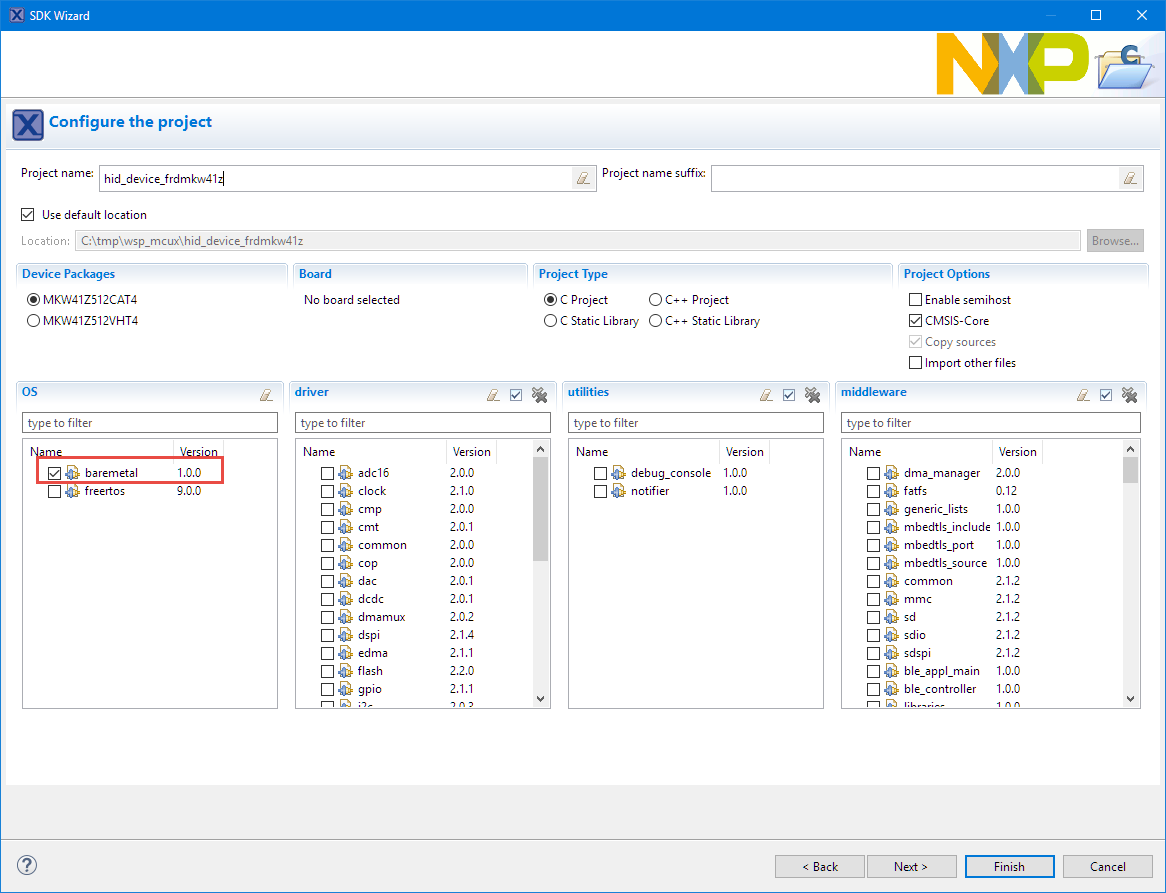
Bare Metal Project
The generated project should build and debug just fine.

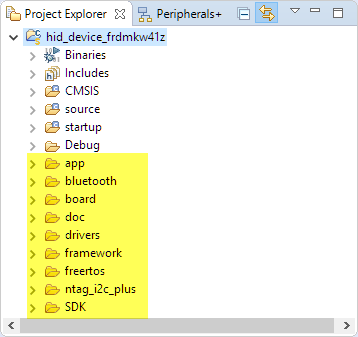
New Project Created
Copy Sources
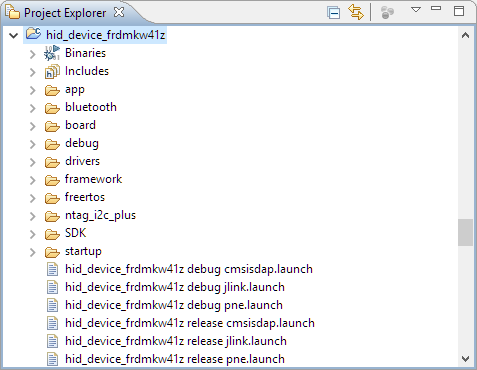
The next step is to copy (or drag&drop) the source files and folder into the new project:
Copied over source files and folders
Do *not* copy the startup files, as the new project already has it.
By default, the folders are ‘excluded’ from the build (see “Exclude Source Files from Build in Eclipse“), so open the settings for each folder and uncheck the ‘Exclude resource from build’:

Including folder into the build
At the end, all source folders have that little ‘C’ in the icon:

Source Folders
Preprocessor Settings
To match the preprocessor settings, check the -D compiler and assembler options of the original project:

KDS Preprocessor Settings
And have them added to the MCUXpresso IDE project settings. Remove any duplicates:

MCUXpresso IDE Compiler Define Settings
💡 An easy way to copy the settings is selecting and copy-paste them.
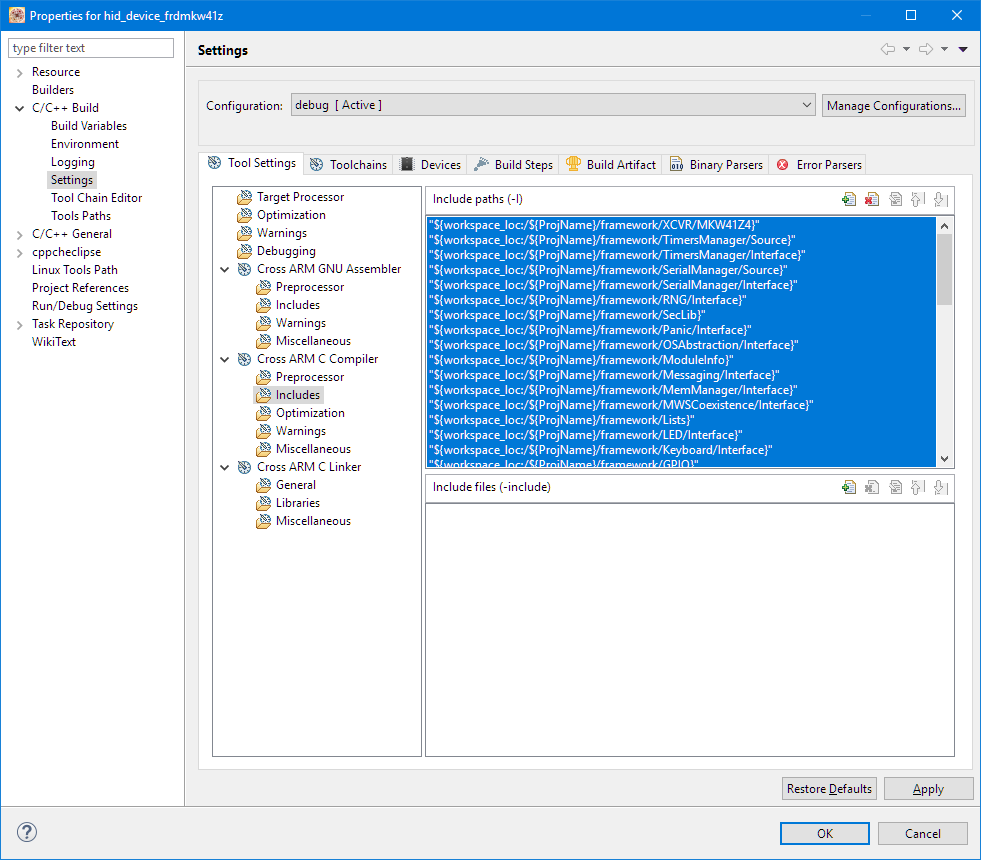
Compiler Include Paths
The sources won’t compile yet, as we did not tell the compiler about all the new include paths. Here again: copy the paths from KDS:
KDS Compiler Include Paths
and put them into the MCUXpresso IDE project:

Copied Include Paths into MCUXpresso IDE Project
Libraries
Check the source project for any libraries used/linked. One setting is here:

Libraries
For the above case, no action is needed as these are all standard libraries.
💡 Actually the above project is not setup in a clean way by the developer who did this, as the linker is able to automatically find and resolve the correct libraries
Interestingly, that example project has extra libraries listed as ‘other objects’, probably because whoever created that project was not aware of “How to use Custom Library Names with GNU Linker and Eclipse“?
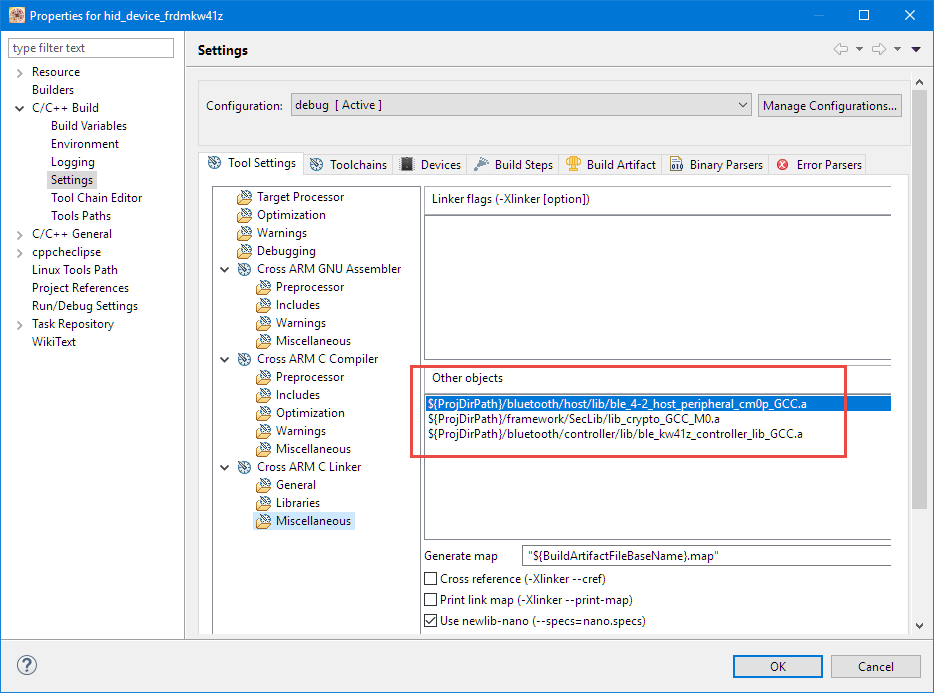
Other Linker Objects
The libraries get added to the options of the new project (note the ‘:’ in front of the library names):

Added Libraries to new project
Not Used Files
The MCUXpresso project comes with startup code and manages the linker files, so we don’t need to carry over any startup code or linker files. Check the source project if it has any excluded files and exclude them in the MCUXpresso project too:
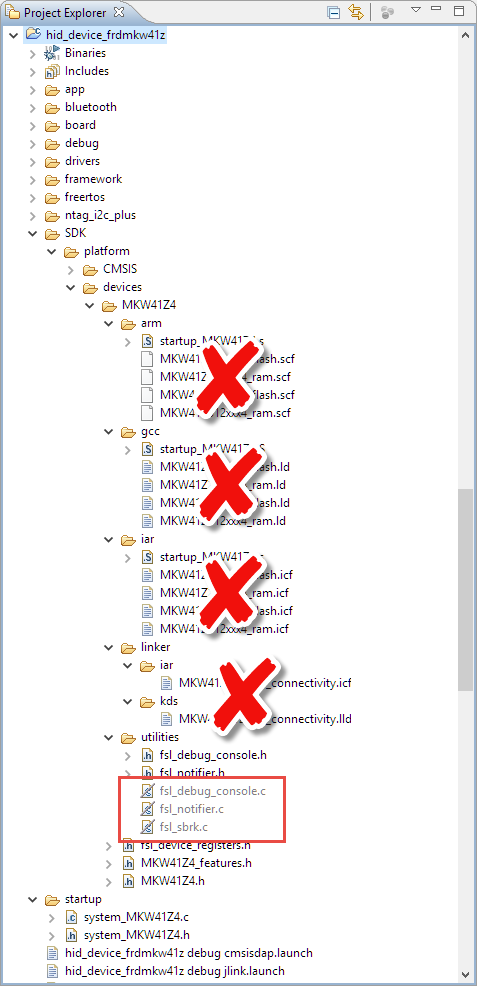
Not used files
CMSIS
The example project comes with its own copy of the CMSIS files, make sure you only have one instance (I usually remove the one from the original project):
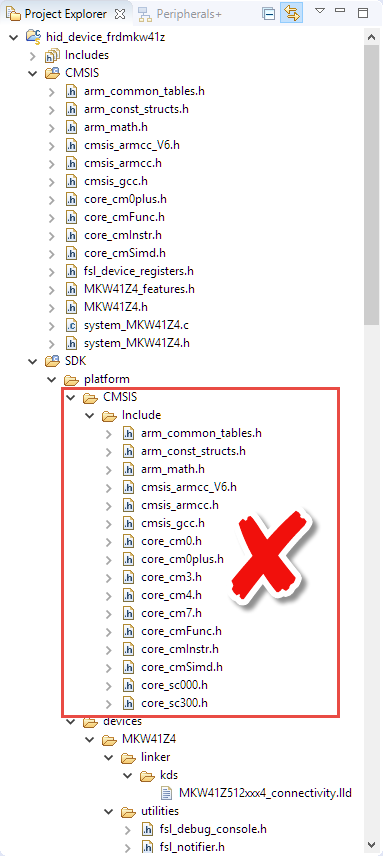
CMSIS
Board and Muxing Files
As I have added board and muxing files from the source project, I can remove the ones inside the ‘source’ folder of the new MCUXpresso IDE project, otherwise I have files duplicated:
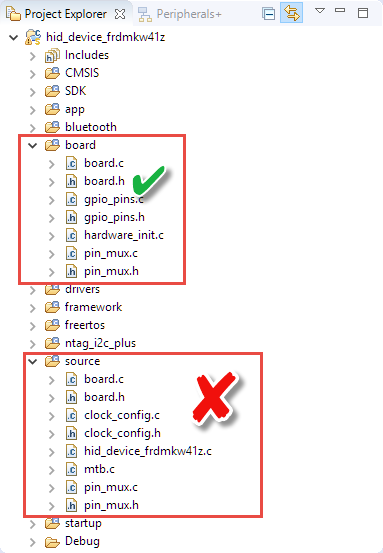
Board and Muxing Files
Building
With this, the project should build just fine. Well, it should, but usually it does not because of some tiny but important details. This very much depends on the source project, and here are a few things for the project used in this article. So here are a few things to check:
I noticed that the original project was using an extra -imacros option:
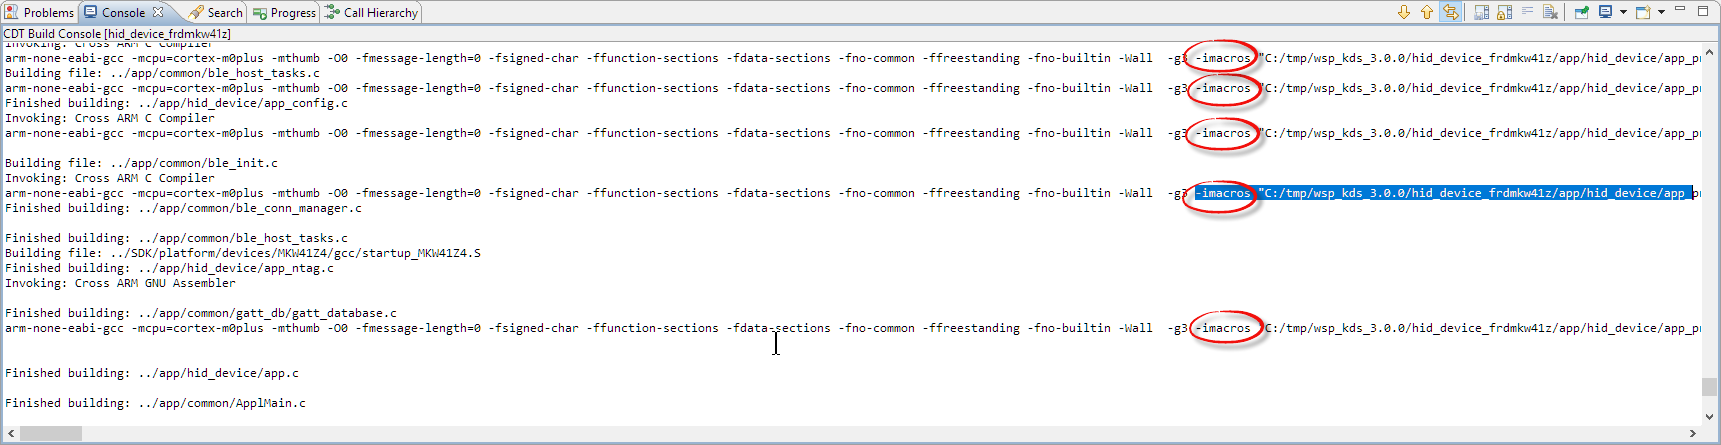
Original Project -imacros option
This comes from a (very unusual) additional macro added to the compiler command line:
PREINCLUDE Flags
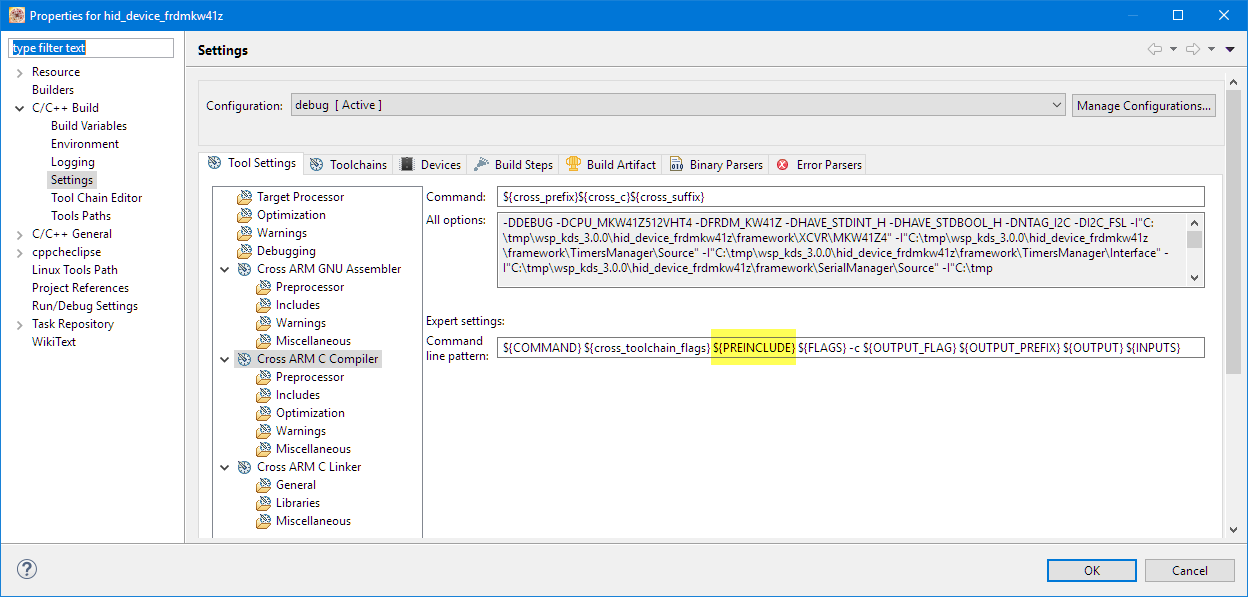
The solution was to add that option to the Miscellaneous compiler options:
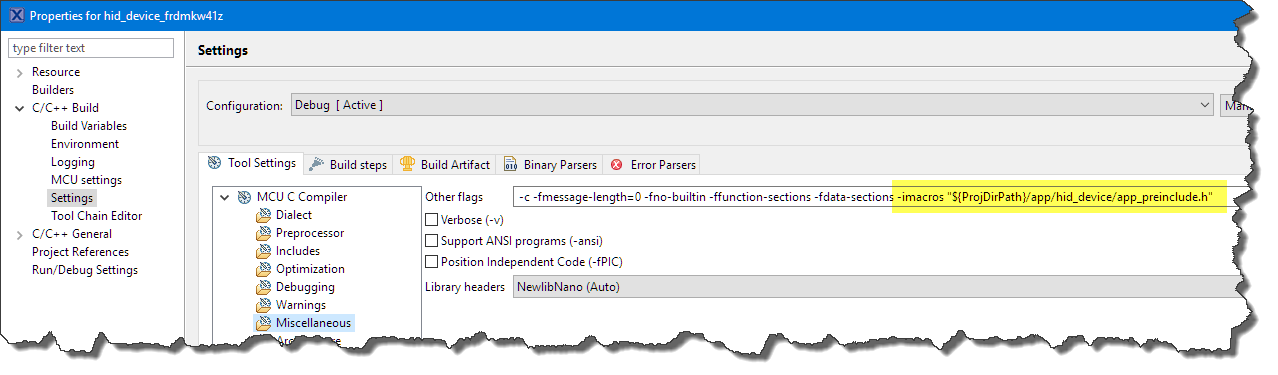
Added Miscellaneous option
Custom Linker Files
That project is using a custom linker file to specify symbols needed in the application and to relocate the vector table to RAM. MCUXpresso IDE is managing the linker files, so the best way is to use the to use FreeMarker scripts.
The MCUXpresso Linker is using template files located in
<MCUXpresso IDE Installation Path>\ide\Wizards\linker
I can add or overwrite things if I have a folder named ‘linkscripts’ in my project with the same file names inside my project:

Custom Linkscripts extensions
That way I can continue using the managed linker files and still add my very specific things.
The NXP BLE project requires some very specific linker variables in the linker file:

Linker File Variables in KDS Linker file
I can add this to the linker file of MCUXpresso IDE with the following user.ldt content:
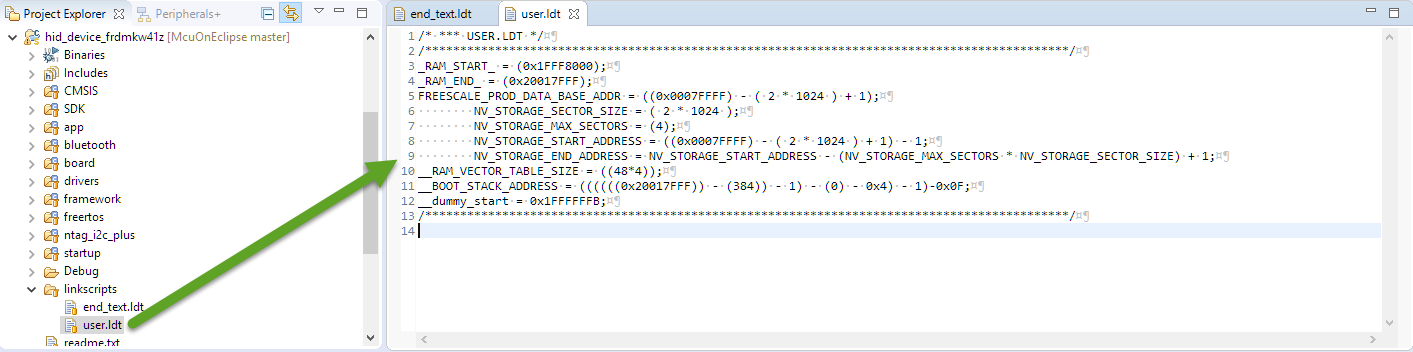
user.ldt
/* *** USER.LDT */
/********************************************************************************************/
_RAM_START_ = (0x1FFF8000);
_RAM_END_ = (0x20017FFF);
FREESCALE_PROD_DATA_BASE_ADDR = ((0x0007FFFF) - ( 2 * 1024 ) + 1);
 NV_STORAGE_SECTOR_SIZE = ( 2 * 1024 );
 NV_STORAGE_MAX_SECTORS = (4);
 NV_STORAGE_START_ADDRESS = ((0x0007FFFF) - ( 2 * 1024 ) + 1) - 1;
 NV_STORAGE_END_ADDRESS = NV_STORAGE_START_ADDRESS - (NV_STORAGE_MAX_SECTORS * NV_STORAGE_SECTOR_SIZE) + 1;
__RAM_VECTOR_TABLE_SIZE = ((48*4));
__BOOT_STACK_ADDRESS = ((((((0x20017FFF)) - (384)) - 1) - (0) - 0x4) - 1)-0x0F;
__dummy_start = 0x1FFFFFFB;
/********************************************************************************************/
The other part is that the original application is relocating the vectors to RAM, and needs the following in the linker file:
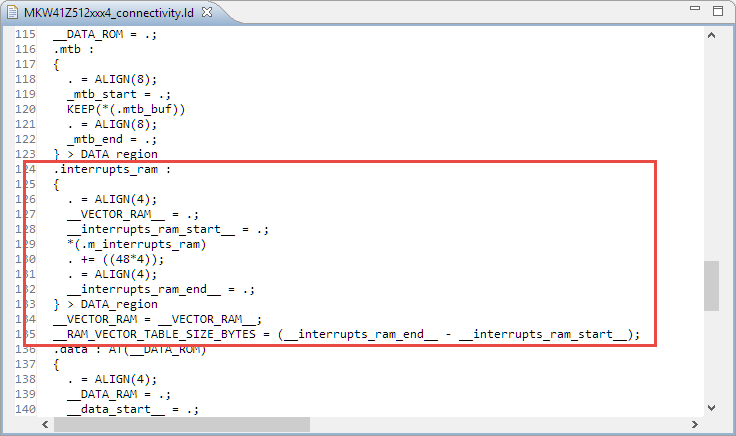
interrupts in RAM
To add this to the MCUXpresso IDE linker file, I’m extending the end_text.ldt with that snippet:
/********************************************************************************************/
__VECTOR_TABLE = ABSOLUTE(.);
 .interrupts_ram :
 {
 . = ALIGN(4);
 __VECTOR_RAM__ = .;
 __interrupts_ram_start__ = .;
 *(.m_interrupts_ram)
 . += ((48*4));
 . = ALIGN(4);
 __interrupts_ram_end__ = .;
 } > SRAM
 __VECTOR_RAM = __VECTOR_RAM__;
 __RAM_VECTOR_TABLE_SIZE_BYTES = (__interrupts_ram_end__ - __interrupts_ram_start__);
/********************************************************************************************/
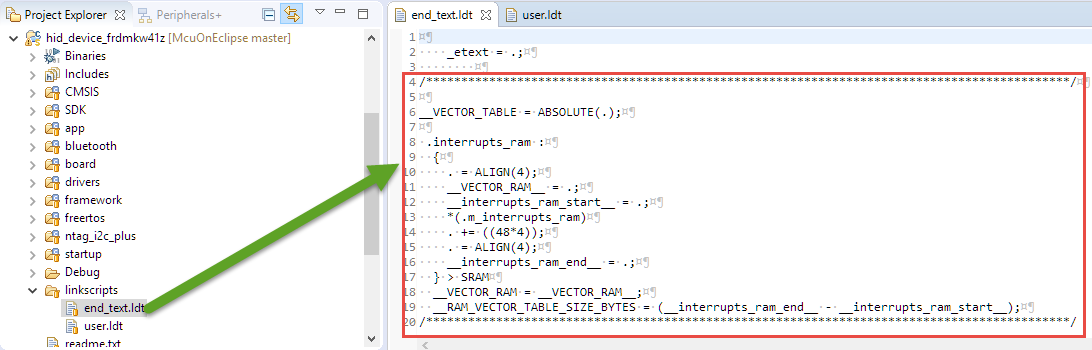
extended end_text.ldt
Multiple Definitions
The crypto libraries seem to define the same multiple times:
wsp_mcux/hid_device_frdmkw41z/framework/SecLib//lib_crypto_GCC_M0.a(ec_p_256.o): In function `Bi_Add':
ec_p_256.c:(.text.Bi_Add+0x0): multiple definition of `Bi_Add'
wsp_mcux/hid_device_frdmkw41z/framework/SecLib//lib_crypto_GCC_M0.a(big_integer.o):big_integer.c:(.text.Bi_Add+0x0): first defined here
wsp_mcux/hid_device_frdmkw41z/framework/SecLib//lib_crypto_GCC_M0.a(ec_p_256.o): In function `Bi_Sub':
ec_p_256.c:(.text.Bi_Sub+0x0): multiple definition of `Bi_Sub'
I added this with the -z linker option to ignore multiple definitions:
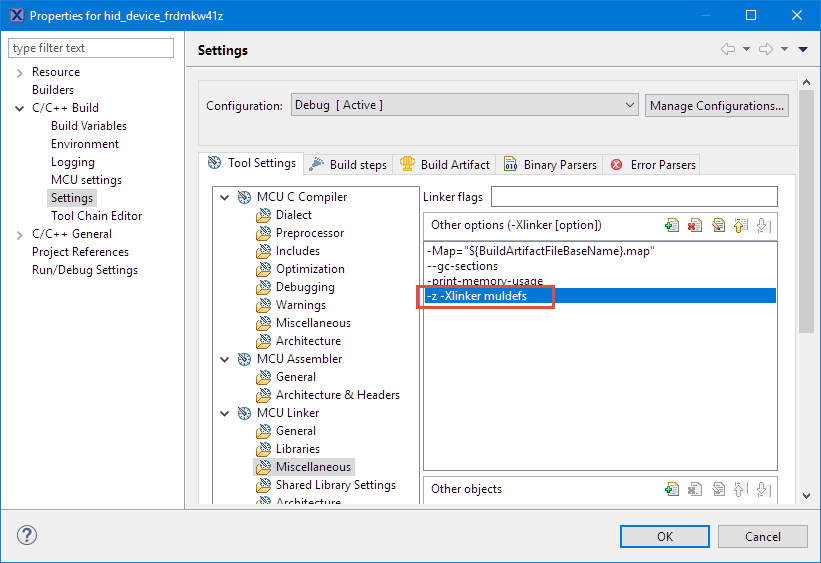
-Xlinker -z -Xlinker muldefs
Which adds
-Xlinker -z -Xlinker muldefs
to the linker options.
With this, that project compiled and linked fine, and worked as well on the hardware :-).
The ported project can be found on GitHub here: https://github.com/ErichStyger/mcuoneclipse/tree/master/Examples/MCUXpresso/FRDM-KW41Z/hid_device_frdmkw41z
Summary
Porting a project from one Eclipse build system integration to another is simple in many cases: create a new project and add the source files. But there are projects like this BLE one which is not that easy because of the special way how the original project has been configured. In this case, more knowledge about project settings is necessary. The MCUXpresso IDE offers all the needed support to successfully port such a project. As a side effect it is a good learning opportunity to get familiar with the advanced features of the MCUXpresso IDE like the managed linker scripts which is really powerful.
I hope this article helps you to port and projects to a different IDE. If you feel I missed something, let me know and post a comment.
Happy Porting 🙂
Links
- Used and ported project in this article: https://github.com/ErichStyger/mcuoneclipse/tree/master/Examples/MCUXpresso/FRDM-KW41Z/hid_device_frdmkw41z
- SW4223: http://www.nxp.com/products/identification-and-security/nfc-and-reader-ics/connected-tag-solutions/ntag-ic-iplus-i-kit-for-arduino-pinout:OM23221ARD?tab=Design_Tools_Tab
- Kinetis Design Studio: http://www.nxp.com/kds
- MCUXpresso IDE web page: http://www.nxp.com/mcuxpresso/ide
- MCUXpresso IDE community: http://www.nxp.com/mcuxpresso/ide/forum
- MCUXpresso Config tools and SDK: https://mcuxpresso.nxp.com/
- GNU MCU Eclipse Plugins: http://gnuarmeclipse.github.io/
- Linked Files and Folder projects: Transforming Eclipse Linked Projects into Standalone Projects

Pingback: Eclipse MCUXpresso IDE 10.1 with integrated MCUXpresso Configuration Tools | MCU on Eclipse
Pingback: Linking Bootloader Applications with Eclipse and FreeMarker Scripts | MCU on Eclipse