
More and more of my students are using Microsoft Windows 10 machines, and my computer has been upgraded to Windows 10 a couple of week ago too. From my work and experience, a new operating system causes always some challenges, and Windows 10 is no difference. And no, this is not about Microsoft vs. Apple vs. Linux, this post is about addressing a potential and painful problem which I have observed with Windows 10 machines, and to my understanding it could happen with any other operating system too. The problem is that somehow on several student machines the bootloader and OpenSDA application on their FRDM boards did not work any more.
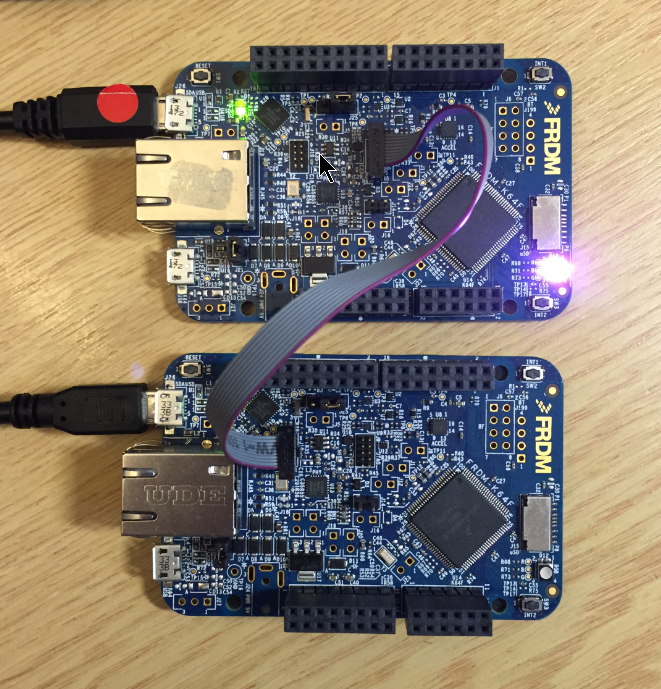
FRDM-K64F (top) programming the OpenSDA Bootloader (bottom)
Windows 10 and OpenSDA Bootloader
I’m not really clear what it is causing this, but the boards which did not work any more had somehow the OpenSDA V2.x bootloader affected:
- I happened 6 times during last semester.
- In all cases a Windows 10 machine was involved.
- It is not clear under which circumstances it happened, it seems to happen rather random, and if the board has been put into BOOTLOADER mode.
The OpenSDA application and bootloader enumerates as virtual MSD (Mass Storage Device) to the host. My speculation is that somehow the host machines read/writes to that device in a way to confuse the bootloader/application on the board. As a result it seems to me that this leads to some programming sequences which then invalidate and corrupt the bootloader and application on it.
Affected OpenSDA Firmware
Only OpenSDA V2.0 (NXP FRDM-K64F) and OpenSDA V2.1 (NXP FRDM-K22F) boards were affected: these board have an ‘unsecured’ (mbed) bootloader on it which can be overwritten as it is open. The OpenSDA V1.0 bootloader (produced by P&E) on the other side seems not to be affected as the bootloader firmware is secured and protected, so it cannot be erased. So the problem seems to be related to the OpenSDA V2.x bootloader.
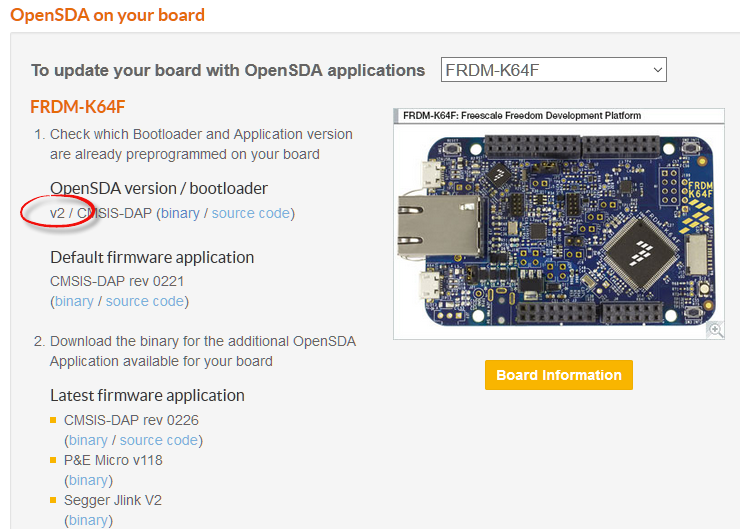
To find out if your firmware could be affected:
- Go to http://www.nxp.com/opensda and select your board
- Check if your bootloader is a V2, V2.1 or V2.x. If yes, you are potentially affected
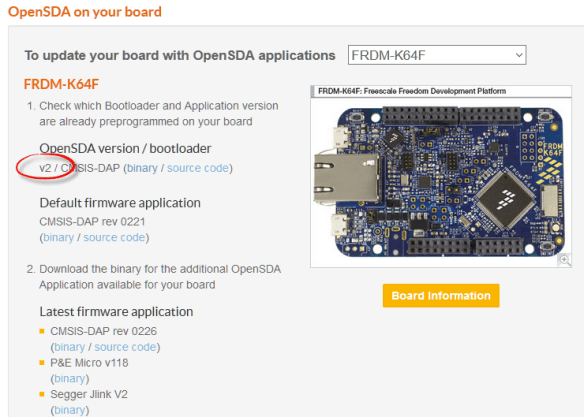
OpenSDA Bootloader Version
If your firmware might be affected, you can
- Do nothing. The problem seems to be rather rare from my experience
- Be prepared to reprogram it with the original firmware.
- There is a new beta OpenSDA V2.2 firmware (see this link) which seems to be able to deal with the issue.
Either way with option 2 or 3, you need an external SWD/JTAG debug device/probe to reprogram the firmware on the Kinetis K20 OpenSDA microcontroller:

OpenSDA K20 Device on FRDM-K64F
Bootloader Files
To reprogram the OpenSDA K20, you need first the bootloader firmware file. You might consider cloning it from a working second board (see “Recovering the FRDM-K64F Bootloader, or: Cloning the Program of a Microcontroller“).
The other way is to find and download the firmware from http://www.nxp.com/opensda:

Bootloader Firmware File
💡 Be careful to select the correct bootloader file. The FRDM-K64F V2.0 bootloader uses a different base address for the application than the V2.1 one.
You might give the V2.2 firmware on new OpenSDA v2.2 Bootloader binary for FRDM-K22F a try. If flashing this to the FRDM-K64F, then you need to load V2.1 debug applications to it!
Programmer Hardware
In any case, you need a separate/external device to re-program the bootloader. The recommended solution is to use either a Segger J-Link or a P&E Multilink. Alternatively another FRDM board like the FRDM-K64F can be used.

J-Link, Multilink and FRDM board as programmer
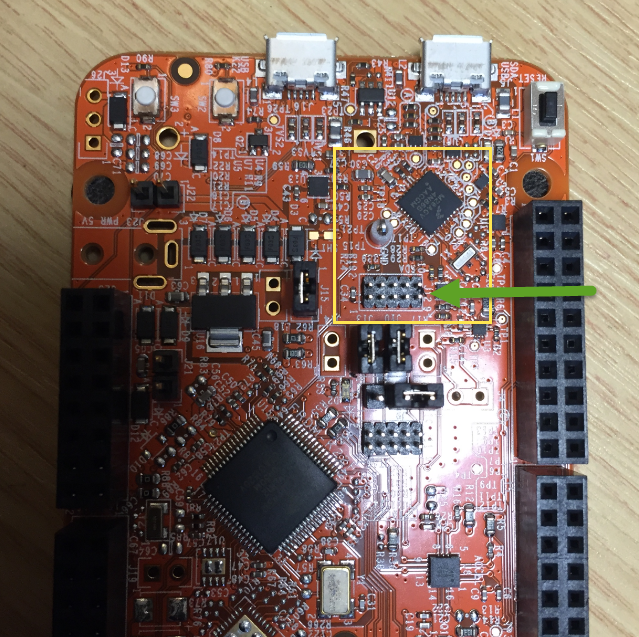
The easiest and simplest way is to use either the P&E Multilink or Segger J-Link. Locate the K20 on the Tower/Freedom board. Usually it is close to the K20 device:
SWD Header for the K20 on the FRDM-K22F
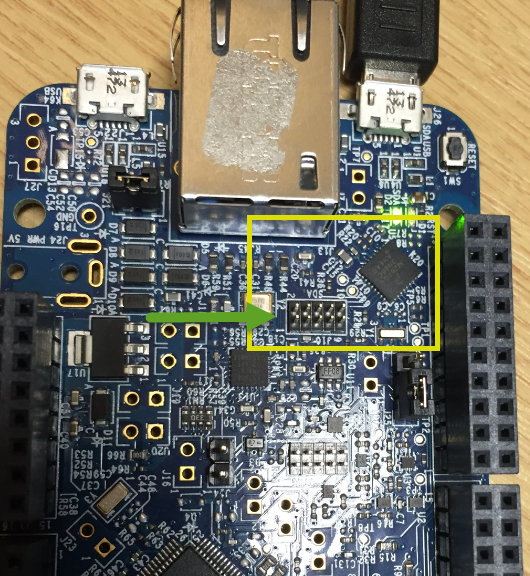
SWD for K20 on FRDM-K64F
Otherwise the OpenSDA on a FRDM or Tower board can be used. For this you
Flashing the Bootloader
If you don’t want to use an IDE, you can use the Segger J-Link Commander which is part of the Segger J-Link software package. It is part of Kinetis Design Studio too. Otherwise it is available from here.
- Launch the commander (jlink executable)
- Set the device: device MK20DX128xxx5
- Connect to the target if not already connected: connect
(use SWD and 4000 kHz) - Load the binary: loadbin k20dx128_bootloader_0x5000.bin, 0
- Reset the device: r
- Quit the commander: exit
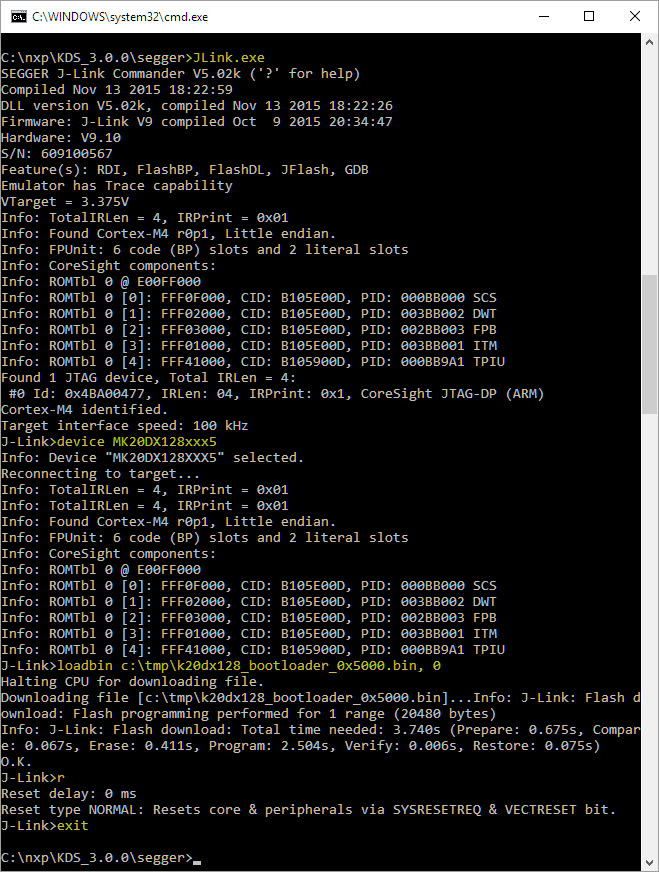
Example Segger Session
I can program the bootloader from Eclipse (e.g. Kinetis Design Studio too). Simply create a dummy project for the MK20DX128xxx5 device. In the debugger launch configuration specify the binary I want to use:
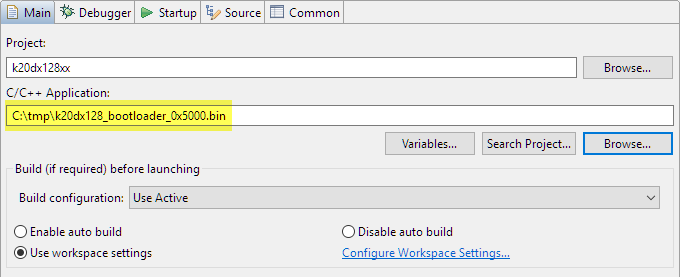
Bootloader Binary
Using FRDM Board to Program another board
It is possible to use another FRDM board to program another board. Depending on the board, a SWD header needs to be soldered on the board and jumpers set or traces cut. Below are a few articles outlining the various ways for different boards:
- FRDM-KL25Z: https://mcuoneclipse.com/2012/11/07/jtagswd-debugging-with-the-frdm-kl25z-board/
- FRDM-KL25Z: https://mcuoneclipse.com/2013/04/27/debug-external-processors-with-usbdm-and-freedom-board/
- FRDM-KL25Z: https://mcuoneclipse.com/2013/04/21/using-the-freedom-board-as-jtag-programmer/
- FRDM-KL43Z: https://mcuoneclipse.com/2015/08/19/using-the-freescale-freedom-frdm-kl43z-to-debug-other-boards/
- FRDM-K64F: https://mcuoneclipse.com/2015/09/08/using-frdm-k64f-board-to-debug-another-kinetis-board/
💡 Keep in mind that the Segger license agreement only allow to program an evaluation board (FRDM, TWR, etc), not a custom hardware. The P&E OpenSDA V1 debug firmware does *not* allow to program any off-board devices.
FRDM-K64F (top) programming the OpenSDA Bootloader (bottom)
Summary
Windows 10 can corrupt an OpenSDA V2.x bootloader. To recover the bootloader I need a programming device and the firmware file, then I can restore the bootloader. While I could use another FRDM board to recover it, it is much easier using a P&E Multilink or a Segger J-Link. Anyway I think for serious development I don’t want to depend on the OpenSDA interface only: to have a ‘real’ debug probe like in this case can safe many hours of work.
Happy Recovering 🙂
Links
- OpenSDA overview: https://mcuoneclipse.com/2012/09/20/opensda-on-the-freedom-kl25z-board/
- NXP OpenSDA: http://www.nxp.com/opensda
- P&E OpenSDA: http://www.pemicro.com/opensda/
- Seger OpenSDA: https://www.segger.com/opensda.html
- OpenSDA V2.2 beta firmware: https://developer.mbed.org/questions/68997/How-to-recover-FRDM-K22F/#answer10413
- Recovering FRDM-K64F Firmware: https://mcuoneclipse.com/2014/11/10/recovering-the-frdm-k64f-bootloader-or-cloning-the-program-of-a-microcontroller/
- Segger J-Link probes: https://www.segger.com/jlink-debug-probes.html
- P&E Multilink probes: http://www.pemicro.com/multilink/index.cfm

hackster.io released a video a while ago indicating there was a bug with windows 10 which can cause the boards to break when you use them, along with a patch:
Maybe it’s the same problem?
LikeLike
Thanks for providing the link to that video!
Yes, I think this is the same problem. The video seems to indicate that it is especially a problem if using the CMSIS-DAP debug application. It suggests to use the SEGGER J-Link debug app a workaround before connecting the board to Windows 10. That might reduce the risk, but I had boards affected which had the Segger J-Link debug app already on it before connecting to Windows 10.
LikeLike
A linux distribution based on red hat or debian is much better tahn windows.
LikeLike
I don’t think that it is true in such a general way. I have seen problems on Mac, Windows and Linux, in different variations. I don’t think any of the host OS is to blame. There is freedom of choice, and each choice does not fit everyone. The important thing is that there is a choice.
LikeLike
Hi all!
Had the same problems with FRDM KL25Z, when I put the board into bootloader mode under WIN10. The board remains undetected, the file LASTSTAT.TXT contains “Programming… ”
Managed to recover the board by connecting to Win7 and re-flashing BOOTUPDATEAPP_Pemicro_v111.SDA then MSD-DEBUG-FRDM-KL25Z_Pemicro_v118.SDA
The board is re-discovered by Windows as a new device and ready to use again
LikeLike
Hi Cristi,
I almost forgot that issue with Windows 8 (see https://mcuoneclipse.com/2013/10/12/frdm-board-bootloader-fails-with-windows-8-1-preview/) and that it applies to Windows 10 too :-(.
Yes, you still need a Windows 7 machine available to update the bootloader (see https://mcuoneclipse.com/2014/11/01/illustrated-step-by-step-instructions-updating-the-freescale-freedom-board-firmware/). That issue BTW is affecting both Mac OS X and Linux. So I guess it is always good to have a Windows 7 machine around to get the bootloader updated. It seems to me that the NXP repository and all the stock of the vendors out there still have that old bootloader on it. I had ordered a few FRDM-KL25Z boards recently for my next course, and they had all that original bootloader on it, so I had to use a Windows 7 machine to update the bootlader first. After that I have not seen any issues using th FRDM-KL25Z with Windows 8, Windows 10, Linux and Mac OS X.
LikeLike
Pingback: Illustrated Step-by-Step Instructions: Updating the Freescale Freedom Board Firmware | MCU on Eclipse
Pingback: Bricking and Recovering OpenSDA Boards in Windows 8 and 10 | MCU on Eclipse
Hello Erich, many thanks for all the information of your posts, it really helps me getting started with Kinetis. Asking here in the hope to get some advice where I should go from now because I’m totally lost at this point. Sorry about the length of this comment but to explain exactly the situation, real questions at the end:
1- I got 2 KL17 and 2 K22F fresh chips. Soldered KL17 in a breakout board with just the basic bypass cap, Vdda/Vssa/Vdd/Vss powered on. Using a well regulated power supply with overvoltage protection (3.3V).
2- One KL17 got FSEC “SECURE” on arrive in the first boot. I suspect i just damaged the chip because i had to rework the soldering, it was stressing. The second chip worked as expected, started uploading test applications (KDS), using bootloader as programmer (FlashTool), taking care FSEC and MEEN bits are on a “health” state. All of sudden, doing other tests, without uploading anything (I swear), after a reset caused by EMI (other harsh EMI emitter device I powered on the desk, not connected to the board in any manner), I got SECURE flag also for this second chip. I can contact the chip with bootloader, retrieve info but that’s, just secure also.
3- ROM bootloader on KL17 fails miserably on mass-erase. The only command that usually can’t receive ping back and when it works, returning “success” flag, no deal, still secure.
4- Reading all I can about mass-erase it’s really messed about dozens of problems among diverse programmers/debugger that works well otherwise but not when trying mass-erase. I understand diverse situations can affect this, pin muxing interefering with SWD, clock/reset issues etc. Anyway it always involves some kind of vodoo, even with boards/chips holding basic clock/pin setups. This security scheme on kinetis is horrible, bad. It should have at least simple manners of protecting the chip against this, like setting special condition (read only/protecting) and flashing bypass of the flash configuration field e.g.
Q: Getting P&E Micro or Segger is really expensive for me. I cant find it (i find just Segger/Jlink clone), only way is by importation and here on my country importation taxes are ridiculously highm also applied over shipment price. I’m considering USBDM device which I can find to buy locally. Is USBDM a nice option to try mass-erase and try getting my chip back?
Q: I’m afraid about wasting lots of money for a programmer that will not fix my issue so, I’m wondering about testing: picking one of my K22F, upload OpenSDA (by means of the preloaded flashloader), and use it to try the tools for debugging/mass-erase etc. You know if it’s possible? I mean, there are other hardware (besides headers/USB connectors), on actual FRDM boards needed to make it work as a debugger? Not asking how to do it but if it’s possible using just the K22 chip, headers, connectors to achieve a usual debugger, this way to avoid sacrificing the chip for something that will have no chances to work at the end.
Appreciate any clue. Again, thanks for all the blog’s material.
Regards
Rodrigo
LikeLike
Hi Rodrigo,
have a look at https://mcuoneclipse.com/2015/09/08/using-frdm-k64f-board-to-debug-another-kinetis-board/, same thing should apply for FRDM-K22F (I have not used that one for this, let me know if that does not work).
Are you doing that work for a commercial product, have a look at the J-Link EDU which is very affordable: https://www.segger.com/j-link-edu.html
I cannot guarantee that this will solve your problem, but it solved for me such kind of problems many times. Simply because the hardware/logic on that probe is better/faster than the one on the OpenSDA.
I’m not sure what you used for the KL17 programming, but the bootloader/flashprogramming won’t help you in all cases: they work under ‘normal’ circumstances. So the money invested in a good hardware probe is very well spent in my opinion.
I hope this helps,
Erich
LikeLike
Hi Erich,
I am using the J-Link EDU to try and de-brick my K66F. I’m closely following the steps you outlined, however when I go to load the .bin file using loadbin the command prompt returns a message saying it “failed to download RAMCode”.
Please get back to me whenever you can, and thanks for the info!
-Shawn
LikeLike
Hi Shawn,
I don’t have a K66F, but as you are dealing with the K20 that should not matter. To my knowledge the J-Link tries to download and execute a piece of code in RAM, and this fails. There could be many reasons for this, and here are things I would check:
– properly power the K20
– disconnect with jumpers the K20 from the K66 (there should be jumpers/traces on the board for this)
– make sure you are using the correct device settings for the J-Link
– check the reset pin to the K20
I hope this helps,
Erich
LikeLike
Hi Erich,
Thanks for the tip! I disconnected the K20 from the K66 and that solved the problem.
Thank you!
-Shawn
LikeLike
Pingback: Recovering and Updating the NXP OpenSDA Bootloader with P&E Multilink and MCUXpresso IDE | MCU on Eclipse
Pingback: Adding a Delay to the ARM DAPLink Bootloader | MCU on Eclipse
Erich,
Thanks for your attempts to explain this defect. It seems pretty tenacious, given it has hung around for at least 4 years.
I was a clueless Windows 10 user when I bought 2 Freedom K64F boards for a project because of the alleged simplicity in getting an MQTT client to run on them. Only after the first power up did I learn about the bricking problem.
After reading several recovery procedures on-line I selected one on the NXP forum:
– https://community.nxp.com/docs/DOC-330935
for my first attempt. I have a J-Link dongle, so I was able to download the 0244_k20dx_bl_0x5000.bin file and re-program my K20 bootloader. Thereafter the board would enumerate when I plugged it in, and show up in Explorer as:
– (F:) MAINTENANCE
This did not fix the problem, however.
I then discovered the ARM solution at:
– https://os.mbed.com/blog/entry/DAPLink-bootloader-update/
which additionally states I need to re-program my DAPLink interface firmware via drag & drop technique. I downloaded:
– 0253_k20dx_frdmk64f_0x5000.bin
and copied it to the board as instructed. Since then it shows up in Explorer as:
– (F:) DAPLINK
I thought I could then get on with life, but when I attempt to load the “Hello world” example I pulled out of the MCUXpresso SDK it aborts with the dialog box:
SWD Configuration
(x) 0 available SWD Devices detected
Connect a device and try again
Did I miss a step somewhere? Advance thanks for any light you can shed on this.
LikeLiked by 1 person
Hi Gary,
that it shows up as DAPLINK means that at least there is a CMSIS-DAP firmware running on it. I have to say that I lost faith in CMSIS-DAP at all: too many connection and debug issues. What I did for all my FRDM boards is to load and use either the SEGGER J-Link or P&E Multilink firmware on it. Both P&E and SEGGER support the FRDM boards with their firmware: they are faster, more reliable, have more features and are much, much better than the mbed/DAPLINK firmware. See for example https://mcuoneclipse.com/2014/04/27/segger-j-link-firmware-for-opensdav2/ how you can load it. I hope this helps.
LikeLike