
Many of the NXP OpenSDA boot loaders are vulnerable to Windows 8.x or Windows 10: write accesses of Windows can confuse the factory bootloader and make the debug firmware and bootloader useless. In this post I show how to recover the bootloader using MCUXpresso IDE and the P&E Universal Multilink.
Using P&E Multilink Universal to restore the OpenSDA Bootloader on NXP FRDM-K22F Board
Outline
In this post I show how to re-program the OpenSDA V2.x bootloader with the MCUXpresso IDE V10.0.2, using the P&E Universal Multilink. A JTAG/SWD probe has to be used, it is not possible to reflash and fix the OpenSDA bootloader on the Kinetis K20 without it.
As board I’m using the NXP FRDM-K22F board.
💡 Older OpenSDA v1.x (e.g. FRDM-KL25Z) cannot be updated as the bootloader on these boards use a closed bootloader which cannot be re-programmed.
Bootloader Firmware
The matching bootloader and firmware for your board can be found on http://www.nxp.com/opensda.
The FRDM-K64F board was the first one with an open bootloader (OpenSDA V2.0), and the debug firmware application starts at address 0x5000.
Later boards (as FRDM-K22F) are using OpenSDA V2.1 where the application starts at address 0x8000.
Both original bootloader expose the Windows 8.x/10 problem. What fixed for me the Windows 8/10 problem was using the OpenSDA 2.2 Daplink BOOTLOADER for K20DX.bin (Application Base address at 0x8000) on GitHub.
Converting the Bootloader
Because the P&E debugger loader cannot (yet?) load bin (binary) files, we have to convert the file into an S19/S-Record which is supported. There are multiple ways to do this, one is using the GNU binary utilities, see https://mcuoneclipse.com/2014/08/03/converting-s19-files-into-binary-files-with-gnu-objcopy/.
Below is an example command line (update for your file names):
arm-none-eabi-objcopy.exe --input-target=binary --output-target=srec DAPlink.bin DAPlink.s19
💡 In MCUXpresso IDE, the objcopy program is found in<IDE Installation Path>\ide\tools\bin
💡 I have uploaded the resulting .s19 file to GitHub: https://github.com/ErichStyger/mcuoneclipse/tree/master/OpenSDA/OpenSDA%20V2.2
Creating Project
To flash the bootloader, the easiest way is to create a dummy project (which CPU does not really matter) with the MCUXpresso IDE.
💡 The logical CPU choice for that project would be a 50 MHz K20DX128M5, but because NXP has not produced an SDK with all the files for it, we cannot use it. Instead create a project e.g. for any CPU for which you have an SDK, e.g. the FRDM-K22F itself. We will have to change the MCU in the debug configuration.
Debug Connection
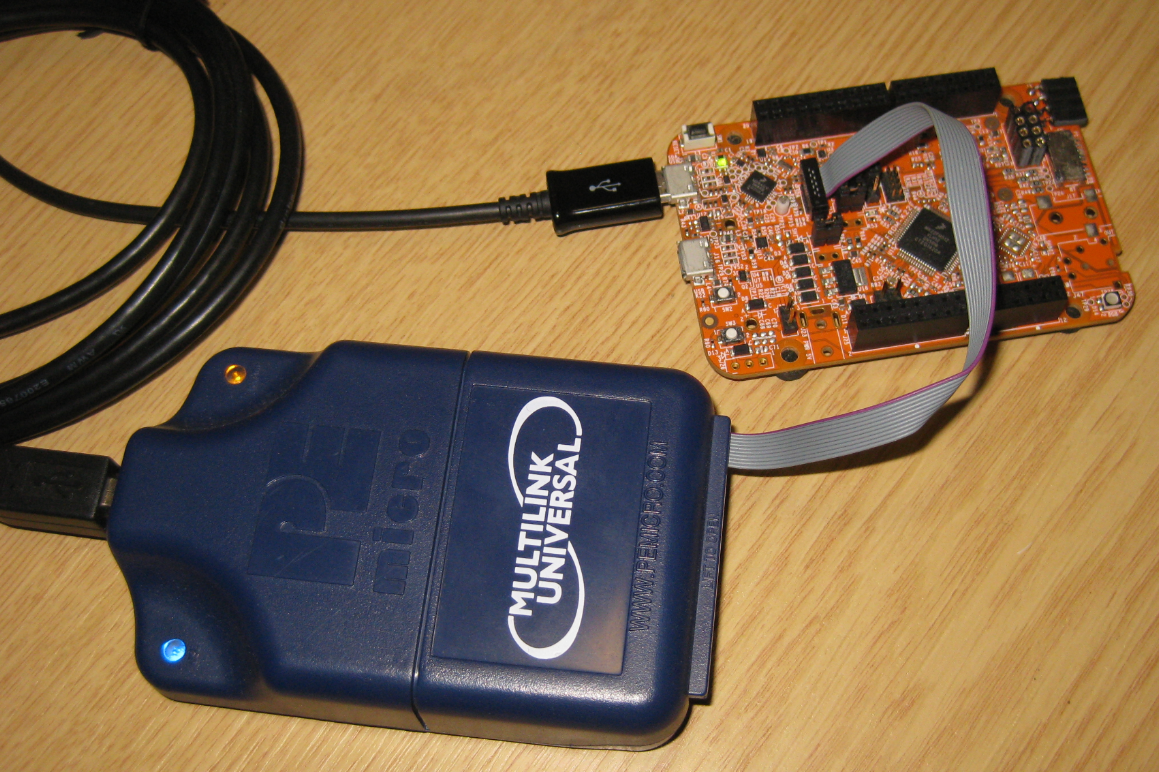
Connect the P&E Multilink Universal to the Debug connector of the K20 (OpenSDA). Check your board schematics and make sure the cable is properly oriented. Typically it is the SWD header close by the K20 MCU.
Using P&E Multilink Universal to restore the OpenSDA Bootloader on NXP FRDM-K22F Board
Launch Configuration
Then use the context menu on the project to create a new P&E debug connection:
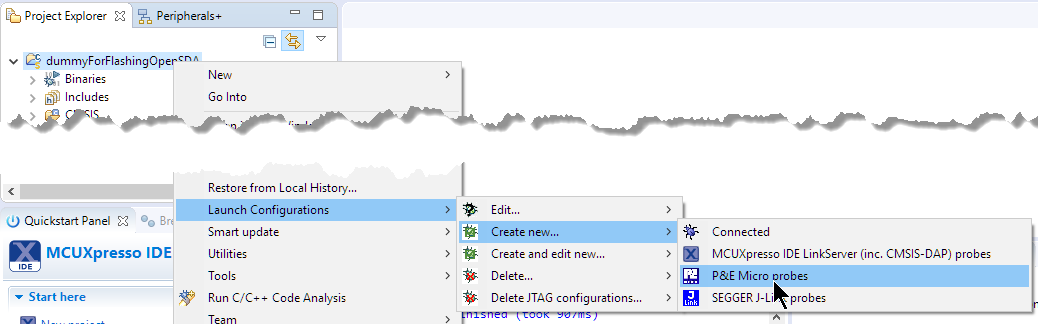
New P&E Probe Connection
Double-click on the created debug launch configuration to open it. Use the ‘Select Device’ button in the Debug tab of the P&E Debug connection to set the device to the K20DX128M5 which is used on the board for the OpenSDA circuit:
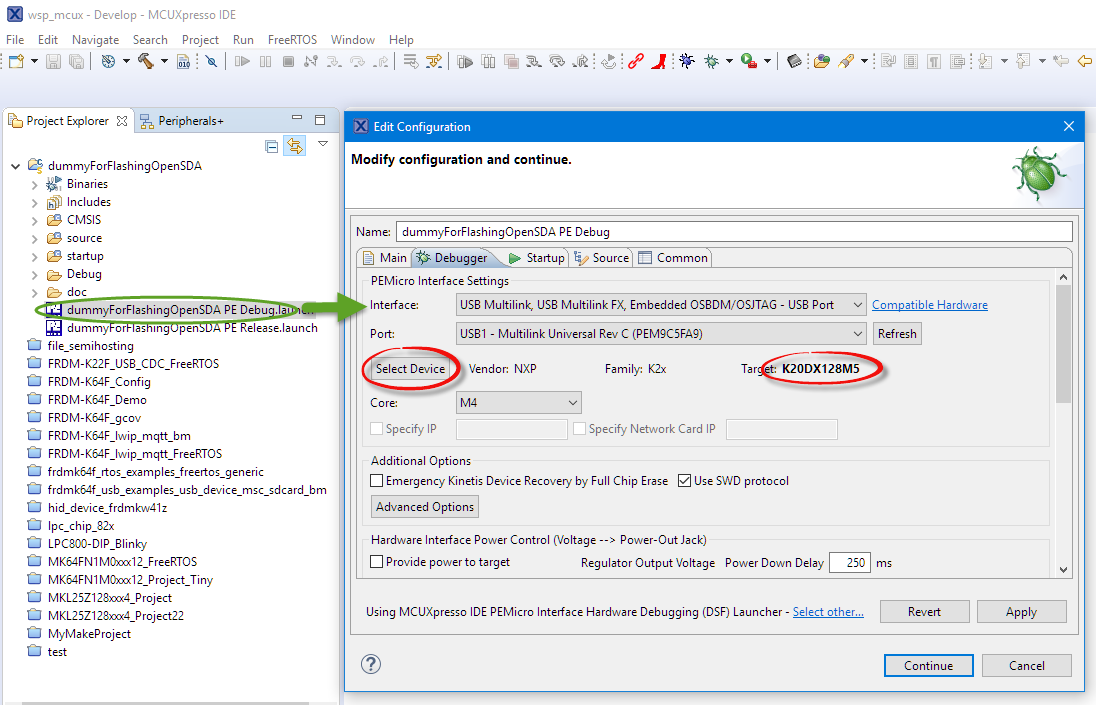
Selected K20DX128M5 Device
In the debug configuration, instead using the normal .axf, specify the .s19 file. In the example below, I have added that .s19 file to the root folder of the project.
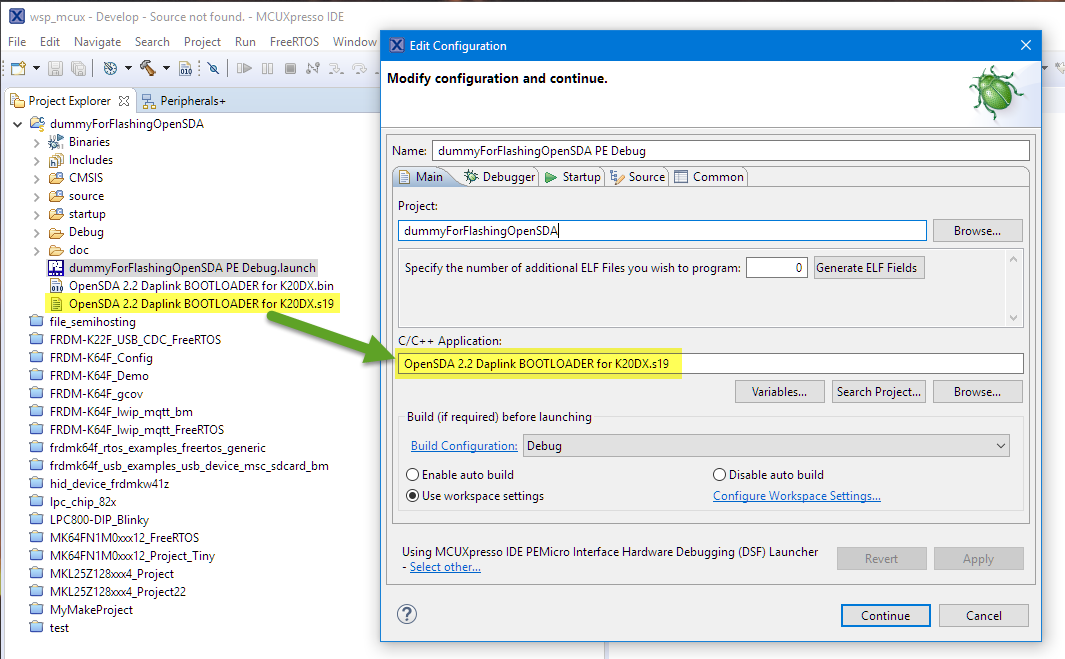
Specified S19 file
💡 I cannot use the ‘Search Project…’ or ‘Browse…’ buttons. Enter the file name directly. Make sure it matches the correct file and path.
Save and close that dialog.
Flashing the S19 file
To download the file to the K20DX128M5, use the ‘Debug as’ context menu on the launch configuration we have modified:

Debugging with Launch Configuration
That should download the S19 to the board. The debug session does not show anything useful (because we are debugging with a binary S19 file with no source or debug information), so we can end the debug session.

Terminating Debug Session
Checking Bootloader Version
Power-on the board with the reset button pressed. The device should enumerate as DAPLINKBOOT device, and the DETAILS.TXT on it should show this:
# DAPLink Firmware - see https://mbed.com/daplink
Unique ID: 0000000026294e45001a000e58a9001d3ee1000097969900
HIC ID: 97969900
Auto Reset: 0
Automation allowed: 1
Daplink Mode: Bootloader
Bootloader Version: 0241
Git SHA: be5afd34db2efe1e08d72fa23b3a68ab2625d9a3
Local Mods: 1
USB Interfaces: MSD
Bootloader CRC: 0x439c8da1
Interface CRC: 0x2e72072e
With the bootloader restored on the board, you can now load the debug firmware (e.g. from SEGGER or P&E, available from http://www.nxp.com/opensda.
Summary
It is easy to update the NXP OpenSDA V2.x bootloader with a DAPLink one. This fixes the Windows 8.x/10 problem which can make the bootloader and debug application useless. All what I need is the binary/s19 file plus a JTAG/SWD debug probe. As the P&E debug connection knows .elf/.axf and S19 files, I have to convert the binary (.bin) into an S19 file first, then specify it in the debug connection, using the K20DX128M5 as a device. With this, I can recover the OpenSDA bootloader.
💡 The above approach to use a dummy project and then point to the S-Record/S19 file of course can be used for a ‘normal’ project binary too.
Happy Recovering 🙂
Links
- Bricking and Recovering OpenSDA Boards in Windows 8 and 10: https://mcuoneclipse.com/2016/08/01/bricking_and_recovering_opensda_boards_in_windows_8_and_10/
- How to Recover the OpenSDA V2.x Bootloader: https://mcuoneclipse.com/2016/06/26/how-to-recover-the-opensda-v2-x-bootloader/
- P&E website: http://www.pemicro.com
- NXP OpenSDA website: http://www.nxp.com/opensda
- OpenSDA Overview: https://mcuoneclipse.com/2012/09/20/opensda-on-the-freedom-kl25z-board/
- OpenSDA V2.2 Bootloaders: https://github.com/ErichStyger/mcuoneclipse/tree/master/OpenSDA/OpenSDA%20V2.2

Hello Erich
Thanks for great guidance in the article.
I’m looking at a new board to control the power to a Beagle Bone Black and provide it with time on boot, and to use the MKL27Z256 to do it.
I started with a prototype on FRDM-KL27Z – which was new to me – and was tearing my hair out over trying to get the basics going. I wasn’t sure if it was the upgrade to MCUXpresso 10.2 and it didn’t work on KDS32 either.
Then I tried using MCUXpresso on Ubuntu 17.04 – and it turns out MCUXpresso is only being tested on Ubuntu 16.04 and there is some sort of ISB recognition issue for SDA /PE and – hey I guess its difficult for the MCUXpresso technology gurus to conceive other folks keep up with other technologies.
Then I read your article. Thankyou thankyou. Its so complex being in the maze of tool trenches – thankyou for providing some navigation on it.
However I didn’t have the SDA 2x5connector for the SDA FRDM-KL27Zt and reverted to using the JTAG for KL27Z64.
I got in 2 JTAG connectors and a FRDM-KL43Z – it is recommend for the later KL27Z256.
So I upgraded the FRDM-KL43Z OpenSDA on a linux system and now reads
Board Name is: FRDM-KL43Z48M
MicroBoot Kernel Version is: 1.06
Bootloader Version is: 1.12
Installed Application: PEMicro FRDM-KL43Z48M Mass Storage/Debug App
Application Version is: 1.18
The FRDM-KL43Z also has a new SPI FLASH connected to the SDA MK20 – something interesting there. Wish they’d also add it to the standard processor then could do some prototyping file systems.
I soldered on the new JTAG 2×5 to the SDA pins. However when I tried the PE multilink programming as per your suggestion it came up with
“Device is permanently secure (Mass Erase is disabled). Try to unsecure anyway. Yes /Quit”
A yes didn’t work.
So disconnected PE JTAG to SDA.
I thought what the heck lets see if it works on SDA (try the basics), built a FRDM-KL43Z project and tried using the magic Blue bug button and hey presto it connected and started debugging. Whew.
Well there is the story – hope the details help anybody else treading along the same path!
LikeLike
Hi Neil,
I had myself some issues with USB and Linux machines too with student machines: there seems to be so many variables and so many things can go wrong :-(.
You say “However I didn’t have the SDA 2x5connector for the SDA FRDM-KL27Zt” but the FRDM-KL27Z board I had *did* had the SWD header both for the K20 and the KL27Z?
Then “The FRDM-KL43Z also has a new SPI FLASH connected to the SDA MK20”: really? You mean the unpopulated SPI Flash chip on U6 (https://mcuoneclipse.files.wordpress.com/2015/10/sw11-populated-on-the-freescale-frdm-kl43z-board.png)?
That one exists on the first FRDM board, but was never used. It would allow to store some data on the K20, but I never saw it working.
About ““Device is permanently secure (Mass Erase is disabled). Try to unsecure anyway. Yes /Quit”: yes, this is expected. You cannot reprogram the K20 on the FRDM_KL48Z because that one is secured. You can do this on other boards like the FRDM-K64F which uses an unsecured OpenSDA firmware.
Erich
LikeLike
My FRDM-KL43Z board came with no JTAG 0.05″. Oh, I didn’t check the board only the schematics, the FRDM-JL43Z U6 is unpopulated
LikeLike
Pingback: Adding a Delay to the ARM DAPLink Bootloader | MCU on Eclipse
Hi Erich,
I followed your solution step-by-step for my FRDM-K64F board using Multilink-FX. At the end of downloading the S19, I got this error:
——————————————–
Error in final launch sequence
Failed to execute MI command:
symbol-file “C:\\Users\\Abi\\Documents\\MCUXpressoIDE_10.1.1_606\\workspace\\DummyForFlashing\\OpenSDA 2.2 Daplink BOOTLOADER for K20DX.s19”
Error message from debugger back end:
`C:\Users\Abi\Documents\MCUXpressoIDE_10.1.1_606\workspace\DummyForFlashing\OpenSDA 2.2 Daplink BOOTLOADER for K20DX.s19′: can’t read symbols: File format not recognized.
`C:\Users\Abi\Documents\MCUXpressoIDE_10.1.1_606\workspace\DummyForFlashing\OpenSDA 2.2 Daplink BOOTLOADER for K20DX.s19′: can’t read symbols: File format not recognized.
——————————————–
Any idea how this can be fixed?
Thanks,
Abi
LikeLike
Hi Abi,
the error message indicates that you try to download and debug an S19 (S-Record) file. As this file does not contain any debug information, you cannot use it that way. You need to specify the .elf file in your launch configuration, not the OpenSDA 2.2 Daplink BOOTLOADER for K20DX.s19.
Do you have a binary file (.bin)? If yes, you can convert it to an ELF file, see https://mcuoneclipse.com/2018/01/27/converting-a-raw-binary-file-into-an-elf-dwarf-file-for-loading-and-debugging/
I hope this helps,
Erich
LikeLike
Thank you Erich for your quick response.
I was able to fix this issue (without using a debug probe e.g. Mulyilink-FX) by following the instructions given here:
DAPLink bootloader update
https://os.mbed.com/blog/entry/DAPLink-bootloader-update/
LikeLike