
The Raspberry Pi Pico RP2040 is a very versatile microcontroller. It is not the least expensive or the most powerful microcontroller, but it is one which is available and has an excellent software and tool ecosystem.
This article shows how to use the Raspberry Pi Pico-W with BLE and optional WiFi, running with FreeRTOS.
Outline
Back in February 2023, the Raspberry Pi Foundation has released the SDK V1.5 for the Pico, which now includes support for Bluetooth (both BLE and Bluetooth Classic) for the Pico-W board. The SDK V1.4 had only WiFi supported for the Infineon CYW43439. As the CYW43439 can do both WiFi and Bluetooth, we had to wait or the SDK 1.5.
The SDK has BlueKitchen’s BTstack integrated, optimized for small and resource-constraint microcontroller systems. BTstack runs both bare-metal or with an RTOS like FreeRTOS.

For a University research project I need to transmit data from a sensor to another device, in a wireless way. Communication shall be as easy as possible. As communication way, the BLE way has been selected. So why not using to Raspberry Pi Pico-W to transmit the data?
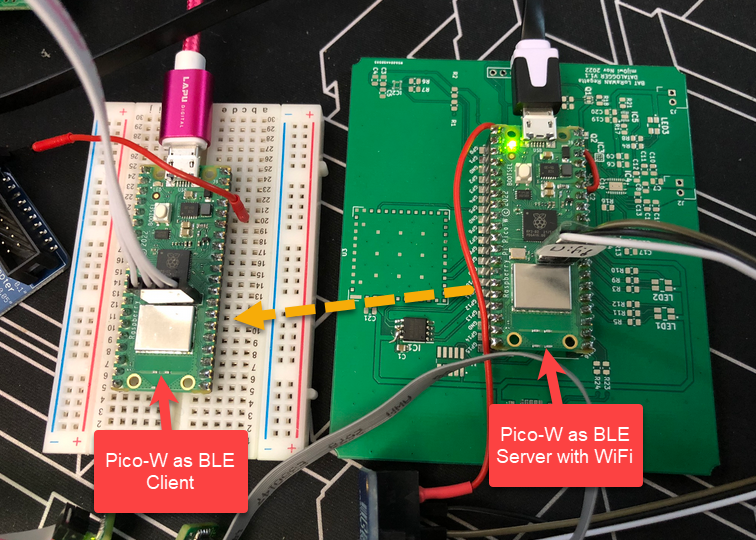
There are some BLE examples in the 1.5 SDK, including a ‘Standalone’ one with a BLE client and BLE server. That was a good starting point, but I wanted to have it working with FreeRTOS plus WiFi (at least optionally). I managed to get it work on this weekend, so I decided to document and publish the project as an example.
The project uses CMake with Eclipse. Data is transmitted from the BLE ‘Server’ to a ‘BLE’ client. Both client and server run with FreeRTOS, and server and client can optionally use WiFi. For the sensor data in this example, the temperature value of the internal RP2040 sensor is transmitted.
The project discussed in this article is available on GitHub.
Project
The project is a CMake project in Eclipse, using make files:

It use the Raspberry Pi Pico SDK together with the McuLib.
The main part is inside the ‘src’ folder:

- app_platform: device initialization
- application: main application logic
- ble_client: BLE client implementation, receiving the sensor data
- ble_server: BLE server implementation, sending the sensor data
- btstack_config: BLE stack configuration for client and server implementation
- IncludeMcuLibConfig: McuLib configuration
- Shell: command line interface (SEGGER RTT and USB CDC)
There are some files which are only used if WiFi support is enabled:
- dns_resolver: resolves IP addresses to names
- lwipopts: lwIP configuration file
- MinIniKeys: used to store WiFi credentials in FLASH
- ntp_client: NTP implementation to get current data and time
- PicoWifi: WiFi connection and utilities
Application Configuration
The application can be configured using the settings in app_platform.h:

The most important ones are:
- PL_CONFIG_STANDALONE_BLE_CLIENT: if server or client
- PL_CONFIG_USE_WIFI: if WiFi is enabled or not
- PL_CONFIG_USE_BLE: if BLE is enabled or not
CMakeLists.txt Files
The ‘main CMake file is pretty standard for a Pico-W:
cmake_minimum_required(VERSION 3.13)

# initialize the SDK based on PICO_SDK_PATH
# note: this must happen before project()
include(pico_sdk_import.cmake)

project(pico_W_BLE C CXX ASM) # sets ${CMAKE_PROJECT_NAME}
set(CMAKE_C_STANDARD 11)
set(CMAKE_CXX_STANDARD 17)

set(PICO_BOARD pico_w)  # needed for Pico-W, otherwise #include "pico/cyw43_arch.h" won't be found

# [Platfrom specific command] Initialize the Raspberry Pi Pico SDK
pico_sdk_init()

set(PROJECT_ROOT_DIR "${CMAKE_CURRENT_SOURCE_DIR}")
add_compile_options(-include "${PROJECT_ROOT_DIR}/src/IncludeMcuLibConfig.h")

add_executable(${CMAKE_PROJECT_NAME})

# enable USB CDC and disable UART:
pico_enable_stdio_usb(${CMAKE_PROJECT_NAME} 1)
pico_enable_stdio_uart(${CMAKE_PROJECT_NAME} 0)

# add component directories to the list
add_subdirectory(./McuLib)
add_subdirectory(./src)

# generate extra files (map/bin/hex/uf2)
pico_add_extra_outputs(${CMAKE_PROJECT_NAME})

target_link_libraries(
  ${CMAKE_PROJECT_NAME}
  # might have circular library dependencies, see https://stackoverflow.com/questions/45135/why-does-the-order-in-which-libraries-are-linked-sometimes-cause-errors-in-gcc
  SrcLib
  McuLib
  SrcLib  # again because of FreeRTOShooks.c
  pico_stdlib
)
The CMakeLists.txt in the ‘src’ folder is special and integrates both the BLE stack and the lwIP stack:
# file: Collect all files that need to be compiled.
file(GLOB FILES
  main.c
  app_platform.c
  application.c
  Shell.c
  FreeRTOShooks.c
  ble_client.c
  ble_server.c
  PicoWiFi.c
  ntp_client.c
  dns_resolver.c
)

# add_library: With this declaration, you express the intent to build a library.
# The first argument is the name of the library,
# the second argument are the files that will be compiled to create your library.
add_library(SrcLib ${FILES})

# need to add custom compile flags
target_compile_definitions(SrcLib PRIVATE
  CYW43_ENABLE_BLUETOOTH=1  # otherwise cyw43_arch_init() will not initialize BLE
)

# target_link_libraries: If you link with other libraries, list them here
target_link_libraries(
  SrcLib                # this library
  McuLib                # we need the McuLib
  pico_stdlib           # pico standard library
  hardware_adc          # internal temperature and ADC
  pico_btstack_ble      # BLE stack
  pico_btstack_cyw43    # BLE stack with CYW43
  pico_cyw43_arch_lwip_sys_freertos  # full lwIP stack including blocking sockets, with NO_SYS=0
)

# target_include_directories: Libraries need to publish their header files
# so that you can import them in source code. This statement expresses where to find the files
# - typically in an include directory of your projects.
target_include_directories(SrcLib PUBLIC .)

pico_btstack_make_gatt_header(SrcLib PRIVATE "${CMAKE_CURRENT_LIST_DIR}/temp_sensor.gatt")
The special entries are:
- CYW43_ENABLE_BLUETOOTH=1: this is required to have the CYW43 integration with BLE enabled
- pico_btstack_ble: this adds the BLE stack (only BLE, no classic Bluetooth)
- pico_btstack_cyw43: this adds the integration of the stack with the CYW43
- pico_cyw43_arch_lwip_sys_freertos: this adds the lwIP stack with FreeRTOS support and blocking sockets.
A special CMake function is used to run the comile_gatt too. This creates a GATT from the BTstack GATT file:
pico_btstack_make_gatt_header(SrcLib PRIVATE "${CMAKE_CURRENT_LIST_DIR}/temp_sensor.gatt")
The file is generated in the src folder as a GATT file for a temperature sensor.
BLE Client Implementation
The client implementation is in ble_client.c With WiFi enabled, there is already a WiFi task. Otherwise a task for the client gets created. That BLE task does the CYW43 initialization:
#if !PL_CONFIG_USE_WIFI
static void clientTask(void *pv) {
  /* initialize CYW43 driver architecture (will enable BT if/because CYW43_ENABLE_BLUETOOTH == 1) */
  if (cyw43_arch_init()) {
    McuLog_fatal("failed to initialize cyw43_arch");
    for(;;){}
  }
  BleClient_SetupBLE();
  for(;;) {
    btstack_run_loop_execute(); /* does not return */
  }
}
#endif

void BleClient_Init(void) {
#if !PL_CONFIG_USE_WIFI /* if using WiFi, will do the BLE stuff from the WiFi task */
  if (xTaskCreate(
      clientTask,  /* pointer to the task */
      "BLEclient", /* task name for kernel awareness debugging */
      1200/sizeof(StackType_t), /* task stack size */
      (void*)NULL, /* optional task startup argument */
      tskIDLE_PRIORITY+2,  /* initial priority */
      (TaskHandle_t*)NULL /* optional task handle to create */
    ) != pdPASS)
  {
    McuLog_fatal("failed creating task");
    for(;;){} /* error! probably out of memory */
  }
#endif
}
The BLE client setup is a below:
void BleClient_SetupBLE(void) {
  l2cap_init(); /* Set up L2CAP and register L2CAP with HCI layer */
  sm_init(); /* setup security manager */
  sm_set_io_capabilities(IO_CAPABILITY_NO_INPUT_NO_OUTPUT); /* set security manager that we want to connect automatically */
  gatt_client_init(); /* initialize client */

  hci_event_callback_registration.callback = &hci_event_handler; /* configure callback structure */
  hci_add_event_handler(&hci_event_callback_registration); /* register callback */

  /* setup timer */
#if PL_CONFIG_USE_WIFI /* use cyw43/lwip timer */
  async_context_add_at_time_worker_in_ms(cyw43_arch_async_context(), &heartbeat_worker, LED_SLOW_FLASH_DELAY_MS);
#else /* use BTStack timer */
  heartbeat.process = &heartbeat_handler;
  btstack_run_loop_set_timer(&heartbeat, LED_SLOW_FLASH_DELAY_MS);
  btstack_run_loop_add_timer(&heartbeat);
#endif
  hci_power_control(HCI_POWER_ON); /* turn it on */
}
Depending on if only BLE or BLE+WiFi is running, different timer callbacks have to be used to flash the LED and to restart the timer:
#if PL_CONFIG_USE_WIFI
  static void heartbeat_handler(async_context_t *context, async_at_time_worker_t *worker);
  static async_at_time_worker_t heartbeat_worker = { .do_work = heartbeat_handler };

  static void heartbeat_handler(async_context_t *context, async_at_time_worker_t *worker) {
    bool useShortDelay;

    useShortDelay = callbackToggleLED();
    /* restart timer */
    async_context_add_at_time_worker_in_ms(context, &heartbeat_worker, useShortDelay?LED_QUICK_FLASH_DELAY_MS:LED_SLOW_FLASH_DELAY_MS);
  }
#else
  static btstack_timer_source_t heartbeat;

  static void heartbeat_handler(struct btstack_timer_source *ts) {
    bool useShortDelay;

    useShortDelay = callbackToggleLED();
    /* restart timer */
    btstack_run_loop_set_timer(ts, useShortDelay?LED_QUICK_FLASH_DELAY_MS:LED_SLOW_FLASH_DELAY_MS);
    btstack_run_loop_add_timer(ts);
  }
#endif
The client then waits for an advertising packet from the server and connects to it:
00:00:01,17 INFO  ble_client.c:178: BTstack up and running on 43:43:A2:12:1F:AC.
00:00:01,17 INFO  ble_client.c:43: Start scanning!
00:00:01,64 INFO  ble_client.c:196: Connecting to device with addr 28:CD:C1:08:13:5D.
00:00:02,69 INFO  ble_client.c:207: Search for env sensing service.
00:00:03,28 INFO  ble_client.c:86: Storing service
00:00:03,35 INFO  ble_client.c:98: Search for env sensing characteristic.
00:00:03,47 INFO  ble_client.c:108: Storing characteristic
00:00:03,47 INFO  ble_client.c:122: Enable notify on characteristic.
00:00:03,60 INFO  ble_client.c:134: Notifications enabled, ATT status 0x00
After that, it receives data items from the server every 10 seconds:
00:00:03,60 INFO  ble_client.c:147: Indication value len 2
00:00:03,60 INFO  ble_client.c:150: read temp 22.36 degc
00:00:08,13 INFO  ble_client.c:147: Indication value len 2
00:00:08,13 INFO  ble_client.c:150: read temp 22.38 degc
BLE Server Implementation
The server implementation in ble_server.c is very similar to the client one. Except that it configures the data source (temperature sensor):
#define HEARTBEAT_PERIOD_MS 1000

static btstack_packet_callback_registration_t hci_event_callback_registration;

static void callbackSendData(void) { /* callback is called every second */
  static uint32_t counter = 0;
  counter++;
  if ((counter%10) == 0) { /* Update the temperature every 10s */
    poll_temperature();
    if (le_notification_enabled) {
      att_server_request_can_send_now_event(con_handle);
    }
  }
}

static void callbackToggleLED(void) { /* called every second */
  /* Invert the led */
  static int led_on = true;
  led_on = !led_on;
  cyw43_arch_gpio_put(CYW43_WL_GPIO_LED_PIN, led_on);
}

#if PL_CONFIG_USE_WIFI
  static void heartbeat_handler(async_context_t *context, async_at_time_worker_t *worker);
  static async_at_time_worker_t heartbeat_worker = { .do_work = heartbeat_handler };

  static void heartbeat_handler(async_context_t *context, async_at_time_worker_t *worker) {
    callbackSendData();
    callbackToggleLED();
    /* restart timer */
    async_context_add_at_time_worker_in_ms(context, &heartbeat_worker, HEARTBEAT_PERIOD_MS);
  }
#else
  static btstack_timer_source_t heartbeat;

  static void heartbeat_handler(struct btstack_timer_source *ts) {
    callbackSendData();
    callbackToggleLED();
    /* restart timer */
    btstack_run_loop_set_timer(ts, HEARTBEAT_PERIOD_MS);
    btstack_run_loop_add_timer(ts);
  }
#endif

void BleServer_SetupBLE(void) {
  l2cap_init(); /* Set up L2CAP and register L2CAP with HCI layer */
  sm_init(); /* setup security manager */
  att_server_init(profile_data, att_read_callback, att_write_callback); /* setup attribute callbacks */

  /* inform about BTstack state */
  hci_event_callback_registration.callback = &packet_handler; /* setup callback for events */
  hci_add_event_handler(&hci_event_callback_registration); /* register callback handler */

  /* register for ATT event */
  att_server_register_packet_handler(packet_handler); /* register packet handler */

  /* setup timer */
#if PL_CONFIG_USE_WIFI /* use cyw43 timer */
  async_context_add_at_time_worker_in_ms(cyw43_arch_async_context(), &heartbeat_worker, HEARTBEAT_PERIOD_MS);
#else /* use BTStack timer */
  heartbeat.process = &heartbeat_handler;
  btstack_run_loop_set_timer(&heartbeat, HEARTBEAT_PERIOD_MS);
  btstack_run_loop_add_timer(&heartbeat);
#endif
  hci_power_control(HCI_POWER_ON); /* turn BLE on */
}

static void SetupTemperatureSensor(void) {
  /* Initialize adc for the temperature sensor */
  adc_init();
  adc_select_input(ADC_CHANNEL_TEMPSENSOR);
  adc_set_temp_sensor_enabled(true);
}

#if !PL_CONFIG_USE_WIFI /* if using WiFi, will do the BLE stuff from the WiFi task */
static void serverTask(void *pv) {
  /* initialize CYW43 driver architecture (will enable BT if/because CYW43_ENABLE_BLUETOOTH == 1) */
  if (cyw43_arch_init()) {
    McuLog_fatal("failed to initialize cyw43_arch");
    for(;;) {}
  }
  BleServer_SetupBLE();
  for(;;) {
    btstack_run_loop_execute(); /* does not return */
  }
}
#endif /* !PL_CONFIG_USE_WIFI */

void BleServer_Init(void) {
  SetupTemperatureSensor();
#if !PL_CONFIG_USE_WIFI /* if using WiFi, will do the BLE stuff from the WiFi task */
  if (xTaskCreate(
      serverTask,  /* pointer to the task */
      "BLEserver", /* task name for kernel awareness debugging */
      1200/sizeof(StackType_t), /* task stack size */
      (void*)NULL, /* optional task startup argument */
      tskIDLE_PRIORITY+2,  /* initial priority */
      (TaskHandle_t*)NULL /* optional task handle to create */
    ) != pdPASS)
  {
    McuLog_fatal("failed creating task");
    for(;;){} /* error! probably out of memory */
  }
#endif
}
Data collected and transmitted is then shown in the console:
18:01:58,59 INFO  ble_server.c:51: ADC: temperature 22.36 degc
18:01:58,59 INFO  ble_server.c:86: Can send data now
18:02:09,05 INFO  ble_server.c:51: ADC: temperature 22.36 degc
18:02:09,05 INFO  ble_server.c:86: Can send data now
WiFi Task
The WiFi support with PicoWiFi.c is optional: the example can run without WiFi too. It uses MinINI to read the WiFi credentials from FLASH:
static void WiFiTask(void *pv) {
  int res;
  bool ledIsOn = false;

#if CONFIG_USE_EEE
  if (networkMode == WIFI_PASSWORD_METHOD_WPA2) {
    McuLog_info("using WPA2");
  }
#endif

  McuLog_info("started WiFi task");
  /* initialize CYW43 architecture
      - will enable BT if CYW43_ENABLE_BLUETOOTH == 1
      - will enable lwIP if CYW43_LWIP == 1
   */
  if (cyw43_arch_init_with_country(CYW43_COUNTRY_SWITZERLAND)!=0) {
    McuLog_error("failed setting country code");
    for(;;) {}
  }
#if PL_CONFIG_USE_BLE && PL_CONFIG_STANDALONE_BLE_SERVER
  BleServer_SetupBLE();
#elif PL_CONFIG_USE_BLE && PL_CONFIG_STANDALONE_BLE_CLIENT
  BleClient_SetupBLE();
#endif
  wifi.isInitialized = true;
#if PL_CONFIG_USE_WIFI
  McuLog_info("enabling STA mode");
  cyw43_arch_enable_sta_mode();
#if PL_CONFIG_USE_MINI
  McuMinINI_ini_gets(NVMC_MININI_SECTION_WIFI, NVMC_MININI_KEY_WIFI_HOSTNAME, WIFI_DEFAULT_HOSTNAME, wifi.hostname, sizeof(wifi.hostname), NVMC_MININI_FILE_NAME);
  McuMinINI_ini_gets(NVMC_MININI_SECTION_WIFI, NVMC_MININI_KEY_WIFI_SSID,     WIFI_DEFAULT_SSID,     wifi.ssid, sizeof(wifi.ssid), NVMC_MININI_FILE_NAME);
  McuMinINI_ini_gets(NVMC_MININI_SECTION_WIFI, NVMC_MININI_KEY_WIFI_PASS,     WIFI_DEFAULT_PASS,     wifi.pass, sizeof(wifi.pass), NVMC_MININI_FILE_NAME);
#else
  McuUtility_strcpy(wifi.hostname, sizeof(wifi.hostname), WIFI_DEFAULT_HOSTNAME);
  McuUtility_strcpy(wifi.ssid, sizeof(wifi.ssid), WIFI_DEFAULT_SSID);
  McuUtility_strcpy(wifi.pass, sizeof(wifi.pass), WIFI_DEFAULT_PASS);
#endif
  McuLog_info("setting hostname: %s", wifi.hostname);
  netif_set_hostname(&cyw43_state.netif[0], wifi.hostname);

  vTaskDelay(pdMS_TO_TICKS(1000)); /* give network tasks time to start up */

  McuLog_info("connecting to SSID '%s'...", wifi.ssid);
  res = cyw43_arch_wifi_connect_timeout_ms(wifi.ssid, wifi.pass, CYW43_AUTH_WPA2_AES_PSK, 20000);
  if (res!=0) {
    for(;;) {
      McuLog_error("connection failed after timeout! code %d", res);
      vTaskDelay(pdMS_TO_TICKS(30000));
    }
  } else {
    McuLog_info("success!");
    wifi.isConnected = true;
  #if PL_CONFIG_USE_NTP_CLIENT
    NtpClient_TaskResume();
  #endif
  #if PL_CONFIG_USE_MQTT_CLIENT
    MqttClient_Connect();
  #endif
  }
  for(;;) {
    cyw43_arch_gpio_put(CYW43_WL_GPIO_LED_PIN, ledIsOn);
    ledIsOn = !ledIsOn;
    if (wifi.isConnected) {
      vTaskDelay(pdMS_TO_TICKS(1000));
    } else {
      vTaskDelay(pdMS_TO_TICKS(50));
    }
  }
#endif
}
Depending on the BLE (client or server) it calls the BLE setup:
#if PL_CONFIG_USE_BLE && PL_CONFIG_STANDALONE_BLE_SERVER
  BleServer_SetupBLE();
#elif PL_CONFIG_USE_BLE && PL_CONFIG_STANDALONE_BLE_CLIENT
  BleClient_SetupBLE();
#endif
With WiFi and NTP enabled, it gets date and time information from the internet. Below is such a startup sequence of the server with WiFi and NTP client running:
00:00:00,00 INFO  PicoWiFi.c:103: started WiFi task
00:00:00,92 INFO  PicoWiFi.c:119: enabling STA mode
00:00:01,14 INFO  PicoWiFi.c:130: setting hostname: pico
00:00:01,16 INFO  ble_server.c:67: BTstack up and running on 28:CD:C1:08:13:5D.
00:00:01,17 INFO  ble_server.c:51: ADC: temperature 20.96 degc
00:00:02,14 INFO  PicoWiFi.c:135: connecting to SSID 'mySSID'...
00:00:02,86 INFO  ble_server.c:112: Attribute write callback
00:00:02,87 INFO  ble_server.c:86: Can send data now
00:00:05,09 INFO  PicoWiFi.c:143: success!
00:00:05,12 INFO  dns_resolver.c:20: 'pool.ntp.org' resolved to 152.67.73.149
00:00:05,14 INFO  ntp_client.c:42: got ntp response: 19/03/2023 17:41:30
17:41:35,48 INFO  ble_server.c:51: ADC: temperature 20.96 degc
17:41:35,48 INFO  ble_server.c:86: Can send data now
Summary
With this I have a working BLE client-server communication between two Raspberry Pi Pico-W boards, both running with FreeRTOS, and both with optional WiFi support. This makes it a very versatile and cost effective solution for any kind of short range communication devices.
You can find the current code and project on GitHub, together with other Raspberry Pi Pico based projects.
Happy Bluetoothing 🙂
Summary
Links
- Raspberry Pi Pico SDK 1.5: https://github.com/raspberrypi/pico-sdk/releases/tag/1.5.0
- BlueKitchen’s stack: https://github.com/bluekitchen/btstack
- Project on GitHub: https://github.com/ErichStyger/mcuoneclipse/tree/master/Examples/RaspberryPiPico/pico_W_BLE
- Using MQTT with the Raspberry Pi Pico W and HomeAssistant for an Optimized Solar Energy Electrical Vehicle Charger
- Add extra Storage to the Raspberry Pi Pico with W25Q128 and LittleFS
- Picoprobe: Using the Raspberry Pi Pico as Debug Probe
- Getting Started: Raspberry Pi Pico RP2040 with Eclipse and J-Link

Wow this is very interesting!
Since I am new to microcontrollers and following the Pico official documentation, I am set up in VS Code and using a Pico debug probe. Am I able to use your code as-is?
LikeLike
Hi Jacob,
yes.
LikeLike
Hello Erich,
Thank you very much for this very comprehensive and documented project. I’m very interested in reproducing it for an IoT project, where the client would have a screen.
Anyways, I tried over the past couple of days understanding the way the McuLib works and getting it to work as it’s the first time I’m following one of your projects !
Unfortunately, even with the latest version pulled from GitHub, and following the instructions specific for the raspberry pico, I run into problems. I made sure to specify the board type,
set(PICO_BOARD pico_w)ANDpico_cyw43_arch_lwip_sys_freertosin their respective CMakeLists.I then proceded to several tests with different configurations, only BLE, only WiFi and both. Either way I didn’t even had a blinking LED. I then proceeded to use a debug probe to see what was going on.
I discovered that everything goes as planned, the task gets created without an issue the Startschedueler command runs without problem.
Then, in timers.c (from McuLib/FreeRTOS),
static portTASK_FUNCTION( prvTimerTask, pvParameters ) does a few runs (where nothing is happening) in the
for( ; configCONTROL_INFINITE_LOOP(); )
But then, with a callstack including the wifi task, bluetooth stack and others, I get into a breakpoint from runtime.c
void __attribute__((noreturn)) __attribute__((weak)) _exit(__unused int status) {
#if PICO_ENTER_USB_BOOT_ON_EXIT
reset_usb_boot(0,0);
#else
while (1) {
__breakpoint();
}
#endif
}
I have to admit I have no clue what I’m doing wrong, even if I feel I missed something.
If you have any hint/clue why this situation is happening, please let me know.
For information, I’m using VSCode.
I also had a question, that might be related to my error : why are there a custom files in the ARM_CM4F for the raspberry pico ? It’s a M0 and the GCC Portable ports.c and portmacros.c are available online on the pico sdk github.
Thanks again for this code and article, and I look forward to reading your reply !
LikeLike
I’ll have to check and re-run that project.
As for the ARM_CM4F (I think you refer to the FreeRTOS port files?): this is shared between M4, M0 and M33. FreeRTOS originally has them separate, but because the ports are 99% the same, I have them combined.
LikeLike
Yes I was speaking about the FreeRTOS port files. As I thought it might have something to do with the error I mentionned it !
I also forgot to mention that I tried to increase the heap size and the size allocated to the task, but that didn’t seem like the reason of the breakpoint, as I would have had an error when creating the task.
LikeLike
What kind of error did you get with creating the task? Most likely it is about lack of heap size, but you have to check (e.g. step into the task creation routine with the debugger and check what is going on.
LikeLike
I don’t have any error on creating the task.
After some more research, I think my problems comes from the BTStack, which seems weird ?
Here’s the stack leading to the breakpoint :
_exit runtime.c:187
__assert_func runtime.c:271
default_enter_safe_zone_timeout_ms flash.c:183
flash_safe_execute flash.c:78
pico_flash_bank_write btstack_flash_bank.c:163
btstack_tlv_flash_bank_write btstack_tlv_flash_bank.c:127
btstack_tlv_flash_bank_write_header btstack_tlv_flash_bank.c:220
btstack_tlv_flash_bank_init_instance btstack_tlv_flash_bank.c:537
setup_tlv btstack_cyw43.c:32
btstack_cyw43_init btstack_cyw43.c:65
cyw43_arch_init cyw43_arch_freertos.c:53
cyw43_arch_init_with_country cyw43_arch.c:162
WiFiTask wifi.c:126
In the pico_flash_bank_write an undefined error (but not a timeout) is triggered, leading to a flash_safe_execute, which will trigger an Assert, leading to __exit function and the infinite breakpoint.
Do you think the configuration changed in the BT Stack, because I didn’t touch anything in these file at the moment of testing, I only set CONFIG_USE_BLE to 1.
LikeLike
That’s interesting, never saw that message. Indeed the BT Stack seems to use FLASH memory, and somehow fails. Currently I have no idea what could have caused this 😦
LikeLike
After some more digging, I think the main problem comes from FreeRTOS Files. It might be because this project is a year old, but the FreeRTOS folder was updated for your recent projects. Because of this, the FreeRTOS Kernel is V11.0, but the FreeRTOS Config and all other project related files were written for FreeRTOS V10.X.
After some debugging and adding configuration related to FreeRTOS V11.0, I didn’t manage to make the project work again, having several compiling errors each time.
Or it might also be BTStacks updates too.
LikeLike