The NMI is a special interrupt on ARM Cortex-M architecture: as the name indicates, it cannot be ‘masked’ by the usual ‘disable interrupts’ flags (PRIMASK, BASEPRI), similar to the Reset signal.

cortex-m-vector-table (Source: adapted from arm.com)
Dealing with the reset signal is kind of obvious, and most designs and boards have it routed to a reset button or similar. The NMI is less obvious if you don’t pay attention to it: most ARM-Cortex implementations and boards have the NMI signal routed to a pin and are ‘hiding’ it in the schematics behind a normal GPIO pin or port: if you don’t pay attention to the NMI functionality, the board might not work as intended.
Outline
This article is about dealing with the NMI pin. If not handled properly, it might cause issues especially with custom board designs. The article describes how disable the NMI pin functions if the NMI is not needed or not used.
💡 Another possible ‘gotcha’ is the EzPort which is present on some devices. See “Disabling EzPort on NXP Kinetis to Solve Power-On Issues“.
You need to have the NMI pin enabled again, have a read at Mark Butchers explanation in the NXP forum.
NMI Pin
The problem exists for example on the tinyK22 boards which are used at the Lucerne University of Applied Sciences and Arts. On the Kinetis K22 the NMI function is behind the PTA4 pin:

NMI Pin on tinyK22
Similar e.g. on the NXP FRDM-K22F board:

PTA4 and NMI on FRDM-K22F (Source: adapted from arm.com)
By default and in many examples the NMI functionality is enabled out of reset: which means if there is ‘something’ on that pin pulling that signal low (NMI is low active), the processor will constantly fire the NMI interrupt and won’t startup up. This can be really nasty if there is a glitch or transient signals on that pin. Even worse if it happens in the field.
This can be easily demonstrated with the FRDM-K22F board: pull the PTA4 (NMI) pin to ground, and the word won’t start any more.

NMI Test Setup
Because the board constantly goes into NMI, it is very likely that the SWD debug connection won’t be able to gain control over the board:
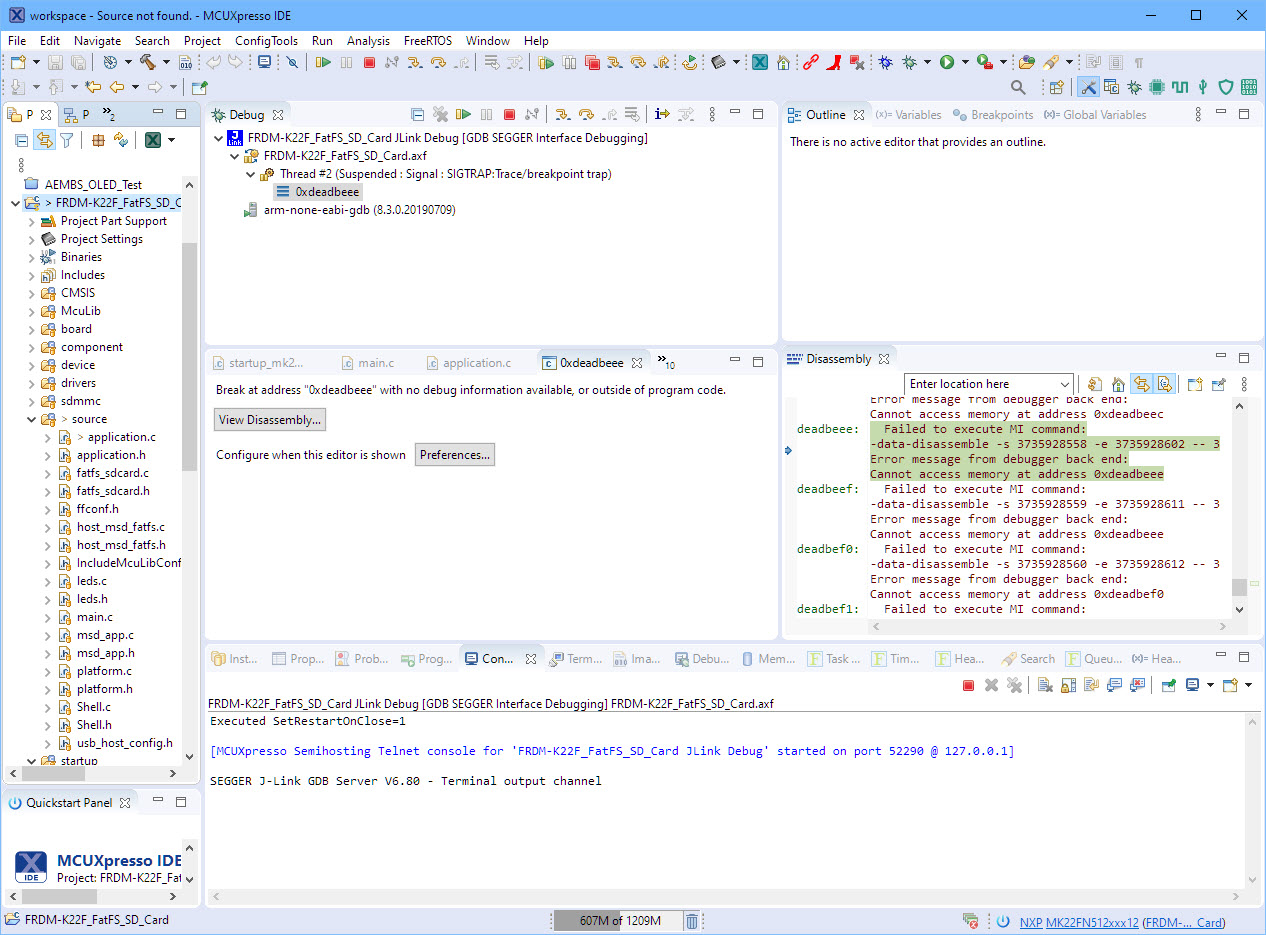
Failed to debug board in NMI mode
In that case: What I had to do in such cases was to lift that pin on the board to regain access or making sure the NMI pin stays floating or high.
NMI Interrupt Handler
The first thing to check and modify is the NMI vector entry. Below is for examle the default implementation of the NMI_Handler() in the NXP MCUXpresso SDK:

NMI_Handler
The above implementation is having an endless loop: if that interrupt happens (NMI pin low), it will hang inside that interrupt service routine. Should there be a glitch on that NMI pin, one could replace that handler with an empty interrupt handler, because that default is marked as ‘weak’ and I can overwrite it with my own handler easily:
void NMI_Handler(void) {
  /* do nothing, just in case we get here */
}
That does not help much, but at least the application would continue running if that interrupt would happen. Definitely not an ideal solution.
Flash Configuration (FOPT)
A better approach is to disable the NMI function. While it would be possible to do this during the reset (startup) vector function, it might be already too late, as the signal might be low already and the NMI vector would be entered.
Instead, most microcontroller implementation offers some kind of configuration register setting which is used very early in the processor startup at reset. For the K22F this is the ‘Flash Configuration Block’ or FOPT (Flash Option Register) and the setting can be found in the startup code file:
//*****************************************************************************
// Flash Configuration block : 16-byte flash configuration field that stores
// default protection settings (loaded on reset) and security information that
// allows the MCU to restrict access to the Flash Memory module.
// Placed at address 0x400 by the linker script.
//*****************************************************************************
__attribute__ ((used,section(".FlashConfig"))) const struct {
    unsigned int word1;
    unsigned int word2;
    unsigned int word3;
    unsigned int word4;
} Flash_Config = {0xFFFFFFFF, 0xFFFFFFFF, 0xFFFFFFFF, 0xFFFFFFFE};

💡 That register is used for flash readout protection too.
Checking the FOPT, there is a bit to disable the NMI functionality:
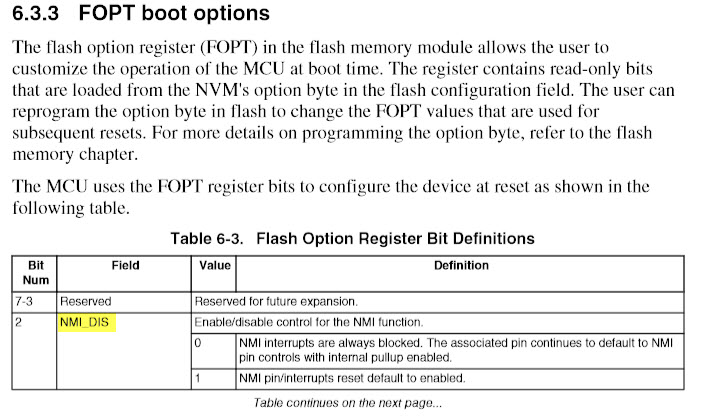
NMI_DIS in the FOPT Register (Source: K22FN512 RM)
The NXP SDK has the following for the FOPT:

FOPT Register in the NXP SDK
The FOPT register is loaded at boot time from the Flash Configuration, and the settings are at address 0x40D on the K22FN512:
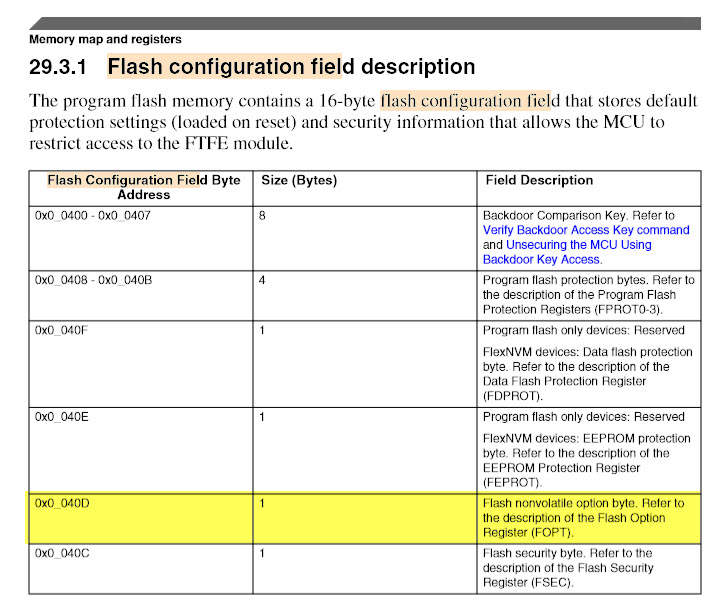
FOPT in Flash Configuration Area (Source: K22FN512 RM)
The SDK has some useful defines:
#define NV_FOPT_NMI_DIS_MASK                     (0x4U)
#define NV_FOPT_NMI_DIS_SHIFT                    (2U)
/*! NMI_DIS
 *  0b0..NMI interrupts are always blocked
 *  0b1..NMI_b pin/interrupts reset default to enabled
 */
#define NV_FOPT_NMI_DIS(x)                       (((uint8_t)(((uint8_t)(x)) << NV_FOPT_NMI_DIS_SHIFT)) & NV_FOPT_NMI_DIS_MASK)
Using the macros, I can now disable the NMI function in the FOPT. But instead using a ‘magic number’ of 0xFFFFF9FE as in the original SDK code, I prefer a more readable approach doing this:
#include "MK22F51212.h"
#define FOPT_Config \
            (  (0xFF & ~(NV_FOPT_NMI_DIS_MASK|NV_FOPT_EZPORT_DIS_MASK|NV_FOPT_LPBOOT_MASK)) /* keep other bits untouched */ \
             | NV_FOPT_NMI_DIS(0)    /* 0: NMI disabled; 1: NMI enabled */ \
             | NV_FOPT_EZPORT_DIS(0) /* 0: EzPort disabled; 1: EzPort enabled */ \
             | NV_FOPT_LPBOOT(1)  /* 0: low power boot; 1: fast boot */ \
            )
__attribute__ ((used,section(".FlashConfig"))) const struct {
    unsigned int word1;
    unsigned int word2;
    unsigned int word3;
    unsigned int word4;
} Flash_Config = {0xFFFFFFFF, 0xFFFFFFFF, 0xFFFFFFFF,
#if 0
    0xFFFFFFFE  /* => 0xFFFFF9FE with NMI disabled */
#else
       (0xFF<<24) /* 0x040F: FDPROT */
     | (0xFF<<16) /* 0x040E: FEPROT */
     | (FOPT_Config<<8) /* 0x040D: FOPT */
     | (0xFE) /* 0x040C: FSEC */
#endif
};
That way, I can ignore the NMI interrupt or I can use that pin as a normal GPIO pin:

Running application with PTA4 pulled LOW
Summary
By default, most examples or boards have the NMI functionality active and ‘hiding’ behind a GPIO pin. This can cause problems if that pin goes low and triggers an NMI interrupt. I recommend disabling the NMI functionality if not used. For this the flash configuration and FOPT register on NXP Kinetis devices need to be configured to have the NMI disabled at boot time.
Happy Interrupting 🙂
Links
- Using the NMI pin as GPIO pin: https://mcuoneclipse.com/2014/04/18/pin-muxing-using-the-nmi-pin-as-gpio-pin/
- User interrupts on NMI pin: https://mcuoneclipse.com/2014/10/12/user-interrupt-on-nmi-pin-with-kinetis-and-extint-component/
- Series on ARM Cortex interrupts: https://mcuoneclipse.com/2016/08/14/arm-cortex-m-interrupts-and-freertos-part-1/

Hello Erik, I liked the post and really liked how you gave some insight on how you used the macro. As one of your students in Rockford IL, what else do you have regarding writing code using the macros in Mcuxpresso? I really want to thoroughly learn how to use the macros. I am moving custom board from a bare-metal IAR project to a Mcuxpresso project. I notice there are two types of macro. The first is where it is static like in today’s example. The second where a template and ram pointers are used. I think. Or is it all function pointers using a template compiled all in flash rom?
Here is the section I an referring to in today’s post, “Using the macros, I can now disable the NMI function in the FOPT. But instead using a ‘magic number’ of 0xFFFFF9FE as in the original SDK code, I prefer a more readable approach doing: (and the code following which is not shown).
LikeLike
Every SDK and vendor handles low level peripheral register access in different ways (constant pointers or structs placed at given addresses). I recommend to adapt to the way the SDK is doing it.
I’m not sure what you mean with ‘static’?
The flash configuration is a static const structure placed at address 0x400 by the linker).
In my example I’m using macros (#defines) to build up the needed constants. In the SDK there are #defines for bit masks (_MASK) and position (_SHIFT) plus macros to set/or clear the bits (e.g. NV_FOPT_NMI_DIS()).
So no function pointers or anything, just normal constant arithmetic at compile time.
LikeLike
I’m loving the detail you dive into for issues like this. I can imagine this has cost someone, perhaps you, hours or days in the past. Thanks for sharing it!
LikeLike
Yes, when I faced the issue it has cost me a day or so. But not only me: I’m aware of two student projects this semester which were running into the same thing too.
LikeLike
Pingback: Disabling a Non Maskable Interrupt Pin on ARM Cortex-M @ARM @McuOnEclipse « Adafruit Industries – Makers, hackers, artists, designers and engineers!
Hi Erich, thanks for the info on the quick switch dialog. I’ve recently installed 2020 06 version, and added our company plugin, but now the quick switch dialog opens on every new file open. I have to click (or hit escape) everytime I open a file… not going to be an ender but it is annoying…do you know if there is a preference that I can force to prevent the dialog from opening? thanks! Jim
LikeLike
Hi Jim,
I think it must be your company plugin? it seems it sends a CTRL+TAB to every new window. What you could try is to change the preference for the shortcut and use a different one?
LikeLike
Pingback: Recovering Cortex-M Microcontroller with a Power Glitch | MCU on Eclipse
Erich, thanks a lot for this post! I saved a lot of time in searching in the data sheet.
Andrea
LikeLiked by 1 person
Hi Andrea,
thanks for letting me know that this one was useful, appreciated!
Erich
LikeLike
Hi Erich,
I just ran into this problem two days ago and your solution worked like a charm, thanks.
Gabriel
LikeLiked by 1 person
Hi Gabriel,
great to hear that it worked out that way. Any many thanks for your that cool and nice surprise with the split-flaps yesterday, that was really cool!
PS: instead soldering to the pin on the bottom: you could have used one of the I2C or UART pins too: that way no soldering would have needed. Anyway, very cool idea!
LikeLike