Last month (June 2017), the latest version of Eclipse “Oxygen” has been released, and I have successfully used it in several embedded projects. Time to write a tutorial how to use it to build a custom Do-It-Yourself IDE for ARM Cortex-M development: simple, easy, unlimited and free of charge. While the DIY approach takes a few minutes more to install, it has the advantage that I have full control and I actually know what I have.

Eclipse Oxygen
Overview
Eclipse Oxygen (4.7) is the latest and most advanced version of Eclipse as of today. It comes with many new and useful features, see https://www.eclipse.org/eclipse/news/4.7/. This article describes how to build a custom DIY (Do-It-Yourself) IDE for development for any ARM Cortex-M based device.
Vendor provided Eclipse IDEs are maybe easier to install for a Newby and can have great extension features. But on the other end the licensing terms put some usage limites (e.g. I can use the IDE only for devices from that vendor, or other kind of limitations). As at the university we building up a new curriculum with a course which uses microcontroller from multiple vendors, we are going to use a custom DIY Eclipse version we can have installed on every students machine without any strings attached.
To install a custom DIY Eclipse based IDE for C/C++ development for any ARM Cortex-M devices is pretty simple and requires about 20-30 minutes including download time. I need
- Eclipse Oxygen for C/C++
- GNU ARM MCU plugins
- ARM Cortex Build tools
- Debug probe interface (P&E and Segger), depending on the debug interface used
My screenshots show things for a Windows 10 64-bit machine, but everything applies to Linux or Mac machines as well.
In the installation instructions below I prefer to download the zip/archive packages: that way I can build up an Eclipse installation with no need for an installer: everything is included in a directory tree I easily can zip for a backup or pass to someone else. The only exception are the debug probe support files as they run an installer to install the necessary USB device drivers.
Eclipse Oxygen Installation
This step includes the core of everything: the Eclipse IDE and framework.
Go to http://www.eclipse.org/downloads/ and choose your package to download and install. The default is to download a small installer which then downloads the other files while installing. I prefer the ‘Download Packages’ method as with this I get everything on my disk as a zip file which then I can pass to students or install on multiple machines without downloading things multiple times.
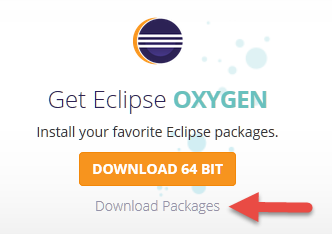
Eclipse OXYGEN download
So I select the ‘Download Packages‘ link and use the “Eclipse IDE for C/C++ Developers” (around 200 MByte):

Eclipse for C and C++ Developers
The package is an archive/zip file. Extract the files to a folder, e.g. C:\Eclipse\Oxygen:

Eclipse package extracted
GNU MCU Eclipse
Here again I prefer the local archive way. Download the latest version from
https://github.com/gnu-mcu-eclipse/eclipse-plugins/releases

GNU MCU Eclipse Installation package
To install the plugins in Eclipse, use the menu Help > Install New Software and use the archive file from the previous step:

Installing GNU MCU Eclipse Plugins
A restart of Eclipse is asked at the end of the installation process.
ARM Toolchain
This step installs the needed compiler and build tools to develop for ARM Cortex.
Go to https://developer.arm.com/open-source/gnu-toolchain/gnu-rm and go to the downloads (https://developer.arm.com/open-source/gnu-toolchain/gnu-rm/downloads). I prefer the zip file (not the installer) as I don’t want the installer to make any environment or path changes.

GNU ARM Embedded Toolchain
Then I have unpacked the toolchain files into my Eclipse directory (c:\eclipse\oxygen\toolchain):

GNU ARM Embedded Toolchain
💡 We need that path later to tell Eclipse where to find the compiler/linker/etc.
GNU MCU Eclipse Build Tools
To run the build tools (echo, make, mkdir, rm), I need extra utilities on Windows.
Go to https://github.com/gnu-mcu-eclipse/windows-build-tools/releases and download the latest build tools zip file:

GNU MCU Eclipse Windows Build Tools
Place the folder inside the Eclipse Oxygen folder:

GNU Eclipse Build tools
Eclipse Paths: Global Build Tools and ARM Toolchain
We need to tell Eclipse where to find the tools. I do not prefer using environment variables (see https://gnu-mcu-eclipse.github.io/toolchain/path/ for a detailed discussion), instead I like to point to the tools bundled with the IDE (that’s why I have installed it inside the IDE folder). The setting for the Global Build Tools Path is in Eclipse (menu Window > Preferences):
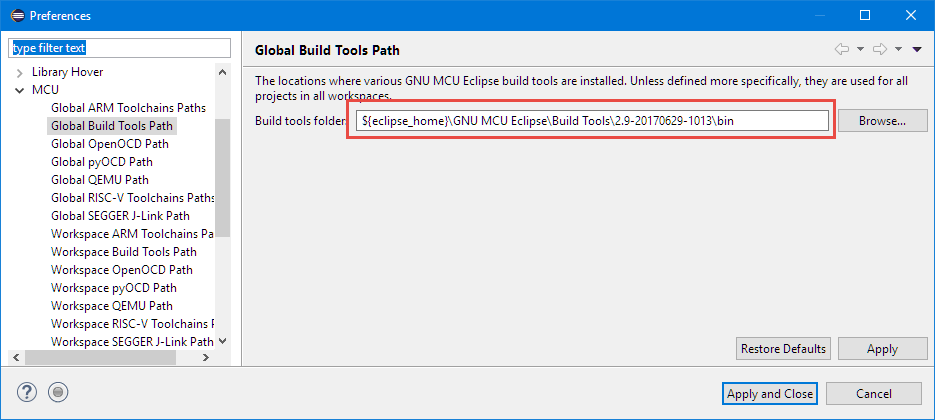
Global Build Tools Path
I’m using the ${eclipse_home} variable to keep things relative to my Eclipse IDE:
${eclipse_home}\GNU MCU Eclipse\Build Tools\2.9-20170629-1013\bin
💡 if using a different version of the GNU MCU Eclipse plugins, you have to update the above path. Another solution is to have a ${eclipse_home}\GNU MCU Eclipse\bin folder for all the binary tools.
Same for the setting pointing to the ARM toolchain:
${eclipse_home}\GNU Tools ARM Embedded\6 2017-q2-update\bin

Global ARM Toolchains Paths
SEGGER J-Link
This step is only needed if you plan to use the SEGGER J-Link debug probe. The Segger probes are of course not free of charge, but many vendor boards (NXP Freedom/Tower boards, STM Nucleo boards, …) can be loaded with a Segger firmware.

J-Link EDU with a NXP/Freescale Tower Board
The J-Link software is available for download from https://www.segger.com/downloads/jlink/. Because it installs USB drivers, it is a setup executable which installs the drivers.
💡 To have a ‘self-containing’ IDE, I can install the J-Link inside my Eclipse IDE folder (e.g. c:\Eclipse\Oxygen\Segger) and run the <install>USBDriver\InstDrivers.exe re-install the USB drivers if needed.
In the settings (Window > Preferences > MCU > Workspace) specify the file and path to the Segger GDB Executable:
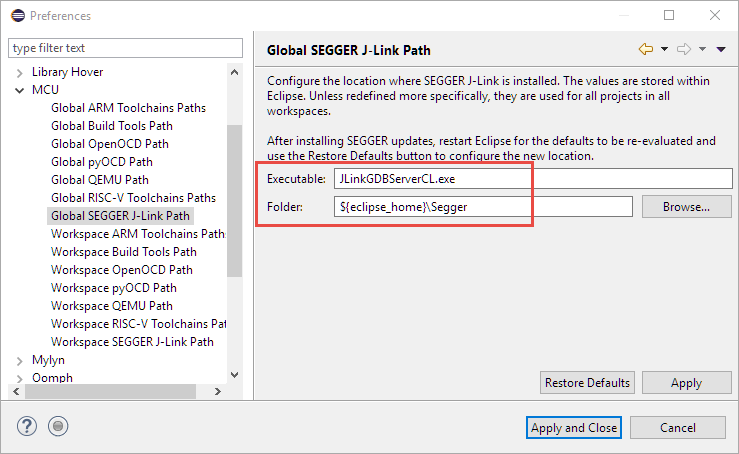
Global Segger J-Link Path
With this I can use the Segger J-Link debug connection.
If you have a STM board with the ST-Link on it, you can convert it into a Segger J-Link probe, see https://www.segger.com/products/debug-probes/j-link/models/other-j-links/st-link-on-board/
If you have the popular NXP LPC-Link2 debug probe, the same is described here: https://www.segger.com/products/debug-probes/j-link/models/other-j-links/lpc-link-2/
P&E Multilink
This step is only needed if working with the P&E debug probes. Similar to the one from Segger, many boards can be loaded with a P&E debug firmware to debug it.

Debugging FreeRTOS on NXP FRDM-K64F with P&E Multilink Universal
The P&E drivers can be downloaded from http://www.pemicro.com/opensda/ (user account/login required):
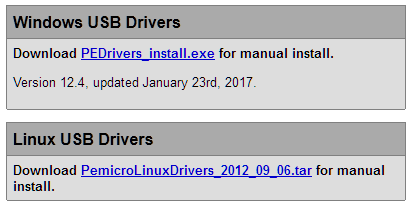
PEDrivers
Download and run the setup to have the USB drivers installed. The Eclipse plugins are available from the following Eclipse update site:
http://www.pemicro.com/eclipse/updates
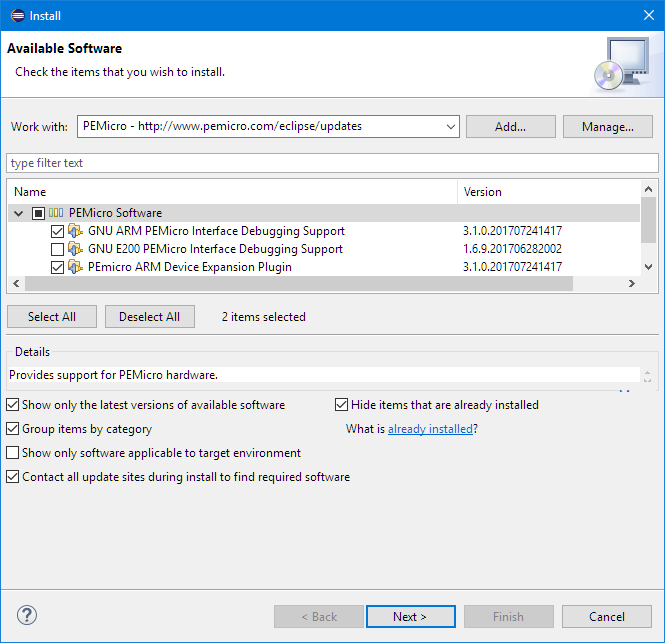
PEMicro Eclipse Update
💡 If you need to have that update site available for offline installation, it is possible to download the update site, see https://mcuoneclipse.com/2014/07/03/replicating-an-eclipse-update-site-for-offline-usage/
With this I can use the P&E Multilink debug connection.
ST-Link2
To use ST-Link2 debug probes, download and install the drivers from http://www.st.com/content/st_com/en/products/embedded-software/development-tool-software/stsw-link009.html
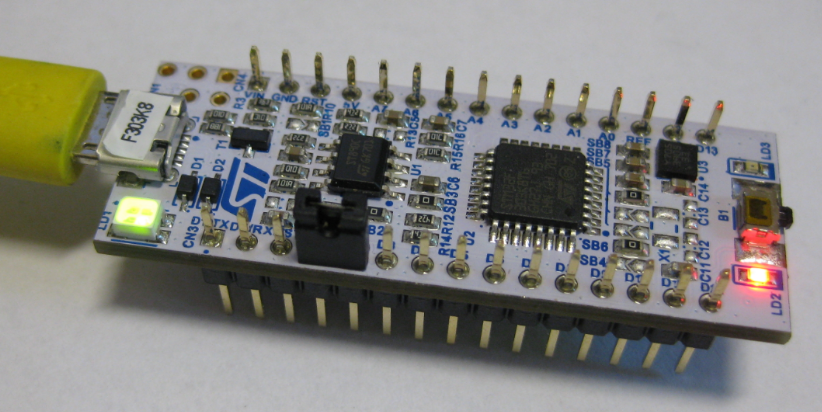
STM32F303 Nucleo-32
The easiest way for me to use any ST-Link2 is to convert it into a Segger J-Link (see https://www.segger.com/products/debug-probes/j-link/models/other-j-links/lpc-link-2/).
The other option is to use OpenOCD (if you insist), but OpenOCD always has been problematic for me and not very stable. The best option is to use the hassle free distribution of OpenOCD by GNU MCU Eclipse: https://gnu-mcu-eclipse.github.io/openocd/install/. Download the latest version from https://github.com/gnu-mcu-eclipse/openocd/releases (I prefer again the .zip file which I can extract into the Eclipse IDE folder).
There is more…
The cool thing with Eclipse is that there are thousands of plugins. Here are a few pointers what to add:
- FreeRTOS Task Awareness from NXP: FreeRTOS Kernel Awareness for Eclipse from NXP
- Percepio Tracealizer plugin: Percepio FreeRTOS Tracealyzer Plugin for Eclipse
- EmbSysReg Registers View: EmbSysRegView 0.2.6 for Eclipse Neon and Oxygen
There are many more plugins you can use.
Summary
It does not take much to have a custom DIY IDE and toolchain around Eclipse Oxygen. Of course it requires me to download and install several packages, but at the end I have a fully featured IDE: simple to use, unlimited and free of charge.
Happy Oxygening 🙂
Links
- What’s new in Eclipse Oxygen 4.7: https://www.eclipse.org/eclipse/news/4.7/
- Eclipse downloads: http://www.eclipse.org/downloads/
- Eclipse Packages downloads: http://www.eclipse.org/downloads/eclipse-packages/
- GNU ARM Embedded Toolchain: https://developer.arm.com/open-source/gnu-toolchain/gnu-rm
- GNU MCU Eclipse Windows Build Tools: https://github.com/gnu-mcu-eclipse/windows-build-tools/releases
- DIY series with previous versions of Eclipse: Going to Mars: Building a DIY Eclipse IDE for ARM Embedded Microcontrollers
- GNU MCU Eclipse plugins archives: https://github.com/gnu-mcu-eclipse/eclipse-plugins/releases
- J-Link Download page: https://www.segger.com/downloads/jlink/
- P&E OpenSDA drivers: http://www.pemicro.com/opensda/
- Creating offline Eclipse update site: https://mcuoneclipse.com/2014/07/03/replicating-an-eclipse-update-site-for-offline-usage/
- Converting onboard ST-Link into a Segger J-Link Debug Probe: https://www.segger.com/products/debug-probes/j-link/models/other-j-links/st-link-on-board/
- Converting LPC-Link2 into a Segger J-Link: https://www.segger.com/products/debug-probes/j-link/models/other-j-links/lpc-link-2/
- ST-Link USB Drivers: http://www.st.com/content/st_com/en/products/embedded-software/development-tool-software/stsw-link009.html
- GNU MCU OpenOCD: https://gnu-mcu-eclipse.github.io/openocd

You may place jre to eclipse folder. You got portable Eclipse and it run it at any computer with windows.
LikeLike
After converting st-linkv2 to segger. Can i use st-linkv2 dongle to debug other boards different than ST?
LikeLike
no.
LikeLike
Pingback: Using Eclipse with its local Version of Java Virtual Machine | MCU on Eclipse
Pingback: Tutorial: Porting BLE+NRF Kinetis Design Studio Project to MCUXpresso IDE | MCU on Eclipse
Pingback: New Concept for 2018 Mini Sumo Roboter | MCU on Eclipse
Pingback: Flash-Resident USB-HID Bootloader with the NXP Kinetis K22 Microcontroller | MCU on Eclipse
Pingback: Show Eclipse Project Location in System Explorer | MCU on Eclipse
Pingback: Tutorial: RAK813 LoRaWAN+BLE+GPS Sensor Node with Eclipse IDE | MCU on Eclipse