
There are people around me who think I’m crazy. And they are probably right. Who else would buy a machine from someone he does not know. I have to pay upfront. It is not clear how things will get delivered, what gets delivered, or if it gets delivered at all. Up to the point I can lose the money I have spent. Best of all: that machine is dangerous enough to potentially kill me. And it has the potential to put my home on fire too. Well, that sounds like an exciting weekend project, or not?
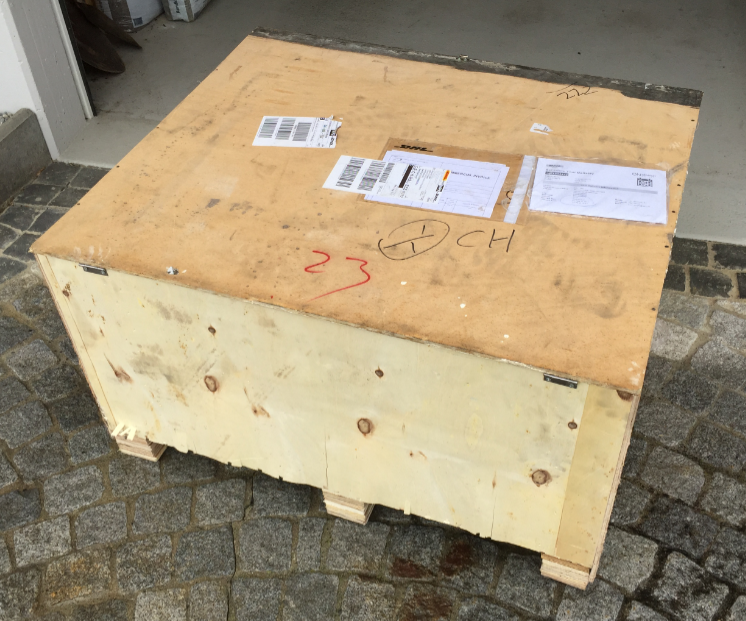
60 kg Weekend Project Box arrived on the front door
Background
We do have one of these expensive laser cutting machines in our FabLab at the Lucerne University, a 100 Watt AKJ-6090. Great and professional machine! Using it requires advance planning (the FabLab is open Tuesday, Wednesday and Thursday). I learned with using a 3D printer that faster cycles makes a huge difference, especially doing projects on weekends.
So I have followed many these ‘ultra cheap Chinese laser cutter’ stories you can buy on eBay (just search the internet for ‘k40 laser cutter’, or see this Hackaday lead article). And some of them were indeed ‘horror’ stories. The general consent seemed to be that these machines get better and better, and you get what you pay for. Fair for me.
What still was a concern for me was the software part: it seems many of these machines work with a CorelDraw (hacked?) version. Or LaserDRW, a piece of software I consider as ‘not so easy to use’. So all the software was rather disappointing to me. So I had put the idea of using a laser cutter aside.
What finally triggered again my interest was an article published on Hackaday: [Scorch] has reverse engineered that protocol to the commonly used M2 nano controller board (see “K40 Whisperer” and published his work as open source and published everything on www.scorchworks.com/K40whisperer/k40whisperer.html. With his software, it gets as simple as that:
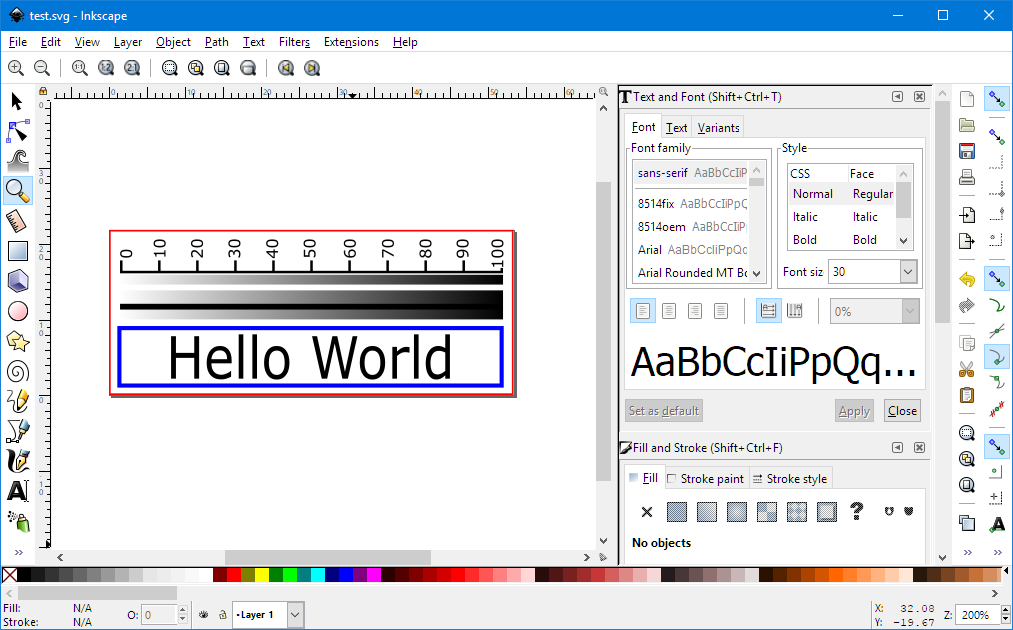
- Create the drawings with red, black and blue color e.g. in Inkscape, and save it as .svg or .dxf file

Inkscape
- Open it in K40 Whisperer software and engrave and cut the work.
That was exactly what I was looking! All what I needed was now a decent laser cutter with that C6879-LASER-M2 board and hope for the best.

M2 Nano Laser Controller Board
After doing some research, it was clear to me that I did *not* want to go for one of these ultra cheap K40 ‘blue boxes’ which one can buy for less than $500 on eBay. What I was looking for was:
- Larger cutting/engraving area than 31x22cm ==> 40x40cm
-
More power than the 40 Watt ==> 50 Watt
Of course it has to have the M2 nano board, otherwise I cannot use the [Scorch] software. And I wanted to have a few extras which most users of the K40 end up adding:
- Air assist (air flowing to the laser nozzle) to lower fire risks
- Bed leveling to move the bed up and down
- Laser pointer for the laser head
- Minimum safety features like an emergency stop button
- Honeycomb table
Ordering the Machine
After doing a lot of searching and weighting in pros and cons, I have found a seller on AliExpress which had what I was looking for:
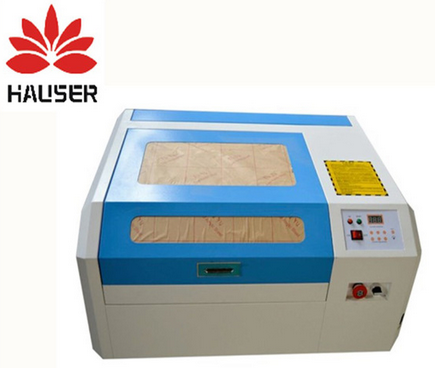
AliExpress 4040 Laser (Image source: AliExpress)
The problem with these offers on AliExpress (or Ebay, etc) is that the sellers seem to copy-paste the specs and images, and it is really hard to tell how reliable a seller is. Can I trust reviews or are they fake as well?
I ended up with a seller which seemed to have sold several of these machines in the past year, and his store was specialized for CNC and laser machines. Most important he seemed to have shipped items to Europe to the destination address and offered registered shipping with DHL and others. I saw others with no clear sign that they ship to the closest sea port only and you have to pick it up there and deal with customs/etc.
It was not the cheapest offer for this kind of machine, but still at an amazing low price of $750 (!!!). There is some buyer protection as well on AliExpress, so I thought maybe the risk of loosing that money is worth what I could get?
So I placed the order and hoped for the best.
Payment got accepted, and then the first thing: the seller needed an extra $150 for shipping it by DHL to Switzerland :-(. I could have declined that and cancel the order. After some back and forth, I agreed, and things were going well and I received a tracking number.
Unboxing, Part 1
The tracking number location came closer and closer, and this Friday it finally arrived. The DHL courier rang at the door, and with high expectations I did open the door and received the package:

That’s not the Laser Cutter I ordered
A silicon adhesive sealant plus one (in)famous USB dongle as the key for a laser cutter software. Yes, it came from the seller, and yes it was that tracking number I had received.
You probably have heard of all the horror stories about someone selling a mobile phone and then you receive a toy version or only the enclosure? Should I have received for that $750 only that software dongle which is sold around $50 on eBay? 😦
I immediately contacted the seller, and he responded with this:
“machine will be reach you soon friend no.worry,send separate,because usb is hard to send together with machine,patient please friend”
And indeed: a few hours later, another DHL courier was staying at the front door, and this time this was more promising 🙂 :
Weekend Box
Unboxing, Part 2
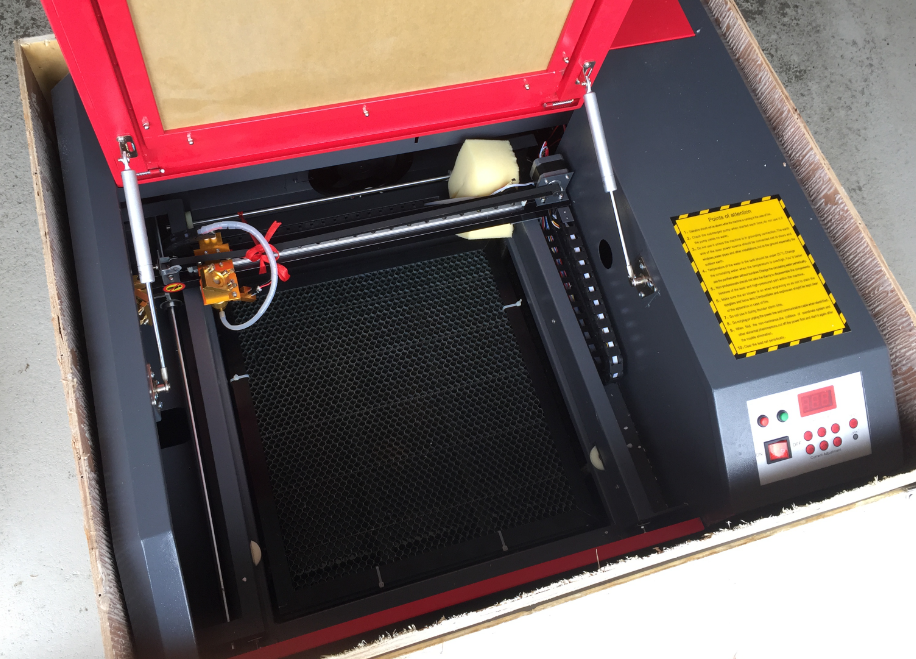
Open up the box with removing all the nails, and it indeed had a machine in it:
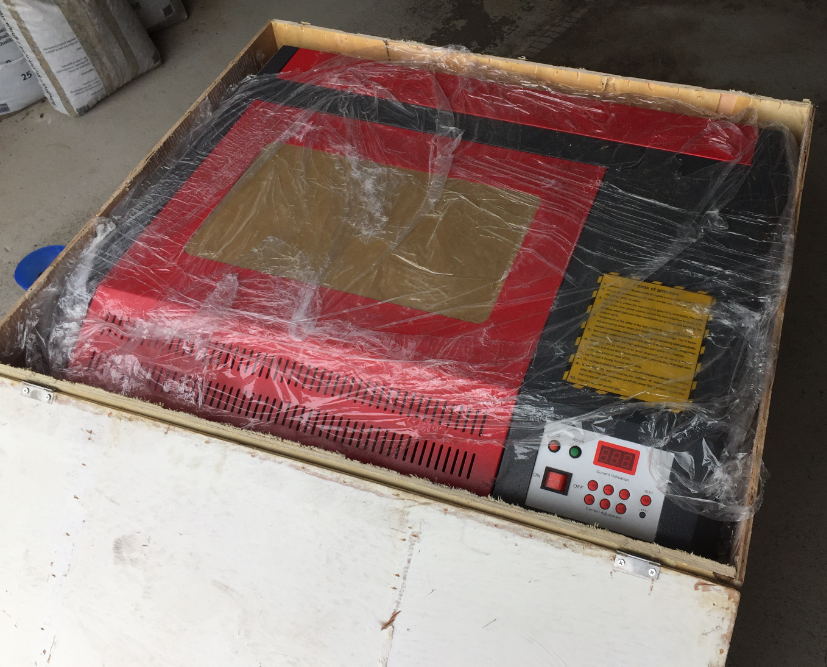
Unboxing and machine in it
Now if you remember the seller image from above, this is not the machine I have ordered: the colors are very different, and the design is somewhat different too.
But as I did not order that thing to match my living room furniture, I was ok with that and continued working to get the machine out of the box.
Apart of that foil on the top, there was nothing to protect the machine on the sides. That is somewhat questionably, but obviously the machine did not take any damage that way.

Laser Cutter Unboxing
Inside the machine, a plastic container:

Plastic Container
Which had all the other small parts in it:

Plastic Box content
Which includes a burned software CD-R, USB cable, air pump, water pump and parts for the fume extraction:

Box Content
Under the plastic container, the honeycomb platform secured with zip tie:
Honeycomb
The laser head was secured in place:

Laser Head

Transport protection
The bottom revealed some holes and is prepared to get some rollers or leveling feet:
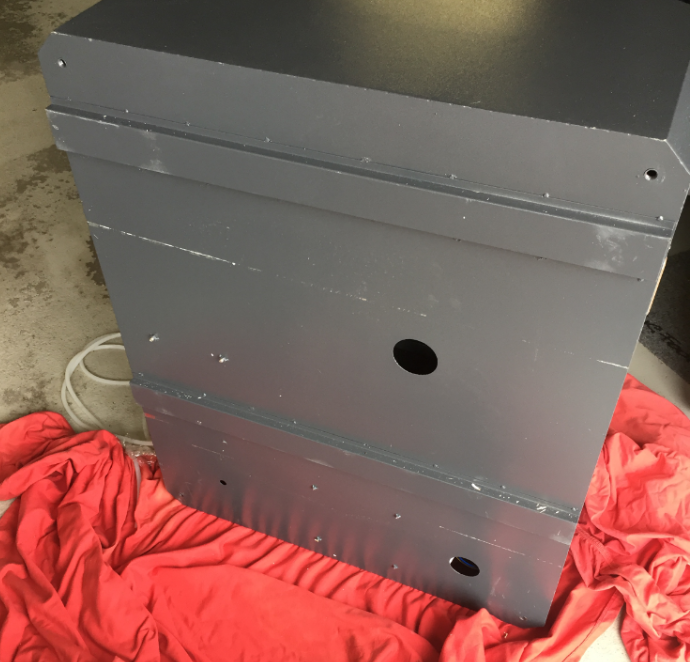
Laser cutter bottom
Overall, the machine is looking really nice, and the enclosure makes a good impression:

50W CO2 Laser Cutter
Laser Tube
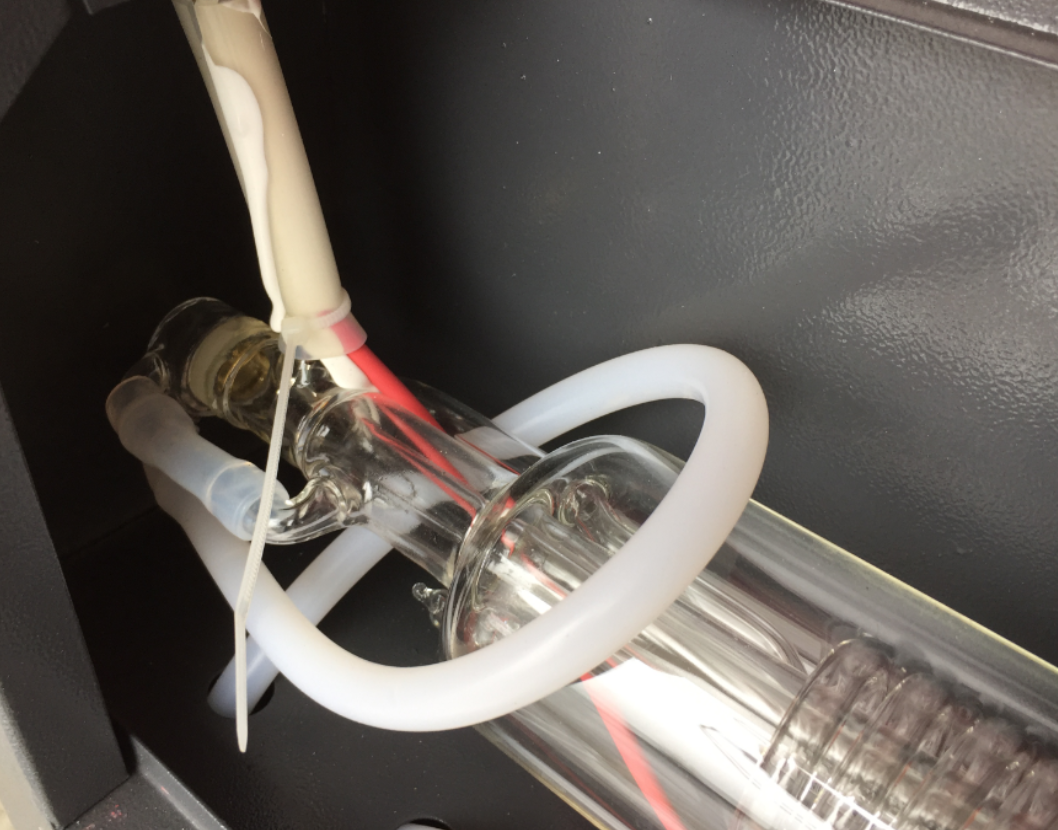
Checked the laser tube: one of my nightmares would be a broken tube, but everything looked ok:

Laser Tube
The laser tube is supposed to run for about 1000-1500 hours, but who knows? I have seen reports that the tube was not working after a few hours, so we have to see.
The tube was filled with water, so that tube seems to be tested. But no label or brand, so I hope this is a 50W tube and not a 40W one. We will see how much this tube is able to cut.
Below a picture of the first laser mirror. Notice the springs are hold back by two nails: simple and works :-):

First Laser Mirror
The high voltage connection of the tube looked like many others I have seen: wires filled with silicone to make the connection (weird, but that seems the standard way):
Laser Tube High Voltage Connection
The laser tube ground connection usually uses the same kind of ‘wires wrapped around and then filled with silicone), but that one did not look safe to me:

Laser Tube Ground Connection
I decided to secure the ground using a pice of shrink tube so the ground wire cannot easily disconnect:
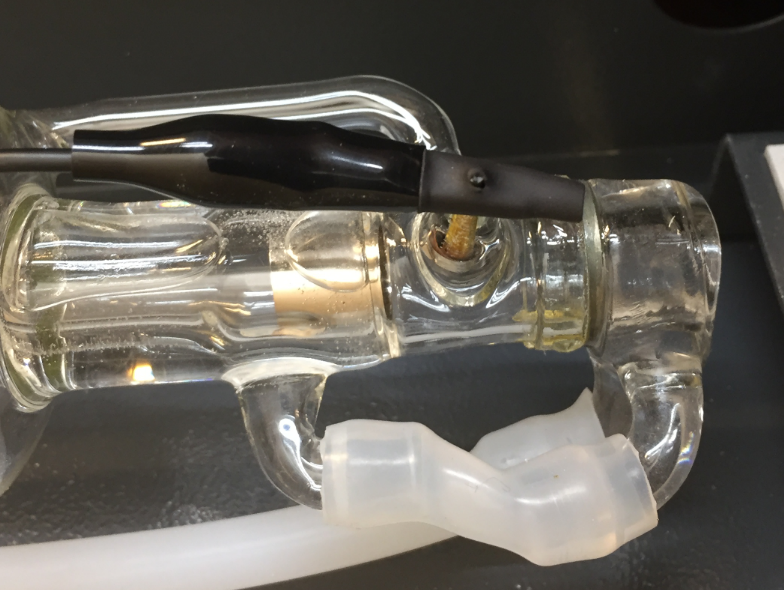
Secured Ground Connection
Switches and Tubes
On the backside, the pipes for cooling water and air assist.

Air, water and power
I checked the connection/resistance between the extra GND connector and the GND of the power plug and it was OK. The wiring of the single-phase electrical connection was OK with proper grounding.
Near the main power there are two auxiliary power sockets for the water pump and air pump, both with US connectors.
💡 The two auxiliary plugs are on power when the machine is turned on. They don’t hold the plugs very well, so they can easily fall off. This is a problem as with this cooling or air assist might not be working and can damage the machine.
There is an emergency stop button on the front plus the switch to turn on the laser power supply (horizontal is ON, vertical is OFF): I think I will add a better label for it.

Emergency Stop Button
On the top there is a list of warnings, although I’m not sure what “water without sundries” means?

Warning signs
The front panel is easily understood: Main power switch, push buttons for moving the honeycomb up and down, laser power (percentage) indication and buttons to change it. A test button to fire the laser and a laser LED indicating if the laser is firing:
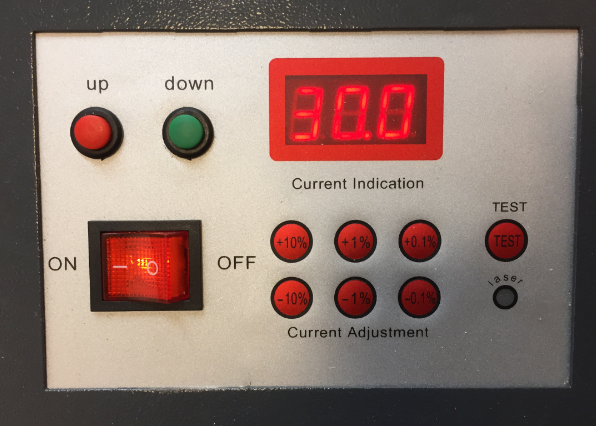
Front Panel
Electronics
The electronics are behind the side door:
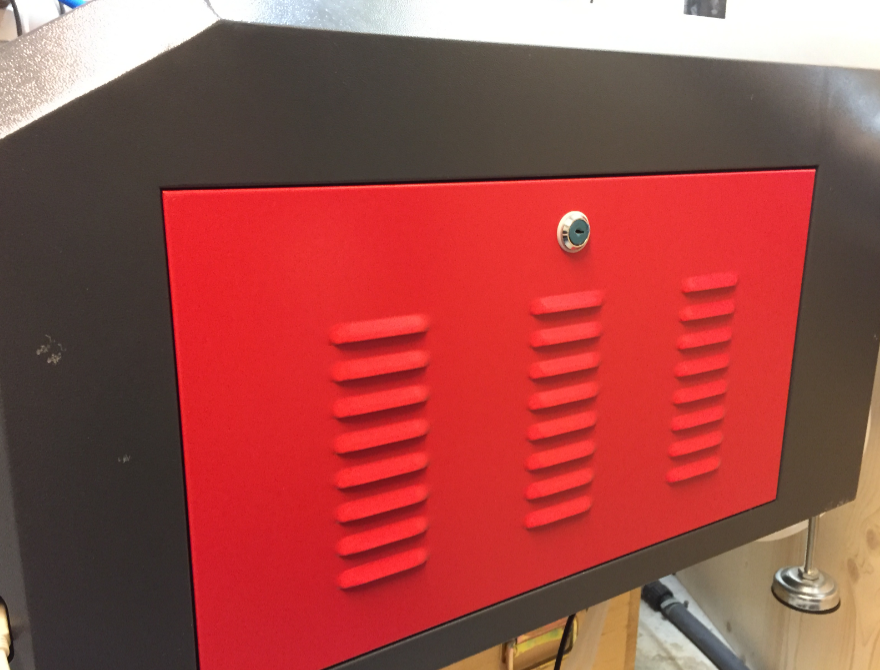
Electronics compartment
Things wired in a reasonable way. In my view the power supply would deserve an enclosure:
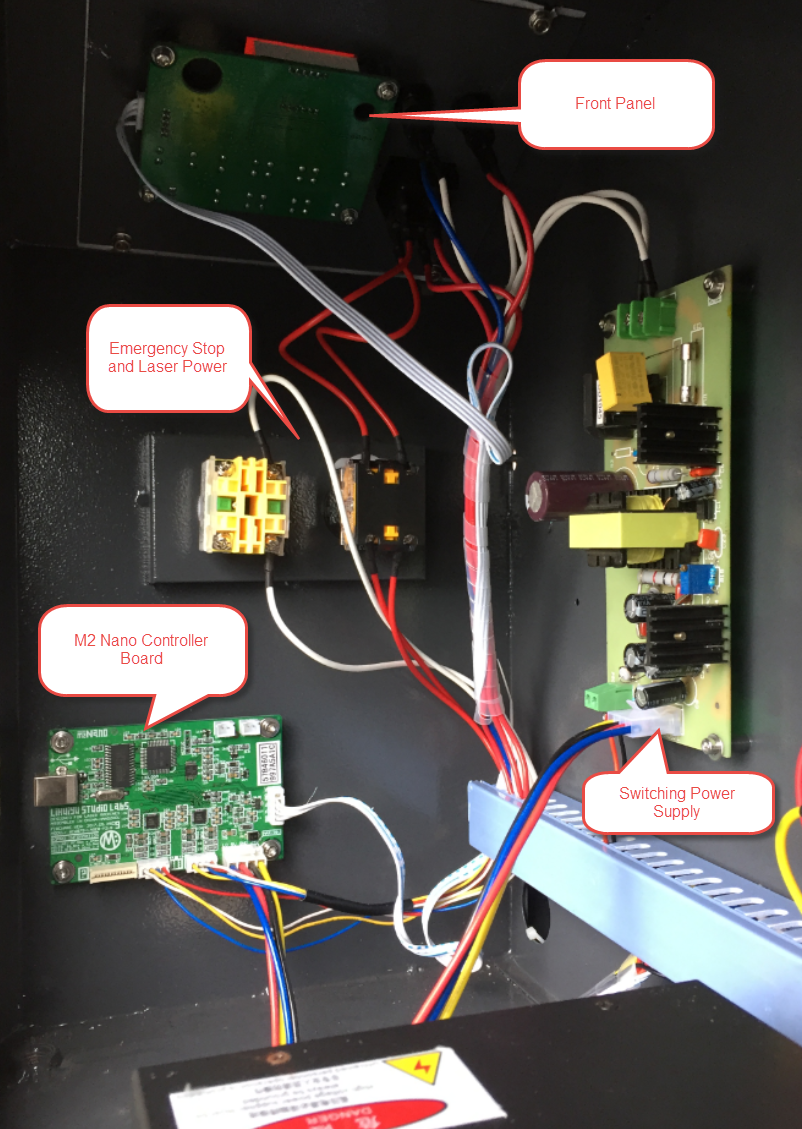
Front Electronics

Power Supply
Most important, it uses the M2 Nano board which is supported by the K40 Whisperer software:
M2 Nano Laser Controller Board
USB connection from the M2 Nano board to the PC on the outside:

USB Cable connection to PC
The cables to the laser head:
Cables and air to laser head
In the middle the high voltage laser power supply with the filter in the background:

Laser Power Supply
Below the high voltage connector to the laser tube and the backside wiring:
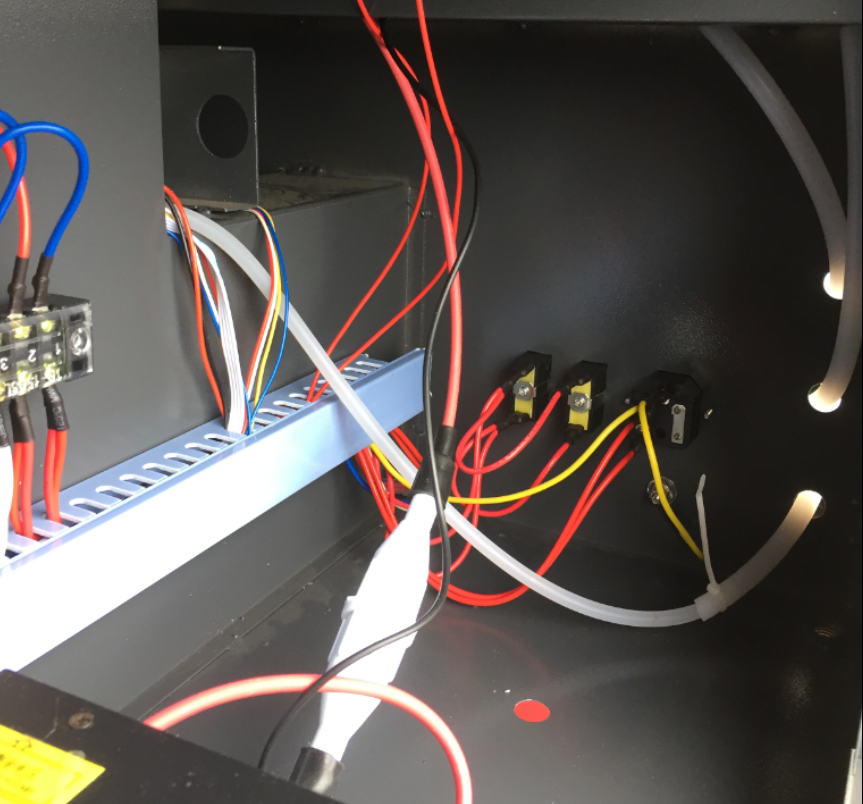
backside wiring
Everything looked pretty solid with proper shrink tubing. Sure a few cables could have been fixed better, but that’s something I plan to upgrade.
The first thing was to test with a multimeter the grounding and electrical connections of the machine. Everything was OK, and the power supplies and pumps were rated for the 230V I’m using. I checked this because of horror stories about K40 machines which had things wired up in a wrong way.
Mirrors and Laser Path
A closer inspection of the mirrors showed a fingerprint or similar:
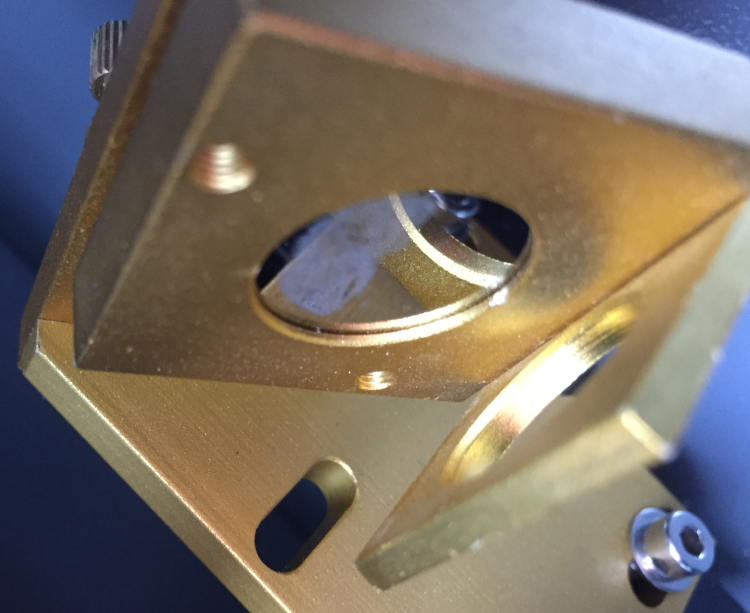
Fingerprint on laser mirror
I had to clean this and the other one near the tube with Ethanol and cotton swabs:
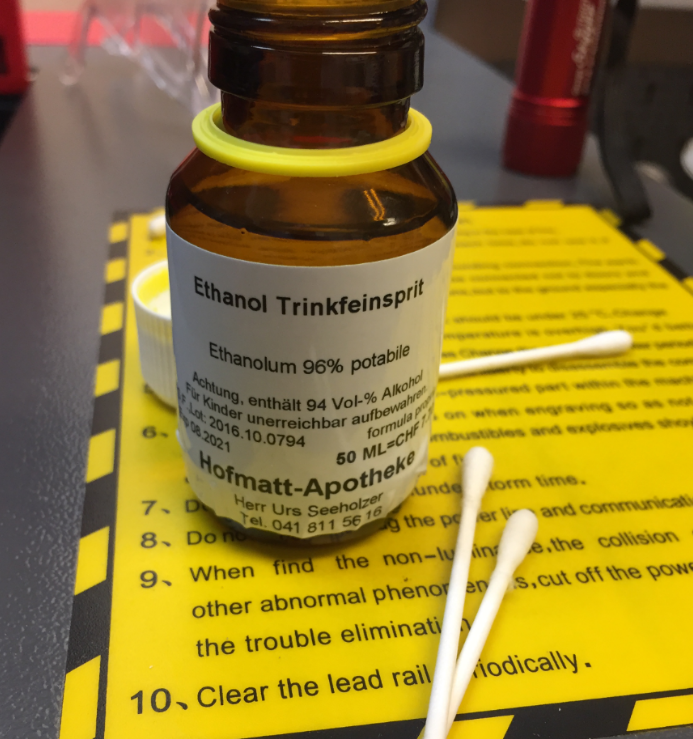
Ethanol
After that, the mirrors were clean:
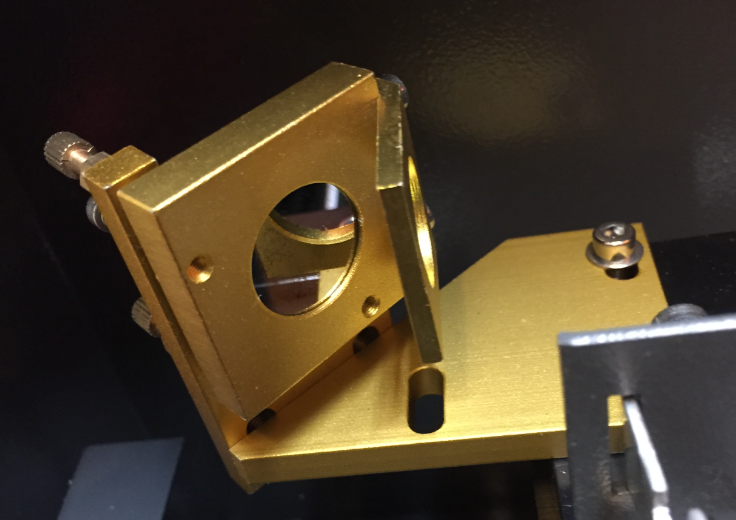
Cleaned Mirror
I used the common ‘post-it burning method’ to verify the laser path. All the mirrors seemed to be properly perpendicular aligned. Only the beam hitting the last mirror was really on the edge:
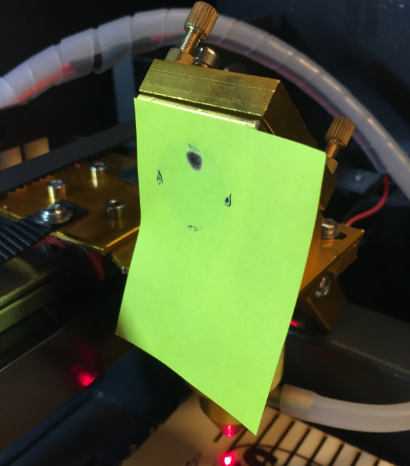
perpendicular but too high
So I had to adjust the laser tube itself (see http://justaddsharks.co.uk/support/laser-beam-alignment-guide) and going through a whole of ‘post-it test fire procedure’ to get the laser path perpendicular:
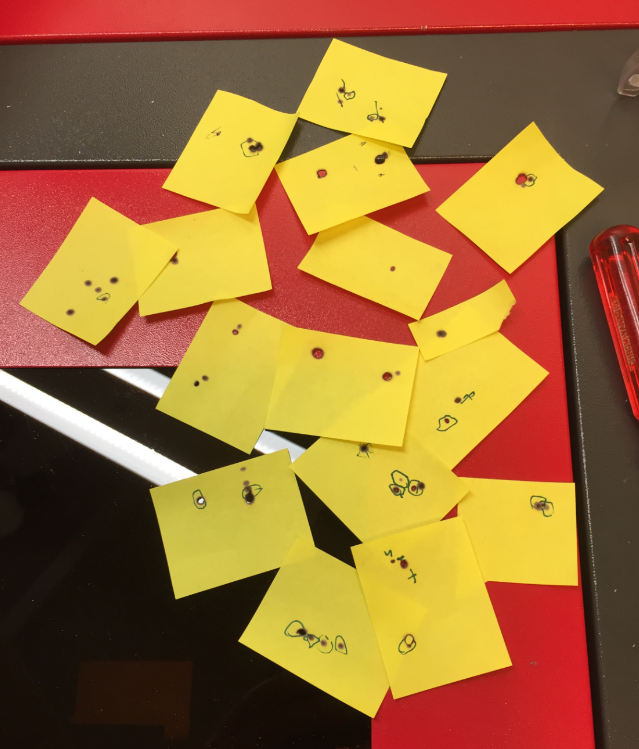
Testing laser with post it notes
With the result that the beam now is hitting the center of the last mirror in a perfect way:
Last Mirror
Inside the Machine
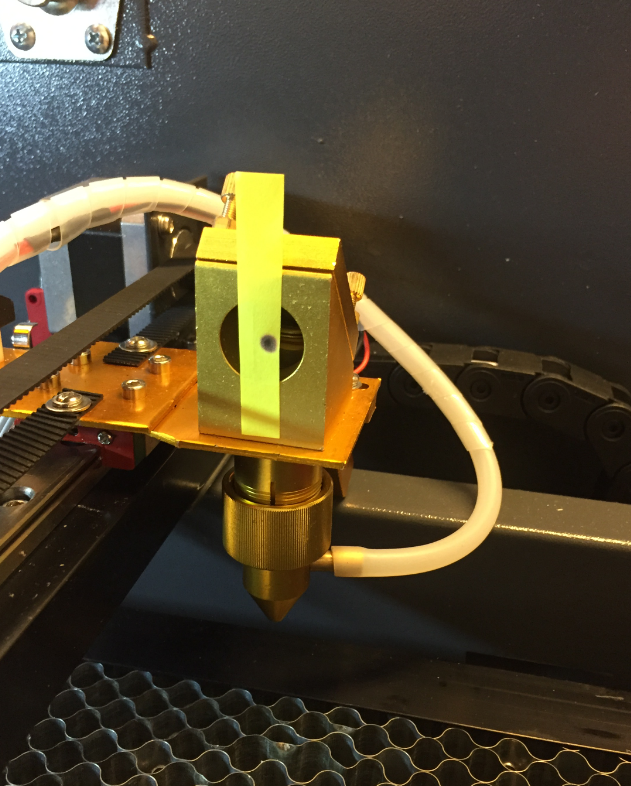
The machine comes with a nice internal LED light:

Illumination
Detail of the laser head with air assist and laser pointer:
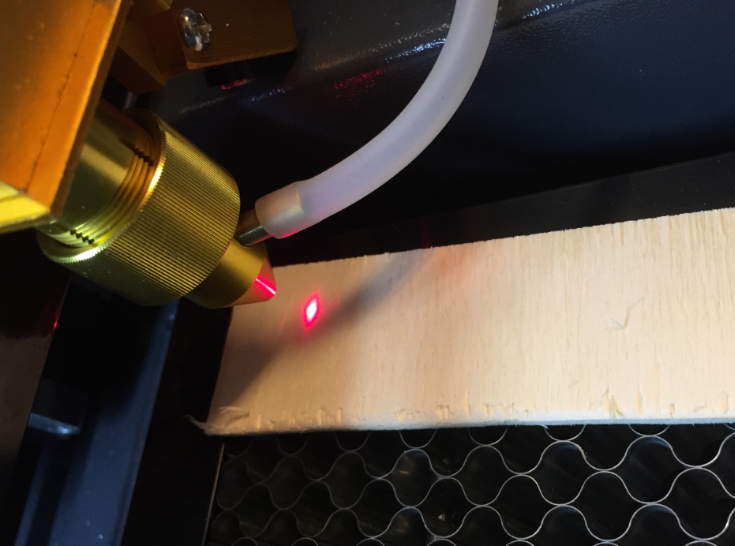
laser head with air assist
The machine features a leveling bed. When cleaning up the machine after removing the honeycomb from some polystyrene, I noticed that a washer. That washer (and missing bolt) came from the edge bed. Nothing serious and easy to fix with a new bolt.
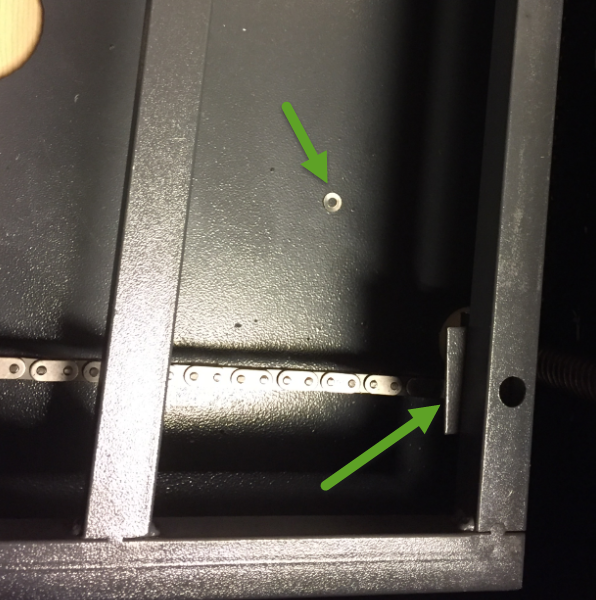
washer
This reminded me to check other parts, and I have found that the screw for one of the end switches needs to be tighten up:
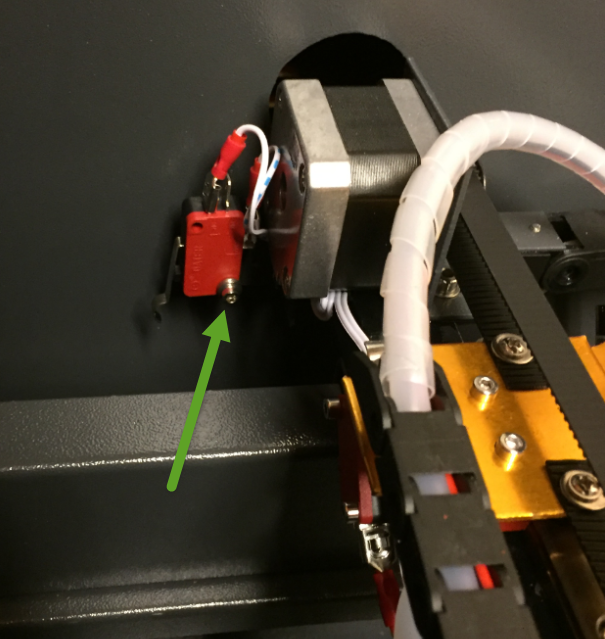
Fixing End Switch
On the bottom plate there is a round hole (not sure for what this one is?):

hole
Closed hole
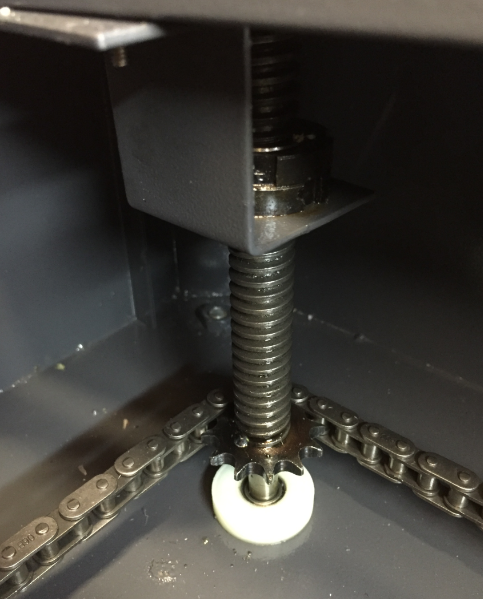
A DC motor with a chain is used to level the bed:
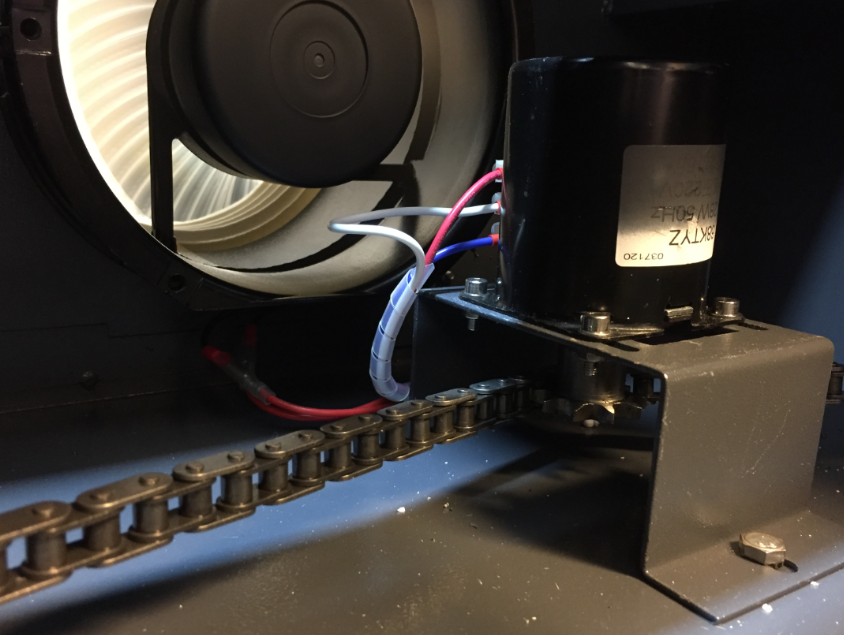
level bed motor
The motor turns forward or backward with the green (up) and red (down) push buttons on the front panel. So the leveling is manual which is what I expected.
Bed Leveling
But the red (up) button had an issue: I pressed it once, and the bed did not stop moving up: I had to power off the machine to stop it. The problem was the up push button which closed the contact, but did not release it. The problem was because when the cables have been put onto the button, the contacts got pushed too much into the button. Fixed with disassembling the button and putting the cables on it without pushing the contacts into the button. That fixed it.
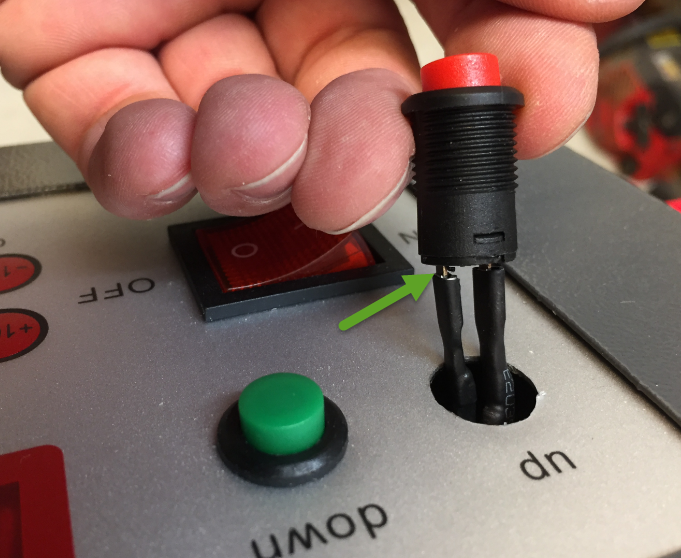
Fixed Push Button
I consider to replace the button with better quality ones. Otherwise leveling works very well.
Software
The CD-R had had a 519 MByte 460M2.rar file on it. It included
- CorelLaser
- LaserDRW

Software delievered
Anyway, I was going to use the K40 Whisperer software, so I did not need all the extra software, but still good to have it.
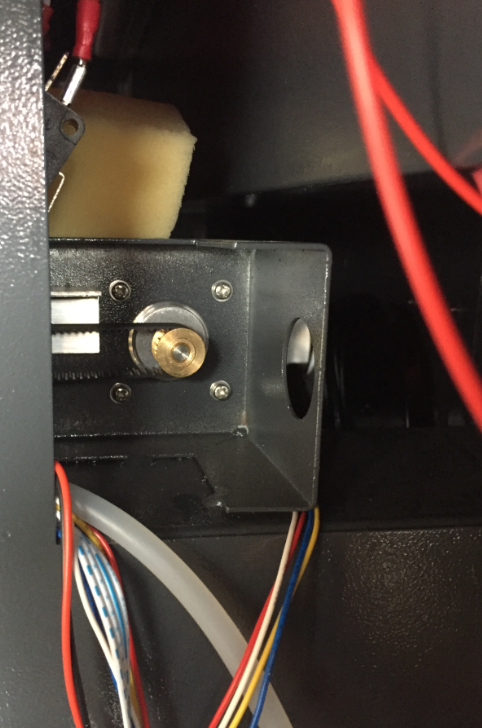
The documentation is a mixture of Chinese and English, and better than I expected it (Google translate?). With my research upfront using the many YouTube videos and online tutorials for the K40 there was nothing really new, except one thing: I was wondering what that small plastic part is for. First I thought it was a kind of test prove, but it turned out it is to set the distance between the laser head and the target to 10 mm:

Laser head alignment polycarbonate

Laser Focus
There is an excellent tutorial video about the importance of laser focus settings here: https://www.youtube.com/watch?v=Eg6THrEdleo
It included a folder with more pictures and a video how to adjust the laser beam and path, some information in English and some in Chinese:

Laser Path Adjustment
That information was not really new to me, as I did some reasearch upfront. There are plenty of good tutorials available like this one on YouTube: https://www.youtube.com/watch?v=KhhOHUe_b6o
The K40 Whisperer software worked perfectly for me.
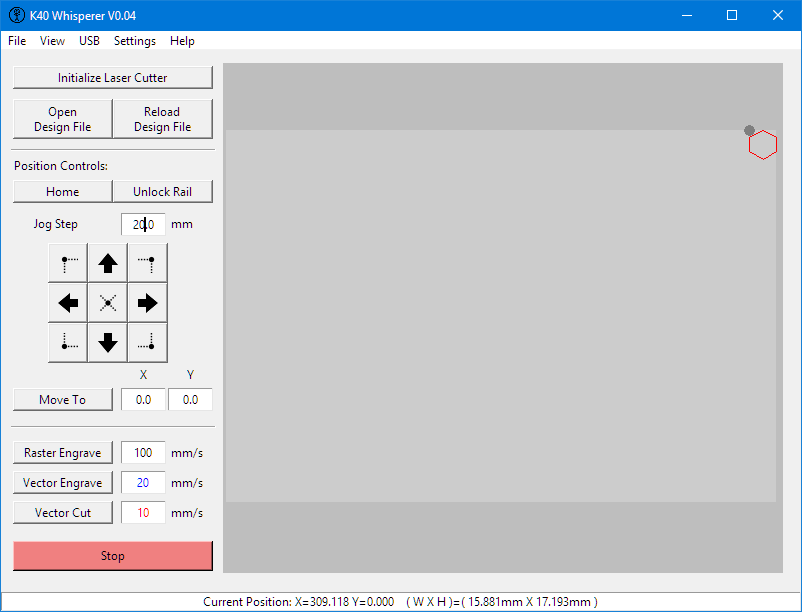
K40 Whisperer
The only issue I have is that my laser machine is using the right upper corner for the zero position, while the K40 uses the left upper corner. Below the first test run with Raster engrave (10% laser power, 100mm/sec):

First machine run
Fixed it to flip the graphic horizontally in Inkscape as a workaround:

Hello world
As the K40 Whisperer software is open source, I will look into ways to add this as an option to the software.
Fume Extractor
One upgrade I did is to spend a metal fume extractor pipe instead of the delivered plastic one. And yes, I placed a fire extinguisher nearby too:

Fume extraction
Water Cooling
For the cooling system I’m using 5 liter of deionized water as used for lead batteries. The lid avoids contamination of the water, and added algicide keeps the water fresh (I hope). Otherwise I have more water so I can exchange it.
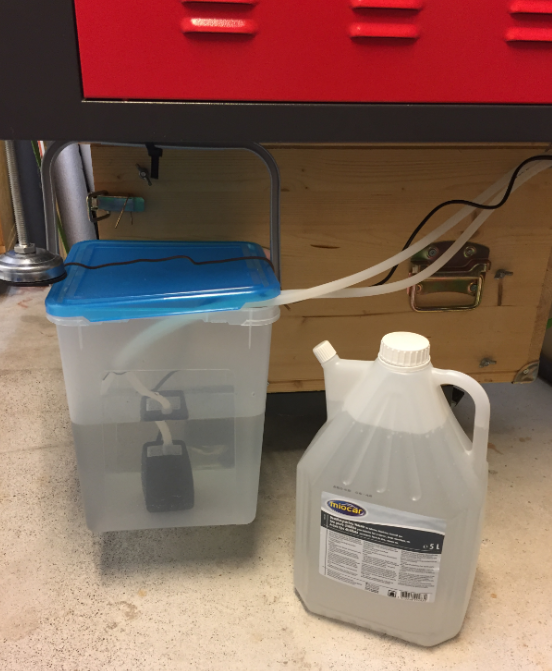
Water cooling with deionized
I attached the container to the machine so I can move it around.
💡 First I had the water outlet pipe outside the water to see if the pump is working. But this drained the water outside of the laser tube when the pump is not running. This creates air bubbles inside the tube which can be a problem. I have been running the pump for a long time at the beginning to remove any air bubbles from the pipe, and to avoid air to get into the system the outlet pipe under the water surface. I can feel the water container vibration to check if the pump is running or not (just to be sure). I need to think about a good automatic way to check the water pump is running.
Cutting Performance
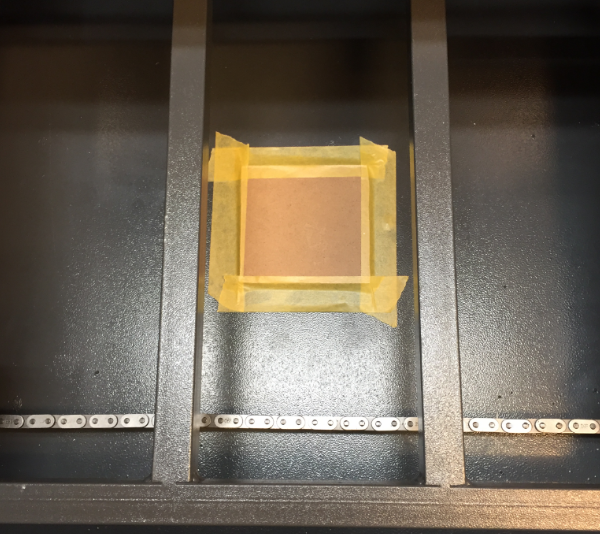
Below some samples from the first plywood cutting tests:
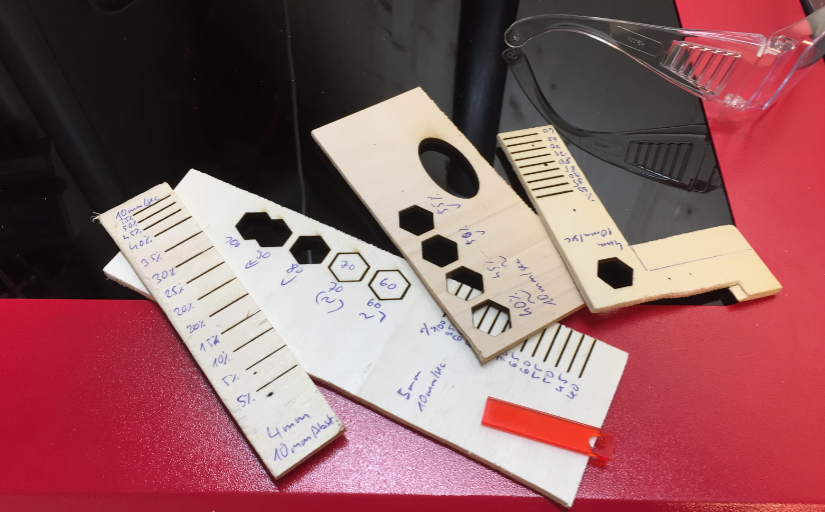
Plywood cutting tests
With 10mm/sec, cutting 4 mm Plywood worked very well with 50% laser power. With 45% or 40% it did not always cut through. For 5 mm plywood I had good results with 80% laser power, 70-75% worked sometimes too. Overall this is what I expected. I still have to run tests with MDF and PMMA.
Upgrades?
Here are a few things I consider as extra upgrades I could work on in the future:
- Additional LED light inside the cutter to better illuminate the cutting area. The cover has a tinted polycarbonate sheet (good!), but it would be good to be able to monitor better while it is cutting/engraving.
- Better air assist and water pump sockets: I fixed the cables, but they still could fall out.
- Ability to turn on/off air assist: the air blast makes a kind of nasty sound.
- Water temperature monitoring: to avoid that the cooling water temperature increases too much. Maybe an active cooler water chiller.
- Cover safety switch, to turn off the laser if the cover is open
- Laserhead autofocus sensor: this would help to measure the distance between laser and target.
- Magnets to hold the target in place: useful especially for small and light things, as the air assist might move it or because the plywood is not perfectly aligned.
- Corner alignment helper: that way I can position the wood/etc always the same way. That would allow to cut thicker material (see https://www.youtube.com/watch?v=DQXuzTTf2QE).
Maybe more will come up :-).
Summary
It took a weekend and some work, but so far I’m very happy with that machine. I think I got a ton of value for that money spent. Yes, such a laser engraving and cutting machine is definitely not a consumer product and not comparable with a professional one. It requires technical knowledge, and I have learned a lot of new things. The laser power of 50W and the high voltage are definitely very dangerous, and such a machine *never* shall be operated unattended. The internet is full of good tutorials and information, and it helped me to tweak the machine so I can successfully use it. It greatly extends my maker capabilities, and I have tons of great projects in mind :-).
In case you are considering to do the same thing: be aware that things are always different. Installing and using such a machine requires time and preparation, but is very rewarding. Reach out for advice and help in your local maker space. With this I hope that this article is helpful for your own adventures.
Happy Cutting:-)
Links
- FabLab Luzerne: http://fablab-luzern.ch/
- Tales of a cheap chinese laser cutter: http://hackaday.com/2017/02/22/tales-of-a-cheap-chinese-laser-cutter/
- Hackaday article: http://hackaday.com/2017/07/19/take-control-of-your-cheap-laser-cutter/
- K40 Whisperer: http://www.scorchworks.com/Blog/k40-whisperer-k40-cheap-chinese-laser-control-software/
- K40 Whisperer web page: www.scorchworks.com/K40whisperer/k40whisperer.html
- Good introduction about laser mirror adjustments: https://www.youtube.com/watch?v=KhhOHUe_b6o
- Tutorial about laser focus point: https://www.youtube.com/watch?v=Eg6THrEdleo
- Another useful laser mirror adjustment guide: http://justaddsharks.co.uk/support/laser-beam-alignment-guide

Looks great fun, Erich. There are certainly several ways to kill yourself here. I would guess “water without sundries” means water without impurities or perhaps de-ionised water, which is what you have done.
I can’t wait to hear how you combine your new toy and your love of cooking to produce new BBQ recipes.
LikeLike
Yes, I guessed something like that, as there are articles on the web about using destilled water or deionized water. The point is to avoid current flowing throught he water or causing extras discharge, so removing ions is deemed essential. If using destilled (more expensive) or deionized seems not to make much difference.
As for BBQ combined with a laser cutter: not really sure I want to go down that route. I have seen some articles about engraving things into a brisket/etc. The laser focus is very narrow (still need to exactly determine that focal point). I think using iron branding would be a better way than using a laser cutter/engraver for this?
LikeLike
In addition to lser cutters there seems to be a large number of CNC milling / engraving machines, some of which claim to be able to machine aluminium parts which would be ideal for automation / robotics development projects. Picking the right vendor is half of the challenge , there are so many of them.
LikeLike
Yes, a CNC milling machine has been on my wish list for a very long time too. But I think that one has to wait for a bit longer….
LikeLike
A further thought on useful fabrication technologies: I have been using selective laser sintering (SLS) of nylon with good results, from this bureau https://www.3dprint-uk.co.uk/
LikeLike
I will work on adding an option to handle your machine configuration in K40 Whisperer. I was previously unaware of this type of laser setup.
LikeLike
Wow, that would be really great! Thank you so much for your excellent work, the V0.04 version works very well with my .svg and Inkscape files.
LikeLike
K40 Whisperer Version 0.05 (which is available now) includes an option in the settings window for machines that home in the upper right corner. If you change the setting and click on the Configuration File: “Save” button your choice will be remembered for future K40 Whisperer sessions.
I think I have it set up the way your machine works. Let me know if it needs to be adjusted.
LikeLike
Thank you so much! I’m going to try this out and report back.
Thanks again,
Erich
LikeLike
The K40 Whisperer version 0.05 works like a charm on my machine witht he upper right corner. THANK YOU!
LikeLiked by 1 person
This not for the faint of heart project is very, very cool. I liked your careful preparation. Trust but verify. I am looking forward to seeing what you create with it. You made me laugh about the unit being a totally different color. “But as I did (not) order that thing to match my living room furniture, I was ok with that and continued working to get the machine out of the box.”.
LikeLike
Hi Kevin,
I like that red color more, but as that thing is rather big, and even if it located in the in basement of the building, the other family members had a say too. Not sure how easy it would have been to return that machine just because of the color.
Thanks for catching that missing ‘not’, fixed now 🙂
Erich
Erich
LikeLike
Great article. Wiring and mechanical make-up seems to be in general of the type of what we have seen in similar equipment/devices from Chinese manufacturers. Glad to see that with time they have been upgrading and increasing their build quality. Might the large center hole in the bottom possibly be there to act as a drain in case you have water leaking somewhere?
LikeLike
My thinking about the hole is a) to use it for engraving something very tall (the K40 machines have such a hole in the bottom too, as these machines are made to engrave some kind of rubber stamps)
or b) that this would be an option to return back the air from the bottom after it has passed a filter.
But I’m not sure, maybe someone has a better explanation?
LikeLike
You’re going to want to open that hole back up if you intend on doing any serious cutting. The primary purpose of it is to feed fresh air to the underside of your part, which aids with cutting and maintaining clean lines for materials like acrylic.
You’ll begin to notice that the laser requires less power depending on how much oxygen is available and what the ambient temperature is (it’s far easier to cut cleanly in lower temperatures).
On my K40, I even went as far as expanding the hole when I swapped out the under-powered fume extractor for a bathroom ventilation fan (the K40 has an oddly shaped bolted-on fume extractor).
LikeLike
Thank you for all these hints! That indeed could be a good reason to open it up again (and maybe put some mesh over it to avoid parts falling through). My fan is pretty good I think, and I think the machine gets enough air, but with that hole it certainly could be improved. With the honeycomp it did cut Acrylic up to 5 mm very well so far. Good point about the temperature, that’s something I can improve too.
Thanks again!
Erich
LikeLike
A very interesting article. I am from Russia and also ordered such a machine. Thank you Erich for the informative information. Can lay out photos of their work on this machine?
LikeLike
thanks :-). Not sure what you mean with “Can lay out photos of their work on this machine?” If this is about if you can engrave photos, then the answer is yes.
Still need to make some test runs, but as you can see from the pictures in this article I can engrave with different shades of gray. So if the image has good contrast and is good in gray colors, this should be very much doable.
I plan for a follow-up article with more examples I have lasered.
LikeLike
Sorry for the translation. It would be nice if You showed your products on this machine. I think it will be interesting that it may be in your capable hands.
LikeLike
Hi Vlad,
ah, ok, now I understand. Yes, I will post some additional articles with what I’m currently cutting and engraving. I’m experimenting with Acrylic and with card box material too.
LikeLike
Sorry if the previous message was written to the wrong place. Also I think to take cooling CW-5000 or CW-5200. Without cooling I’m afraid to start). While I’m all screwed up, configure,. Still thinking to buy a hood 550 watts.
LikeLike
I’m after a CW-5000 too.
LikeLike
Thanks Erich:-)! And here’s the first problem – the plugs for the air pump, water pump and power machine – the standard of China. Is it possible to change to Euro? How about You? Did you use a adapter or altered?
LikeLike
Hi Vlad,
maybe you have seen the pictures in my post: both the air and water pump are using US plugs (I call it like that, as they are used in the US that way). They plug into the backside of the machine as it has two US sockets for it. I don’t like these plugs/sockets as they are not of good quality and easily fall out, so I plan to replace them in the future (have not done that yet).
For the power socket, it is using a standard 3 pin socket on the machine. Yes, the cable which came with had a US plug too, so I throwed that one away and used an European cable instead (I have plenty of these around).
You should be able to do the same?
LikeLike
Hi Erich! Thanks for the info, I thought it was a Chinese outlet. Honestly, I did not notice them the first time around – too much). So I bought a 2 Euro plug, cut off the air pump and water pump are old and put new. Also took a power cable from the computer – it fits her perfectly. Tested the pumps separately – everything works. I then connected everything and turned it on.The tube remains in a bubble – I don’t know how bad it is?
LikeLike
Hi Vlad,
See https://en.wikipedia.org/wiki/AC_power_plugs_and_sockets#North_American_and_IEC_60906-2 for the US power plugs. China uses a different one from what I can tell. That site lists all the other types.
Do not use the tube if it has air bubbles in it! Get them out as much as possible (run the pump for a long time, elevate the cutter on one end, etc).
LikeLike
Hi Erich! Thank You for the links. Will expel from the tube, probably will tip engraver. I connected to the hood aluminum corrugation 150 mm 3 meter length. The end does not fit, had to cut and roll up with foil tape. Desk bad falls and rises when it is the cell – chain does not twist. Test laser by 3 %. The burn is. Mirrors are not yet set up. It will be necessary to ensure no fingerprints.
LikeLike
Hi Erich! Find the cheapest price for the chiller. May be useful to You. I think to myself to take some time. https://ru.aliexpress.com/item/cw5200-water-chiller-for-laser-machine-cooling-laser-tube-device/
LikeLike
Your link is for the CW-5200 which I think is a bit too overpowered (depending on your use case, I think). The CW-5000 is more than enough for a single CO2 laser up to 100 Watt.
LikeLike
You are right Erich, that CW 5000 is sufficient, however, the difference between the CW 5000 and CW 5200 about 50 euros. How to acquire’ll adjust, we now have +35 degrees Celsius (in Russian 🙂 ), so no chilling fear.
LikeLike
Hello Erich. Ordered CW5200. There is a freon cooling, CW3000 has no freon cooling – only within room temperature. Now the question is what to use as coolant. I think the solution = distilled water 50% + propylene glycol 50%. Not automotive antifreeze as ethylene glycol, which is poisonous. We have a winter to minus 40 below zero, so you need antifreeze (of course the room warmer, but just in case). What do You think about this?
LikeLike
Hi Vlad,
yes, the CW-3000 is ‘by air cooling’ only. Means there is a fan cooling the water down to the room temperature. So with this you can cool down the water to the room temperature, but not below.
CW-5000 and CW-5200 are using a compressor for cooling, so it can cool below room temperature like a fridge.
As for the water solution: use deionized water. You only need anti-freeze/glycol if your room temperature goes below say 5°C which seems to be the case. But honestly I think you should not operate the laser in such an environment.
And adding anti-freeze to the cooling water is very bad too, as it reduces the resistance of the water which is very bad for the laser. Better operare it with pure deionized water plus a few drops of anti-algea (to void algea to grow), and no anti-freeze at all. If you want to protect the water with such a high amount of anti-freeze for that minus 40°C, then I think this will be a problem. But I’m not a an expert, you might check other forums like http://www.cnczone.com/forums/general-laser-engraving-cutting-machine-discussion/50904-cooling-laser-tube-antifreeze.html or http://www.cnczone.com/forums/general-laser-engraving-cutting-machine-discussion/244650-laser-garage-winter-antifreeze.html. They all seem to indicate you should not use any antifreeze.
LikeLike
Good evening, Erich. Thanks for the tips. Don’t plan to use the laser below 5 degrees. But you need to insulate a room. Also I have no heating and I’m afraid if I for a few days will leave the laser, the liquid to turn into ice. I installed Corel Draw X4 and Corel Laser. It comes as a plugin and put after. The computer has identified the machine and I have to move the axis via the computer control. As I understand, you are using a different program, how comfortable is it?
LikeLike
According to my research, the ideal temperature for the cooling water is 25°C. I don’t know what happens if the temperature is lower than that. As outlined in this article, I’m not using that Corel Draw version I received (I don’t trust it, it is probably a pirated version or might even have some nasty virus in it. Same for the LaserDRW software. Instead, I’m using Inkscape (open source) plus the K40 Whisperer (excellent software!), check the links section of this article. There is as well a video in the linked article how to use it. In my view the easiest way to use a laser cutter.
LikeLike
One more thing: K40 Whisperer supports only the M2 nano board (picture in my article). Other boards are currently not supported.
Check http://www.scorchworks.com/K40whisperer/k40whisperer.html for details.
LikeLike
And one more thing. You had no noise when moving the axes, similar to the scrolling rubber toothed rim? What can be the reason? You may need to remove the movement speed in the program?
LikeLike
no, I nothing like that. I’m moving the laser with up to 150 mm/sec. Maybe you still have some packaging material inside your machine?
LikeLike
Hello Erich. About the strange grinding – I looked with a flashlight about garbage and transport fixation – did not find anything. Bolts on the end pieces are fixed and everything works. Just in case, I increased the distance in the program to the endpoints from 5 mm to 7 mm along the X and Y axes.
LikeLike
I think to find a solution of propylene glycol for heating systems. It is green. The canister is 10 liters, the freezing point is 30 degrees below zero. Also, there the anti-foaming additives + have lubricating properties. Also antifreeze does not bloom. I plan to dilute 50% of the distilled water / 50% antifreeze. If you do not insulate the room, then 100% antifreeze.
LikeLike
Erich, special thanks for the programs Whisperer and Inkscape. Can You hear about a program PhotoGrave 3, that allows You to laser engrave on glass? Trial 30 days. Then You can remove and reinstall again.
http://mir-cnc.ru/topic/2785-программа-photograv/
Yet very interesting is Your section on the depth of cutting at different capacities.
LikeLike
Hi Vlad,
why should I need yet another program for glass engraving? I have not tried on glass yet, but Inkscape+K40 Whisperer will do this too.
LikeLike
Good evening, Erich! Finally came water chiller CW 5200. However, I had to buy again the cord to the power supply (came on 3 pins), connector tubes on the chiller 10 mm, and the laser is 6 mm. and Bought the adapters and clamps. I also have 10 litres of liquid for heating systems based on propylene glycol (not toxic) to -30, most likely will flood is not diluted. Tomorrow I’m going to build a chiller. Very eager to finally start the laser!!!)))
LikeLike
Good evening, Erich! My first cutting!!!
LikeLiked by 1 person
Great! I hope it is working great!
LikeLike
1. Connect the chiller. Filled with propylene glycol. Places of joints immediately began to flow. On both sides of the metal clips had to attach plastic like you. Corrected.
2. I was afraid to tune the laser). It turned out that the second mirror was shot down horizontally and when the third mirror moved, the beam went beyond the target. Corrected. Pff …)
3. I used the program Corel Drow 3 with a plug-in for the laser. First, the engraving of the square, then the text. Cutting did not turn out 43% set, plywood 4 mm – in cutting mode of course. Maybe you should reread your blog again.
4. Imported the picture in Corel Drow, the engraving is excellent, with no passes and lines.
I’ll try, I’ve waited so long for cooling, now I can not worry). Thank you very much for the useful information. I will be happy to follow your success !!! 😉
LikeLike
Hi Vlad,
glad to hear that things are getting into shape. I had to do lots of fine tuning to to get reasonable results, so this is just the first step.
BTW, I’m in the process to replace the default motor controller hardware with a more powerful one. Not finished yet, but for sure I will write about it.
LikeLike
Good morning, Erich! Insulate the working area, but I think it will be enough frost. So good that the cooling system propylene glycol. Cut the plywood 4 mm at a speed of 10 power by 25%, the etching rate of 200 a capacity of 5-10 % depending on depth. Acrylic haven’t tried. I also want to follow Your example and make boxes. How do You do?
By the way, I congratulate You on Halloween!
LikeLike
Hi Vlad,
I have received from others questions about how to create boxes. I’ll prepare a short article about this for everyone.
Erich
LikeLike
Hi Vlad,
I’m sorry, I did not make any progress documenting how to create a box. But have a look at http://www.makercase.com which should get you started?
LikeLike
Good night, Eric! Thanks for the link. You used this to create a box or was the finished project on the Internet? You have it turned out wonderful, as was the case for weather device. By the way, is it possible to use a laser to create circuit boards for chips? I have tried several materials – plywood 3 and 4mm acrylic 2 mm plexiglass – however, I came across the plexiglass with a chlorine content (as I said), it doesn’t cut, the edges would burn, a lot of blue smoke. I think you need to choose the material, try small pieces. Nothing wrong with that on boxes yet article. Patience and hard work made man :).
LikeLike
I ususally create the box with that software, then import it into Inkskape and modify it. That way that box in https://mcuoneclipse.com/2017/09/09/wifi-oled-mini-weather-station-with-esp8266/ has been created.
I do not recommend laser cutting PCBs or copper: this can damage the laser, plus the fumes can be dangerous too. But there are many articles on the web on that topic, including https://hackaday.com/2017/08/22/laser-etching-pcbs/
And be very carefule with chlorine: this is very dangerous!
LikeLike
I think that You too would not be difficult to collect such a laser machine). Dangerous material I no longer use, it was a negative experience. You have a wonderful, meteorological device, not tried to do any of the Smart Home? We have temperatures below zero Celsius, I’m glad the cooling system is 100% propylene glycol. The room is not heated and does not work when the temperature takes its toll. I think liquid is propylene glycol down to -30, and then turn into a gel. You as there with temperature?
LikeLike
Good night Eric! Today I connected a rotary device for machining cylindrical surfaces. It works! Tried on glass bottle green glass. Engraving 200 speed 20 power. There are nuances. Bottle diameter 65 mm to fit with a rotary device, so I had to remove jacenty table and Unscrew the frame on which it lies.
LikeLike
I have ordered a dedicated controllerboard which I can use with the LaserWeb software: the controller board has more than 3 stepper motor connectors, so I can easily use it with a rotary device without removing the Z axis stepper connection.
LikeLike
Sorry Erich, this translator is driving me crazy 🙂
LikeLike
Here is a link to a video (not mine). I have the same rotary device, ordered from the same seller as You. https://www.youtube.com/watch?v=wstE5DPBIv8
LikeLike
ATTENTION! The turning device to connect when completely off the machine! Otherwise you’ll burn the motherboard! Disable the Z-axis on the motherboard and connected to the same rotary device. Then turn on the machine. The rotator starts to rotate. Click on the endstop of the Z axis on the machine (he was right). The turning device is stopped. Can work.
LikeLike
It should be clear that one should never change electrical connections while a system is powered?
LikeLike
Good evening, Erich! I do not doubt Your competence. Just Your blog is read by people with different levels of training and I felt it my duty to warn you.
LikeLike
With my level of training it is important that someone explained to me what to do and what not. Since we are talking about security, I could not ignore this fact.
LikeLike
Good evening Erich! Here is the first breakdown. When cutting 35 percent is gone laser light, high voltage power supply started to make grinding noise. When cutting at 5 percent of power no sound, the beam was increased to 15 per cent appeared sound and the beam disappeared. I will change this unit. On aliexpress there is a choice of 2 units – such as I have MYJG 50W and HY-T50 50 W. What can you recommend? Faced with such a situation?
LikeLike
No, my laser tube is working without any issues. Do you know what was causing that problem? I have read that damaging a laser tube usually is because of a) overheating the tube or b) having a low resistance in the cooling water (Ions, etc). That grinding sound could be because of that cooling fluid you are using. I would use de-ionized water *without* any anti-freeze. Maybe if you replace your coolign water that would solve your issue.
I would replace the tube with one as close as possible to the one you already have installed.
LikeLike
Merry Christmas Erich!
LikeLike
The problem is not in the tube. Broke the high-voltage unit. As I understand from the Internet, it could be the transformer inside – it makes the sound of the breakdown current. Can be two reasons – either low room temperature – condensation, or voltage surges in the mains – you need a voltage regulator. I ordered an identical model on aliexpress – did not experiment. Are You looking at the voltage regulator?
LikeLike
I mean, whether or not You have a voltage regulator? About the liquid – I don’t think that the problem may be due to propylene glycol. The liquid needed for cooling, because there is glass, dielectric – fluid is isolated from electricity. And, by the way, propylene glycol does not bloom and does not need to be changed frequently.
LikeLike
Please forgive me if the translation is not entirely successful and the idea is not as accurate as I’d like – I use Google translator. Once again, happy holidays!
LikeLike
Dear Erich! The machine is repaired. I replaced the high voltage unit (had to cut old wire black, as I had no connector on the new block and assign it to a new block). Also I put the voltage regulator for 2 kW and connected to the stabilizer and even a chiller. I noticed, by the way, surges when turning on the chiller. Maybe it was one of the reasons of breakage of the high voltage unit?
LikeLike
Surges? Where did you see them? I have not observed any with my chiller, and that would not be good. But if this would be the reason for your breakage or not, is not clear to me.
LikeLike
As soon as I hooked up the stabilizer, I saw that when you enable a chiller going surges is displayed on the gauge voltage regulator. Because the machine connected to the same line, I think this affects the high voltage unit. I have not disassembled the broken unit, but I think it burned out the transformers, as was the sound weld when you turn the broken unit.
LikeLike
Pingback: Bringing A 50 Watt Laser Cutter to Life | Hackaday
As far as water cooling goes look into PC water cooling stuff – 12VDC fans, 120mm common-sized radiators plus all the temperature monitors and things you could ever hope for. Thanks for the write-up, I’m hoping to get one soon ad this will help a lot. Thanks!
LikeLike
Thanks for that advice, I think that’s indeed something to consider.
LikeLike
Doing a bit of research: using a passive (fan only) cooling won’t be enough, or only for a very short time. So I need some kind of active (peltier) cooling. I was looking into aquarium water cooling systems which might be an alternative. Or an industrial cooling box as a CW-5000 (the CW-3000 is a ‘fan only’, but cheaper)?
LikeLike
If I had to guess, I believe “water without sundries” means water without mineral impurities. So basically, the vendor’s telling you to use deionized/reverse osmosis water.
LikeLike
Yes, that’s the kind of conclusion I had as well. I’m monitoring now the water temperature, and I think I will need some active chilling, otherwise the water warms up too much.
LikeLike
Pingback: Laser Engraving for a Card Box | MCU on Eclipse
Good article!
One question: Did you had to pay any customs taxes?
Thanks!
Javier
LikeLike
Hi Javier,
I did not receive any invoice yet. Usually it is in the 8% range.
LikeLike
Pingback: Tuning a Laser Cutter and Determining the Maximum Usable Laser Power | MCU on Eclipse
Great article. I’ve ordered a couple of small things off AliExpress. I think all we ever hear about are the BAD stories. I usually expect the worst and am pleasantly surprised. Your lab sounds like a lot of fun!!!
LikeLike
I had ordered small things from AliExpress earlier too, and that was mostly a good experience. Shipping took some time really long (up to 2 months), and one package was lost and never arrived, but I had received a refund.
I agree: better to be prepared for the worst and then things will turn out in a positive way.
And so far I having a lot of fun with that machine. I need to write an article about the smaller upgrades I did so far. And I came to the conclusing that I need a good cooling water chiller too.
LikeLike
Hello Erich! Today I have joy! Also came machine! I will understand, guided by Your instructions. In my opinion, the holes from the bottom of the machine for air flow and close them is not worth it – I read on the Internet that the holes prevent the ignition of the material. But, of course, have yet to be clarified. Don’t know how to add a photo of my machine? And, in principle, it is absolutely such as You)
LikeLike
Congrats to your machine! I plan to re-open that hole, but the reality is that the machine has enough other holes where the air can come in. But I agree it might be a good thing if it comes from the bottom too.
LikeLike
Pingback: Laser Cutter: Wooden Chest Box | MCU on Eclipse
Pingback: WiFi OLED Mini Weather Station with ESP8266 | MCU on Eclipse
hi Erish! amazing your description.
about your the seller on ebay can you share?
I’m afraid to buy without knowing…
Thanks in advance
LikeLike
It was not from eBay, but from AliExpress.
I had it from this store: https://www.aliexpress.com/store/521901?spm=2114.12010108.100004.2.7d847a75fv1Z2
LikeLike
Pingback: 50W Laser Cutter Upgrades | MCU on Eclipse
I have not been able to get k40 whisperer to recognize anything created in Inkscape as vector graphics. Is there something I need to set up different in inkscape? what am I missing?
LikeLike
Make sure you are using blue and red lines (set the color of the lines).
See for example the project I have posted here: https://mcuoneclipse.com/2017/09/09/wifi-oled-mini-weather-station-with-esp8266/ with the link to the files on Thingiverse.
I hope this helps,
Erich
LikeLike
You were right on! I was not using the “correct” red. problem solved. Thank you.
LikeLike
great!
LikeLike
Hi Erich
This was a great article and fun to read. I am thinking as well of buying one of these machines, but I am a little bit worried when it comes to shipping. How much did you pay for the DHL door-to-door delivery, if I may ask? And do you have any tips what I should be aware of when dealing with a seller with respect to shipping?
Thanks in advance!
Greetings from Zurich
Felix
LikeLike
Good evening!
Thanks for this wonderful article; I try to buy a very similar Laser (4050). I want to ask about the shipping Method. Did you buy in “Seller’s Shipping Method“ or “DHL”? You wrote DHL for about 150US$, but on the Store Page the price for DHL is a lot over the machine price only for shipping.
Best Regards from Austria
Peter
LikeLike
I used DHL, but I think the seller made a mistake. He asked for an extra $150 which I had agreed to. I see that now the price is much higher, so I must have been lucky. Using a slower than DHL shippment should be cheaper.
LikeLike
Thanks for answer
Peter
LikeLike
Hi Erich,
first of all… GREAT ARTICLE!!!
I decided to go down your route after reading it and bought the same machine you did from the same vendor.
I have also included the rotary platform while at it. 🙂
One question: would you know what seaport would the goods be stopped before reaching Lugano?
I have chosen sea-transport to save my self 800 USD for Courier freight which would have essentially doubled the cost of the machine…
Thanks.
Alex
LikeLike
Hi Alex,
oh, that rotary platform was on my list of things, but at the end I decided not to include it. Maybe I will do my own rotary device.
As for the sea port: I really don’t know, but I believe it will be Hamburg or Amsterdam. This is at least where things seem to come from mostly if things are coming from China.
Let us know how it goes!
Erich
LikeLike
Hi Erich,
unfortunately I happen to have made the payment just before the Chinese New Year! So… no news for now.
I shall keep you updated as managing the customs’ clearance and road delivery already seems an “interesting” task! 😀
By the way, have you had the chance to test the laser on cellulose acetate sheets?
If not, I could send you a couple of pieces for testing…
I would be most interested in knowing what the outcome was! 😀
Alex
LikeLike
Hi Alex,
yes, I’m facing delays because of the Chinese New Year too. And no, I have not used any cellulose acetate sheets (I even did not know that something like this exists? I think overhead transparency foils are made of it?).
Checking the specs, it seems it is safe cutting them (it always worries me about toxic fumes or putting things on fire). Looking at https://www.youtube.com/watch?v=hOCOFbD9Vao it seems to create a lot of fumes.
I can try it out if you have a sample for me.
LikeLike
Hi again Erich,
I apologise but I do not know how to reply to your latest message as I cannot find the “reply” button… 😀
Anyhow, thanks for your availability to try to test your laser on cellulose acetate sheets (I could organise a quick shipment to you with a courier – feel free to contact me directly with an address I could send the test parts on my email account *** alessandro . ciuchi [-at-] gmail . com ***), this material si what high end hand made eyewear is made of.
One more thing: do you remember how much tax you had to pay to get the laser into Switzerland?
And did you have to pay it directly to DHL?
I am asking it as, after all, it may be simpler and somewhat cheaper (although USD 800,00 is not what I call cheap…) to let them take care of everything rather than me trying not to get “scammed” by unprofessional companies…
As usual: thanks! 🙂
Alex
LikeLike
Err… I just read my latest post and it should have read: ” (I could organise a quick shipment to you with a courier – feel free to contact me directly on my email account *** alessandro . ciuchi [-at-] gmail . com *** with an address I could send the test parts to)
LikeLike
Hi Alex,
If I remember right, I had to pay VAT tax and handling fees in the CHF 50.– area. This was an invoice from DHL.
LikeLike
Pingback: Using a Laser Cutter and Engraver with Cellulose Acetate Sheets | MCU on Eclipse
hey, how can control the power beam?

with software control?
im try test, but on my machine(K2030) always have the same power (nano 2 board V9)
LikeLike
I currently do not control the laser power by software. It is configured on the user panel. That piece of plywood you are linking to has been used with raster mode. That way ‘grayscale’ images can be created.
LikeLike
Pingback: Easy Box Making for Laser Cutters | MCU on Eclipse
Pingback: Happy Easter Laser Cutting | MCU on Eclipse
Pingback: Upgrading a Laser Cutter with Cohesion3D Mini and LCD | MCU on Eclipse
Quick update on my side.
The Laser power source miserably failed 3 months and 3 days into the playing with it (not many hours though – possibly around the 10-15 hours region max).
Unfortuantely it is 3 days after the 3 months warranty cover expired…
I find annoying the warranty times were not shared with me as buyer.
Anyway, let’s see how things develop.
LikeLike
Hi Erich,
this morning I have finally received a new 50W laser power supply.
Before installing it I have noticed a “strange” thing: it is missing the black negative cable to be connected to the “other” end of the laser tube.
I have read here https://groups.google.com/forum/#!msg/opensource-laser/ffET5oi1lQM/D4cx2neEpMQJ that it is anormal chinese standards no to provide with such earthing cables.
Do you have any ideas on how to solve this?
I am by no means an expert in this field and I would appreciate any suggested by you. 🙂
Thanks.
LikeLike
Hi Alex,
I’m not an expert in laser power supplies, but my supply has a grounding wire connected to one end of the tube: https://mcuoneclipse.files.wordpress.com/2017/08/laser-tube-ground-connection.png
I’m travelling so I cannot check the details right now on my machine, but I think you have to do something similar. I’m don’t remember where that grounding wire is connected on my machine.
LikeLike
Thanks Erich,
the original set-up was like your one where the grounding wire was connected in a flimsy way and you put something to make sure the clamp did nkt get loose.
With the new power supply that got delivered today I am lost…
We’ll see. 🙂
Happy and safe travelling!!!
LikeLike
I would sure like to be able to contact someone regarding ordering one. I find the store on AliExpress but I find no phone number contact form or anything to ask questions before ordering. If anybody has some contact information that would be helpful. Although now I see it says Allen’s store, so maybe it’s not directly from the manufacturer. This is the one I was interested in (I think)
https://m.aliexpress.com/item/32430405336.html?trace=storeDetail2msiteDetail&spm=2114.12010612.8148356.1.177133ccuaypO6
LikeLike
Yes, I had ordered mine from Alan’s Store (https://www.aliexpress.com/store/521901?spm=2114.10010108.100005.2.428a2da0JPrLAZ).
If you go to that store, you get contact information and you can chat with them. I think using the phone will be difficult.
Depending on what software you want to use, you might check what controller board is inside (m2-nano?) as it is not clear from the pictures/description.
Good luck!
LikeLike
Pingback: Replacing a cheap Chinese CO2 Laser Tube | MCU on Eclipse
I found your blog a month or so ago and based on your experience, I ordered a 4040 from Hauser (I think it was a direct site, not Alan’s Store). I got the model with the built in DSP controller. It looks like a Ruida which I’m familiar with from working on an older CO2 model (I think it’s an old BOSS) at our local maker space. Of course, it could be a Ruida knock-off, so I’ll let you know how things go when I get it in 20-50 days! I’m also considering a CW3000 chiller, but I’m going to make sure things work well first.
LikeLike
I’m not familiar with that Ruida DSP controller. I have exchanged the one which came with my machine with the Cohesion mini one: https://mcuoneclipse.com/2018/04/15/upgrading-a-laser-cutter-with-cohesion3d-mini-and-lcd/
I’m very, very happy with that controller, exspecially as I an use the LightBurn software with it and don’t have to use Corel or any other Chinese special software.
LikeLike
Too good to be true. Like you, the seller contacted me after payment to say that they could only ship to seaport and that I would have to arrange for additional shipping from port to my address in Wisconsin. My choices at the time of purchase were “Free Shipping” OR DHL shipping for the low price of $808, which is 90% of the cost of the machine. I guess I’ll have to look elsewhere, since I neither know who to contact about picking up at port, nor could I afford that amount at this time. I can’t even be disappointed, since I should have known better. Now I must begin the process of trying to cancel the order and hope there are not additional problems getting a refund.
LikeLike
Yes, too good to be true :-(. Shipping larger pieces by DHL is very expensive, but $808 even tops what I have seen. Shipping to a seaport would have been difficult for me too: I would have to pick it up myself (oh, well, that could be very difficult too) plus I would have to deal with all the customs, etc.
In retrospective, now as I know how such a machine is built, I probably would build one myself with my custom enclosure and just buy the parts from sellers in China. That way I can get things shipped with the usual parcel size and would (hopefully) get exactly the parts I want. But that route was not doable at the that time a year ago, I simply did not had the needed knowledge at that time.
LikeLike
Hello! I have a 50W Chinese machine as well. How do you know that the power control is in percentage and not A or mA? Mine has similar controls to your cutter and it says “Current Adjustment” as well, with an “A”. I thought it refers to the current passing through.
For the record, I use “35” (mA/A/%) on the LED display and 10mm/s to cut through a 3mm acrylic in one pass.
LikeLike
The power supply usually has a current limiter. The maximum power for the tube depends on the tube. See https://mcuoneclipse.com/2018/11/17/replacing-a-cheap-chinese-co2-laser-tube/, my new tube has a rating of 20 mA (see https://www.aliexpress.com/item/Hight-Quality-800MM-50W-Co2-Glass-Laser-Tube-for-Engraver-Cutting-Machine/32666128196.html?spm=a2g0s.9042311.0.0.27424c4dDnSOYg). To be sure, you would have to measure the current (be careful because of the high voltage!). The other comment is that with the orignal board/firmware you really cannot tell what the power supply does. That’s why I have replaced my controller with a Cohesion 3D mini one (see https://mcuoneclipse.com/2018/04/15/upgrading-a-laser-cutter-with-cohesion3d-mini-and-lcd/). Here I have limited the max PWM to 80% in the Smoothieware software to avoid to run the tube with too much current.
LikeLike
Pingback: Lasercut Angel Sweets Box | MCU on Eclipse
Hello Erich!
Did you investigated the autofocus options?
I saw that you’ve played with some ToF sensors, but they’r resolution seems not enough (we need sub-mm resolution). It is possible to make AF on CO2 laser, unfortunately the only solution I’ve found is a complete machine 😦
LikeLiked by 1 person
Hi Zoltan,
I looked into this, and as you say the resolution of these ToF sensors is not high enough. Plus they are optical, so the laser burn smoke likely will cover them so I have to clean them.
A better sensor would be a capacitive one, but this requires a well defined bed and high accuracy too.
To me, a autofocus/bed leveling is not worth the effort and money: I don’t run a factory line with the laser, and leveling/focus the laser is a matter of a few seconds.
LikeLiked by 1 person
Hi Erich,
This https://www.youtube.com/watch?v=aPRxxJhTJqY looks like an optical AF, with sensor probably inside the housing. It is probably in parallel with the actual cutting beam inside the housing.
The Z axis can be made long enough to entirely eliminate the need for moving table.
Leveling/focusing is easy enough task with flat pieces, but what happens when one wants to engrave an “impossible” shape, for example this: https://bit.ly/2AyDp6Q ?
LikeLike
I agree: such complicated use cases can benefit from such auto leveling. What I have seen on other machines is that you can provide a Z axis value: in that case the bed is leveling based on the settings.
I did not had the need for such auto-leveling, so I did not want to overcomplicate my machine for this.
LikeLike
I bought a 100 watt Hauser last year and run it almost daily. The ali dealer is one of the best shops I’ve dealt with. He made sure that I knew that the free shipping was to the nearest port and that I was responsible for customs and shipping from there to my home. That was before he would accept my order! No surprises for me. We upgraded the original 80 watt to 100 watts, added a water chiller and a rotary attachment. I did check the tube for damage and water since it was delivered in the winter. It was ok. I also found a stray screw and a few that could be tightened a bit but the post-it test showed a bulls eye on every mirror. Couldn’t be happier. BTW mine came yellow and gray.
LikeLike
Thanks for sharing! I agree: there are man horror stories, but indeed things could work very well. Mine did work very well too, and I only had to replace the tube so far, and I’m very happy with it.
LikeLike
If your still looking for cooling options the link below is for a nano aquarium. Guessing it would work well with your 5 gallon water supply.
https://www.marinedepot.com/Chill_Solutions_CSXC_1_Thermoelectric_Aquarium_Chiller-6A00002-FICHMC-vi.html?utm_source=mdcsegooglebase2&utm_medium=cse&utm_campaign=mdcsegooglebase2&utm_content=6A00002&gclid=Cj0KCQjw5J_mBRDVARIsAGqGLZCuwOrg9hdLd7c4l3xNl0QlPsD2IcCeDjDj_w3SwaME94SA13jHd1MaAhocEALw_wcB
LikeLike
I upgraded the cutter with an industrial water chiller/cooler: https://mcuoneclipse.com/2017/09/24/50w-laser-cutter-upgrades/ and I’m very happy with it.
LikeLike
Erich….I notice your machine operates on 220 volts. I am in US and most items like this herenoperate on 110 volts. Will this machine operate ok on 110 volts ?
LikeLike
I have ordered my machine explicitly for 230V. So if you order a machine, you have to ask for a 110V version of the power supply. Some power supply have a switch/setting to choose 230V or 110V, so you would have to check.
In the worst case you have to order a matching power supply (e.g. https://www.aliexpress.com/item/MYJG-50W-CO2-Laser-Power-Supply-110V-220V-High-Voltage-PSU-for-50-Watt-Tube-Engraving/32795294171.html)
LikeLike
The hole in the bottom that you plugged, could it be where fresh air enters, so that fumes will be evacuated by the vent fan? Fumes can’t get out, if fresh air can’t get in.
LikeLike
I think it probably would be more for adding another ventilator there. The enclosure has holes on the front which make more sense: pull in air from the front and move it to the back to have the inside filled with fresh air, so the air is pulled through the whole compartement. if it would only get it from the bottom it would probably not vent the front area enough.
LikeLike
can you upgrade from 50 watts engraving machine to 80 watts
LikeLike
That might depend on the tube. In general I would say yes.
You would need a differnt/more powerful laser supply in my view. The bigger problem will be the dimension of of the machine (depending of your laser tube): if it is longer than the machine cmpartement, you have to cut out a hole.
LikeLike
Pingback: Copyright Law for Makers and Educators | MCU on Eclipse
Thanks for your excelent report on your experience buying and using this laser!
I found your blog, because I’m thinking about byuing the same one.
I found the seller you bought your machine from, but also another one, who seems to be using a picture of your review (scroll to the bottom of the page: https://www.aliexpress.com/item/32917078786.html?spm=2114.12010612.8148356.11.4b7d1b8crPBftN) Or could it be that it’s the same seller? It looks like they’re both from the same city (Liaocheng) in China.
I’m leaning towards a Ruida controller and that seller seems to offer a machine with a newer version of it and it also has an Ammeter already built in. Furthermore, it looks suspiciously similar to a laser that is sold by a Dutch company for three times the price: https://metaquip.nl/product/lasersnij-graveer-machine-lite/, that’s why I’m eying that one.
But the store you bought from looks more reliable (at least they have some reviews on their page) and ofcourse there’s your experience.
Tough decision!
LikeLike
Thanks for your comments! Not sure if they are the same seller, this is sometimes not clear at all. The machine https://metaquip.nl/product/lasersnij-graveer-machine-lite/ looks similar because many of these machines are built from the same base parts. Check out my other articles on this machine, e.g. I have upgraded it (https://mcuoneclipse.com/2017/09/24/50w-laser-cutter-upgrades/) and I highly recommend such a cooler even if it is nearly as expensive as the machine. Not sure if you have seen my other article about replacing the tube: https://mcuoneclipse.com/2018/11/17/replacing-a-cheap-chinese-co2-laser-tube/
I hope this helps,
Erich
LikeLike
Yes, I have read your other articles, they offer a lot of good information!
I know the printers are very similar, but whilst doing my research, I also noticed that a lot of sellers aren’t very clear about what exactly you can expect to get when you order from them (eg. some photo’s show controller X, whilst others show controller Y and the discription isn’t very helpful either). So deciding on whom you can trust to buy from isn’t easy. That’s where recomendations from actual customers like your are invaluable. And that’s alo why I found it strange that I saw a screenshot of your review in another seller’s store. Is it the same seller, or another seller using somebody else’s reviews? That’s what I find frustrating about dealing with places like AlieExpress…
LikeLike
I agree: for a small amount of money I usually take more risk. When I ordered my machine I mentally was preparing for either getting crap or other hassles. At least I felt comfortable with the Aliexpress refund policy (but not sure how it would have turned out in reality). The difficulty I see is always about the shipment terms and price: it seems that the price for shipment gets higher and higher.
LikeLike
I have a laser engraver that looks somewhat similar to this one, but it is an 80W(https://omtechlaser.com/products/80w-usb-8r57-us). It’s just under 3,000 and I think I’m very pleased with it. It works well for me to engrave some prints and other creations.
LikeLike
Congratulation! Yours look larger and is about 3x the price I had to pay (including my extras). But 80W for sure is a good thing if you want to cut plywood >6mm in one run.
LikeLike
You should try using MeerK40t instead of Whisperer. Much more functionality.
LikeLiked by 1 person
I have not tried MeerK40t. I have switched to LightBurn (https://mcuoneclipse.com/2018/04/15/upgrading-a-laser-cutter-with-cohesion3d-mini-and-lcd/): not free, but very affordable, and the features are great.
LikeLike
Meerk40t is (IMO) the best software for driving a stock k40 with the m2-nano controller – in some areas (i.e. drawing) it is not quite up to Lightburn standards (yet) but it has some features that Lightburn doesn’t have and can create some excellent results.
I would encourage other people to try this out before spending money on a Cohension3d controller and Lightburn – they are affordable, but in % terms quite a significant extra cost on top of the original K40 price.
LikeLiked by 1 person
What are these features which Lightburn does not have?
I’m not using the drawing in Lightburn at all, I’m using Inkscape instead. At that time, I was not aware of MeerK40t. In retrospect I might have tried it.
LikeLike
I just read through the whole thread, and would like simply to ask you about your experience with this device: are you still very happy with it, as you noted it when you posted the original message ?
LikeLiked by 1 person
Yes, I’m very happy with it, and using the machine frequently. I had to replace the tube (https://mcuoneclipse.com/2018/11/17/replacing-a-cheap-chinese-co2-laser-tube/) plus added upgrades (https://mcuoneclipse.com/2018/04/15/upgrading-a-laser-cutter-with-cohesion3d-mini-and-lcd/), but overall: this is a good machine for me, doing the job I need. Today probably I would aim for more W and a larger bed (but space is always a concern in a small shop area).
LikeLike
Thank you for the feedback. As the machine is still on sale, I’ll take one for our association… and if you don’t mind, I’ll keep you posted about our experience with it. Cheers. Tibor
LikeLiked by 1 person
sure, keep me (and everyone else) updated! I’m curious how your shipping experience will be.
LikeLike