I’m convinced that this ‘Internet of Things’ thing-thing is not real. Pure marketing and buz words without any added value, right? The IoT hype is so bizar: it must be originated by aliens which have taken over the brains of all the Pointy-haired Bosses of the world? There is no useful application or use case out there!
But wait! There *is* actually good use case, at least for the geeks of this world. We all love clocks as we want to know the time, and we all love the weather forecast so we can plan accordingly. At least I usually do :-).

SQUIX ESP8266 Mini Weather Station
A tweet by Daniel Eichhorn (@squix78) triggered my interest: he created a cool ESP8266 WiFi weather station, and actually sells it as a kit. So without waiting I ordered two kits,without really checking all the details: The “ESP8266 WeatherStation Kit” and the “ESP8266 WiFi Color Display Kit”.

Squix ESP8266 Weather Station Kits
Each kit is in a very solid (and useful!) plastic box. And unlike many other kits from China, everything is well-organized and in antistatic bags. The ESP8266 WeatherStation Kit includes

ESP8266 OLED Kit
- DHT11 Temperature/Humidity Sensor
- SSD1306 0.96″ OLED
- 40 Jumper cables
- EP8266 nodeMCU v1.0 with 4 MByte Flash
- Micro USB cable
No soldering is required for the ESP8266 WeatherStation Kit. Daniel wrote an excellent tutorial (https://blog.squix.org/wp-content/uploads/2017/06/esp8266weatherstationgettingstartedguide-20170608.pdf) plus a guide how to integrate the DHT11 sensor (https://blog.squix.org/2015/12/esp8266-weather-station-measuring-2.html). With this the wiring and software setup was a piece of cake :-).
The example code uses the free Weather Underground (https://www.wunderground.com) weather service. Using the ESP8266 chip it connects over WiFi to the service and receives the data in JSON format. A JSON parser on the ESP8266 extracts the data and displays the data. The weather service provides data for many countries and cities, in different languages. I selected a place a few kilometers away from home.
The interval of fetching data is configurable, and I’m using 10 minutes for now. The JSON data has lots of data, and the JSON parser on the ESP8266 extracts information for the display. In the example code it cycles through several pages.
Weather forecast with min/max temperature:
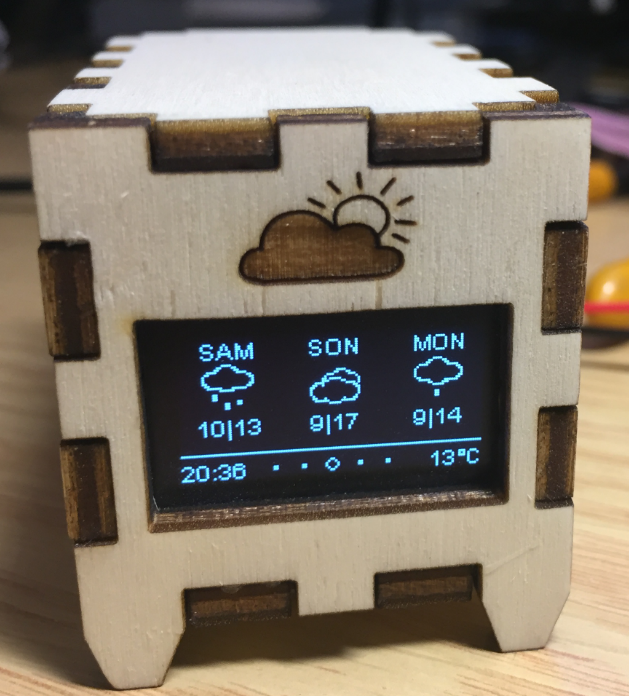
Forecast Data
Current weather:

Current Weather
Indoor (and outdoor) temperature and humidity. For indoor sensor values it uses the DHT11. The temperature and humidity gets pushed to Thingspeak so I can use it from another weather station (more about this later).

Indoor Temperature
Date and Time (yes, it is a clock too!):
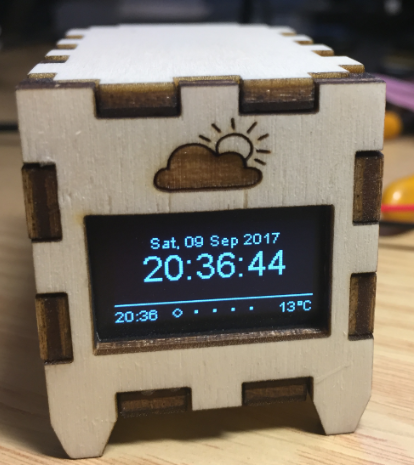
Date and Time
For the weather station I designed in Inkscape an enclosure with 3 mm plywood (35x40x60 mm):
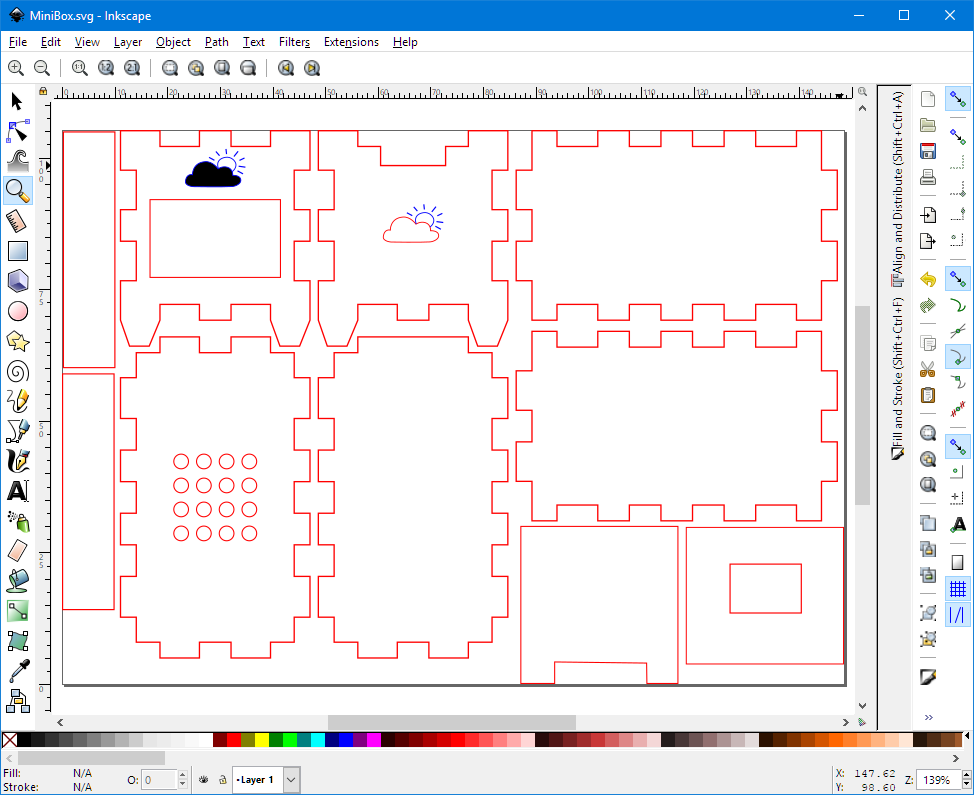
Weather Station Box Design in Inkscape
I used a 50W laser cutter with the K40 Whisperer software.I needed two iterations (first enclosure was a bit too small).
The DHT11 sensor gets placed on the bottom of the box:

DHT11 Placement
I placed the ESP8266 module on top, behind the display. A small plywood pice separates the display from the module so they do not make contact:

ESP8266 Module
On the bottom I added some ventilation holes to get better temperature and humidity values:

Bottom Side
On the backside the USB port with a ‘cloud’ for better air flow.
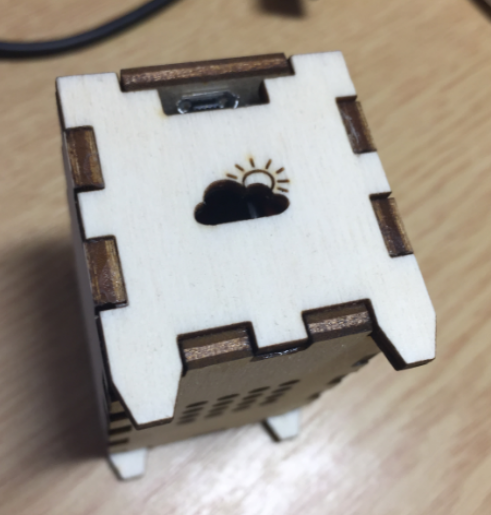
Weather Station Back Side
Currently the weather station gets powered through the micro USB connector. Because of the jumper wiring there is no space for a battery. I have ordered a small LiPo plus a charger module for a next iteration. But so far I’m very happy how it fits together and works :-).
Summary
Thanks to Daniel I have now a small and useful weather station. It fetches local weather and forecast data from the internet using the ESP8266 WiFi chip. It pushes data to Thingspeak so I can use it from anywhere in the world. Or display the data another weather station. Remember that I ordered two kits? Yes, that second kit has a touch LCD, so this one will be next :-).
The design files are on Thingiverse: https://www.thingiverse.com/thing:2527340
Happy Squixing 🙂
Links
- Starter Kits: https://blog.squix.org
- Weather Station Kit: https://blog.squix.org
- Weather Station Color Add-on Kit: https://blog.squix.org
- Getting Started Guide for Weather Station: https://blog.squix.org/wp-content/uploads/2017/06/esp8266weatherstationgettingstartedguide-20170608.pdf
- Blog post: https://blog.squix.org/2016/10/esp8266-weather-station-color-code-published.html
- Github: https://github.com/squix78/esp8266-weather-station-color
- Files on Thingiverse: https://www.thingiverse.com/thing:2527340

I fear that IoT is real but probably not in our interest.
A) What we currently see as Iot is the technology of the end-devices.
B) This is useless without its counter part – 5G will enable the connection of massive devices (large areas with high density of devices).
I can imagine that there is interest in production industries but guess that the risk of hacking completely open systems will be larger than its gain.
So finally only those industries who tend to fetch as much of information from everybody and everywhere and usually abusing this information will drive this game.
LikeLike
Security is a big concern, and with all the ‘data collection’ of Google, Amazon, Apple and all the others things easily might get our of control too. And a new class of virus and denial-of-service waves will reach us in the future too :-(.
LikeLike
Pingback: WiFi TFT Touch LCD Weather Station with ESP8266 | MCU on Eclipse
A useful and beautiful thing
LikeLike
awesome !
LikeLike
Not sure if you are following me on Twitter, but I’m working on a e-paper version, see https://twitter.com/McuOnEclipse/status/918191343482097665
🙂
LikeLike
Pingback: SQUIX ESP8266 based E-Paper WiFi Weather Station | MCU on Eclipse
Hi,
ich möchte das Gehäuse nachdrucken (bzw nachschneiden) lassen. Die svg-Dateien haben laut der Firma keine Maße? Wie kann ich da jetzt da am besten vermitteln, dass die Bauteile in der richtigen Größe geschnitten werden?
Du hast oben 35x40x60 mm angegeben, sind das die Aussenmaße?
LikeLike
Hi Stephan,
I’m using Inkscape, and there I can specify in the document properties that my units are in mm. And what you see in that screenshots are indeed the number of millimeters, so yes, thes are about the sizes in mm, as shown in the screenshot.
LikeLike
Hi Erich,
the cutting part is done. Thanks for your hint; i downloaded Inkscape and edited your files with success.
Now the programming part, it confuses me..
The point ‘wunderground city”, what exactly do i type there?
For example, my nearest station is https://www.wunderground.com/weather/de/norden/IWENORDE4. “IWENORDE4” as ‘city’ doesn’t work. “Norden” as ‘city’ takes me to Nordende, that’s a completely different town in germany. “Osteel” works fine, but that’s a few more kilometers away.
Am i missing something obvious? 🙂
LikeLike
Getting a list of cities from the Wunderground is for sure not simple/easy. There is a list here: https://www.wunderground.com/about/faq/international_cities.asp
LikeLike
Aaaand done 🙂
https://photos.app.goo.gl/yckqtX9LVS8D5eMt1
Thank you for your help!
LikeLike
Hi Stephan,
looks really great! Thanks for sharing!
Erich
LikeLike
Pingback: Building a Raspberry Pi UPS and Serial Login Console with tinyK22 (NXP K22FN512) | MCU on Eclipse
The github link points to a project with the IL display. Is there another github link that points to THIS project? (esp8266, 0.96 OLED display, DHT11). I have all the components, I’m missing the ino file. ty.
LikeLike
That project is from https://blog.squix.org/, and newer projects use the IL display. The SSD1306 and DHT11 drivers are in the McuLib: https://github.com/ErichStyger/McuOnEclipseLibrary.
LikeLike