
The question has been: If I buy such a 50 Watt cheap laser cutter from China, how many Watts does it really have? I have read all these stories that usually what is advertised is only the theoretical maximum I could get, and will not be realistic at all. This article is about how I tuned the machine and how much I got out of it.

Different Laser Power
Outline
For a week I have now that laser cutter, and while I had to tweak things, that machine is so far operating nicely. I actually did not really believe in that 50 Watt power, and even at the university we do not have the equipment to measure the real output power. We can measure up to a few Milli-Watts (say the level of laser pointers), but not to the amount of energy such a ’50W’ machine can produce. Instead, I describe how I have tuned the machine so far and what I’m able to get out of it.
Laser Beam Focus
Depending on the lens and the setup, the distance between the cutting head and the target varies, and with the focal point there is a certain cutting length:
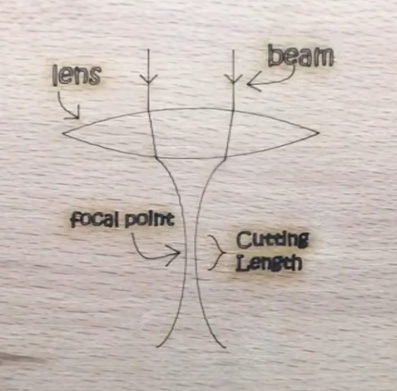
Laser Lens and Beam (Source: YouTube video below)
The following video very well explains that topic:
https://www.youtube.com/watch?v=Eg6THrEdleo&t=231s
I tested the machine with different distances to the engraving target to find the correct beam focus point. Pieces with different sizes helped to set the machine to a given height above the material:
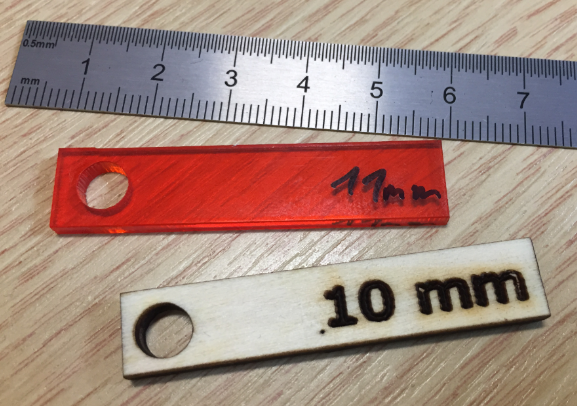
measurement tools
With this I found that the focus point is at 11 mm below the laser nozzle:

Laser Focus Point Test
Test Sheet
Experimented with different materials, adjusting cutting/engraving speed and laser power.
The outcome is a ‘cheat’ sheet with good values for the materials like plywood or acrylic. Below one of the cheat sheets in Inkscape: Black color gets raster engraved, blue vector engraving and red vector cutting:
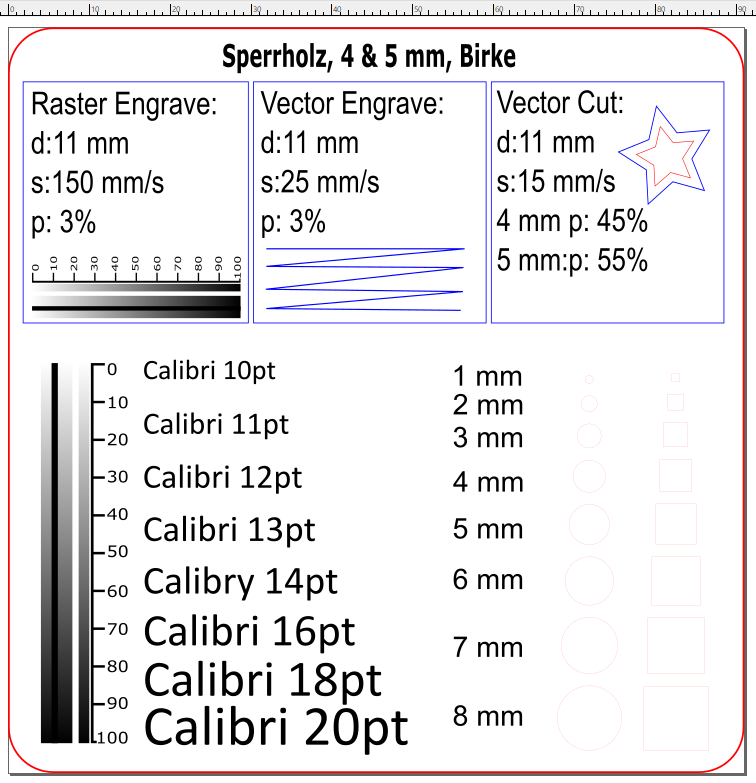
Laser Test Sheet

Engraving and cutting test
Laser Head Oscillations
One small problem I saw is that for vector engraving and cutting, when the laser had has to do an abrupt turn, the head is oscillating, visible if the laser head is moving with 75 mm/sec, when it was coming down and then had to turn 90°:

Oscillating at 75 mm per second
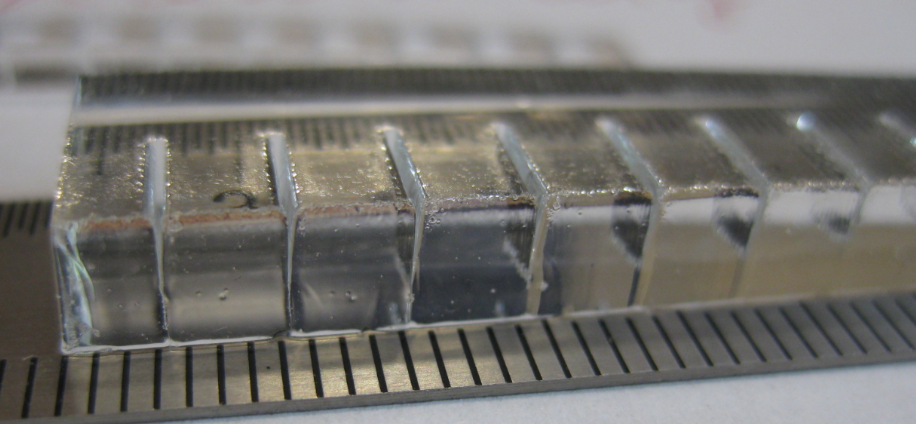
Reducing the engraving/cutting speed to 25 mm/sec minimizes the effect. In the image below, the laser was coming from the left and had to make a 90° turn. One marker on the scale is 1 mm:
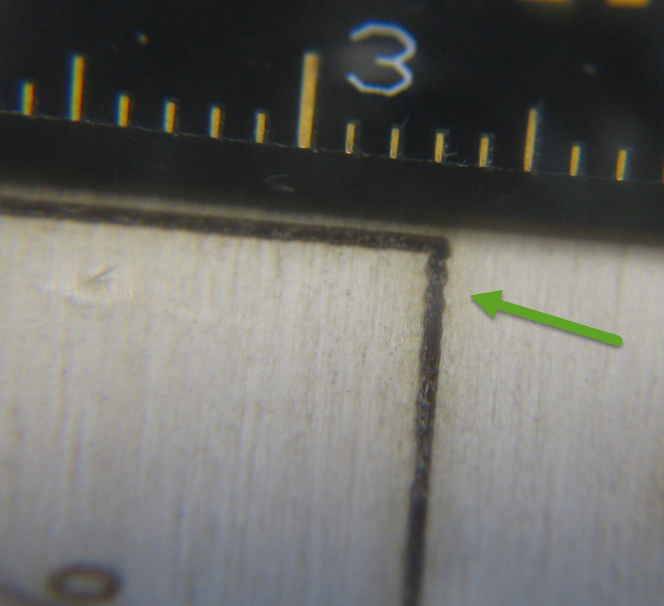
Small Laser Head Oscillation at 90° Turn
Usable Laser Power
Thinner material did cut well around 40 or 30% laser power.
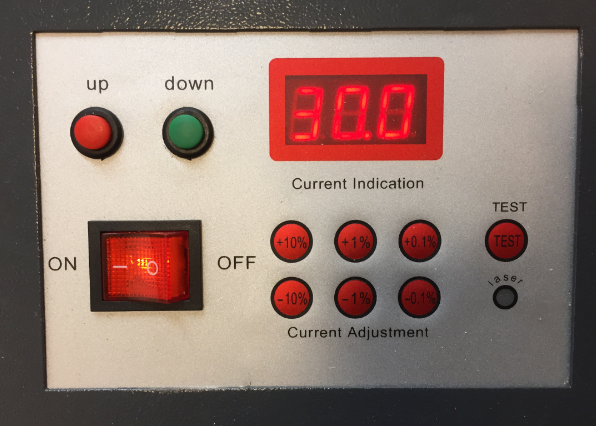
Front Panel with laser power percentage
With thicker materials (4 or 5 mm plywood or similar), I noticed that increasing laser power above 70% did not help much. Instead, slowing down the moving of the laser head helped to get through the material.
So I was wondering how much of the (percentage) laser power is really usable. RDWorks published a nice video how to find this out. So I have used the same approach: cutting a piece of acrylic with different power settings. I have used a 5 mm acrylic with 15mm/sec cutting speed.
Laser Cut Acrylic (click to enlarge)
From the picture above you can see the ‘V’ style of cut which is noticeable especially for thicker material.
Different Laser Power
In order not to cut through the material I increased the moving speed to 15 mm. This gave me the following result, with the numbers indicating the laser power percentage (maximum I can set is 99%) set on the machine panel.
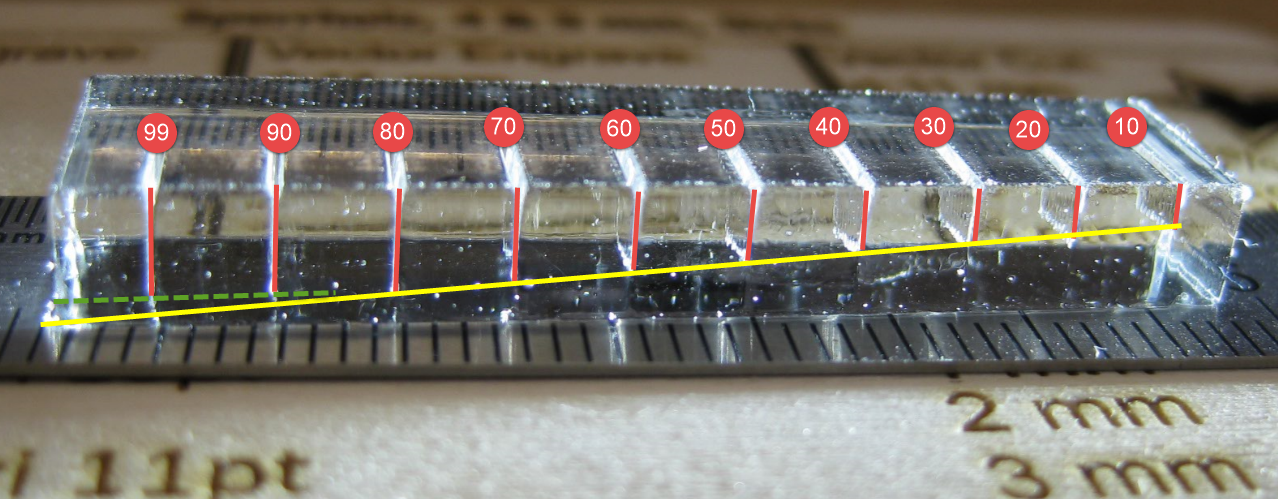
Laser Power Cut Depth (click to enlarge)
In essence, the cutting depth increases in a linear way with increasing the laser power, but only up to around 85%: above that I don’t get more cutting even with increasing the laser power percentage.
I conclude that if the laser tube has a nominal maximum power of 50 Watt, I really get 85% out of it, or around 42.5 Watt. Or as a rule of thumb: I can expect effectively 40 Watt out of a 50 Watt laser tube. Or using the machine above 80% does not make sense and probably only shortens the tube life time.
Summary
Knowing the correct focus point distance is essential to use a laser cutter and engraver. Every material is different, but at least I have now some good ‘rule of thumb’ values determined for my machine.
The small oscillation of the laser head is something I can reduce with slower speed settings. Maybe I find a way to mechanically optimize this so I can run vector engraving with higher speed.
The amount of laser power I really can use out of my machine is around 15% less than what would be the theoretical maximum, and no surprise to me. So it does not make sense to use the machine above that 80-85%. I keep the machine running below that percentage, and I hope this will extend the tube lifetime too.
Happy Lasering 🙂
Links
- RDWorks Learning Lab 22 The 50 watt fraud a lesson learned: https://www.youtube.com/watch?v=KQDCy-mPNqA
- Getting Control over a 50 Watt CO2 Laser Cutter from China
- Laser Engraving for a Card Box

Nice article Erich. The same is true about WiFi too, isn’t it?
LikeLike
I think a lot of claims are ‘to the edge’ and won’t pass a reality check: mileage for a car, internet ISP bandwith, WiFi throughput (you name it), or even how that hamburger looks on display 🙂
LikeLike
If you want to actually check it, you need a probe like this: http://www.2laser.com/laser_power_meter_probe_and_laser_monitor You might be able to make one with a block of aluminum treated with the right material and a thermocouple.
The wiggles you are getting are either due to belt tension or to stepper harmonics. Most machines will gear the output between the stepper and drive belts with a pulley assembly to move this out of the typical cutting speed range. The other part, the belts vibrating, this also can be fixed with having a geared down assembly to reduce the belt tension needed to keep it tight without skipping. I’m not sure about your specific machine.
LikeLike
Thank you for that link for a laser power meter probe!
And good hint about the belt tension or stepper harmonics, so I have to check this out.
LikeLike
Pingback: Using a Laser Cutter and Engraver with Cellulose Acetate Sheets | MCU on Eclipse
Hey,
I recently acquired a machine like yours and am currently getting to know it. Therefore, It would be absolutely awesome if you could upload/share all ‘cheat’ sheets you made with us (inkscape-files would be best)!! That way I (and people like me) would have a starting point for our experimentation and optimization.
Thanks in advance.
Cheers,
a British fan of yours 🙂
LikeLike
Great, have fun with your machine! And good suggestion about making the ‘cheat’ sheets public: I have uploaded them (with other files) here: https://github.com/ErichStyger/mcuoneclipse/tree/master/LaserCutter/Inkscape
Enjoy!
LikeLike
I like your Laser Test Sheet, great idea!
One thought/question regarding the mA vs. actual output power calculation:
The only statement your experiment proves is that your tube provides its maximum power at setting 80%.
Have you checked if 100% output equals 18 mA (typical rating for 50W tubes)? Probably the manufacturer has limited the current to 12-15 mA to extend tube life.
Cheers,
André
LikeLike
Hi André,
no, I have not checked that. To me that mA display was kind of useless anyway. That’s why I have removed the factory controller board and replaced it with a Cohesion 3D one:
This board runs with Smoothie and was an excellent choice for me, especially in combination with LightBurn software. With it I can drive the laser with a PWM and can limit it to 80%, regardless of current. This has worked like a charm, and the ability to run automatic multi-passes allows me to cut even thicker materials.
LikeLike