
Many projects benefit from a small display as a user interface. For very low power applications this is usually a no-go as the display needs too much energy. I have used e-paper displays from Kent: while these e-paper displays do not need any power to keep the image, changing the display content is not for free, plus is very slow (around 1 second needed to update the display). So I was looking for something low power and fast for a long time, until Christian (thanks!) pointed me to a display from Sharp: both very low power and fast:

Font Test with Sharp Memory Display
And even better: Adafruit has a breakout board for that display available (https://www.adafruit.com/product/1393) :-). The display on the board is the Sharp LS013B4DN04 with 96×96 monochrome pixel resolution. The display is a cross between a e-paper and normal LCD. The ‘background’ color is a nice silver color. What looks cool with this display is that the pixels show up like little mirror:

Sharp Memory Display Mirror Effect
The display has no backlight: readability is excellent (although somewhat view angle dependent) under daylight, under darker light conditions an extra illumination is needed. It has a very good contrast between the pixels:

Sharp Memory Display Lines and Box Demo
Wiring
The Adafruit breakout board comes with a level shifter so it can be used with 3.3V-5V. I’m using it with 3.3V, and only need 5 wires connected to the display:
- VIN: 3.3-5V
- GND: Ground
- CS: SPI chip select, HIGH active
- CLK: SPI clock (up to 1 MHz)
- DI: SPI MOSI with clock idle polarity low (CPOL=0) and Data valid on clock leading edge (CPHA=0), with bits sent MSB (Most Significant Bit) first.
The other pins can be left unconnected. The display is ‘write only’, so there is no way to read back the data on the display.
External Clock and VCOM
One special thing with the Sharp Memory display is that it needs a special clock signal to generate the VCOM, an alternating signal that prevents a DC bias from being built up within the display panel. Depending on the display used, that signal or clock needs to supplied in the range of 0.5 to 60 Hz. That signal can be supplied either externally or by software, depending on the EXTMODE pin:
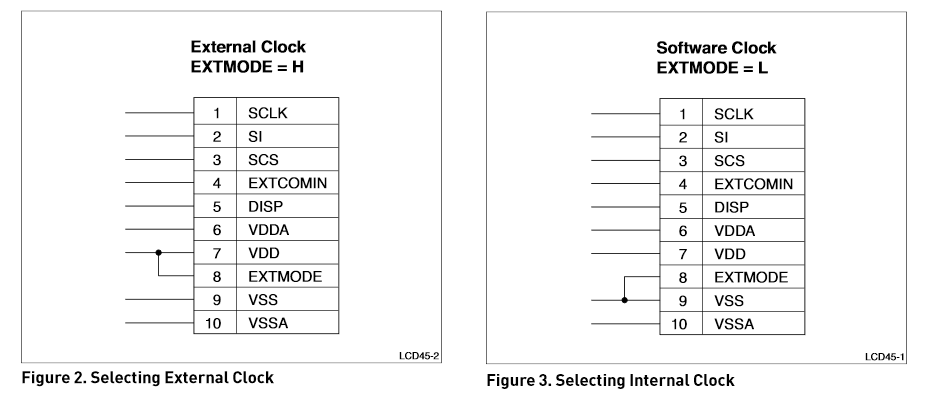
Sharp Memory Display EXTMODE (Source: Sharp)
On the Adafruit breakout board, EXTMODE is pulled LOW: the clocking has to be provided by software. With software a special ‘VCOM’ command is sent to the display:
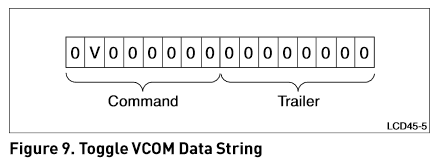
toggle VCOM command
The V bit is then toggeled.
void SHM1_ToggleVCOM(void)
{
 /* send toggle VCOM command */
  SCEpin3_SetVal();
  WriteData(SHM1_sharpmem_vcom);
  WriteData(0x00); /* 8bit trailer */
  SHM1_TOGGLE_VCOM;
  SCEpin3_ClrVal();
}
On a logic analyzer this looks like this:
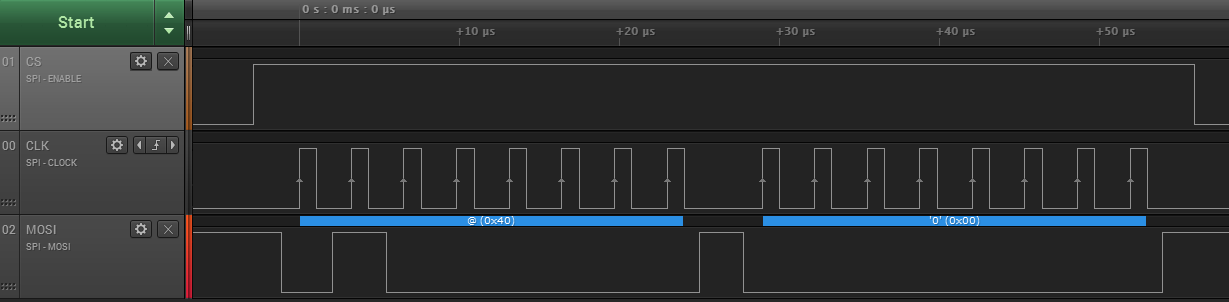
VCOM Bit High
In the next call the bit is toggled:
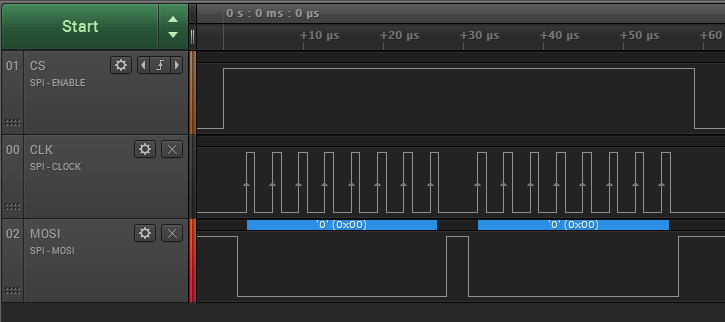
VCOM Bit Low
The ToggleVCOM() function only needs to be called if there are no other display commands sent, as the VCOM bit can be toggled while writing to the display.
Clearing the Display
There is a special ‘clear’ command to clear the display:
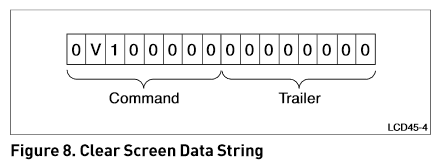
Clear Display Command (Source: Sharp)
The following code does a clear:
void SHM1_Clear(void)
{
 /* send clear command */
  SCEpin3_SetVal();
  WriteData(SHM1_sharpmem_vcom | SHM1_BIT_CLEAR);
  WriteData(0x00);
  SHM1_TOGGLE_VCOM;
  SCEpin3_ClrVal();
}
Here again the VCOM bit is toggled after each command. And this is how things are sent over the wire, with the VCOM bit set:
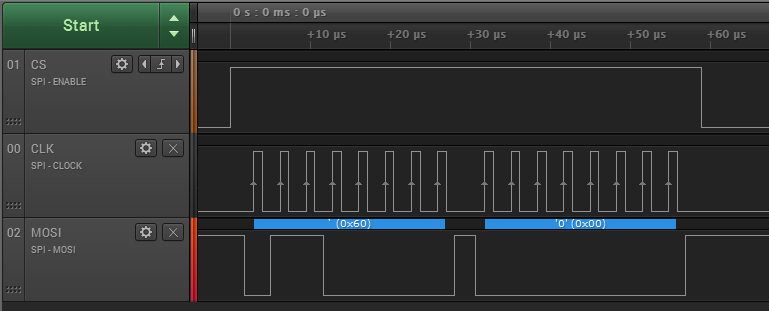
Display Clear Command
Updating Display Line
Each line of the display can be updated with a command: sending line number, then the number of bytes (12 for the 96 bits) followed by a trailing 16 zero byte:
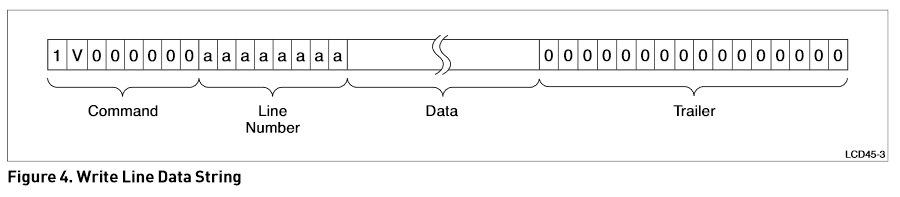
Writing Single Line (Source: SharP)
void SHM1_UpdateLine(uint8_t line, uint8_t *dataP)
{
  int i;

  /* Send the write command */
  SCEpin3_SetVal();
  WriteData(SHM1_BIT_WRITECMD | SHM1_sharpmem_vcom);
  SHM1_TOGGLE_VCOM;

  /* Send the address for line */
  WriteData(SHM1_RevertBits(line+1)); /* line starts with 1 */

  /* Send data byte for selected line */
  for (i=0; i<(SHM1_HW_WIDTH/8); i++) {
    WriteData(*dataP);
    dataP++;
  }
  /* Send trailing 16 bits  */
  WriteData(0x00);
  WriteData(0x00);
  SCEpin3_ClrVal();
}
💡 A confusing and strange thing is that the line number has to be sent in LSB first format!
Below is an example writing to line number 1:

Updating Single Line (click to enlarge)
Multiple Lines
Writing multiple or all lines is not much different from writing a single line:
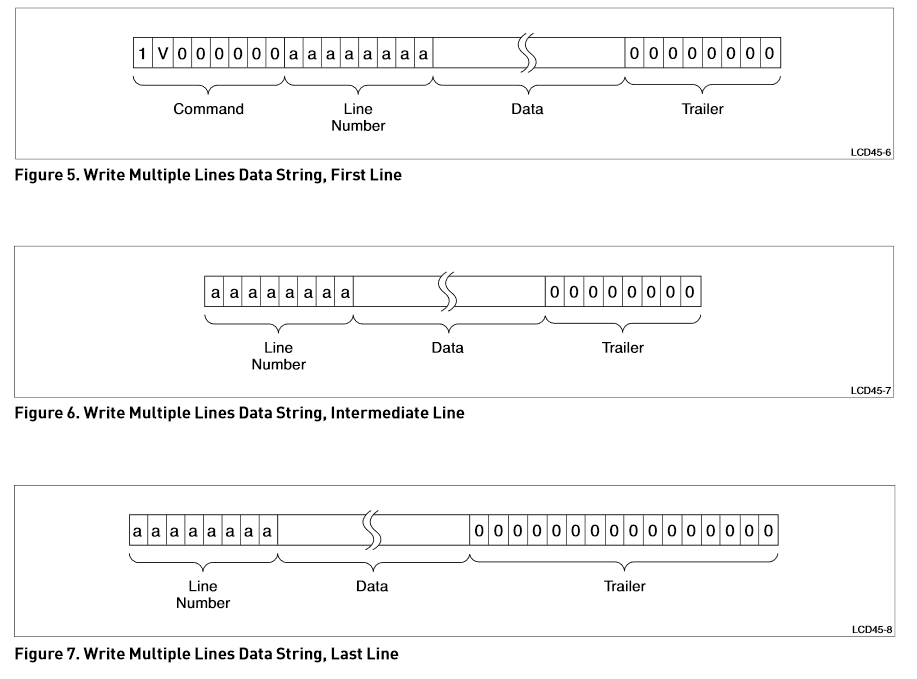
Writing Multiple Different Lines (Source: Sharp)
- Send Write command followed by line number and data, end with eight trailing zero bits
- Continue to send line number with data and eight trailing zero bits
- Finish the last line of data with 16 trailing zero bits
void SHM1_UpdateFull(void)
{
  uint16_t numBytes = sizeof(SHM1_DisplayBuf);
  int i, currentline, oldline;
  uint8_t *data = (uint8_t*)SHM1_DisplayBuf;

  /* Send the write command */
  SCEpin3_SetVal();
  WriteData(SHM1_BIT_WRITECMD | SHM1_sharpmem_vcom);
  SHM1_TOGGLE_VCOM;

  /* Send the address for line 1 */
  oldline = currentline = 1;
  WriteData(SHM1_RevertBits(currentline));

  /* Send image buffer */
  for (i=0; i<numBytes; i++) {
    WriteData(*data);
    data++;
    currentline = ((i+1)/(SHM1_HW_WIDTH/8)) + 1;
    if(currentline != oldline) {
      WriteData(0x00); /* send 8 trailing bits to finish current line */
      if (currentline <= SHM1_HW_HEIGHT) {
        /* send new line number */
        WriteData(SHM1_RevertBits(currentline));
      }
      oldline = currentline;
    }
  }
  /* Send another trailing 8 bits for the last line */
  WriteData(0x00);
  SCEpin3_ClrVal();
}
Processor Expert Component
Of course I have created a new Processor Expert component for using that display. With it is only a matter of minutes to get the display up and running:
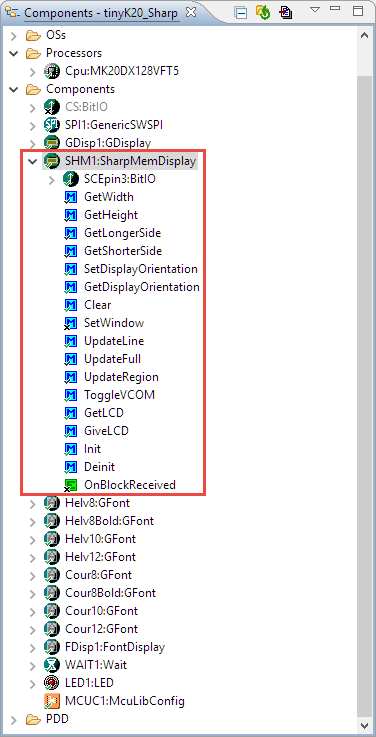
SharpMemDisplay Component
Using that component, all the other drawing and font components can be used. The component supports both bit banged and hardware SPI:
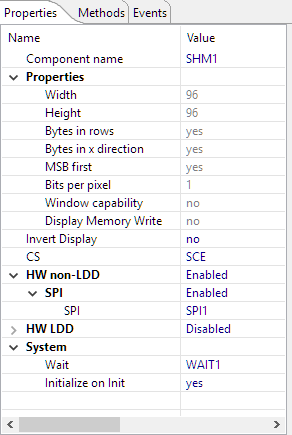
SharpMemDisplay Settings
Low Power
The display needs around 16 μA while not updating the image:
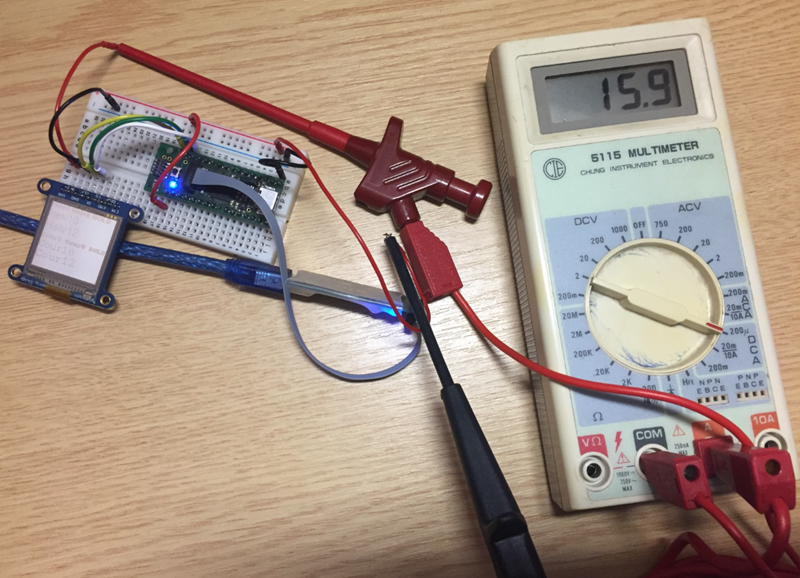
Current used by display
Making full updates of the display every 20 ms (50 images per second) requires 41 μA. Of course the less frequent image updates or the less lines update, the better.
Summary
That Sharp Memory Display is a really cool one. The Adafruit breakout board has its price ($39.95). It took me a while to get the protocol right, but now I have very low power display and driver in my inventory :-). There is an example project on GitHub, and the SharpMemDisplay component is available on GitHub and will be part of the next McuOnEclipse component release. If you are interested in the sources only, they are available on the McuOnEclipseLibrary project.
💡 It seems that the 96×96 (LS013B4DN04) display is obsolte now, but there is a newer 128×128 (LS013B7DH03) for $20.
Happy Sharping 🙂
Links
- Adafruit Sharp memory display breakout module: https://www.adafruit.com/products/1393
- Adafruit Git Repo: https://github.com/adafruit/Adafruit_SHARP_Memory_Display
- Adafruit tutorial: https://learn.adafruit.com/adafruit-sharp-memory-display-breakout/overview
- Sharp application note: http://www.sharpmemorylcd.com/resources/programming_memory_lcd_app_note.pdf
- Data sheet: http://www.sharpmemorylcd.com/resources/ls013b4dn04_application_info.pdf
- Example project: https://github.com/ErichStyger/mcuoneclipse/tree/master/Examples/KDS/tinyK20/tinyK20_Sharp
- McuOnEclipse Library: https://github.com/ErichStyger/McuOnEclipseLibrary

NIce 1!
It’s overpriced but looks like a e-paper in real life. We’ve here such displays on the prices in the shop 🙂 They are updates on-line and looks really cool.
When the power consumption is not a big deal color-tfts has like a 1:5th of that price(3-4dollars with touch and card-holder)
LikeLike
Hi Erich,
Thanks for this post and all your posts!
I apologize for bugging you with this question.
I was able to make this project work.
The only thing missing right now is the include files for the fonts.
In processor expert, I do not see the helv and cour components.
Let me know if you have any suggestions or solutions?
Note: I took the latest PE from your Git repo
Thanks in advance,
Julien
LikeLike
Hi Julien,
the component is named ‘GFont’: I have multiple instances of it in my project and have it named as ‘Helv’.
If you have all the components installed from the https://github.com/ErichStyger/McuOnEclipse_PEx, you can load the example project in https://github.com/ErichStyger/mcuoneclipse/tree/master/Examples/KDS/tinyK20/tinyK20_Sharp and copy-paste the components to your new project (see https://mcuoneclipse.com/2013/03/31/copy-of-processor-expert-components/).
LikeLike
Thanks Erich!
It is now working, didn’t realized there was many instances of the GFont component.
I really appreciate you taking the time to answer my question.
Sincerely,
Julien
LikeLike
How can i get the font files for this application?
LikeLike
You can use any font files. You find several on my GitHub repository. You can have a look at the LittlevGL project too: https://mcuoneclipse.com/2018/08/12/tutorial-open-source-embedded-gui-library-littlevgl-with-i-mx-rt1050-evk/
LikeLike
Pingback: Upgrading to Sharp 128×128 Pixel Memory Display | MCU on Eclipse
Pingback: McuOnEclipse Components: 28-Jan-2017 Release | MCU on Eclipse