I have several applications where I store application specific information in the microcontroller FLASH memory (see “Configuration Data: Using the Internal FLASH instead of an external EEPROM“). I have run into issues recently with the Segger J-Link GDB server as by default it does *not* erase all the FLASH memory. So the question is: How can I erase all (or part) of the FLASH memory with GDB (e.g. in Kinetis Design Studio or in Eclipse)?

Memory Monitor with Erased Flash
Erase in CodeWarrior?
In CodeWarrior for MCU this problem is solved with an extension (see “Flashing with a Button (and a Magic Wand)“): I have the ability to erase the full device:

Erase Whole Device in CodeWarrior
Erase with GDB?
However, such an option does not exist in GDB :-(. Actually with using the P&E GDB server my problem of not-erased sectors did not come up, as P&E seems always to do an erase of the full device anyway. This is different with the Segger J-Link: the J-Link only erases the sectors which needs to be programmed. This is smart as it reduces the download time needed, but leaves parts of the device un-erased. And there is no option for erasing the device in the GNU ARM Eclipse debugger plugins.
Erase with Segger J-Flash Utility?
Segger has a separate utility named J-Flash which would do exactly what I would need (and even has more advanced capabilities):

Segger J-Flash Utility
However, that feature is not free and needs a license :-(. The J-Flash is definitely a cool tool, but maybe I can erase the device in another way? Yes, I have found a way. As always: either invest some money to buy something, or invest some time to do it yourself 😉
Erase with Jlink
The Segger J-Link installation files come with a utility Jlink.exe (JinkExe on Linux) which comes with many command line options, and one of it is ‘erase’:

Erase Command in Jlink
Tu use it, I have first to specify the microcontroller I’m using. The the supported microcontroller are listed on https://www.segger.com/jlink_supported_devices.html
With
device MKL25Z128xxx4
I select the device I use. And with
erase
The device gets erased.
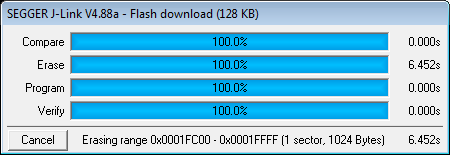
Jlink Erasing Progress Dialog

Jlink Device Selection and Erasing
Many thanks to Liviu for providing this tip!
How to Erase with GDB
The idea is to have a project to create a binary with all 0xFF in it (every byte erased), then download that program to effectively erase the device :-).
For this, create a new project for your device you want to erase. I show here an example with Kinetis Design Studio, but it is applicable to any Eclipse project with GDB.
All what we will need is
- an assembly file which will fill the FLASH memory with 0xFF (erased)
- a GNU linker file
Cleaning up the project
So remove all not needed files from the project, only keep the linker file (*.ld):

Deleted files from project
Linker File
As we do not need any startup code/etc, the linker file can be cleaned up too. What remains is are the MEMORY, the SECTIONS with interrupts, flash_config and the .text:
/* Linker file for GNU C Compiler */

/* Specify the memory areas */
MEMORY
{
  m_interrupts          (RX)  : ORIGIN = 0x00000000, LENGTH = 0x00000100
  m_flash_config        (RX)  : ORIGIN = 0x00000400, LENGTH = 0x00000010
  m_text                (RX)  : ORIGIN = 0x00000410, LENGTH = 0x0001FBF0
  m_data                (RW)  : ORIGIN = 0x1FFFF000, LENGTH = 0x00004000
}

/* Define output sections */
SECTIONS
{
  /* The startup code goes first into internal flash */
  .interrupts :
  {
    __VECTOR_TABLE = .;
    . = ALIGN(4);
    KEEP(*(.isr_vector))     /* Startup code */
    . = ALIGN(4);
  } > m_interrupts


  .flash_config :
  {
    . = ALIGN(4);
    KEEP(*(.FlashConfig))    /* Flash Configuration Field (FCF) */
    . = ALIGN(4);
  } > m_flash_config

  /* The program code and other data goes into internal flash */
  .text :
  {
    . = ALIGN(4);
    *(.text)                 /* .text sections (code) */
    *(.text*)                /* .text* sections (code) */
    *(.rodata)               /* .rodata sections (constants, strings, etc.) */
    *(.rodata*)              /* .rodata* sections (constants, strings, etc.) */
    *(.glue_7)               /* glue arm to thumb code */
    *(.glue_7t)              /* glue thumb to arm code */
    *(.eh_frame)
    KEEP (*(.init))
    KEEP (*(.fini))
    . = ALIGN(4);
  } > m_text

  .ARM.attributes 0 : { *(.ARM.attributes) }
}
I explicitly keep the flash configuration part for the Kinetis devices (so it does NOT get erased), to avoid that my device gets secured and potentially bricked (see “How (not) to Secure my Microcontroller“).
Assembly File
As only source file I add an assembly file Erase.S to the project:
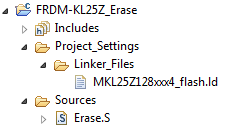
Project with Erase Assembly Program
The assembly file has the following content:
/* * erase.S * * Created on: 14.11.2014 * Author: Erich Styger * * This is an assembly file which is used to erase the FLASH of the device * It uses the .space directive: * .space <size>[,pattern] */ .section .isr_vector, "a" .space 0x100, 0xff .text .space 0x1FBF0, 0xff .endThe assembly file contains two things: one section for the interrupt vector table, and one for the text/code. This because the linker file has it splitted up too, with the flash configuration in between:
MEMORY { m_interrupts (RX) : ORIGIN = 0x00000000, LENGTH = 0x00000100 m_flash_config (RX) : ORIGIN = 0x00000400, LENGTH = 0x00000010 m_text (RX) : ORIGIN = 0x00000410, LENGTH = 0x0001FBF0 m_data (RW) : ORIGIN = 0x1FFFF000, LENGTH = 0x00004000 }The
.spaceGNU assembler directive is used to fill the memory with the pattern after the comma. The first argument of.spaceis the size in bytes. Here I use the number of my device, taken from the linker file.Linker Settings
If I compile the project, I will see that actually something is missing: my sections have not been taken into account (see “Printing Code Size Information in Eclipse” how to create that code size information):
'Invoking: Cross ARM GNU Print Size' arm-none-eabi-size --format=berkeley "FRDM-KL25Z_Erase.elf" text data bss dec hex filename 280 0 0 280 118 FRDM-KL25Z_Erase.elf 'Finished building: FRDM-KL25Z_Erase.siz'The problem is: by default the linker will strip of any unused sections. So I need to tell the linker to be less smart ;-). In the linker options I tell the linker not to use any default libraries and startup code, and not to remove unused sections:
Unsmarting the Linker
Now things look the way I want it: FLASH is full with 0xff :-):
'Invoking: Cross ARM GNU Print Size' arm-none-eabi-size --format=berkeley "FRDM-KL25Z_Erase.elf" text data bss dec hex filename 130288 0 0 130288 1fcf0 FRDM-KL25Z_Erase.elf 'Finished building: FRDM-KL25Z_Erase.siz'S19 File as Check
If I generate an S19 file (see “Binary (and S19) Files for the mbed Bootloader with Eclipse and GNU ARM Eclipse Plugins“), I see that everything is filled with 0xff:
S19 File with everything to be erased
Download (well, Debug) Configuration
The debug configuration to download the generated application is a normal one, except that I have disabled breakpoints, Pre-run reset and halt, and the Continue option:
Segger J-Link Launch Configuration Settings
Then, with the debugger I flash the file to the target. With the Memory view I can now see that all my memory has been erased 🙂 :
Memory Monitor with Erased Flash
Summary
There is no ‘erase device’ command in GDB (or at least I’m not aware of it). However, creating a simple application with a single assembly file, some linker option changes and I can erase my microcontroller that way. This approach of course works as well if you only want to erase some areas of your flash memory: in that case adopt the assembly file and the linker file.
The project created in this tutorial is available on GitHub.
Happy Erasing 🙂


The GNU ARM Eclipse J-Link Debugging plug-in does not provide explicit support to erase the flash because SEGGER provides a separate program (JLink.exe on Windows, JLinkExe on Unix) that has tens of commands, including an ‘erase’ command that claims to ‘Erase internal flash of selected device’.
Did you try this command?
LikeLike
No, I have not tried that :-(. I had found an article in the Segger forums on that topic, and the answer there was to use the Segger J-Flash utility (which needs a license), so I explored the way how to use an application to erase it.
I quickly tried the erase command in Jlink program, and indeed: it does the job 🙂
So many thanks for your tip! Oh well, at least I have learned something more about the GNU assembler syntax, and how to have a generic solution. But your way is definitely better! Now I have to update the article about it 😉
Multumesc,
Erich
LikeLike
Hello
I have a project in eclipse. But when I select debug it does not download the program into the MCU. But I end up in debug. It only worked once to download the program when the MCU was eresed with another jtag emulator.
Where do I set so the debugger will always download the program into the MCU when i select debug?
LikeLike
What toolchain and debug connection are you using? Typically, the default is that the debug probe/connection/launch configuration will erase the flash and then program the device. So if you go with the defaults (e.g. created by the project wizard of Kinetis Design Studio or the default launch configuration settings of the GNU ARM Eclipse plugins), it will do what you are asking for. So I guess you have disabled something?
LikeLike
This has been a huge issue for me the last couple of days. I finally found a way to erase the device. I’m using GNU Arm Eclipse on a Mac.
It turns out there are OpenOCD commands to erase the flash, http://openocd.org/doc/html/General-Commands.html#Memory-access-commands.
This is what you do:
1. Find the OpenOCD location, and run the OpenOCD command from the project settings in a terminal. I suggest doing it from the OpenOCD/bin directory. Something like > ./openocd -f “board/stm32f0discovery.cfg”, or whatever your board is.
2. Open another terminal and telnet to localhost 4444. > telnet localhost 4444
3. You now have direct access to openocd.
4. In your telnet session, check your flash by using the ‘flash banks’ command. Looks like this for me:
> flash banks
#0 : stm32f0x.flash (stm32f1x) at 0x08000000, size 0x00000000, buswidth 0, chipwidth 0
5. Now, from the link above, use “flash erase_sector num first last” to erase the flash. For me that would be > flash erase_sector 0 0 0
6. Done, theoretically. Some parts of my flash was still not erased. Using the “mdw” command, you can inspect the flash. The error I get from the openocd session in Eclipse was that the flash on address 0x8002800 was not erased. So.. > mdw 0x8002800 64
0x08002800: 00000000 00000000 08001875 08001881 08001895 08001869 08001771 00000000
0x08002820: 2d230043 00202b30 004c6c68 45676665 30004746 34333231 38373635 43424139
0x08002840: 00464544 33323130 37363534 62613938 66656463 ffffff00 12345678 20000090
7. There was definitely something there. Now check the ‘flash erase_address’ command. > flash erase_address pad 0x08002800 64
Adding extra erase range, 0x00002840 to 0x00002bff
erased address 0x08002800 (length 64) in 0.039919s (1.566 KiB/s)
8. Great success! 😀 I can now flash my image through Eclipse again.
Hope this helps someone.
– Joakim
LikeLike
Hi Joakim,
thanks for sharing, this is very useful!
Erich
LikeLike
From the gdb console you have ‘monitor’ commands (which openocd supplies). To see which ones are available you run ‘monitor help’. For mass erasing this is available:
stm32lx
stm32lx flash command group (command valid any time)
stm32lx mass_erase bank_id
Erase entire flash device. including available EEPROM
So you erase the whole flash with:
stm32lx mass_erase 0
LikeLike
Hi Jerry,
thanks for sharing! The monitor commands depend on the GDB server implementation, and some server implement such commands, and others do not.
LikeLike
Pingback: Flash-based Configuration Data Using The ld Linker – vilimblog
Is it not possible to use the = option in the Linker file (ProcessorExpert.LD) to force an erased value of ( 0xff ) into a region?
LikeLike
Not directly, you have to turn off linker file generation and then add the change. See https://mcuoneclipse.com/2014/10/06/putting-code-of-files-into-special-section-with-the-gnu-linker/.
LikeLike
I just was playing around with JLinkGDBServerCL.exe from the current Segger 8.12 release, and when I use arm-none-eabi-gdb.exe from the current ST Cube IDE 1.17.0 to connect to the JLink GDB Server (I assume any GDB would work) I can erase the flash by issuing a “monitor flash erase” command:
Hope that helps!
LikeLike
Hi Markus,
thanks for that one! Indeed, some GDB server implement custom commands to do specific things like this.
Erich
LikeLike