
This is Part 2 of a Mini Series. In Part 1, I described how to set up the hardware (see “Tutorial: Adafruit WS2812B NeoPixels with the Freescale FRDM-K64F Board – Part 1: Hardware“). Now it is time to have the software tools ready. In this post I describe to have the IDE (Freescale Kinetis Design Studio) with the Freescale SDK installed, along with the correct firmware on the FRDM-K64F Board. The goal is to drive Adafruit’s NeoPixel (WS2812B) with the Freescale FRDM-K64F board:
Freescale FRDM-K64F with NeoPixels
Mini Series Tutorial List
- Tutorial: Adafruit WS2812B NeoPixels with the Freescale FRDM-K64F Board – Part 1: Hardware
- Tutorial: Adafruit WS2812B NeoPixels with the Freescale FRDM-K64F Board – Part 2: Software Tools
- Tutorial: Adafruit WS2812B NeoPixels with the Freescale FRDM-K64F Board – Part 3: Concepts
- Tutorial: Adafruit WS2812B NeoPixels with the Freescale FRDM-K64F Board – Part 4: Timer
- Tutorial: Adafruit WS2812B NeoPixels with the Freescale FRDM-K64F Board – Part 5: DMA
Outline
This post describes the basic tool setup with Kinetis Design Studio (Eclipse based) and the Kinetis SDK. If you are familiar with this environment, you might skip that post ;-).
I have received the feedback that many of may articles are far too advanced, so I’m here back to the basics. And in any case: the steps below are generic and apply to any board project.
[Greg, do you read this 🙂 ? Happy to fulfil your wish for basic tutorials. ]
Freescale Freedom Board Firmware
The Freescale FRDM-K64F board has an onboard debug interface, named ‘OpenSDA‘, or ‘OpenSDAv2‘. By default, the FRDM-K64F board comes with an CMSIS-DAP debug firmware loaded for OpenOCD. My recommendation is: don’t use this. It is slow, not reliable and not worth the efforts :-(. Instead, switch the firmware either to P&E or Segger J-Link. I’m proposing to use the Segger OpenSDAv2 firmware instead.
Follow the steps described in https://mcuoneclipse.com/2014/04/27/segger-j-link-firmware-for-opensdav2/ to install the Segger Firmware on your board.
Freescale Kinetis Software Development Kit (SDK)
Like other ARM vendors, Freescale offers a set of software drivers and middleware for their devices. For NXP this is LPCware, for Freescale this is the “Kinetis SDK“. Go to http://www.freescale.com/ksdk and download it (registration required, the current version is V1.2) and install it with the default settings.

Kinetis SDK Block Diagram
Freescale Kinetis Design Studio
Freescale offers an unlimited, free-of-charge Eclipse based toolchain with the GNU ARM Embedded Toolchain which is available for download on http://www.freescale.com/kds (registration required). It is available for Mac OS X, Linux and Windows (which I use). The current version is V3.0.0. Download it and install it with the default settings.

Kinetis Design Studio Block Diagram (Source: Freescale)
After installation, launch the IDE from the shortcut. It will ask which folder shall be used as the Eclipse Workspace:

Selecting Workspace
The ‘workspace’ is a special folder where Eclipse will store the settings (in the .metadata folder in it). Plus by default it will store the projects into that location. So provide a workspace folder name for it.
💡 Never mess up with the workspace. Do not copy the workspace (.metadata) folder, or move it! And do not share the workspace with different versions of Eclipse based tools. That’s why I e.g. name it ‘wsp_kds_3.0.0’ to indicate that this is the workspace for Kinetis Design Studio v3.0.0.
If using a new workspace, the ‘welcome’ view is shown: click on ‘Workbench’:

Welcome to Kinetis Design Studio
This opens the default C/C++ Perspective:

Kinetis Design Studio Default Perspective
💡 A ‘perspective’ is a set of views in Eclipse. Common perspectives are the ‘C/C++’ or ‘Debug’ Perspective.
Installing Kinetis SDK into Kinetis Design Studio
The Kinetis SDK and the Kinetis Design Studio (KDS) are separate installs. I have to install an Eclipse feature into Kinetis Design Studio so the IDE knows about the SDK. For this, in KDS, use the menu Help > Install New Software:

Installing New Software
In the following dialog I’m going to install the Kinetis SDK update archive inside the KSDK installation folder:
- Press the “Add…” button
- Press the “Archive…” button
- Browse to the archive (zip) file which is “C:/Freescale/KSDK_1.2.0/tools/eclipse_update/KSDK_1.2.0_Eclipse_Update.zip”
- Provide a name (I used “KDS v1.2 Update”)
- Press OK

Locating KDS Eclipse Update
Select the update (I recommend to deselect “Contact all update sites”, see “Reduce Eclipse ‘Install New Software’ Installation Time“) and press Next to go through the installation process.

Starting Installation of KDSK v1.2 Update
Restart the IDE at the end of the installation process.
Creating Project
Now the IDE knows about the SDK supported devices. The next step is to create a new project for the board.
For this, use the menu File > New > Kinetis Project:

New Kinetis Project
Provide a name for the project:
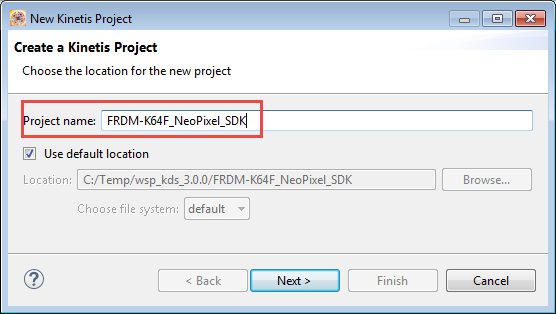
New Project Name
Press Next. Then select the board:

Selecting Board
Press Next. Make sure you have the Kinetis SDK option selected:

Kinetis SDK Project
Press Next. Make sure that “GNU C Compiler” selected:

GNU C Compiler
This is the last dialog. Press Finish.
With this, I have a basic Kinetis project for the Kinetis SDK created:

Kinetis SDK Project Created
Building Project
To build the project, select the root folder oft the project in the Project Explorer view and use the ‘hammer’ icon to build it:

Building Project

Building Project Progress
If everything goes well, then no errors are shown in the ‘Problems’ view:

Empty Problems View
And the Console View shows the code/data size (see “text, data and bss: Code and Data Size Explained“):
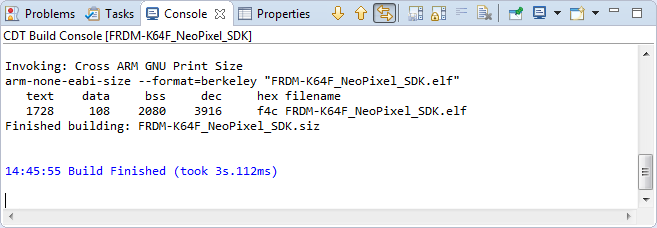
Console Output
Debugging Project
Now as we have built the project, the .elf (binary) file has been created inside the ‘Debug’ folder:

ELF File in Debug Folder
To debug it the first time, I need to go to the Debug configurations: Have the project root folder selected, and use the menu ‘Debug Configurations’ in the menu of the ‘debug’ icon:
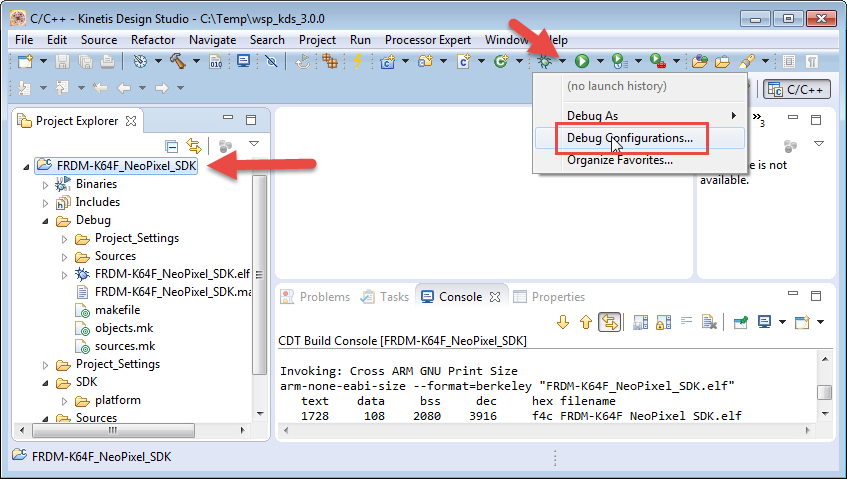
Debug Configurations
Unfold the ‘GDB SEGGER J-Link Debugging’ group and select the debug configuration on the left side. Then select the ‘Startup’ tab. In that tab disable the ‘SWO’ option as our board does not support Single Wire Output (SWO). Then press Debug button:
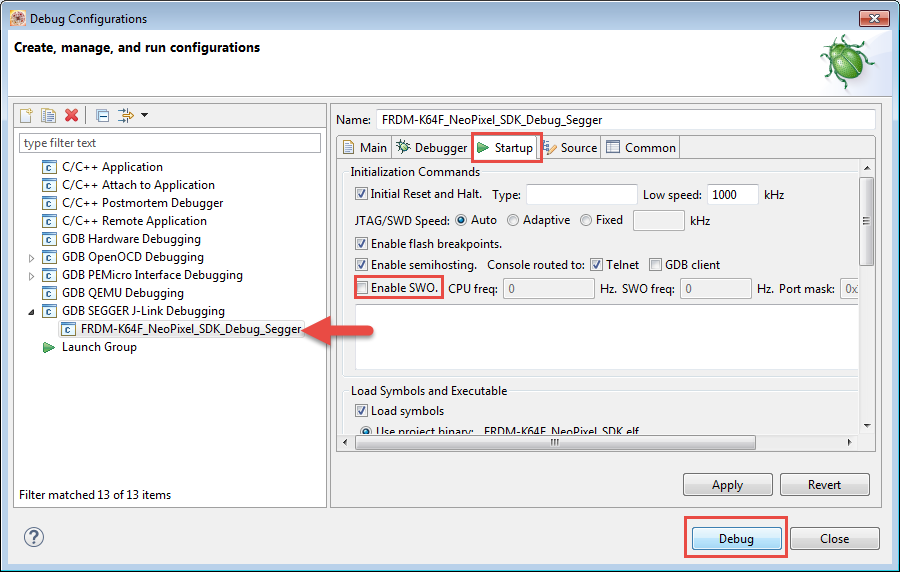
Disabling SWO
This launches the debugger. It will ask to switch to the debugger perspective. Say yes :-):

Switch to Debug Perspective
The debugger will have set a temporary breakpoint in main(), so this is where we will stop:
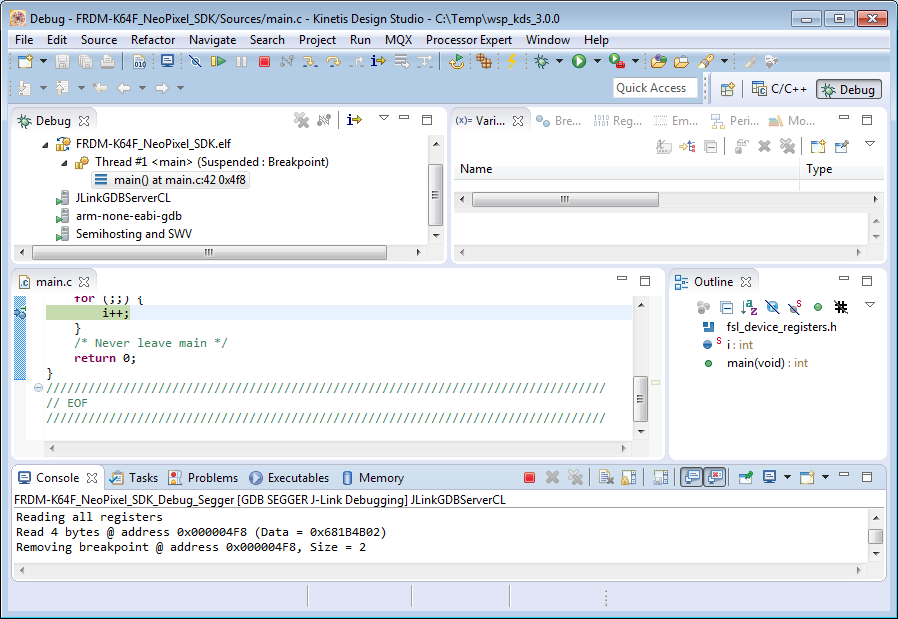
Debugging
Use the Eclipse toolbar to step/debug the application:

Eclipse Debug Toolbar
- Resume: Continue execution
- Suspend. Pause execution
- Terminate: stop debugging (kill application)
- Step into: Step into function calls
- Step over: Step over function calls
- Step out: Step out of function calls
- Asm stepping: Enable instruction/assembly level stepping
- Restart: restart application
Use the “Terminate” button to kill the debug session. Then switch back to the C/C++ perspective:

Switch to C and C++ Perspective
And now I’m back to the default C/C++ Perspective:
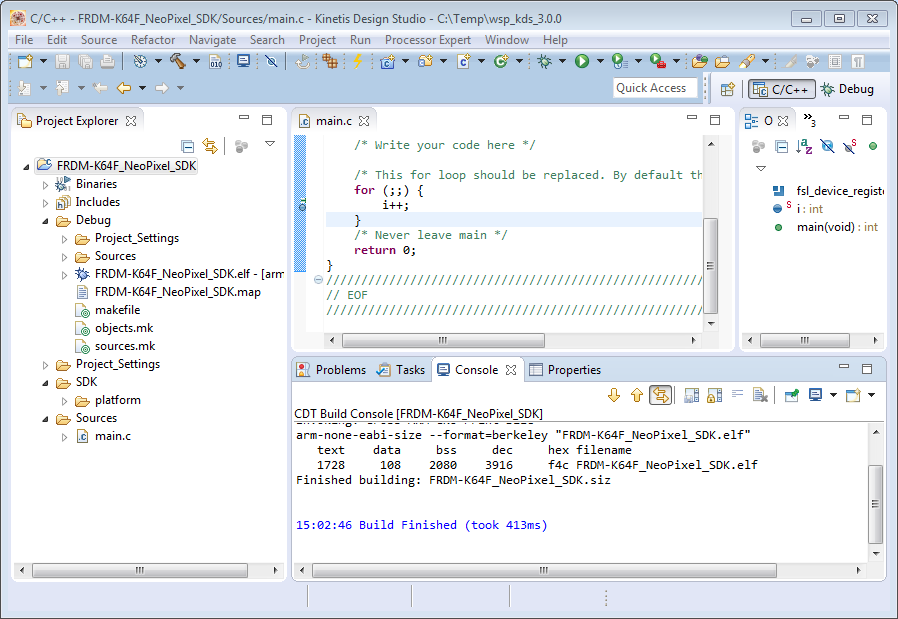
C and C++ Perspective
I can edit, build and debug my project again. Now as I have used a debug configuration, it is listed under the debug icon, so I can start it from there:

Debug with Drop Down
Summary
I have now an Eclipse IDE with the Kinetis SDK installed. I have a basic starting point project, I can build it and debug it.
The project is available on GitHub: https://github.com/ErichStyger/mcuoneclipse/tree/master/Examples/KDS/FRDM-K64F120M/FRDM-K64F_NeoPixel_SDK
In the next step I will show the concepts to drive the NeoPixels. So stay tuned for the next post…
Happy Tooling 🙂
Links
- Installing Segger J-Link OpenSDAv2 Firmware: https://mcuoneclipse.com/2014/04/27/segger-j-link-firmware-for-opensdav2/
- Adafruit Guide on NeoPixels: https://learn.adafruit.com/adafruit-neopixel-uberguide/overview
- Manya’s Diary: https://mcuoneclipse.com/category/manyas-diary/
- Freescale Freedom FRDM-K64F Board: http://www.freescale.com/webapp/sps/site/prod_summary.jsp?code=FRDM-K64F
- Freescale Kinetis Design Studio: http://www.freescale.com/kds
- Freescale Kinetis SDK: http://www.freescale.com/kds

Pingback: Tutorial: Adafruit WS2812B NeoPixels with the Freescale FRDM-K64F Board – Part 1: Hardware | MCU on Eclipse
Pingback: Tutorial: Adafruit WS2812B NeoPixels with the Freescale FRDM-K64F Board – Part 3: Concepts | MCU on Eclipse
Pingback: Tutorial: Adafruit WS2812B NeoPixels with the Freescale FRDM-K64F Board – Part 4: Timer | MCU on Eclipse
Pingback: Tutorial: Adafruit WS2812B NeoPixels with the Freescale FRDM-K64F Board – Part 5: DMA | MCU on Eclipse
Pingback: From the Forums: How to drive WS2812/NeoPixels with a Freescale FRDM board - Arduino collector blog