Windows 8 and 10 have added a ‘feature’ to scan and index devices attached to the host machine. This means that bootloaders or MSD (Mass Storage Device) programming implementations on evaluation boards developed in the Windows 7 age might not be prepared for that. Up to the point that it can impact the bootloader as outlined in “Bricking and Recovering OpenSDA Boards in Windows 8 and 10“. So far one of the easiest way to get out that situation was to use a Windows 7 machine. But if you only have a Windows 10 machine available, this article describes the needed steps to update the bootloader with Windows 10 host machines.

OpenSDA LED
‘OpenSDA’ is the debug circuit and debug firmware used on many of the Freescale/NXP evaluation boards
If it happens that your Windows 10 machine is affecting the bootloader, then the OpenSDA LED will blink an error code.
💡 see https://mcuoneclipse.com/2016/08/01/bricking_and_recovering_opensda_boards_in_windows_8_and_10/ for a list of error codes.
Check the version of the bootloader on the board which is available in bootloader mode:
💡 to enter bootloader mode, power the board with the RESET button pressed.

SDA_INFO.HTM
Open the SDA_INFO.HTM of the board:

Bootloader Version
If it is NOT showing the required 1.11 version, you have to upgrade the bootloader first.
To do this, unplug/disconnect the board from the host PC.
Next we have to stop/disable several Windows 10 services which interfere with the bootloader.
Disable/stop Windows Services
The issue is that Windows talks to the OpenSDA bootloader and confuses it. Windows Services doing this are the ‘Storage Service’ which scans storage devices and the ‘Windows Search’ service which tries to index the device for faster access.
First, use the computer management console (click on the Windows symbol in the task bar, then type ‘computer management’):

Opening Computer Management Console
Otherwise you can find it here:
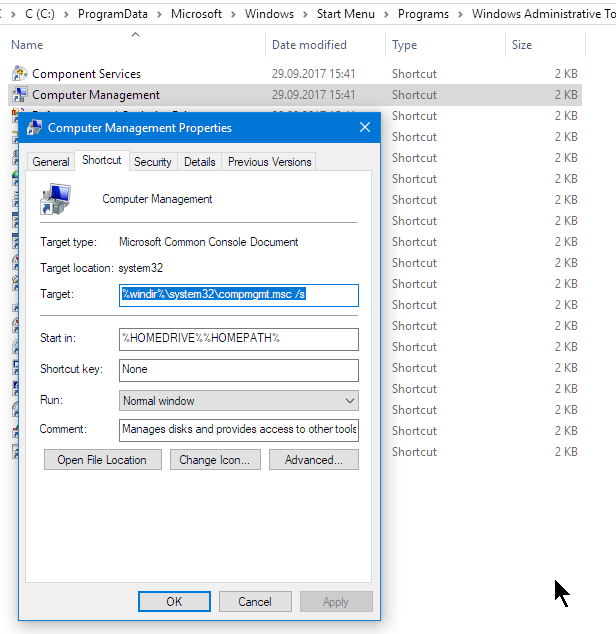
Computer Management Console Location
In the console, STOP the Storage Service:

Stopping Storage Service
Next, DISABLE the Windows Search Service: For this, use the ‘Properties’ context menu on that service and disable it for the startup (so it won’t run again):

Disabling Windows Search
Finally, STOP that service as well:

Stopping Windows Search Service
Note and update: some other applications might use that Windows Storage Service. Make sure you re-enable it after you have updated your board, otherwise you might see some strange error messages. See this community post for details.
Updating Bootloader
Now with these services stopped, we can update the bootloader to V1.11. The updated bootloader is available from the P&E web site (http://www.pemicro.com/opensda/):

Firmware_Apps
Download that file and extract it. Extract the ‘OpenSDA_Bootloader_Update*.zip’ inside that zip file as well.
Then update the bootloader (see “Step-by-Step: Updating OSBDM/OSJTAG Debug Firmware“):
- Power the Board with the RESET button pressed on the OpenSDA USB port
- Copy the BOOTUPDATEAPP_Pemicro_v111.SDA to the board drive
- It might be necessary for Windows that you ‘safe remove’ the device here.
- Unplug the board/cable
- Plug it in again in a normal way (no buttons pressed!)
- Unplug it again and this time plug it in with the RESET button pressed to get it into Bootloader mode. The green LED should blink now with about 1 Hz.
Check now the SDA_INFO.HTM again, it should show the new bootloader version:

Updated SDA Info
Congratulations, now the bootloader is ‘Windows 10 aware’ :-).
Windows Search
This is kind of optional, if you like to keep windows searching and optimizing your drives.
We can re-enable the ‘Windows Search’ service again in the management console. For this, set it back in the properties to ‘automatic’:

Windows Search Service back to automatic
Then start the service again:

Starting Windows Search
Loading Debug Firmware
The last step is to load/update the OpenSDA debug firmware (e.g. Segger or P&E). To load the P&E firmware, while the board is in Bootloader mode, e.g. copy the matching firmware to your board. E.g. for my FRDM-KL46Z board it is:
MSD-DEBUG-FRDM-KL46Z48M_Pemicro_v114.SDA
Note: It might be necessary for Windows that you ‘safe remove’ the device and not simply unplug the board after you have copied a file.
Here again I can verify with the SDA_INFO.HTM if that firmware has been properly loaded:

SDA_INFO with loaded Firmware
Summary
Windows 10 tries to talk to the OpenSDA bootloader/debug app and might confuse it and basically can brick the device. Usually a Windows 7 machine was necessary to recover such a board. With the above steps (disabling services, updating bootloader) it is now possible to update the bootloader to make it work properly in a Windows 10 environment.
Links
- Bricking and Recovering OpenSDA Boards in Windows 8 and 10
- NXP OpenSDA: http://www.nxp.com/opensda
- https://os.mbed.com/users/maripogoda/notebook/update-frdm-kl25z-bl-with-win8/
- Adding a Delay to the ARM DAPLink Bootloader
- P&E Binaries: http://www.pemicro.com/opensda/
- Step-by-Step: Updating OSBDM/OSJTAG Debug Firmware

Thanks for the walkthrough. I have a kl46z that won’t work anymore and I no longer have access to a Win7 machine so I’ll give this a shot.
LikeLike
Can you let me know if have success?
LikeLike
Hi Erich. Finally got around to doing this. (only a few months late)
Worked flawlessly. KL46Z shows 1.11.
Bit frustrated that NXP didn’t release a how-to themselves (as far as I know)
I know we had problems internally at NXP with the KL25. The group was shipping freedom boards as part of demos and they were bricking themselves when the customer connected to a win10 PC. We were running win7 at work so weren’t aware of the issue.
Really weird that they didn’t publish an official fix.
LikeLike
HI David,
great that you have found a solution. Yes, I know it took very long until some steps about solving the issue were published on http://www.nxp.com/opensda, but it is still kind of hidden.
LikeLike
Hi, Erich.
I tried your instructions on my WIN10 using a KL25Z and it did worked.
Thanks, Manuel.
LikeLiked by 1 person
Hi Manuel,
what step did not work? The easiest way would be using a windows 7 machine (for this I keep an old laptop on Windows 7 because other boards have this issue too).
What you could check as well are the steps described in https://os.mbed.com/blog/entry/DAPLink-bootloader-update/.
I hope this helps,
Erich
LikeLiked by 1 person
Erich,
Unfortunately, stopping the windows services did not work for me (I tried several times, including a windows reboot and then checking that the services were not running). However, I was able to run Windows 7 in a VirtualBox VM on the Windows 10 machine, capture the USB port into the VM (with it already in the bootloader), and then successfully copy the 1.11 update file over. Crazy, but that is what worked for me. Hopefully, this might save someone else a couple of hours.
Thanks,
Angelo
LikeLike
Hi Angelo,
thanks for sharing your experience and solution! I have found that depending on updates on Windows 10 sometimes that approach seems not to work. It seems to be different between machines. The most reliable way I have found is using a Windows 7 machine. Exactly for this reason I keep an old notebook with Windows 7 on it in a shelf.
LikeLike
Greetings, thank you very much for your contribution.
I tested on the FRDM-KL05Z with Win10 and succeeded! Very good!
LikeLike
Hi Daniel,
great! Thanks for confirming that it worked for you 🙂
LikeLike
Hi Erych,
Recently purchased a Freedom KL02 from Mouser which came with the vintage firmware which immediately bricked under Windows 10. I spent the better part of the weekend trying to recover it with no luck, finally stumbling onto this post via the MCUXpresso IDE User Guide of all places. The procedure ultimately worked, the one step I needed to add was the “Eject Removal Drive”. I think the new firmware won’t write correctly unless you safely remove the Freedom board (rather than just removing the USB cable and replugging).
Now my old Freescale board works perfectly with Windows 10, all nicely upgraded to latest bootloader and PE Micro debug image. Really couldn’t be happier, and I thank you very much for this post.
Regards
Phil
LikeLike
Hi Phil,
thank you for that feedback :-). I never had to unject the device, but I see that this might be necessary, so I have added this now to the steps. That way other readers won’t fall into this (yet another) trap.
Thanks again!
LikeLike
“Download that file and extract it.”
I tried draging the .SDA file from within the P&E ZIP file straigh.I did not work until I pick the file from the EXTRACT folder.
LikeLiked by 1 person
Is that not exactly what it exactly says: “download and *extract* it”?
LikeLike