
I’m using the NXP Pins tool (see “Tutorial: Muxing with the New NXP Pins Tool“) now in several projects, and I think it is time to share a few tips and tricks.

Pins Tool
So join me on a journey through the internals of the NXP Pins tool :-).
Web or Desktop?
The tool is available both as online/web-based version on http://kex.freescale.com/ (Kinetis only). The web-based version is fine for getting started with the tool, but maybe I’m more of a ‘traditional’ developer and prefer the locally installed tool: this gives me more control over my development tools. Plus the same Pins Tool exists for the NXP i.MX Application processors, and for this series of devices the tool is Desktop only anyway. So I’m using for my i.MX development (Toradex Colibi i.MX7D board) the standalone tool anyway.

i.MX Development Board (Toradex Colibry i.MX7D)
The desktop versions for NXP i.MX and for NXP Kinetis are although separate installations, the tools are same. All what makes it a bit different is the data loaded into it. So all what I describe in this post applies to both version of the tools.
But with using the desktop tool, it means that I have all the device data on my local machine too. So this article explains how I’m managing this.
Mostly Connected
The tool is ‘mostly connected’: it means that when I create a new configuration for a device, it reaches out to nxp.com and presents a list of available devices:

Creating New Configuration
It uses kex.nxp.com on port 80 (html port) for the connection (see this community discussion). Which server it uses is specified in the ‘tools.ini’ file located inside the ‘bin’ folder of the installed executable:
-Dcom.nxp.restapi.server=http://kex.nxp.com
If I select a processor or board I have not used yet, it downloads the data. I can see this with the progress dialog it shows in that case:

Downloading Data
It makes sense that it only installs the data I need and when I need it. Given the number of devices NXP (or former Freescale) has, this could be easily GBytes of data.
💡 Data size is about 30-40 MByte for each device, at least for the devices I’m using. The more complex the device, the more data it needs.
Offline or Not
I said above that the tool shows me all available processors, devices and boards when I create a new configuration, as it takes that information from the web. There is a setting in the tool under the menu Tools > Preferences which controls that:
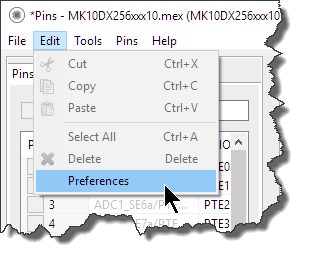
Tools Preferences
In that dialog there is a setting to put the tool into offline mode:
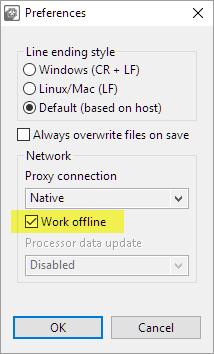
Enabled Offline Mode
💡 Note the Proxy connection setting above. ‘Native’ will use your system (default web browser) proxy settings, while ‘direct’ will not use the proxy. So if you are sitting behind a firewall proxy, you might need to make sure you have that configured properly.
With the tool in offline mode, it will not reach out to the web. In that case, if I want to create a new configuration, it only shows me the devices for which I have already installed on my local machine:
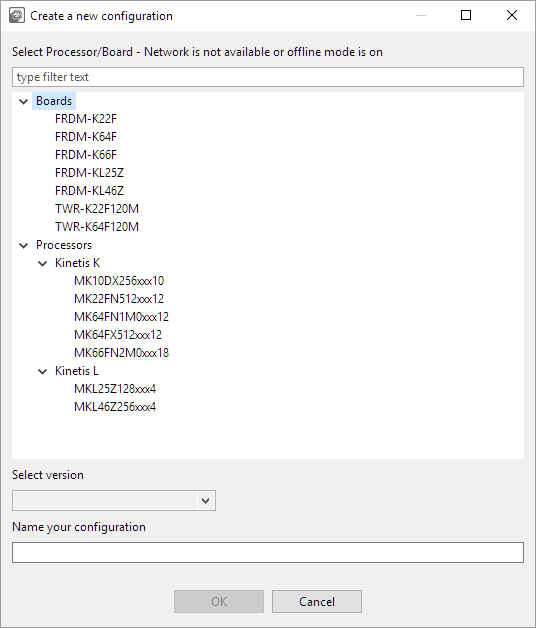
Boards and Processors in Offline Mode
Going to travel? Get the data while connected!
So what does this mean? I’m travelling nearly every day by train. Usually I do not have network connection while travelling. I can work with the tool with no connection to the internet, but I need to make sure I have the device information for the ones I want to work with it downloaded first. The simplest way is:
- Make sure that not in offline mode and I’m connected to the internet.
- Use the File > New menu and create configurations for all the devices I need.
- In offline mode I can verify in the configuration selection dialog (above) if I have everything I need.
This requires a bit planning, but has worked very well for me.
💡 Usually I work with a handful devices anyway, this is not a big deal. Although a way to download multiple devices in one step would be a great addition to the tool.
Where is the Data?
Using a version control system to store not only the project files, but as well all the used tools (and data!) is a need for most of the projects I’m doing. The tool itself and the setup binaries is easy. But the tool is using some settings like most recent used configuration and other items. The hint for that place is present in the ‘tools.ini’ file in the bin folder of the installed binaries:
-data
@user.home/.nxp/nxp_conf_workspace
And indeed, in the .nxp folder there are all the settings of the tools:

NXP Pins Tool Settings
There are two settings folder (i.MX_Pins_Tool and KEx_Tools for the Kinetis variant). The workspace folder seems to be used for temporary storage.
As the above folders only contain ‘temporary’ settings or things like the proxy settings, I don’t worry about them. On the other end it is good to know where things are stored, so if I want to make a ‘tabula rasa’ and make sure I start the tools with a clean set of settings, I simply can delete the data in this folder.
Data Files
But where is the data downloaded from the NXP servers? The ‘Details’ in the About box gives me an overview what is installed:

Locally Installed Data listed in the About Box Details
This took me a bit research to find it for each host.
💡 I have asked NXP with a feature request to list the path where the data is installed. So next version should show that path in the Details box (shown above) and with this it should be easily identifiable.
The data about the processors and boards is located in the following folder, depending on the host operating system:
- Windows 7: C:\ProgramData\NXP\
- Windows 10: C:\ProgramData\Application Data\NXP\
- Mac OS X and Linux: {user.home}/.nxp/
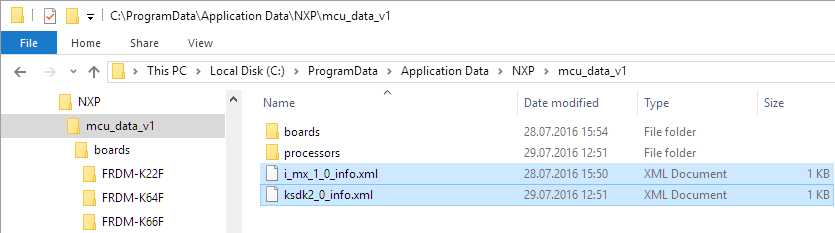
This folder has a folder named ‘mcu_data_v1’, and this folder contains all the boards and processor data:

Pins Tool Data on Windows
The board files (.mex files) are referencing a processor, so having a board means that I have/need the corresponding processor too.
Moving or Copy the Data
So now I know where all the data is, and I can properly save it in a version control system. But it now opens up another very useful thing: I can download the data once, and pass it to my students, or get it to another machine without downloading it again! This is very useful for example if my students work ‘off the network’ or if I just want to give them the data they need. It even makes possible to use the Pins Tool on a machine without any network connection at all:
- On a machine connected to the internet, download the installer.
- Install the tool on the connected machine.
- Create configurations for all the devices, boards and processors needed.
- Put the installer and all the data files on a memory stick or any other transport media.
- Install the tool on the other machine.
- Copy the data files to the other machine.
If I need to enable the other machine with more data, I can simply copy the data. That approach might be very useful for large engineering teams, or for automated test environments where both the tools and all the projects/files are in repository and checked out during the build process.
Internals of the Data
In the root folder of the data there are two XML files:
data root files
Depending if you use the i.MX or Kinetis, or both, you should copy one or the other, or both. The content is very simple XML information about the version of the data (id, ksdk2_0 or i_mx_1_0):
<?xml version="1.0" encoding="UTF-8"?>
<swtools_data>
  <data name="KSDK 2.0" id="ksdk2_0" description="Kinetis SDK 2.0" version="1.0"/>
</swtools_data>
That ID is found inside each processor/board folder:

Version ID
Obviously the tool is able to deal with different SDKs or version of it, and now there is just one id for each. What it comes down is that I simply can copy/zip/archive individual folders in ‘boards’ and ‘processors’ folders.
So this is what I put into the archive:
- .xml file(s) in data root folder (i_mx_1_0_info.xml, ksdk2_0_info.xml)
- All the board folders I need in the ‘boards’ sub-folder. Make sure you pack as well the corresponding processor for it from the ‘processors’ folder!
- All the processor folders I need in the ‘processors’ folder.
💡 As the board files only reference the processor files, it is needed to pack the processor(s) for it too!
Pack/Zip/copy and unpack/zip/paste on the destination machine. Done! With this I have replicated the environment.
Summary
For many of my projects I need to version control the software and tools used for it. I can do this as well with the NXP Pins tool outlined with the information in this article. As a nice bonus, I’m now able easily distribute the software and tools to my students with the data so they do not have to download it through the internet.
Happy Dataing 🙂
Links
- Online version of the Pins tool (Kinetis only): https://kex.nxp.com/
- Download page for desktop Kinetis Pins Tool: http://www.nxp.com/ksdk
- Download page for the desktop i.MX Pins Tool: http://www.nxp.com/pinsimx
- How to control the clock gates and initialization in the Pins Tool: NXP Pins Tool: Clock Gates and Controlling the Bits
- NXP Pins Tool Tutorial Video: https://community.nxp.com/videos/5971
- Community discussion on Pins Tool network connection: https://community.nxp.com/thread/430831
