
Some of my robotics projects take a rather long time do a full build. When I developed applications with Visual C++ on the host, using precompiled headers gave me a big boost in compilation speed. I was looking for the same in similar with GNU and gcc, and as expected: gcc does support precompiled headers too. And indeed, I was able to cut down compilation time by 30% :-). So this post is about how to use gcc with precompiled headers in Eclipse/CDT to give my builds a boost.

using precompiled header
Outline
When the compiler compiles a file (e.g. main.c), it includes all the header files. The total size of the header files can be very large, include other header files/etc. It can be thousands of source lines which then need to be processed by the compiler. And this happens for every single source file. Instead to compile the header files again and again, the idea is that the header files get pre-compiled and stored on disk. Later, when the compiler again tries to include that header file, it is already compiled and needs less compilation time.
The basic principle this:
- Identify the set of header files heavily used in the application.
- Put these header files into a single header file (e.g. “pch.h”).
- Include that header file (#include “pch.h”) in my application.
- Generated a precompiled version (pch.h.gch) of that header file and place it into the same folder as “pch.h”.
- gcc will automatically use the precompiled header file to reduce compilation time.
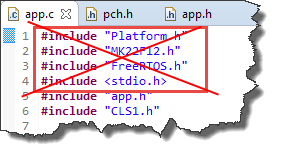
For example I have this (app.c), and the four first includes are used in many other sources files too:
#include "Platform.h"
#include "MK22F12.h"
#include "FreeRTOS.h"
#include <stdio.h>
#include "app.h"
#include "CLS1.h"
...
The idea is to have
#include "Platform.h"
#include "MK22F12.h"
#include "FreeRTOS.h"
#include <stdio.h>
precompiled to reduce compilation time. Obvious candidates for precompilation are huge header files which are included many times in the application.
Adding Precompiled Header(s)
Inside my project, I create a new folder (e.g. “PCH”) and place two new files into it (“pch.c” and “pch.c”):
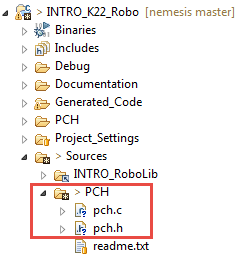
Folder for Precompiled Files
💡 Be free to use your own structure and names. I use ‘pch’ to show that it is about precompiled headers.
Into pch.h I place the header files I want to precompile:
#include "Platform.h"
#include "MK22F12.h"
#include "FreeRTOS.h"
#include <stdio.h>
💡 Only put the header file includes into it, no other stuff.
In pch.c only put one line: to include the header file:
#include "pch.h"
Creating PCH Build Configuration
To create the precompiled headers, I’m using a special ‘PCH’ build target. To create a new build configuration, I use the menu Build Configurations > Manage…:

Managing Build Configurations
With the ‘New’ button I create a new ‘PCH’ configuration:
💡 It is important that this configuration is using the same compiler/build settings!

Creating new Build Configuration
Per-File Option to Create Precompiled Header
Right-Click on pch.c to specify special compiler options. Make sure to select the PCH configuration.
I’m going to remove the options which are used to generate an object file. Instead, I modify the options to create the precompiled header file with the -x compiler option.
From the Command Line pattern *remove*
-c ${OUTPUT_FLAG} ${OUTPUT_PREFIX}${OUTPUT}

Removing from Command Line Pattern
So it looks like this:

Command Line Pattern Removed
In the compiler ‘Miscellaneous’ options, add this to create the precompiled header file:
-c -x c-header -o "../Sources/PCH/pch.h.gch"
- -c: compile file.
- -x: generate precompiled header.
- c-header: generate precompiled header for C. If compiling in C++ mode, use c++-header instead.
- -o: Produce output file. Specify the path/filename for the precompiled header file. The produced output file has to have the same name as the header file “pch.h” with extension “.gch”. The output file has to placed in the same folder as the source header file (pch.h)!

Compiler Options to produce precompiled header file
Building PCH Build Configuration
Then I can use the PCH configuration to create the precompiled header files:
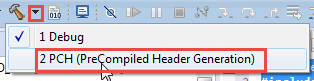
Generating Precompiled Headers
And this should create the pch.h.gch file:
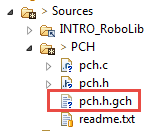
Created Precompiled Header File
The PCH project will result in link error, as it cannot find pch.o object file. That’s expected and OK! All what I wanted is to create the precompiled header file.
Exclude from Build
As I do not need to compile pch.c for my normal build, I can exclude it from the build (context menu on pch.c, then choose Properties):
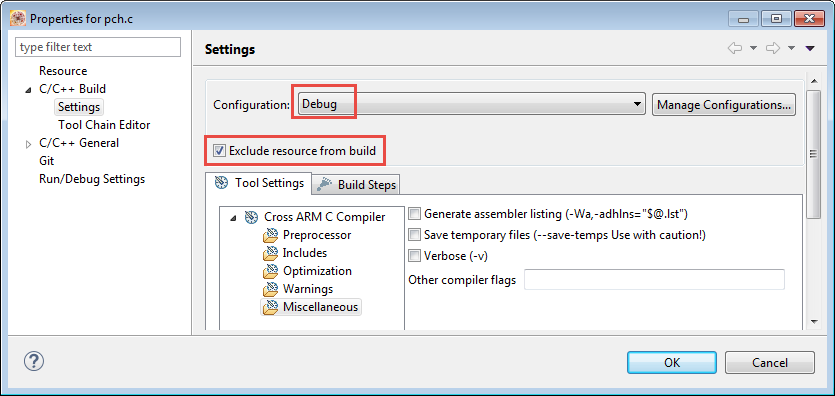
Excluding from Build
This will exclude it from my normal ‘Debug’ build configuration:

Excluded from Build
Include Path to Precompiled Header Files
Make sure that the compiler finds the header file(s):

Compiler Include Path Settings
💡 What I have found really confusing is that the precompiled header needs to be at the location of the normal header file. Yes, I can use the -I option to specify a folder having the precompiled header files. But if the compiler is falling back to use the normal header file (see Considerations below), then it does not find the normal header file any more. This is at least the case for GNU gcc 4.8 and 4.9.
Using Precompiled Header Files
In my source files I can now remove the ‘precompiled’ headers:
Application Includes
and use the precompiled header file instead:
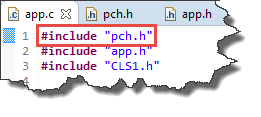
Using Precompiled Header file
The compiler will now use pch.h if there is no precompiled header file present. But if there is header file with the same name, but with .gch extension present at the same location, it will use the precompiled header instead.
Verify the Includes
To verify what the compiler is using, I can use the -H compiler option:

Compiler Option to show what is included
This shows me in the console for each compilation unit what is used:
using precompiled header
-Winvalid-pch Option
Another great diagnostic compiler option is
-Winvalid-pch
It will tell me if something is wrong with the precompiled header (e.g. compiled with C, but now using in C++ mode).

Warning about invalid pch Files
Multiple Precompiled Header Files
In above steps I showed how to use a ‘master precompiled header file’. This is the usual approach. What I do often too is to add more precompiled files:
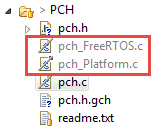
Additional Precompiled Files
pch_FreeRTOS.c creates the precompiled header file ‘FreeRTOS.h’. The .c file only has the include in it:
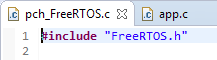
FreeRTOS Include
It creates the precompiled header file where the normal FreeRTOS.h is present:

FreeRTOS Precompiled Header File
That way I can create and use precompiled header files as needed.
Important Considerations
One important thing with using precompiled header files is: they can get easily out of sync. Make sure that when any of the header files changes, the precompiled headers are re-build. ‘Clean’ won’t work with the approach described above: better delete the *.gch files.
Another consideration is create the pre-compiled headers in a pre-build step, but I do that now manually. If using normal make files, it is easier to directly create the pre-compiled headers as part of the build.
Additionally, there are several rules how precompiled files are used (see https://gcc.gnu.org/onlinedocs/gcc/Precompiled-Headers.html). To make sure that a precompiled header is used:
- It must be the first include in the file.
- It must be the first preprocessing token/include in the file (comments are ok).
- Only one precompiled header file is used for a source file.
Examples:
This works:
/* this is a comment at the beginning of the file */<span></span>
#include "pch.h" /* have precompiled header for this one */
While this does not work as the precompiled header is not the first preprocessor token in the file. It will use the normal pch.h header file instead (not the precompiled one):
#ifndef MY_DEFINE
#include "pch.h" /* have precompiled header for this one */
#endif
If having multiple precompiled headers, then only the first one is used. For all the other includes the normal include is used:
#include "pch.h" /* have precompiled header for this one */
<span></span>#include "FreeRTOS.h" /* have precompiled header for this one, but will NOT be used as not first one */
One method to easily detect if the precompiled header is used or not is to add an error directive to the pch.h (after the precompiled header has been created):
#error "not using precompiled header file"
That way I easily can see where the standard header file is still used.
Summary
Using precompiled headers in Eclipse/CDT does not work out-of-the-box: there is no magic switch like ‘use precompiled headers’. Instead it requires to a trick to generate the precompiled (.gch) header files. Using precompiled headers with gcc requires some careful considerations which include tweaking the source code to make sure that the precompiled headers are used. That extra effort does not pay off for small/simple projects. But if the project uses large and many include files, and is built often then investing in using precompiled headers properly will reduce the build time needed. It took me a while to get things working properly, but it has well paid off :-).
Happy Precompiling 🙂
Links
- GNU documentation about using precompiled header files: https://gcc.gnu.org/onlinedocs/gcc/Precompiled-Headers.html
- Using precompiled headers: https://gcc.gnu.org/onlinedocs/libstdc++/manual/using_headers.html
- Original idea I borrowed from: http://www2.warwick.ac.uk/fac/sci/systemsbiology/staff/dyer/software/pchineclipse/

Erich,
Does this approach eliminate the ability to debug as well as the auto-completion feature of the IDE?
LikeLike
Hi Joe,
no, that’s not affected at all.
LikeLike
Great Article! Thank you.
LikeLike
unfortunatelly I tried this and failed on PCH creation step. PCH not compiles. I am in PCH config and try to build with no luck. It seems that options we remove conflict with boost library i use, but i am researching the case…
LikeLike
Your very first mention of pch.h says ‘pch.c’.
LikeLike
Indeed, thanks for catching. Fixed now :-).
LikeLike